To avoid these ads, REGISTER NOW!

VISE REPAIR 101 all vise repairs, lubricants, sources for parts and the tricks to fix

nutjob

Well-known member
Joined
May 8, 2008
Messages
807
Location
NE, PA
I have been hobby blasting for over 40 years. We started with a crude home made cabinet and used sand. I have not used sand since. Some people refer to it as sandblasting but no one uses sand! It is media blasting and I use 3-4 different types. Also I will adjust the air pressure for different media and different parts. I start rusted stuff with Fast Cut MAX Abrasive from TP Tools. Very fast to clean deep rust. I have 2 different grit glass beads. The finest is almost like talc and leaves a very smooth finish, this is great for car parts, sheet metal type stuff. I use walnut shells on some vises. I had one that was painted silver and the walnut shells removed the paint and some of the light surface rust but did not "clean" the parts to bear metal.

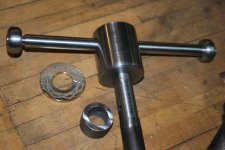
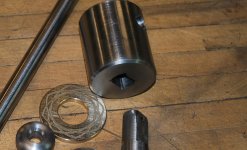
Depending on what condition the vise is in I will blast all parts including the finished machine areas. This does not ruin the finish. It is rusty and nasty to begin with. But I will use a fine wire wheel on the 4 1/2" grinder or bench grinder on the machine surfaces after blasting or put back in the cabinet and use a medium grit glass bead. Depending on what final finish I want I could continue to use other products to give me the satin or more polished look.

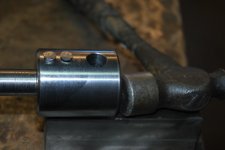
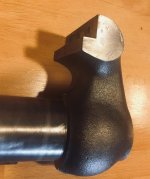
By the way, the cap on a Wilton bullet is not sheet metal, it is much thicker than that and having spent time hammering on them to remove dents, blasting is not going to harm it!

Kevin
 
Last edited:
To avoid these ads, REGISTER NOW!

BMR24

Well-known member
Joined
Oct 2, 2017
Messages
234
Location
Rocky Mountains Colorado
Hi all, I haven’t posted in some time. I’m trying to decide how I want to proceed with this pinned mainscrew. Use it as is, cut it off and re drill, or weld the holes closed, turn it back to round and re drill. Any opinions or input is really appreciated

99D3CBC1-E54E-48EC-9564-95BD0F8E135F.jpg
 

_Ace_

Member
Joined
Jan 16, 2019
Messages
23
Location
NY
BMR24 If you have acess to a lathe/ mill i would bore out that hole to a decent size and then make a steel sleeve that will press fit into the new bored out hole and then have the I.D be the right size for you pin to fit in.
 

BMR24

Well-known member
Joined
Oct 2, 2017
Messages
234
Location
Rocky Mountains Colorado
Thank you both, I don’t have a mill or lathe but the sleeve is a good idea. Might be a bit close to the end though.

Fretters: any reason why brazing would be preferred to welding? I figure any heat treat will be lost with either method
 

_Ace_

Member
Joined
Jan 16, 2019
Messages
23
Location
NY
I would weld a pin in, but i would make it so it has a shoulder on that really opened up section and then machine off the excess weld
 

KMScott

Well-known member
Joined
Feb 14, 2012
Messages
4,642
Location
Daufuskie Island, South Carolina
BMR, This is how I did one on a American Scale and the 13" vise of Royce's.

I machined two flats on the spindle the same depth on opposite sides then machined a pocket in a 3" round stock and hand fit the spindle to the pocket real tight. Added two pin holes and peened two soft pins in place. This is actually how American Scale did their handle supports on their vises.
 

Attachments

  • American Red # 53  (6).jpg
    American Red # 53 (6).jpg
    119.6 KB · Views: 47
  • American Scale no 53 (34) - Copy.jpg
    American Scale no 53 (34) - Copy.jpg
    81.7 KB · Views: 45
  • American Scale no 53 (32) - Copy.jpg
    American Scale no 53 (32) - Copy.jpg
    107.8 KB · Views: 43
  • American Scale no 53 (30).jpg
    American Scale no 53 (30).jpg
    90.9 KB · Views: 44
  • American Scale no 53 (22) - Copy.jpg
    American Scale no 53 (22) - Copy.jpg
    146.9 KB · Views: 46
  • American Scale no 53 (24).jpg
    American Scale no 53 (24).jpg
    100.3 KB · Views: 46
  • American Scale no 53 (10) .jpg
    American Scale no 53 (10) .jpg
    151.7 KB · Views: 49

Janion

New member
Joined
Jan 26, 2019
Messages
2
Location
Worcestershire, uk
Hi All, this is first post on garage journal. Last year I bought a slightly rusted record number 3 from a car boot sale and have since caught the bug for rejuvenating these fantastic old tools.

My most recent one is a record number 34, seemingly from 1935. I've got it mostly apart easily enough and it looks to be in reasonable condition. What has me stumped is the screws on the jaws. I need to get the jaws off as I think they need replacing. The screws are a little mashed, one in particular, but the rest seem like they have a very shallow slot. I'd like to save the screws so I don't really want to drill them out, so here are the options I've found:

1) use a Dremel cut off wheel to cut a new slot and use an impact driver to loosen them, applying heat to help free them.

2) weld a hex nut to the tops and use a socket to loosen them. The caveat being that I only have gasless mig, which I think lacks the control needed to do this without also welding to the jaws. I know somebody with a tig welder so that could be an option.

Do either of those sound reasonable? Are there other options I've missed?

Here are a few pictures:
ThanksIMG_20190124_185031932.jpegIMG_20190124_185017938.jpegIMG_20190124_185108823_BURST000_COVER_TOP.jpgIMG_20190124_185054963.jpg
 

BMR24

Well-known member
Joined
Oct 2, 2017
Messages
234
Location
Rocky Mountains Colorado
I’d weld only the inside of the nuts not the outside. Then the mig should work. I’d also crank up the amps to get better penetration. But practice on some other screws to see what works.

You’re problibly going to have to replace the screws no matter what. New ones should come with the new jaws.
 

JZiggy

Well-known member
Joined
Dec 1, 2014
Messages
990
Location
Atlanta
Janion, I went through the same thing with the same vise. Had to drill them out and then I tapped a smaller hole inside and put a bolt in it with a jamnut to pull it out. They were a weird 5/16 BSC thread size.
 

Outlawmws

Well-known member
Joined
Aug 9, 2011
Messages
39,279
Location
The Badlands
Jan, use the vise to help get the screws loose. I would:

  • Heat them more than hot to help break the rust bonds
  • Clean the driver groves our as best you can.
  • Find a bit driver that fits as tight as possible
  • use the vise to hold the bit driver in tight (Block of wood between the driver bit and jaw holding it in.)
  • Get a wrench on the driver bit
  • Loosen until you can do so with a regular driver
  • Rinse and repeat.
 

Shiftless

Well-known member
Joined
Mar 9, 2014
Messages
14,553
Location
East Bay SFO
Does anybody use Simple Green to strip off paint? Diluted or undiluted?
Does heating it up make a big difference in how well it works?
If so, how do you heat it and keep it hot? How hot? How long?
 
Last edited:

Outlawmws

Well-known member
Joined
Aug 9, 2011
Messages
39,279
Location
The Badlands
Shift, I use full strength SG and the concentrated type. (sold in 1/2, 1 and I believe in 5 Gallon containers)

I've never bothered to heat it intensionally, but I do cover it both for smell and evaporation.

I've taken house paint brushes, totally caked with paint, and restored them to clean users leaving them to soak in it, and wire brush combing the bristles out.

I've also used SG soaked paper towels for "spot use" and covered the paper towel with saran wrap so it stays wet.

I only found one paint that took forever to soften, but it eventually did.

I have combined it with an ultrasonic cleaner and those do get warm. I'd not try it too hot however, as it would evaporate that much faster.

How Long? depends on the paint. Its fairly fast but not instant, but a few paints practically wash off with it, (the paint Coleman used on lanterns and stove, in years gone by for instance)

A quick test is to rub with an SG soaked paper towel, and see if color comes off right away

Back to the heated SG: I do mildly heat Molasses for rust removal, but it's like set the container on a metal surface in the sun, and it will get plenty warm, but not blistering hot.
 

Shiftless

Well-known member
Joined
Mar 9, 2014
Messages
14,553
Location
East Bay SFO
Thanks outlaw,
I just picked up a large sized crock pot that a neighbor threw out because the lid broke. That should work for the hot SG experiments. Rated at 250 watts. I better test it right now to see if it gets hot before I proceed.
 

kenc184

Well-known member
Joined
Feb 25, 2012
Messages
718
Location
Nor Cal
I used simple green in my parts washer one time. About three months later I opened up the lid to use it and all the interior paint had been stripped off to the level of the SG!

Very annoying!
 

lafester

Well-known member
Joined
Mar 1, 2017
Messages
2,191
Location
Northern CO
I've been using SG a lot lately but have never left it on long enough to notice the paint removal feature. Using with scotch brite pads cleans up surface rust pretty well without taking off factory paint. Maybe I'll test it out with a small piece and see how it goes.
 
To avoid these ads, REGISTER NOW!

autopts

Well-known member
Joined
Jul 4, 2009
Messages
2,268
Shipping a vise made easy
Fellas, we all seen nice vises however the ones we want most, are in other states and often the seller has no knowledge about shipping costs. If they can pack it properly and give you the weight and rough size of the box, sending him a prepaid shipping label will make it easy for him and cost effective for you. Get a friend that sells on EBay (even yourself) go to a sold item, click on the drop down box, and select print another shipping label click onFed Ex. edit and go change the shipping address to yourself and enter his name as the seller, enter the size and weight and make sure you change the shipping date to about 3 days later. Print the shipping label and send it to him in the mail. I've done it a few times and found it easy.
 
Last edited:

RedDawg

Member
Joined
Jan 27, 2019
Messages
7
Location
Holladay, TN
Hello everyone. New user here. I've done some looking around but can't seem to find a part I need and this forum kept popping up as a good place to ask questions. I need a spindle for a Simplex Utility NO 500 vise. Where is the best place to look for one of those?

I'm sure this forum will be an invaluable resource in the future. Thanks.
 

Attachments

  • Simplex Vise.jpg
    Simplex Vise.jpg
    141.1 KB · Views: 23

Shiftless

Well-known member
Joined
Mar 9, 2014
Messages
14,553
Location
East Bay SFO
Hello everyone. New user here. I've done some looking around but can't seem to find a part I need and this forum kept popping up as a good place to ask questions. I need a spindle for a Simplex Utility NO 500 vise. Where is the best place to look for one of those?

I'm sure this forum will be an invaluable resource in the future. Thanks.

Is yours broken or missing altogether?
If you have pieces, measure the diameter, length, and threads per inch. A spindle from another manufacturer might work fine for you.
I have a spindle from an old Reed that you might be able to use.

Anybody need the main screw from a Reed 24?
It’s 12 1/4 inches long and has square threads 4 TPI
Diameter is 3/4 inch
Hole for the handle is 1/2 inch
No handle
 

Attachments

  • BFFE36EB-F063-4163-AE87-7DC0BF6B2A62.jpg
    BFFE36EB-F063-4163-AE87-7DC0BF6B2A62.jpg
    133.9 KB · Views: 23
Last edited:

sandmann

Well-known member
Joined
Oct 29, 2014
Messages
84
Location
Austin, Texas
Is there a pre-determined back or front to a Wilton bullet vise Base? On my new-to-me C3, the base tabs are closer on one side than the other. 7-1/2" spacing on top side and 9" on the bottom. I don't think it will make much difference to me one way or the other...just wondering.

HV5rPYU.jpg
 
Last edited:

Shiftless

Well-known member
Joined
Mar 9, 2014
Messages
14,553
Location
East Bay SFO
I’m currently working on the hot SG technique suggested by several members.
Here is a picture of the dynamic of a Chicago era 8400.
Last week I soaked it in SG at room temperature (about 55-60 in my garage) for 24 hours. No effect. The blue paint didn’t soften at all. So I decided to up my game and heat the SG.

So here is the BEFORE picture...
And the currently in progress picture...

This crock pot was discarded by a neighbor because the glass top broke. So I grabbed it and it’s now dedicated to parts cooking duty. Guys...don’t just grab your wife’s crock pot when she’s not looking. Simple Green is generally considered safe, biodegradable etc. but I don’t recommend using cooking utensils for soaking off possibly toxic paint. Use in a well ventilated place. Not everybody appreciates the odor of Simple Green. Heating it up will spread the smell.
 

Attachments

  • FADAF713-3465-4344-AEE4-5FDBA70436C4.jpg
    FADAF713-3465-4344-AEE4-5FDBA70436C4.jpg
    137.1 KB · Views: 44
  • 785BF52D-8939-4A1F-9B22-99B36ED0757A.jpg
    785BF52D-8939-4A1F-9B22-99B36ED0757A.jpg
    123.4 KB · Views: 47
Last edited:

Shiftless

Well-known member
Joined
Mar 9, 2014
Messages
14,553
Location
East Bay SFO
This experiment came out even better than I expected.

This vise was salvaged from a junior college vocational program. Somebody painted red and then blue. It was stuck tight when I got it. I mean REALLY REALLY TIGHT!
It was quite a challenge to break it free. Long time GJ vise guys might remember years ago when I was in here looking for advice. I got frustrated and backed away from the project and put this vise in a box up on a shelf in the garage. Now I’m back to it.

I love how there is no loss in surface detail with this soak in hot SG method of paint stripping.
Once the SG gets hot, it takes less than an hour before most of the old paint literally falls off. Light brushing removes the rest. No toxic dust or paint stuck in crevasses like with wire wheeling. No fumes like with aircraft stripper.
The SG is reusable of course. Who knows how many jobs it will do before losing it’s potency.
 

Attachments

  • A1AD48F6-39A6-451D-935E-6CFD54B53633.jpg
    A1AD48F6-39A6-451D-935E-6CFD54B53633.jpg
    131.8 KB · Views: 53
  • ED27E5B2-29B6-4188-948E-E038865B174E.jpg
    ED27E5B2-29B6-4188-948E-E038865B174E.jpg
    101.5 KB · Views: 50
  • 1910BA9D-FFAB-4648-8213-BE88149E9B7D.jpg
    1910BA9D-FFAB-4648-8213-BE88149E9B7D.jpg
    83.1 KB · Views: 47
  • 2DEFE641-03B7-4BF4-A257-F0F56079DC6E.jpg
    2DEFE641-03B7-4BF4-A257-F0F56079DC6E.jpg
    119.7 KB · Views: 49
Last edited:
OP
D

drivesitfar

Well-known member
Joined
Oct 23, 2013
Messages
36,034
Location
Pacific Northwest
Shift: thanks for doing that test of the hot or warm SG cause it looks like it really does a nice job.

also that Wilton dynamic sticking up out of a crock pot is a classic picture and you can put it on many posts if you want to ask a member "WHAT'S COOKING" or "WHAT'S UP".

WELL DONE..


so does that mean that the paint was the only thing holding up that Wilton restoration or is there still a bent slide or some other issue to deal with?
 

Shiftless

Well-known member
Joined
Mar 9, 2014
Messages
14,553
Location
East Bay SFO
Very impressive results Shift! Would I be right that you put the heat on low?

Low???...No way outlaw!...this is GJ...I’m running on HIGH. :)

I couldn’t find my lab thermometer so I can’t say exactly how hot it got, but I couldn’t hold it bare handed to pull it out of the soup. It wasn’t bubbling so I’d say it was definitely under 200. I laid it down on the driveway and hosed it off.
This is a GREAT paint removal method.

Loydski29 uses a hot plate and a big stock pot like a turkey fryer. I can see an advantage to that set up. My crock pot takes about 2 hours to reach maximum temperature with about a gallon and a half of SG. A hot plate with about a thousand watts would be much quicker.

Drives: Nice to hear from you about this project. I’m sure you remember all of the angst I went through to get this one apart.
There is no bent slide. I still think it might be a Frankenvise made of two different vises at some time. The different layers of re painting is a strong clue.
I had to remove metal from the inside of the main vise body so that the slide would move smoothly. Probably just a few thousandths. I don’t have a tool to measure inside ID’s to that degree of accuracy.
This vise is in such great condition that I feel it is worth the trouble.

BTW... slide is marked Guar. exp. 12 31 62
.
.
.
 
Last edited:

Shiftless

Well-known member
Joined
Mar 9, 2014
Messages
14,553
Location
East Bay SFO
Thanks guys.
Now I’m looking at all my other vises to see what needs stripping!

BTW...That vise was marked Guar Exp 12 31 62
 

Attachments

  • 7CEA9BD8-1B97-4096-A9BA-6C2AA449F5A5.jpg
    7CEA9BD8-1B97-4096-A9BA-6C2AA449F5A5.jpg
    119.6 KB · Views: 36
Last edited:

Bunchgrass

Well-known member
Joined
Dec 8, 2013
Messages
236
Location
North Idaho
I apologize if posting this link to an older GJ thread that had a lot of vise info is repeating something already listed or is unwanted in this space. Feel free to delete/remove if desired.

Everything You Wanted to Know About Bench Vises .....
https://www.garagejournal.com/forum/showthread.php?t=62716

There used to be a thread called ---- "The VISES of GJ" w/ lots of cool pics of GJ vises but that link doesn't work anymore.
 
Last edited:

Anthony

Member
Joined
Nov 5, 2018
Messages
10
Location
RI
I bought an old Wilton Flip Grip last summer at a flea market and I need to build a set of jaws for it. It came with one jaw with the pins in it. I plan on using that jaw as more of a template...I think I can find steel or brass in the correct size.

My question is how can I recreate those fluted pins that are pressure fit into the jaws and the vise body? I thought of sanding steel rod into a very subtle cone shape and test fitting until I get it just right. Do they sell those grooved/fluted steel pins anywhere?
 

Outlawmws

Well-known member
Joined
Aug 9, 2011
Messages
39,279
Location
The Badlands
Find or make a Vee block, or better still, drill a steel block the size of the pin and cut in half so you have a saddle.

Get it so its solid and lay the blank pin it the groove.

use a SHARP 3/8 0r so chisel and tap an upset groove in the pin. rotate and repeat. if the pin is a snug slip fit this will make it a press fit. Only do the part going into the part you want the pins to stay with...
 

KMScott

Well-known member
Joined
Feb 14, 2012
Messages
4,642
Location
Daufuskie Island, South Carolina
I have made some of these jaws a while back and I reamed the holes for a press fit for standard dowel pins. I added my drawing that I used for my jaws. Outlaw has a good method too.
 

Attachments

  • Wilton_Pivot_Vise_Jaws.jpg
    Wilton_Pivot_Vise_Jaws.jpg
    32.2 KB · Views: 35

RedDawg

Member
Joined
Jan 27, 2019
Messages
7
Location
Holladay, TN
Is yours broken or missing altogether?
If you have pieces, measure the diameter, length, and threads per inch. A spindle from another manufacturer might work fine for you.
I have a spindle from an old Reed that you might be able to use.

Anybody need the main screw from a Reed 24?
It’s 12 1/4 inches long and has square threads 4 TPI
Diameter is 3/4 inch
Hole for the handle is 1/2 inch
No handle

Shiftless, thanks for the reply. Things got crazy here with my 83 year old father going to the emergency room. He just got out today so I can start concentrating on this. Mine is broken near the handle. Is this something that can be welded?

Mine looks like 5 TPI if I understand the measurement right. I've attached a couple of other pictures as well.

Thanks for the reply. Now I can start concentrating on getting things fixed around here.

RedDawg
 

Attachments

  • Spindle 3.jpg
    Spindle 3.jpg
    130.4 KB · Views: 21
  • Spindle 1.jpg
    Spindle 1.jpg
    141.3 KB · Views: 22
  • Spindle 2.jpg
    Spindle 2.jpg
    127.6 KB · Views: 20
  • Simplex Vise 2.jpg
    Simplex Vise 2.jpg
    145.1 KB · Views: 19
  • Simplex Vise.jpg
    Simplex Vise.jpg
    141.1 KB · Views: 19
To avoid these ads, REGISTER NOW!
Top Bottom