To avoid these ads, REGISTER NOW!

Bearing replacement Ammco safe arc 8000

Nigeltufnel

Member
Joined
May 4, 2010
Messages
21
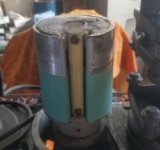
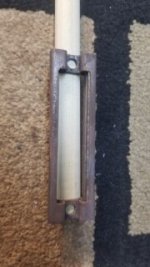
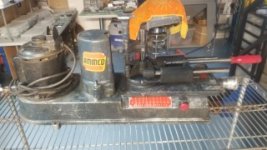
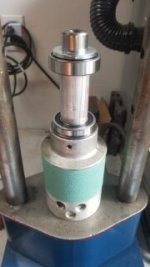
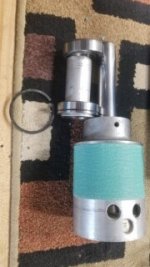
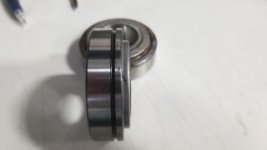
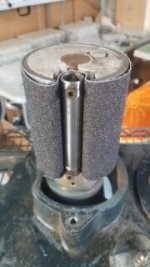
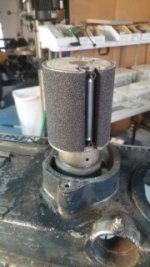
I picked up an Ammco safe arc 8000 in decent shape, but the upper bearing is bad. I started disassembling it, but it's not clear to me how the spindle assembly is removed from the support base. Right now the spindle is half-way out with the top bearing outside the support and the bottom bearing is in no-mans land between the top and bottom portions of the support. Guessing the bottom bearing will need to be pressed through from the bottom side, but thought I'd check and see if anyone else has done this.

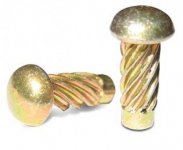
Anyone have any tips/suggestions? Also, FWIW, i removed the roll pin thinking the drum would come off the spindle, but no luck.

a>
 
To avoid these ads, REGISTER NOW!

greg13

Well-known member
Joined
Aug 2, 2018
Messages
497
Location
Weedsport, NY
From the looks of the picture, You will need to pull the bearing off of the shaft first then out of the housing.

You can go to the Ammco site and find parts breakdowns.
 
OP
N

Nigeltufnel

Member
Joined
May 4, 2010
Messages
21
From the looks of the picture, You will need to pull the bearing off of the shaft first then out of the housing.

You can go to the Ammco site and find parts breakdowns.

Thanks. What Ammco site are you referring to? I checked the "official" Ammco web site and didn't see any parts information.
 

gmofaz

Member
Joined
Dec 28, 2020
Messages
6
Location
Arizona
Hi,

New to the forum. Realize I'm bringing up an old thread, but I'm interested in finding out how the bearing replacement effort concluded, and any additional information that may be helpful in repeating the exercise.

I just got a 8000 a week ago, and have been cleaning the unit with the intention of actually using it. I'm a C1/C2 Corvette enthusiast, and help others maintain their cars.

Besides the bearings, I was also curious to know if anyone has come across replacement belt options other than what can be purchased through Friction Works, LLC.

Cheers
Garry
Gilbert, AZ
 
OP
N

Nigeltufnel

Member
Joined
May 4, 2010
Messages
21
I don't remember actually buying a bearing, which leads me to believe that I just lubed up the bearing best I could and put it back together. As far as belts, NOS ones pop up on ebay. I paid $25 per belt about a year ago -bought 2 which should be more than enough for my use.
 

gmofaz

Member
Joined
Dec 28, 2020
Messages
6
Location
Arizona
Do you remember if you pressed out the shaft, or hammered on it? From your initial picture, looks like the bearings just came out with the shaft.

I'd have to believe that with the amount of dust this system throws around, the bearings would be sealed type. The manual provides Ammco part numbers, but searching around hasn't revealed much about them.

I keep my eye out for original belts. Haven't seen any lately. Think I've come up with a way to make my own with little effort.

Cheers
 

rich b

New member
Joined
Jul 30, 2011
Messages
4
Location
Oakdale, MN
I keep my eye out for original belts. Haven't seen any lately. Think I've come up with a way to make my own with little effort.

Do have any further information on your home-made belts? If I can get a few more things straightened out on mine; I will need an abrasive belt; too.
 
OP
N

Nigeltufnel

Member
Joined
May 4, 2010
Messages
21
Do you remember if you pressed out the shaft, or hammered on it? From your initial picture, looks like the bearings just came out with the shaft.

I'd have to believe that with the amount of dust this system throws around, the bearings would be sealed type. The manual provides Ammco part numbers, but searching around hasn't revealed much about them.
I know it's only been 2 years - but my memory on this is foggy. I think I tapped it out from the bottom to get to the point in the picture. My grinder is mounted to a cart so I can't easily look underneath it now.

I suspect I couldn't find a bearing because if I could I likely would have bought one - hence plan B of trying to lube it up. Again, details are foggy but the unit works so it was successful. If it is a sealed bearing the seal may have gone bad allowing contaminants/rust to develop and create noise during operation, and the lube flushed it sufficiently to operate without noise. I don't use this thing much so this method worked for me, but if it were to get heavy use periodic lubing of the bearing may be needed. If your bearing is toast then you will need to find a replacement. Let me know if you go down this road and what you find.
 
OP
N

Nigeltufnel

Member
Joined
May 4, 2010
Messages
21
Do have any further information on your home-made belts? If I can get a few more things straightened out on mine; I will need an abrasive belt; too.

Prior to buying the NOS belts I made a belt. I recycled the plastic mounts from the old worn out belt and cut a strip from a generic belt having similar size and grit as the original. I made holes in the new belt to correspond to the plastic mount and attached the plastic mount to each end of the new belt along with some adhesive. It worked and is still on the machine, but I wasn't convinced it would hold-up long term (the holes were deformed/loose by forcing in the plastic tabs of the mount through the holes and the adhesive was iffy) so I picked up the NOS ones when I saw them on ebay. A specialty adhesive may compensate for the loose holes in the paper - but I don't have any suggestions on what may work.

The first pic shows the paper I used to make the belt, and the other pics show the plastic mount (from my NOS belt) for reference. Hope that helps.
 

Attachments

  • belt1.JPG
    belt1.JPG
    34.6 KB · Views: 35
  • belt3.jpg
    belt3.jpg
    55.1 KB · Views: 37
  • belt4.jpg
    belt4.jpg
    57.5 KB · Views: 33
  • belt5.jpg
    belt5.jpg
    54 KB · Views: 33
Last edited:

gmofaz

Member
Joined
Dec 28, 2020
Messages
6
Location
Arizona
I've complete the prototyping of a replacement belt and tensioner. Pretty simple.

Belt is 4.5" x 14". Tensioner is 3/4" dowel (used wood for prototype, considering half-round steel for final design).

While I think my homemade belt will work just fine, the cost of having a custom belt made is cheap, made of better material (cloth vs paper), and will be the full width of the drum.

As for making my belt, I took stock automotive 2 3/4" x 16 1/2" file sheet sandpaper, cut to 14.5", filed .5" on the abrasive side end, then used contact cement to join the ends, ending up with a 14" belt.

For the tensioner, I cut a 3/4" wood dowel to 4.5" in length, used the original belt attachment to mark the location of the two holes and then drilled them out.

The 3/4" dowel fits easily in the slot in the drum. I used a paper punch to put the two holes in the belt, and then mounted everything. All fits pretty tight and flat against the drum.

That's where things stand for now.

I went back to the shop that I bought the 8000 from to see if by chance they found any original belts, but no such luck. They are planning on doing a remodel, so there may be a chance that they find something during the demo/cleanout.

Cheers
 

Attachments

  • 20210102_160915.jpg
    20210102_160915.jpg
    32.8 KB · Views: 31
  • 20210102_153412.jpg
    20210102_153412.jpg
    35.8 KB · Views: 25
  • 20210101_122430.jpg
    20210101_122430.jpg
    34 KB · Views: 28
To avoid these ads, REGISTER NOW!

gmofaz

Member
Joined
Dec 28, 2020
Messages
6
Location
Arizona
I have completed the rebuild of the unit. I decided to attempt to replace the bearings, and glad I did. They were both bad, especially the bottom one.

The drum is pressed out from the bottom. In my case, the bearings stayed in placed. So after pressing out the drum, I pressed out the bearings by first pressing from the bottom until the top bearing came out, then pressed from the top to remove the bottom bearing.

These appeared to be original bearings, made by New Departure. They are unique in that they have an offset (or extension) that I don't believe you will find a common replacement for. So a shim, or in my case a washer, is needed to replicate the offset. Fortunately I have a friend with a lathe, and we were able to bore out a 2" OD flat washer to match the shaft.

The upper bearing has a stop grove/ring. The replacement bearings I used were an MRC 206SZZG for the upper, and a Koyo 62062RSC3 for the bottom. Both are a 30mm x 62mm x 16mm doubled sealed bearings. Total cost was $45 for both bearings at a local store in Phoenix.

I made two spacers out of thick washers intended for a C2 suspension. They were slightly more in thickness than the offset/extension of the original bearings. Didn't see that the additional, albeit minimal, thickness would create any issues, and it didn't.

I pressed the washer/bearing/spacer/bearing stack onto the drum shaft first, then pressed that assembly into the base from the topside.

The unit is now back together and ready for work. It's proving to be a challenge to find some used brake shoes just to get familiar with the operation of the grinder.

In the next post I'll tell you about the abrasive for the drum.

Cheers
Garry
 

Attachments

  • 20210112_173550 (Phone).jpg
    20210112_173550 (Phone).jpg
    46.6 KB · Views: 21
  • 20210108_123647 (Phone).jpg
    20210108_123647 (Phone).jpg
    31.2 KB · Views: 23
  • 20210105_155357 (Phone).jpg
    20210105_155357 (Phone).jpg
    38 KB · Views: 21
  • 20210105_152806 (Phone).jpg
    20210105_152806 (Phone).jpg
    19.7 KB · Views: 26

like2wheel

Well-known member
Joined
Oct 29, 2014
Messages
1,693
Location
On an as needed basis
Hey, Ive had one of these things up in the rafters for years. Is it worth anything?

Are people still arcing shoes, or can it be used for some other purpose?
 

gmofaz

Member
Joined
Dec 28, 2020
Messages
6
Location
Arizona
I worked with a company called CustomSandingBelts.com to order custom abrasive belts. Price was very reasonable, and I could order two different grits with two different materials. You'll have to call them to make the order, but the configurator lets you see the prices and get a part number.

Based on the sample I created, I went with a 4.5" wide by 14" length for the belt. I ordered both 50 and 80 grit, on both Silicon Carbide and Zirconia Alumina material. I probably should have ordered some Aluminum Oxide as well.

I really wanted J-weighted cloth backing, but only the 80-grit Silicon Carbide was available with this backing. The rest had Y-weighted backing, while stronger is also less flexible. I was afraid that it may be difficult to make the bend for the new clamping system, and I was right for the Zirconia material.

The belts for the Silicon Carbide were $3 each, while the Zirconia belts were closer to $6. Shipping was only $5.

I was able to install the 50-grit Silicon Carbide disk onto the drum with relative ease. I thought the fit and tension were just right. Test will be when it comes to actually grinding some shoes.

Oh - I did use a single hole punch to put the screw holes into the disk. I used the old attachment bracket to get the approximate location for the holes.

I plan to see if someone else can produce the 50-grit belts on J-weighted backing, which will make installation easier.

This was a fun project.

Cheers
Garry
 

Attachments

  • 20210108_170050 (Phone).jpg
    20210108_170050 (Phone).jpg
    41.1 KB · Views: 25
  • 20210108_170203 (Phone).jpg
    20210108_170203 (Phone).jpg
    38.1 KB · Views: 26
  • 20210108_170415 (Phone).jpg
    20210108_170415 (Phone).jpg
    38.8 KB · Views: 25

gmofaz

Member
Joined
Dec 28, 2020
Messages
6
Location
Arizona
I came up with a solution for the exhaust.

I went to Home Depot and picked up a Hose and Accessory kit for shop vacuums, which includes a 2.5" to 2.5", and 2.5" to 1.875" adapter. There was a small ridge on the end of the adapter, that once ground down would allow it to fit tightly into the exhause port on the 8000.

With one of these in place, you could now more easily attach a shop vacuum. I decided, however, to check out attaching a filter bag I used for my blast cabinet vacuum. Worked great.

The filter bag comes from TP Tools, and is used on their VAC-50 setup. The final filter outlet kit, Item #6011-10, costs $37 with reasonable shipping.

I also ordered a selection of drive screws from aircraftspruce.com to be able to replace the missing one for the plate on my motor. Pretty cheap, and having a selection will help when rebuilding things that have plates on them.

Cheers
Garry
 

Attachments

  • Adapter Kit.jpg
    Adapter Kit.jpg
    77.7 KB · Views: 15
  • 20210114_164413.jpg
    20210114_164413.jpg
    147 KB · Views: 16
  • Drive Screws.jpg
    Drive Screws.jpg
    21.7 KB · Views: 14

Parrott

New member
Joined
Feb 6, 2026
Messages
2
I worked with a company called CustomSandingBelts.com to order custom abrasive belts. Price was very reasonable, and I could order two different grits with two different materials. You'll have to call them to make the order, but the configurator lets you see the prices and get a part number.

Based on the sample I created, I went with a 4.5" wide by 14" length for the belt. I ordered both 50 and 80 grit, on both Silicon Carbide and Zirconia Alumina material. I probably should have ordered some Aluminum Oxide as well.

I really wanted J-weighted cloth backing, but only the 80-grit Silicon Carbide was available with this backing. The rest had Y-weighted backing, while stronger is also less flexible. I was afraid that it may be difficult to make the bend for the new clamping system, and I was right for the Zirconia material.

The belts for the Silicon Carbide were $3 each, while the Zirconia belts were closer to $6. Shipping was only $5.

I was able to install the 50-grit Silicon Carbide disk onto the drum with relative ease. I thought the fit and tension were just right. Test will be when it comes to actually grinding some shoes.

Oh - I did use a single hole punch to put the screw holes into the disk. I used the old attachment bracket to get the approximate location for the holes.

I plan to see if someone else can produce the 50-grit belts on J-weighted backing, which will make installation easier.

This was a fun project.

Cheers
Garry
Garry,
Have You had any luck finding 50 grit J backing belts, or did the silicone carbide belt work good?
Thanks,
Jim
 

Junkman

Well-known member
Joined
Dec 18, 2006
Messages
6,626
Location
Northeastern CT
Not to throw cold water on these brake shoe contour machines: if you are using NOS brake shoes that may contain asbestos, be very careful not to inhale the dust. Due to the asbestos, all brake shoes available today are made with new steel shoes, as it is too dangerous to reline the old shoes. If you want an asbestos-free brake shoe, contact Karps Power Brake Service in Chino, CA. They have a proprietary brake lining that stops like the old material, but doesn't have any asbestos in it. I haven't checked recently, so I can't confirm whether they are still relining shoes. http://www.karpspb.com
 
To avoid these ads, REGISTER NOW!
Top Bottom