Whaaaaa!? Don’t leave us hanging!
Sent from my iPhone using Tapatalk
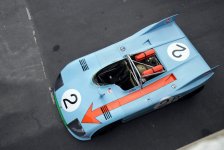
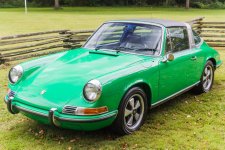
Things are looking good and I agree that baiting us with the Porsche pic has to be against the Geneva Convention.
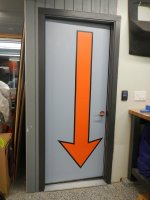
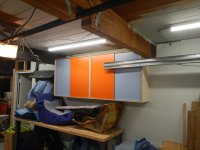
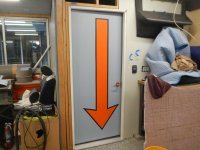
Question regarding the light switches by the door. Have you thought about swapping the white switches out for some black ones to make them disappear? Either that or see if you can find some in industrial orange.
Looking forward to your next update.
Here ya go Steve, I went with the opposite of disappearing

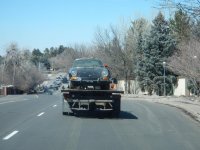
sorry guys, didn't mean to leave you hanging. Yesterday was a long day. Actually, it started on Friday night when a friend (and automotive co-conspirator) called to tell me that the 1971 Conda green 911T that I had inspected earlier was available again and the seller was willing to talk, knowing my previous offer/max price. It was "sold" a while back, but problems with the buyer put an end to that sale. I knew that there was another prospective buyer with a bag of cash handy (very literally, a bag of cash!) so we moved fast to get it out of the seller's garage. I arranged for a meeting with the seller, and just in case, for transport to show up a while later. A deal was cut and before I had loaded all the parts into the boxes, the flatbed arrived. We rushed to get everything loaded and got out of there. The car and parts made the trek across town safely and got tucked away in my friend's garage where the last photo was taken. I got home with enough time to clean up, eat and make a post before leaving for evening plans.
So, what do I know about the car's history? The seller bought the car as a non-running project in 2006 from an elderly widow. He rolled the car into his garage, put it up on stands, and dropped the engine. He did have a local shop diagnose the non-op problem but he decided to rebuild since it was already out. And then he ignored it for 13 years. I confirmed the story with the shop because the shop he went to happens to be run by my friends and they remember trying to convince him to just make the repairs. No paperwork came with the sale.
From the first inspection I knew that the car was originally Conda green under the rattle can black paint. It's not much to look at but there is minimal rust and despite the lack of supporting paperwork, I believe the odometer's sub 90k mileage. The motor and trans numbers are both within the correct range for '71. The interior was "updated" but the remaining pieces that I think are original indicate that it was black. I'll confirm that when I start dismantling/cataloging later. There are enough correct parts to suggest that the car had the S appearance group option. Porsche recently changed their process of obtaining Certificates of Authenticity such that an authorized tech at a specialized dealership (Porsche Classic Center) needs to inspect the car. The CoA is the way that most people get original build information prior to restoring. Now it seems that you're supposed to restore it and then ask Porsche if you did it right? I get that some people have abused the CoA info to create "matching-numbers" cars, but this seems a bit backwards.
First time moving in over a dozen years - too bad it's not under its own power
And another angle in the garage. I'll get over to the garage later to start a more detailed inspection.
And, I'll end with an aspirational photo: I hope a couple years of work will look something like this

 I'm still a fan of VWs


")


 than
than