To avoid these ads, REGISTER NOW!

Rebuilding a Do-All V-36 band saw

OP
A

A_Pmech

Well-known member
Joined
May 8, 2007
Messages
8,002
Location
IL
Yeah, rest assured somebody out there has used a $10 level to "check" a machine leveling job. :wtf:

Soon! I'm actually working on another tachometer today.

:thumbup:

Just kidding, I'd hate to put that think on stuff I've "leveled". It's been a great thread I finally finished reading it all (great pictures too). Now it's your turn to finish up, I'm really impatient and need to see the finished saw next week. :lol_hitti
 
Last edited:
To avoid these ads, REGISTER NOW!

Norcal

Well-known member
Joined
Mar 16, 2008
Messages
13,758
When it comes time to get new heaters for that C-H starter, you are going to choke on the price from a Eaton/Cutler-Hammer distributer the O/L relay is a obsolete Citation line unit & the list price is $80.00 ea.:headscrat It is a unusal combo of a Freedom Series contactor & a Citation line O/L relay, before Eaton bought the Westinghouse line, they manufactured both, about 1995 the Citation line was discontinued, which happened to be my favorite line of starter.


Your saw looks great!
 
OP
A

A_Pmech

Well-known member
Joined
May 8, 2007
Messages
8,002
Location
IL
Thanks for the heads-up! I'll talk to my electrical supplier and see what they can come up with.

If they can't get any at a reasonable price, I'll go used. I have a couple sources that usually stock heaters in all sizes and types.

If those sources fail, I'll stick with a 1HP motor, instead of going up to 1.5HP. Then, I don't have to change heaters. For now... :)

Good thing I haven't ordered the motor yet!


When it comes time to get new heaters for that C-H starter, you are going to choke on the price from a Eaton/Cutler-Hammer distributer the O/L relay is a obsolete Citation line unit & the list price is $80.00 ea.:headscrat It is a unusal combo of a Freedom Series contactor & a Citation line O/L relay, before Eaton bought the Westinghouse line, they manufactured both, about 1995 the Citation line was discontinued, which happened to be my favorite line of starter.


Your saw looks great!
 
Last edited:
OP
A

A_Pmech

Well-known member
Joined
May 8, 2007
Messages
8,002
Location
IL
I was contacted a week or so ago by another Do-All saw owner about the possibility of repairing their tachometer, which is off a 60's era saw:

tachometer2.jpg


Symptoms mainly included a very jumpy needle, which would "stick" as the tach input was rotated. I said I'd take a crack at it. Monday, I opened it up and here's what I found:

swarf.jpg


Notice the swarf in the bottom of the instrument bucket? Here's where it was coming from:

bearingbefore.jpg


As you my recall from my tach rebuild, this is the rotating magnet and the broken thing in the middle is the main instrument bearing. It has disintegrated, which allowed the eddy cup to contact the magnet, causing the jumpy, sticky needle:

eddycup.jpg


The solution to this problem was to make a new main bearing:

bearing.jpg


I'll have more photos once I get it back together.

:beer:
 

BTG

Well-known member
Joined
Oct 1, 2009
Messages
203
Location
Indy
I was contacted a week or so ago by another Do-All saw owner about the possibility of repairing their tachometer, which is off a 60's era saw:


When you're done with his, wanna take a crack at mine off of my South Bend 1307? Looks like it'll need a bit more than a bushing! :lol_hitti Seriously, I want to get this replaced/rebuilt and have no idea where to start...any ideas?

DSCF0042.jpg


PS --you asked for a few pic of the 1307 when I got it unloaded. Its not up and running yet, but hope to in the new year. Then I'll try a doing a light rebuild (but not to your Do-All's level though!) Here is a link to an album with a few pics.

http://s985.photobucket.com/albums/ae336/btgriffin/Tools/
 
OP
A

A_Pmech

Well-known member
Joined
May 8, 2007
Messages
8,002
Location
IL
Hi BTG,

I'm willing to have a look at it if you send it to me.

Thanks for the photos. That's a nice looking machine!

When you're done with his, wanna take a crack at mine off of my South Bend 1307? Looks like it'll need a bit more than a bushing! :lol_hitti Seriously, I want to get this replaced/rebuilt and have no idea where to start...any ideas?

DSCF0042.jpg


PS --you asked for a few pic of the 1307 when I got it unloaded. Its not up and running yet, but hope to in the new year. Then I'll try a doing a light rebuild (but not to your Do-All's level though!) Here is a link to an album with a few pics.

http://s985.photobucket.com/albums/ae336/btgriffin/Tools/
 
OP
A

A_Pmech

Well-known member
Joined
May 8, 2007
Messages
8,002
Location
IL
You'll recall in my last post I started overhauling a second tachometer which ws severely damaged. This tach was shipped to me for repair by another Do-All saw owner. Here's the rest of the repair.

Here, you can see where the cup was damaged by the rotating magnet. The inside of the eddy cup had to be cleaned and deburred:

rubbing.jpg


In this photo, the new bearing I made is pressed into place:

newbearing.jpg


After cleaning everything and lubricating, here it is reassembled and ready to ship out:

reassembled.jpg
 

allessence

Member
Joined
Nov 20, 2009
Messages
18
That is so cool. Can't wait to get it back and into Betzy. Of course now the Band tension meter will need cleaning. :eyecrazy:

And Thanks again. Jennifer
 
OP
A

A_Pmech

Well-known member
Joined
May 8, 2007
Messages
8,002
Location
IL
Last edited:

allessence

Member
Joined
Nov 20, 2009
Messages
18
yup, your welder is dramatically different for the working part.

Your doesn't seem to have the gear drive like mine. It's more like the Powermatics with a spring for upset pressure.
 
OP
A

A_Pmech

Well-known member
Joined
May 8, 2007
Messages
8,002
Location
IL
Yep!

Mine's old-fashioned, emphasis on OLD. lol! Nothing but springs and levers inside the DBW-1A!

It works well, but it takes a certain "touch" to get a good weld. Do-All probably went to a motor drive to take all the "skill" out of making a good weld, if I were to guess. From the video of your newer welder, it appears it's a "set it and forget it" operation.

With mine, I can make a perfect weld about 60% of the time on the first try. I find slowly pushing the lever down until the jaws touch, then briskly pushing it down to activate the welding switch produces the best weld - assuming the upset tension is tailored to the blade.


yup, your welder is dramatically different for the working part.

Your doesn't seem to have the gear drive like mine. It's more like the Powermatics with a spring for upset pressure.
 

allessence

Member
Joined
Nov 20, 2009
Messages
18
It is funny that the Old is now the new. It seems that your welder design was pretty much the standard.

The welder in my machine DBW-8 seems to have been the last of the line in terms of gear drive. All the newer one's from what I can tell are setup just like your DBW-1 with a few minor changes. ALL spring and cam action.


This was probably the thing that I notice right away when I looked at your thread, since I was more familiar with the Powermatics welder at the time.

On that note. I've looked thru most of the welder manuals and it seems it comes down to the operator more than just the welder unit. The manuals say " Some will experience more difficulty creating a perfect weld than others and these specifications are only a starting point".

The powermatics welder you would start with in the clamp position, clamp the blade in, move to the correct blade width position ((which isn't marked with sizes nor is there any reference diagram in the manual) This creates the upset pressure via a spring load)) and then push the button in and hold it till the button shuts off and the weld is completed.

The DBW-8 on the other hand resets itself automatically with each weld to the jaw gap spacing controller on the side of the machine.

Hows the aligning process going. I have Betzy just about all finished up.
 
OP
A

A_Pmech

Well-known member
Joined
May 8, 2007
Messages
8,002
Location
IL
It is funny that the Old is now the new. It seems that your welder design was pretty much the standard.

They say history repeats itself. From my study of manufacturing history, I would say it does with remarkable frequency!

allessence said:
The welder in my machine DBW-8 seems to have been the last of the line in terms of gear drive. All the newer one's from what I can tell are setup just like your DBW-1 with a few minor changes. ALL spring and cam action.

I guess it's like designing anything. You start out with a simple idea, complicate the hell out of it, then arrive right back at the original idea. Along the path if you do anything, you refine the simplicity of the original design and leave the exercise with a more thorough understanding of it's merits. At least, that's what I find as I refine my own ideas!

allessence said:
This was probably the thing that I notice right away when I looked at your thread, since I was more familiar with the Powermatics welder at the time.

On that note. I've looked thru most of the welder manuals and it seems it comes down to the operator more than just the welder unit. The manuals say " Some will experience more difficulty creating a perfect weld than others and these specifications are only a starting point".

The powermatics welder you would start with in the clamp position, clamp the blade in, move to the correct blade width position ((which isn't marked with sizes nor is there any reference diagram in the manual) This creates the upset pressure via a spring load)) and then push the button in and hold it till the button shuts off and the weld is completed.

The DBW-8 on the other hand resets itself automatically with each weld to the jaw gap spacing controller on the side of the machine.

Hows the aligning process going. I have Betzy just about all finished up.

I think your welder was an attempt to remove the operator variables at the risk of added complication. As you gain experience with it, I'd be interested to hear about how finicky it is to use. There's certainly "difficulty in creating a perfect weld" if you don't treat it just right!

I've been so busy making The Hammer and working on a few other tool ideas that I haven't had much time! I need to remove the table, which will require the forklift, which will require leaving one of the doors open. It was -12 yesterday morning, a tad chilly to have the door open. :shocking:

I think you're going to beat me to the finish line! :beer:
 

allessence

Member
Joined
Nov 20, 2009
Messages
18
I have also found that the simpler something is the harder it is to understand. See it in Ninpo all the time.Though I have to say, I didn't understand the DBW-8 until I had it completely apart and watched it work a few times.

It really is a clock work assembly. Rube Goldberg would be proud.

Not to say this in a hurtful way. Better you than me with the temps. I work outside everyday and once it gets into the teens around here the snow just makes working miserable.

Without the snow it doesn't bother me so much.

Did you ever weigh the table?? 250Lbs??
 

allessence

Member
Joined
Nov 20, 2009
Messages
18
I think you're going to beat me to the finish line! :beer:

Well, I would say I've only run maybe 1/4 of the race then. I think you have a few extra laps compared to my refurb. I mean lets face it a complete rebuild is what you did vs just clean and spiff up. :bowdown:
 

Stuart in MN

Well-known member
Joined
Sep 8, 2005
Messages
23,120
Location
Minneapolis
I guess it's like designing anything. You start out with a simple idea, complicate the hell out of it, then arrive right back at the original idea. Along the path if you do anything, you refine the simplicity of the original design and leave the exercise with a more thorough understanding of it's merits. At least, that's what I find as I refine my own ideas!

This reminds me of something one of my professors in engineering school told us...

The three basic steps for any good design are:

1) Make it work
2) Make it simple
3) Make it pretty

:)
 
Last edited:
OP
A

A_Pmech

Well-known member
Joined
May 8, 2007
Messages
8,002
Location
IL
I have also found that the simpler something is the harder it is to understand. See it in Ninpo all the time.Though I have to say, I didn't understand the DBW-8 until I had it completely apart and watched it work a few times.

It really is a clock work assembly. Rube Goldberg would be proud.

Not to say this in a hurtful way. Better you than me with the temps. I work outside everyday and once it gets into the teens around here the snow just makes working miserable.

Without the snow it doesn't bother me so much.

Did you ever weigh the table?? 250Lbs??

Certainly!

The great aeronautical engineer Kelly Johnson was credited as being fond of saying "Simplicate and add lightness!" The hardest task is taking something complicated and making it simple, because to simplify it you have to remove all the filler and **** that doesn't get the job done. To arrive at something simple, you have to completely understand what makes it work.

Much like being one of Eisenhower's general staff and trying to reduce a complicated situation into a one-page situation report! If it wasn't on one page or less, Eisenhower would say that you didn't understand the problem!

No doubt! I dislike the cold too. I'm going to wait for a slightly warmer day to remove the table and associated stuff.

The table is in the 350lb range I think.
 
To avoid these ads, REGISTER NOW!

allessence

Member
Joined
Nov 20, 2009
Messages
18
This reminds me of something one of my professors in engineering school told us...

The three basic steps for any good design are:

1) Make it work
2) Make it simple
3) Make it pretty

:)

Not to sound superficial or conceited but, Sounds a lot like me:bounce:
 

allessence

Member
Joined
Nov 20, 2009
Messages
18
The table is in the 350lb range I think.

Ouch, now I can see why you want to use the fork lift.

The table on my saw by the way is only 2 way adjustable. I believe yours is 4 way correct?


It being a 2 way is more than likely why it survived the move with the fork lift.

I have seem several DoAlls with tables looking like there ready to fall off. This being a clear indication something isn't right.

Was almost 40F here today. Yippy.
 

willy3486

Well-known member
Joined
Jan 14, 2010
Messages
1,594
Location
Middle Tennessee
Any more I try to find old tools over new. I have all kinds of old motorized tools. I rebuild them myself and most of my woodworking tools are at least 40 years old. I prefer them because they last longer,work better,heavier duty and I have less in them. I have not found a old machine made before 1970 that had a belt driven motor that I haven't been able to fix. But I have quite a few tools and seen more of them that were made after 1970 that couldn't be fixed or cost almost as much as buying a new one. I stick with the older stuff.
 
OP
A

A_Pmech

Well-known member
Joined
May 8, 2007
Messages
8,002
Location
IL
Ouch, now I can see why you want to use the fork lift.

The table on my saw by the way is only 2 way adjustable. I believe yours is 4 way correct?

Yep!

As I recall, if you compare the underside of an old table to a new one, you'll notice there's about twice as much iron in the old table. They used a double-wall construction on the old tables. The new ones are cast as a single-wall with no core cavity. They also look a bit thinner. I don't know when they changed designs though.

It being a 2 way is more than likely why it survived the move with the fork lift.

I have seem several DoAlls with tables looking like there ready to fall off. This being a clear indication something isn't right.

Was almost 40F here today. Yippy.

That probably has something to do with it! I don't think I've seen a 2-way up close, but they look beefier in the photos. I've seen a few auction photos where the table was on the ground next to the saw!

It's interesting to note that the tables appear to have gotten lighter while the trunnions have gotten heavier! :wtf:

Same! Heat wave! Uphill to spring now. :beer:
 
OP
A

A_Pmech

Well-known member
Joined
May 8, 2007
Messages
8,002
Location
IL
Sounds like you have the old machine tool disease too, Willy.

The Do-All is currently my oldest machine, but not my oldest tool. Funny you mention 1970... Most of my machine tools were made within months of each other in 1970. I didn't plan it that way, it just happened!

Any more I try to find old tools over new. I have all kinds of old motorized tools. I rebuild them myself and most of my woodworking tools are at least 40 years old. I prefer them because they last longer,work better,heavier duty and I have less in them. I have not found a old machine made before 1970 that had a belt driven motor that I haven't been able to fix. But I have quite a few tools and seen more of them that were made after 1970 that couldn't be fixed or cost almost as much as buying a new one. I stick with the older stuff.
 
OP
A

A_Pmech

Well-known member
Joined
May 8, 2007
Messages
8,002
Location
IL
I was contacted about two weeks ago by a member of Practical Machinist who also lurks over here on Garage Journal. He asked if I would post the conversation between us so that other owners would have insight on lubricant choices for old 2-speed Do-All band saws like the V-36. Here's our conversation, edited slightly:

Eric said:
A_P,

I've been following your DoAll restoration both here and on Garage Journal. Very well done.

I just bought a new-to-me 1950 DoAll Metalmaster (ML). Very nice saw. If I believe the previous owner, it was bought new in 1952 by a shop owner who died in 1953. It sat unused in a heated garage until it was purchased by his neighbor in 2000. This saw has only one coat of new-ish paint on it and the wear I can see may indicate the story was true. I downloaded the operators manual, which is the same as the V-36. 2nd to last page has a list of lubricants and lubrication points on the last page. I can find everything on the list but the SAE No. 40 transmission oil used in the transmission. I tried to find some kind of cross-reference to this oil, but can't figure it out. It it just SAE 40 motor oil? SAE 90 gear oil? What are you planning on using?

You haven't posted an update on PM in a while, so I figured a private message might get to you faster than just asking on the thread. I'm not a member of Garage Journal, so I didn't try there.

Thanks,
Eric

A_Pmech said:
Hi Eric,

Thanks!

I see I'm not the only PM guy hanging out over on GJ. :)

Due to the cold and the fact that my forklift is 2.5" taller than my door opening, I haven't had a chance to get the table off to start aligning the saw. I think I'm going to wait for it to warm up a little. I've also been hunting for a nice Reliance XT series or equivalent 3-phase motor on Ebay.

It sounds like you found a nice saw! That's a rarity with the older Do-All's. They seem to end up in fabrication shops, or in the back of repair shops where they get abused. I'm still amazed mine was 98% complete and didn't have a broken trunnion!

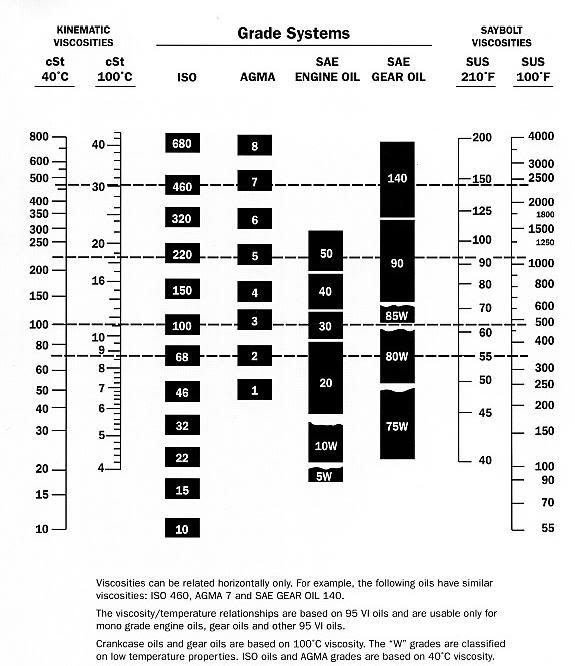
Like you, I've been puzzled as to what oil to use. The manual I have for the 3613-1, a slightly later V-36 incarnation, recommends EP 90 gear oil, which is the same stuff that's available in the auto parts store for rear ends. I find it fascinating that the V-36 manual makes a distinction between SAE 40 oil and EP90 gear oil and only recommends the EP90 for use in the V-60. I can't explain that.

However, looking at this chart, the viscosity of SAE 40 engine oil and EP90 gear oil is similar, although EP90 has a wider range of viscosity:

oilviscosityconversion.jpg


I have another table from Velcon which matches this one closely.

My plan is to run 80W90 multi-grade hypoid gear oil in the transmission, which is readily available at the local auto parts store. Multi-grade oils weren't available in the 40's. Looking at Mobil's 80W90 offering and comparing it to the viscosity chart, it is right in the middle of the SAE 40 engine oil range:

http://www.mobil.com/USA-English/Lub..._LS_80W-90.asp

Anyway, I'm not a tribologist and I don't even play one on TV, but that's my plan! I learned a lot about lubricating oil viscosity measurement while finding and studying the various charts. Lubrication is a fascinating subject.

I recall reading some time back that you're putting a machine shop together. I hope all is going well with your business.

Regards,

John

Eric said:
Thanks for the thoughts on the oil. I the thing that has been really
throwing me off is the "transmission" oil...not "motor" oil for the gear box
in the owner's manual.

Eric said:
John,


Last week I had sent off an info request to Mobil for what to use in the DoAll saw gearbox (because of Grey Rider's info). I didn't hear anything back so that is why I contacted you. Today I got a request for the model of the saw. I e-mailed them the pdf instruction along with the model name. The applications engineer replied that according to their records (that the instruction manual confirmed) they currently recommend Mobil DTE Extra Heavy for the DoAll gearbox.

Hope this helps,

Eric

A_Pmech said:
Hi Eric,

Cool! Thanks for letting me know what Mobile suggested. The "transmission oil" part got me too, I have a feeling they stopped selling that stuff in the 50's! I considered the DTE Extra Heavy myself, but it's another "specialty oil" to order in and keep around. I try to keep myself down to as few "special order" lubes as possible, which is why I chose the 80W-90 gear lube. Looking back at the chart, DTE Extra Heavy is right in the middle of the 80W90 range, so I think either one makes a good choice.

Regards,

John

Eric said:
John,

Maybe you could add my question and your reply to the saw restoration thread (and maybe my Mobil response). That way everyone would have the info.

Thanks again,
Eric
Forward Message
 
OP
A

A_Pmech

Well-known member
Joined
May 8, 2007
Messages
8,002
Location
IL
A New Motor for the Do-All

Early next month will mark the first anniversary of buying the V-36. I'd like to have it finished by then! With that in mind, I took a few measurements last night to see how much room I had to work with inside the saw. New motor frames are longer and smaller in diameter than the old motor frames, so I wanted to be sure a new frame would fit.

566.jpg


567.jpg


The measurement is from the rough centerline of the motor drive belt to the doghouse enclosure wall. Plenty of room for any standard frame motor!

I have a couple of motors in mind and I'll update in a day or so when I've made my final decision. :beer:
 
Last edited:
OP
A

A_Pmech

Well-known member
Joined
May 8, 2007
Messages
8,002
Location
IL
Update

A NOS Reliance Electric 1.5HP "Duty Master" TEFC motor and NOS Cutler Hammer H1029 overload heaters should be headed my way in the next few days.

:)
 
OP
A

A_Pmech

Well-known member
Joined
May 8, 2007
Messages
8,002
Location
IL
3phase I assume?

Hi Spyder,

Yep, it's a 3-phase motor.

I originally planned to replace the existing 1HP motor with another 1HP motor. However, 1HP motors seem to be scarce on Ebay. By stepping up to 1.5HP, the largest size the motor starter can handle at 220V 3-phase, I increased the selection enormously.

I'll have to bore out the drive pulley, as the new motor has a 7/8" shaft instead of 3/4" like the old motor. Easy enough...
 
OP
A

A_Pmech

Well-known member
Joined
May 8, 2007
Messages
8,002
Location
IL
The Motor has Arrived

The UPS guy showed up this rainy morning with a rather ratty looking package for me:

571.jpg


As soon as I saw him pick it up from the truck, I was concerned. The box was beaten to a pulp! When he handed it to me, I noticed the motor was rattling around inside the box and there was a hole where the shaft had poked out thought the wall!

Upon opening the box I found the motor was stuck in there with a couple pieces of junk cardboard and that was it:

570.jpg


Fortunately, the motor didn't have far to travel to me, so it made the journey fine. The motor is brand new, although it sat on somebody's shelf for a while and has the typical rusty shaft:

569.jpg


Here's the dataplate. Look in the bottom right hand corner. That's what I like to see. :thumbup:

568.jpg


All in all, not bad for a $0.99 Ebay steal. :bounce:

As an aside, the old motor weighed about 75 lbs. This motor is about 45lbs and uses a smaller diameter frame, although it has a larger diameter shaft. Once I have the motor mount cleaned up and reinstalled, I'll ballast and shim it to fit the new motor.

I was expecting the heaters I bought to arrive in the mail today but they didn't show. Maybe tomorrow...
 

Lu47Dan

Well-known member
Joined
Apr 3, 2006
Messages
51
Location
N/W Pa.
AP, nice work on the saw, I was sucked in by the link over on SFT. Took too many hours to get caught up on this thread.
Dan
 
OP
A

A_Pmech

Well-known member
Joined
May 8, 2007
Messages
8,002
Location
IL
Thanks, Dan.

I figured I'd better post an update over there as the rebuild has been kinda slow lately.

I think another couple pages should see the saw done. :)

AP, nice work on the saw, I was sucked in by the link over on SFT. Took too many hours to get caught up on this thread.
Dan
 
OP
A

A_Pmech

Well-known member
Joined
May 8, 2007
Messages
8,002
Location
IL
Another little detail has been finished!

You might recall I was having trouble finding a suitable bulb to fit the lamp holder on the blade welder. In the end, I used a control transformer to reduce the voltage from 220V to 110V to increase the selection of bulbs. My electrical supply still couldn't order a suitable bulb, so I just forgot about it for a while.

Last night I just happened to be looking in the light bulb section at Wal Mart when I found this:

573.jpg


It fits great!

574.jpg


:bounce:
 

wineslob

Well-known member
Joined
Oct 22, 2009
Messages
233
Location
The Northstate
Pmech, I'm pretty sure you know this, but just in case, notice the heaters have a pointed end. If you reverse the heaters, that is, put the arrowed ends in the opposite direction intended, (there is a CH chart for this) you change the trip setting of the heaters. More or less this is a "fine tune" of the protection.
 
OP
A

A_Pmech

Well-known member
Joined
May 8, 2007
Messages
8,002
Location
IL
Pmech, I'm pretty sure you know this, but just in case, notice the heaters have a pointed end. If you reverse the heaters, that is, put the arrowed ends in the opposite direction intended, (there is a CH chart for this) you change the trip setting of the heaters. More or less this is a "fine tune" of the protection.

Hi Wineslob,

Yep! :thumbup:

They have a "High" and a "Low" position as you said. As this motor is rated at 4.4 amps, 1.15 service factor I'll be using the #1029 heaters in the "Low" position, per the table:

297.jpg


I need to print off a copy of this to post inside the enclosure door for future reference.
 
OP
A

A_Pmech

Well-known member
Joined
May 8, 2007
Messages
8,002
Location
IL
Another Do-All 36" rebuild is under way!

Mark over on Practical Machinist posted the following yesterday:

Mechanist said:
I'm going to try to attach a photo to this post, I hope that it takes: its the first photo that I've posted. First off, a big hats off to A_Pmech for your detailed posts about rebuilding your DoAll saw. I figure that you've saved the life of at least a dozen saws that might have been scrapped this year, and inspired the repair of many more.

I run two different machine shops, one for UC Berkeley, and the other at UC Davis. I'm able to get surplus federal property for use by the University. (Sorry, but I can't get anything for myself or anyone else.) Last year, one of the machine tools that I pulled out of government surplus was a 1952 DoAll 36-2 band saw. I got this item from the Marine Corp at Camp Pendelton.
Its out at my shop in UC Davis. (I have a Powermatic at Berkeley). Like almost all of the tooling that I pull out of government salvage, its going to need some repair. This is such an excellent saw, and DoAll did such a good job designing it, that I want to completely go through it, and put it back into "new like" condition.

I downloaded all of the posts that A_Pmech made regarding his repairs, and transfered them to Microsoft Word. I formatted most of the photos to 75% size to reduce the size of the document, and then printed them out. So far A_Pmech's repair manual is 318 pages long, and fills two binders (and growing!). I also downloaded all of the videos onto a cd, and printed out Grey Rider's webpage.

It's going to take over a year to rebuild this saw, as I have an endless supply of other work to do. But, it will be worth it in the end to restore this machine and put it back into use. I intend to disassemble it to the frame, and then sandblast and repaint in the spring when it stops raining.
There are two items that I'd like to comment on. First, engine turning the welder frame plate was brilliant! I totally and shamelessly intend to copy that idea from you! (only difference is: I'm going to paint the weld control handle red - other than that, it's going to be a total rip off!). Second, getting rid of the air compressor, and adapting the saw to run with shop air. That's Nobel Prize material there!

The saw has some of the origional features, like the factory work light and the work lubrication can that mounts to the back of the saw. But other things are missing; like the chain assembly for the hydraulic power feed. Amazingly, all of the saw guides were in the catch can, along with a couple of pounds of metal chips, at the bottom of the chip shute. I'm looking foward to fixing this saw, even if I have to do it a little bit at a time. Thanks for all the information, it makes other people's work a hundred times easier.

Here's his saw, awaiting rebuild:

DoallBandsaw36-2.jpg


My advice? Go out and buy a cheap old Do-All and join in the fun. It's bound to keep you out of trouble for 200 to 500 hours. :bounce:
 
OP
A

A_Pmech

Well-known member
Joined
May 8, 2007
Messages
8,002
Location
IL
A few more things arrived in the mail today to wrap up some details:

A new grinding wheel for the blade welder and 1/4" Loc-Line for the chip blower are the highlights.

:)

575.jpg
 
OP
A

A_Pmech

Well-known member
Joined
May 8, 2007
Messages
8,002
Location
IL
Replacing the Motor Pulley

Originally, I intended to re-use the original motor drive pulley by boring it out and re-broaching the keyway to fit the larger shaft of the new motor. However, before I went to the trouble I figured I would search for a new pulley first as it would save some time.

The first step to replacing the pulley is to measure it. Many times, pulleys are referred to by their outside diameter and many people purchase them based upon that measurement. While there are standard pulley outside diameters, they are not necessarily a reliable reference for the pitch diameter of the pulley, especially as v-belt pulley standards have changed since 1947, notably with IP20-1988 and the switch to the "Datum Diameter" system.

The location the belt rides in a pulley is important and totally independent of the outside diameter of the pulley. As the radius between the center of rotation and the belt's power carrying fibers, known as half of the "Pitch Diameter" changes, the drive ratio between the driving and the driven pulleys changes as well and thus the speed of the driven pulley. So, it is important to compare pulleys by measuring the groove and NOT the outside diameter, especially when the standard to which the pulley is made is unclear.

To begin, here is a table of basic dimensions from standard IP20-1988:

illus1.jpg


illus2.jpg


As previously mentioned, Datum Diameter is the diameter by which Classical section v-belt pulleys are interchanged. To measure the Datum Diameter, the first thing to do is pick out the v-belt cross-section from the chart. In this case the Do-All uses a Classical B section v-belt. Looking to the right in the chart, notice column dB. This is the diameter of the ball bearings required to measure the datum diameter. In this case, 9/16".

Digging into my collection of ball bearings which I keep for measuring odd features, I pulled out two 9/16" balls:

576.jpg


Here's the old pulley:

577.jpg


Here's a photo of the 9/16" ball within the pulley groove:

578.jpg


Here you can see I'm measuring the datum diameter. It isn't easy to keep the two balls positioned in the groove while measuring over them. Some heavy axle grease will help to hold them in place if necessary. In this case, the dimension is 3.36"

579.jpg


Looking at the illustration, you'll notice that the datum diameter is taken as the dimension between the CENTERS of the two bearing balls. To arrive at that dimension I need to subtract 9/16" from the measurement taken across the balls. So, 3.36 - .56 = 2.8 The Datum diameter of the old pulley is 2.8".

Now, going to my favorite power train supplier I selected a pulley from their list of available options. Since my motor has a 7/8" shaft and I need a datum diameter of 2.8", I need a 1-BK30-D pulley from the Surplus Center:

table.jpg


The new pulley should be here in a few days.

:beer:
 
Last edited:
To avoid these ads, REGISTER NOW!
Top Bottom