To avoid these ads, REGISTER NOW!

ZMotorsports Shop Projects 2.0

To avoid these ads, REGISTER NOW!
OP
Z

zmotorsports

ALLIANCE MEMBER
Joined
Oct 20, 2009
Messages
21,452
Location
Northern Utah
I say clear powder coat on this. That will show the true quality craftmanship. Well done Mike, as always.

Thank you, I appreciate that. Actually the silver powder coat won't be too far off from the bare steel.:lol_hitti

I'm also very glad we decided to do the tank tuck as it isn't even visible from the back of the Jeep and all of that hard work we put into the rear axle is visible.

Thanks for following along.:beer:
 
OP
Z

zmotorsports

ALLIANCE MEMBER
Joined
Oct 20, 2009
Messages
21,452
Location
Northern Utah
Maybe I missed it, what did you do (or plan to do) to seal up the floor after cutting out the spare tire well?

I have a piece of aluminum that will cover the opening screwed in using threadserts and sealed off. I haven't completed that as I figured that would something I could do while the bumper is being powder coated.

Thanks for asking and I will show it when completed.
 
OP
Z

zmotorsports

ALLIANCE MEMBER
Joined
Oct 20, 2009
Messages
21,452
Location
Northern Utah
A little change of direction tonight. I took a break from my son’s WJ bumper to try and abate a slight belt chirp in the belt train on my Jeep. Upon initial startup I’d get some belt chirp until the belt warmed a bit in which it would then reside.

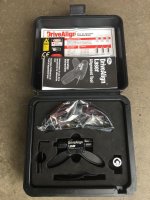
Visual inspection wasn’t revealing anything so I broke out the Dayco laser tool.
8d6c497de863502bcb6134c05e212549.jpg

My A/C compressor was ever-so slightly out of alignment. I was able to loosen the fasteners just enough to use a small pry bar to tweak the compressor enough to bring it into alignment without having to remove the stretch belt. That did the trick and it is now chirp free.

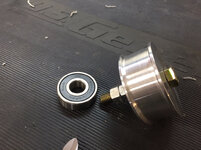
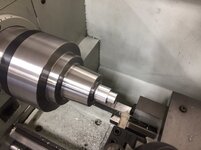
Upon inspecting the rest of the accessory drive I also noticed on my main serpentine belt that the belt was riding a bit to the outside edge of the upper idler. Upon inspection after releasing the tension and slipping the belt off I could move the idler pulley radially which told me the spacer was undersized.

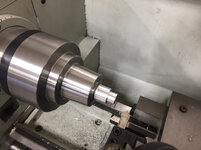
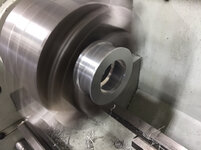
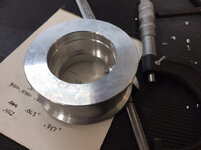
I decided to machine a new spacer to a tighter tolerance and remove the play and hold the idler pulley more precisely to keep the belt in the middle of the pulley vs letting it walk outward slightly.

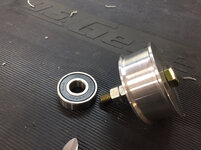
Measuring the pulley to get the correct dimensions.
be67678d38a71e82aa815cc73a078e7d.jpg

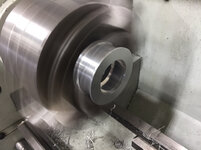
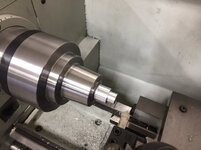
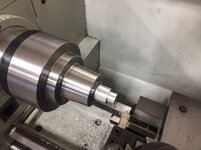
Machining the new spacer.
7bfe838ea7de002d85deaae9ef3f1c7d.jpg

82c9b5cf1696e1741022db8ff15aa3a2.jpg

After all that I forgot to take a picture of the final product and installed but it much more solidly supporting the idler allowing the belt to run in the middle of the pulley.

I think I may still machine a new pulley in the near future with a snap ring retaining the bearing for easy bearing replacement. I machined one similar on my old Ford 460 that I had a Vortex supercharger on many years ago and it turned out great and then just carried a spare 6303 bearing in my toolbox.

Thanks for looking.
 

Attachments

  • 8d6c497de863502bcb6134c05e212549.jpg
    8d6c497de863502bcb6134c05e212549.jpg
    812.1 KB · Views: 0
  • 82c9b5cf1696e1741022db8ff15aa3a2.jpg
    82c9b5cf1696e1741022db8ff15aa3a2.jpg
    646.2 KB · Views: 0
  • 7bfe838ea7de002d85deaae9ef3f1c7d.jpg
    7bfe838ea7de002d85deaae9ef3f1c7d.jpg
    632.7 KB · Views: 0
  • be67678d38a71e82aa815cc73a078e7d.jpg
    be67678d38a71e82aa815cc73a078e7d.jpg
    743.2 KB · Views: 0
Last edited:
OP
Z

zmotorsports

ALLIANCE MEMBER
Joined
Oct 20, 2009
Messages
21,452
Location
Northern Utah
Interesting. How does the tool work?

Matt, the two gold pieces on the bench are the laser alignment tools. They are intended to be used on bare metal pulleys. They each have a magnet on the underside in which to affix themselves to the pulley, usually the crankshaft for the laser and then whichever one you are trying to align with the receiver portion. On the laser one there is a small lever on the underside that when it stick to the pulley it turns the red laser on and then you aim it towards the receiver portion. You want to make certain that both are in the same groove on the pulleys to ensure you are in line.

However, I didn't remove the belt for alignment of the A/C compressor so I "fudged" the procedure a bit. I set the laser on the belt ensuring both the front and rear were in the same orientation on the belt, then rocked the laser slightly on the front two feet keeping it in firm contact with the belt and making certain it didn't slip until the laser beam met the corresponding pulley. That is when I noticed it was slightly out of alignment. Seeing as how this was not how the tool was designed to be used I did it multiple times to ensure I was getting the correct indication and then again to verify after I had tweaked the compressor alignment slightly.

I was surprised how much chirp I was getting with such a very small deviation as I've seen belts much further out of alignment where you could obviously see some alignment issues and not get any noise.

This morning was a great test because it has been raining hard all night so there was moisture in the air and it was cold which should have had it chirp for a good 5 minutes or so until everything warmed up a bit but there was absolutely no noise when I started it in the garage this morning.:thumbup:

I hope I explained how the tool works. I've only used it a few times in my career but when it isn't as obvious this thing is worth its cost. I HATE belt chirps with a passion.
 

LXCam

ALLIANCE MEMBER
Joined
Apr 23, 2013
Messages
19,200
Location
AZ
As always Mike :thumbup: :thumbup: :beer:

Too bad you're not down this way. This weekend is our big annual dodge even at Pomona. You'd have dug some of the builds that are going to be here.
 
OP
Z

zmotorsports

ALLIANCE MEMBER
Joined
Oct 20, 2009
Messages
21,452
Location
Northern Utah
As always Mike :thumbup: :thumbup: :beer:

Too bad you're not down this way. This weekend is our big annual dodge even at Pomona. You'd have dug some of the builds that are going to be here.

Thanks Cam.

Are you going to miss those events when you leave CA or is there just as active of a scene in AZ where you are going?
 

LXCam

ALLIANCE MEMBER
Joined
Apr 23, 2013
Messages
19,200
Location
AZ
Thanks Cam.

Are you going to miss those events when you leave CA or is there just as active of a scene in AZ where you are going?


Probably not. I've been heavily involved with this scene since the very beginning. This is how I became involved with dodge corporate not inclusive doing this all over the country and making a ton of friends. It's really the one time a year my buddies come from far and wide to attend. However there is a big crowd out of the Phoenix basin that get together regularly and I know a bunch of them, so I'm walking right into my extended family. Last week the wife said "ahhh you're gonna be lonely". To which I said (not thinking this out). Hun I'll be fine, I've got a bunch of buds out there........wrong answer :headscrat :(

Btw, I'm gone as of Wednesday.
 
OP
Z

zmotorsports

ALLIANCE MEMBER
Joined
Oct 20, 2009
Messages
21,452
Location
Northern Utah
Probably not. I've been heavily involved with this scene since the very beginning. This is how I became involved with dodge corporate not inclusive doing this all over the country and making a ton of friends. It's really the one time a year my buddies come from far and wide to attend. However there is a big crowd out of the Phoenix basin that get together regularly and I know a bunch of them, so I'm walking right into my extended family. Last week the wife said "ahhh you're gonna be lonely". To which I said (not thinking this out). Hun I'll be fine, I've got a bunch of buds out there........wrong answer :headscrat :(

Btw, I'm gone as of Wednesday.


Glad to hear it is all working out. They evidently met your requests huh......
 

LXCam

ALLIANCE MEMBER
Joined
Apr 23, 2013
Messages
19,200
Location
AZ
Glad to hear it is all working out. They evidently met your requests huh......


Sorry we haven't talked. Ya they came to the table with everything I asked for two weeks ago today so at that point it became a .......I'm outta here :3gears:
 

Mike.ASC

Well-known member
Joined
Apr 21, 2010
Messages
880
Location
East coast
A little change of direction tonight. I took a break from my son’s WJ bumper to try and abate a slight belt chirp in the belt train on my Jeep. Upon initial startup I’d get some belt chirp until the belt warmed a bit in which it would then reside.

Visual inspection wasn’t revealing anything so I broke out the Dayco laser tool.
8d6c497de863502bcb6134c05e212549.jpg

My A/C compressor was ever-so slightly out of alignment. I was able to loosen the fasteners just enough to use a small pry bar to tweak the compressor enough to bring it into alignment without having to remove the stretch belt. That did the trick and it is now chirp free.

Upon inspecting the rest of the accessory drive I also noticed on my main serpentine belt that the belt was riding a bit to the outside edge of the upper idler. Upon inspection after releasing the tension and slipping the belt off I could move the idler pulley radially which told me the spacer was undersized.

I decided to machine a new spacer to a tighter tolerance and remove the play and hold the idler pulley more precisely to keep the belt in the middle of the pulley vs letting it walk outward slightly.

Measuring the pulley to get the correct dimensions.
be67678d38a71e82aa815cc73a078e7d.jpg

Machining the new spacer.
7bfe838ea7de002d85deaae9ef3f1c7d.jpg

82c9b5cf1696e1741022db8ff15aa3a2.jpg

After all that I forgot to take a picture of the final product and installed but it much more solidly supporting the idler allowing the belt to run in the middle of the pulley.

I think I may still machine a new pulley in the near future with a snap ring retaining the bearing for easy bearing replacement. I machined one similar on my old Ford 460 that I had a Vortex supercharger on many years ago and it turned out great and then just carried a spare 6303 bearing in my toolbox.

Thanks for looking.

Great tool, I have the Gates version....
 

Attachments

  • IMG_1451.jpg
    IMG_1451.jpg
    108.5 KB · Views: 99
  • 7bfe838ea7de002d85deaae9ef3f1c7d.jpg
    7bfe838ea7de002d85deaae9ef3f1c7d.jpg
    90 KB · Views: 3
  • 8d6c497de863502bcb6134c05e212549.jpg
    8d6c497de863502bcb6134c05e212549.jpg
    141 KB · Views: 1
  • be67678d38a71e82aa815cc73a078e7d.jpg
    be67678d38a71e82aa815cc73a078e7d.jpg
    126.3 KB · Views: 0
  • 82c9b5cf1696e1741022db8ff15aa3a2.jpg
    82c9b5cf1696e1741022db8ff15aa3a2.jpg
    95.3 KB · Views: 0

lilscorpion

Well-known member
Joined
Mar 15, 2010
Messages
3,600
Location
Colorado
Matt, the two gold pieces on the bench are the laser alignment tools. They are intended to be used on bare metal pulleys. They each have a magnet on the underside in which to affix themselves to the pulley, usually the crankshaft for the laser and then whichever one you are trying to align with the receiver portion. On the laser one there is a small lever on the underside that when it stick to the pulley it turns the red laser on and then you aim it towards the receiver portion. You want to make certain that both are in the same groove on the pulleys to ensure you are in line.


I get it, that’s slick. Now I want one.
 
OP
Z

zmotorsports

ALLIANCE MEMBER
Joined
Oct 20, 2009
Messages
21,452
Location
Northern Utah
So the rear bumper is done and ready to break down and bring to the powder coater this next week.

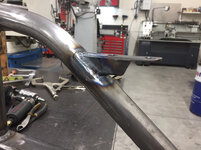
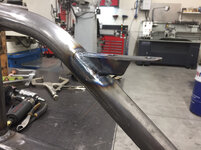
Fabricating the lower support for the swing away tire carrier. I pie cut the 2”x3” tube to mirror the angle of the bumper.
045c898037cd4c7574765e869d9e3f79.jpg

08332b8dfda75fe639286ba7cd9d3fc2.jpg

Vertical for the tire mount.
73badcaa608f7e78b34ad769e21113e8.jpg

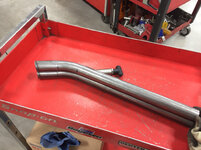
I bent the 1.5” diameter tubing at 30-degrees.
3816d66cc31352b6e77051ace787f850.jpg

Tacked in place.
889582f2298b8fd060c2194b39a5624f.jpg

While I was at it I fabbed up a little mount for the CB antenna and flag mount.
44492e127b4c69a561ce7c6df946bf4a.jpg

c4dc6950513744df8a0865fd1328ba89.jpg

Mount for the carrier lock that holds it in the open position.
f20fff2d1635213992d0e7284f538e4f.jpg

4985212ec5e1be5614852447f789fd1e.jpg

df7b16ad688f58b972ec2cdd117df16b.jpg

f75a400897bafc26389b67686a93f32b.jpg

Done and ready to break down.
2dc1b7c72cef5274900177b0fa9d89d1.jpg

f45a46814c788cf3a6bf3e055adeb33a.jpg

79ec8a11981f385c1a56227be9ba506a.jpg

08db7a280506d04c083b9a3ad63e4e5c.jpg

Thanks for looking.
 

Attachments

  • 08db7a280506d04c083b9a3ad63e4e5c.jpg
    08db7a280506d04c083b9a3ad63e4e5c.jpg
    659.1 KB · Views: 1
  • 79ec8a11981f385c1a56227be9ba506a.jpg
    79ec8a11981f385c1a56227be9ba506a.jpg
    658.4 KB · Views: 0
  • f45a46814c788cf3a6bf3e055adeb33a.jpg
    f45a46814c788cf3a6bf3e055adeb33a.jpg
    690.2 KB · Views: 0
  • 2dc1b7c72cef5274900177b0fa9d89d1.jpg
    2dc1b7c72cef5274900177b0fa9d89d1.jpg
    661.1 KB · Views: 0
  • f75a400897bafc26389b67686a93f32b.jpg
    f75a400897bafc26389b67686a93f32b.jpg
    667.7 KB · Views: 0
  • df7b16ad688f58b972ec2cdd117df16b.jpg
    df7b16ad688f58b972ec2cdd117df16b.jpg
    669.8 KB · Views: 0
  • 4985212ec5e1be5614852447f789fd1e.jpg
    4985212ec5e1be5614852447f789fd1e.jpg
    704.4 KB · Views: 0
  • f20fff2d1635213992d0e7284f538e4f.jpg
    f20fff2d1635213992d0e7284f538e4f.jpg
    630.9 KB · Views: 0
  • c4dc6950513744df8a0865fd1328ba89.jpg
    c4dc6950513744df8a0865fd1328ba89.jpg
    699 KB · Views: 0
  • 44492e127b4c69a561ce7c6df946bf4a.jpg
    44492e127b4c69a561ce7c6df946bf4a.jpg
    747.3 KB · Views: 0
  • 889582f2298b8fd060c2194b39a5624f.jpg
    889582f2298b8fd060c2194b39a5624f.jpg
    691.8 KB · Views: 0
  • 045c898037cd4c7574765e869d9e3f79.jpg
    045c898037cd4c7574765e869d9e3f79.jpg
    686.5 KB · Views: 0
  • 3816d66cc31352b6e77051ace787f850.jpg
    3816d66cc31352b6e77051ace787f850.jpg
    832.7 KB · Views: 0
  • 73badcaa608f7e78b34ad769e21113e8.jpg
    73badcaa608f7e78b34ad769e21113e8.jpg
    693 KB · Views: 0
  • 08332b8dfda75fe639286ba7cd9d3fc2.jpg
    08332b8dfda75fe639286ba7cd9d3fc2.jpg
    744.5 KB · Views: 0
Last edited:
To avoid these ads, REGISTER NOW!

rmack898

Well-known member
Joined
Jan 23, 2007
Messages
3,199
Location
Honu Grove NE Florida
Mike I try to stay current with your thread but if I miss a few days it can some times take a few pages of reading to catch up.

The bumper is really nice but the carrier you built for it brings it to a whole new level.

4 pages back there was a picture of the bumper sitting on your welding table, in the background I see 2 milling machines. Have I been that far out of touch or did you sneak a new machine in the shop when nobody was looking?
 

Boosted1

Well-known member
Joined
Nov 25, 2007
Messages
1,680
Location
Georgetown, KY
Man that rear bumper and spare tire carrier are so nice. Nice than anything you could buy.
Do you mind sharing a closeup of your locks ( Closed and Open )?
How does the open lock engage?
 
OP
Z

zmotorsports

ALLIANCE MEMBER
Joined
Oct 20, 2009
Messages
21,452
Location
Northern Utah
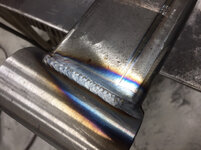
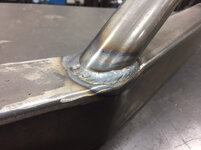
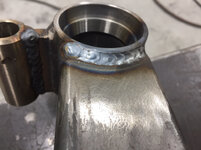
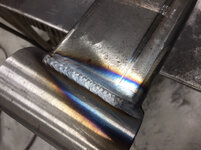
Hey Mike, very nice work as usual, love those welds.

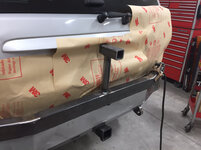
Where does the license plate go? Looks like you covered it up.

David

David, the license plate will actually mount to the center of the spare, we didn't move it yet because he installed his OEM bumper while the new one is getting powder coated. We will relocate it once we put the new bumper on for the final time.

Thanks for stopping by and checking on the projects.
 
OP
Z

zmotorsports

ALLIANCE MEMBER
Joined
Oct 20, 2009
Messages
21,452
Location
Northern Utah
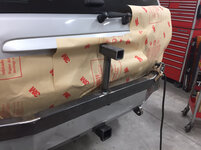
Mike, talk to us about the 3M paper you're using?

Nothing special, just 3M's welding and spark deflection paper. It is somewhat sticky on the backside to adhere to surfaces but not enough to leave residue behind. I also like it because it can be relocated a few times and still stick. It is somewhat spendy so I use it sparingly and don't use it unless called for but it does works great.

Thanks for checking up on the projects.
 
OP
Z

zmotorsports

ALLIANCE MEMBER
Joined
Oct 20, 2009
Messages
21,452
Location
Northern Utah
Mike I try to stay current with your thread but if I miss a few days it can some times take a few pages of reading to catch up.

The bumper is really nice but the carrier you built for it brings it to a whole new level.

4 pages back there was a picture of the bumper sitting on your welding table, in the background I see 2 milling machines. Have I been that far out of touch or did you sneak a new machine in the shop when nobody was looking?

Thanks Mac. My mill is the manual BP style and my son's is the vertical column CNC milling machine. He purchased it a couple of years ago when we moved into the new shop. It hasn't gotten much use lately as he has been building his Jeep.

My son mentioned last night when we were working on his Jeep that he feels this is the nicest bumper/carrier that we have built to date. I know it is definitely the most intricate and detailed of all of the bumpers, that I know for sure.
 
OP
Z

zmotorsports

ALLIANCE MEMBER
Joined
Oct 20, 2009
Messages
21,452
Location
Northern Utah
Man that rear bumper and spare tire carrier are so nice. Nice than anything you could buy.
Do you mind sharing a closeup of your locks ( Closed and Open )?
How does the open lock engage?

I'll have to post a picture up when it comes back from powder coating as it is all broken down and in the truck at the moment. The lock itself is just a push pin style that has a retention pin to hold it raised or the spring pushes it to the lowered position. When lowered it drops into a hole in the bumper to lock it in the open position. When the carrier is closed it has a De-Sta-Co toggle style clamp to retain it closed.

Thanks for the comments and for following along.
 
OP
Z

zmotorsports

ALLIANCE MEMBER
Joined
Oct 20, 2009
Messages
21,452
Location
Northern Utah
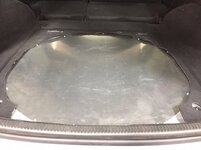
Yesterday after returning from breakfast we finished up the rear interior so my son could drive the Jeep while waiting for the bumper/carrier to return from the powder coater.

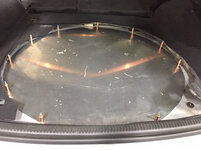
We made a cardboard template prior to cutting the aluminum.
29365c6aabf8f55ba48295a159fe8f48.jpg

Holes drilled and temporarily held in place with Clecos.
be23aef24504bdef2d872e263abd3189.jpg

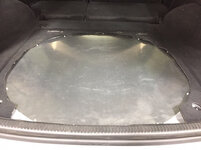
Screwed in place after applying a bead of sealant between the new panel and remaining floor.
cf18da8e7b2bbe34f4eb37849df1a788.jpg

The carpeted cover sits right back in place and from the interior it appears completely stock with no indication that the floor had been cut and fuel cell raised.
 

Attachments

  • be23aef24504bdef2d872e263abd3189.jpg
    be23aef24504bdef2d872e263abd3189.jpg
    704.6 KB · Views: 0
  • cf18da8e7b2bbe34f4eb37849df1a788.jpg
    cf18da8e7b2bbe34f4eb37849df1a788.jpg
    687.6 KB · Views: 0
  • 29365c6aabf8f55ba48295a159fe8f48.jpg
    29365c6aabf8f55ba48295a159fe8f48.jpg
    685.5 KB · Views: 0
OP
Z

zmotorsports

ALLIANCE MEMBER
Joined
Oct 20, 2009
Messages
21,452
Location
Northern Utah
Does that floor plate flex at all?

If I lean in the middle I get very little deflection but it has a fairly rigid cover that is carpeted that overlays it as well. Plus there is several inches of room between the aluminum cover and the fuel tank and lines so no chance of contacting anything.

Thanks for stopping by.
 
OP
Z

zmotorsports

ALLIANCE MEMBER
Joined
Oct 20, 2009
Messages
21,452
Location
Northern Utah
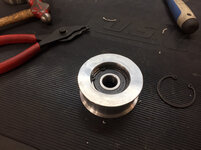
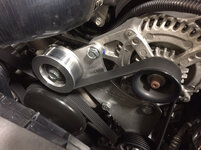
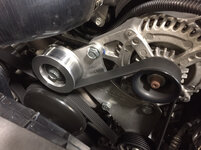
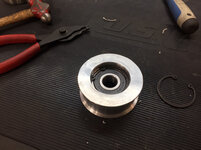
Well I “nearly “ did my entire engine swap on my Jeep without any custom parts. No big deal though as I at least machined a part that I can replace bearings in and only have to carry a spare bearing with me.

The reasoning is twofold, first I wanted to have just a little larger pulley to get the tensioner in the upper middle part of the tension indicator as it has been on the stretched end of the indicator even with a new belt. Secondly the belt has been walking slightly to the outside of the flat idler so I thought I would machine one with a recess to keep the belt in the middle of the pulley, again not a big deal but I figured what the hell I would just machine a new pulley and utilize a little larger bearing while I’m at it.

I didn’t have any 3” diameter round aluminum so I started with a square chunk of aluminum.
a79c588253b084357e075a9a5589bd64.jpg

I cut the bulk off using my vertical bandsaw then put it in the lathe to make it round.
44e1263de15f4cb4c9f1de707862a778.jpg

Facing each side to bring everything square and to 1.25” thick.
070a9bfcb366834b96fc3dde08b279aa.jpg

Sunk a recess into the pulley with tapered ledges.
258827cedad948ba951afc3903ed6254.jpg

Bored the I.D out to the minor size in which will be the inner shoulder.
54f2d6a5cf23edef1d1ce63ad71afbf2.jpg

Bored the major I.D to a .0015” interference fit for the bearing.
bf999d68e400ccff0031b1a1c7567b44.jpg

Machined the snap ring groove then test fit the snap ring.
a1af9a920ccbd61253a6c7125e96be02.jpg

Deburred and ready to press the bearing into place.
16073a730efa48eab2999d26415f0fc2.jpg

211969585859e7213aba92756c8e90d7.jpg

Completed and ready for installation on the motor.
74afcfc67110532efe7836e368e1083f.jpg

Runs smooth as silk and accomplished both objectives.
479ee1bf041ebb3ba61372ce1e58d1bb.jpg

Thanks for looking.
 

Attachments

  • 479ee1bf041ebb3ba61372ce1e58d1bb.jpg
    479ee1bf041ebb3ba61372ce1e58d1bb.jpg
    734.2 KB · Views: 0
  • 74afcfc67110532efe7836e368e1083f.jpg
    74afcfc67110532efe7836e368e1083f.jpg
    713.2 KB · Views: 0
  • a79c588253b084357e075a9a5589bd64.jpg
    a79c588253b084357e075a9a5589bd64.jpg
    757.4 KB · Views: 0
  • 16073a730efa48eab2999d26415f0fc2.jpg
    16073a730efa48eab2999d26415f0fc2.jpg
    649.5 KB · Views: 0
  • 070a9bfcb366834b96fc3dde08b279aa.jpg
    070a9bfcb366834b96fc3dde08b279aa.jpg
    753.4 KB · Views: 0
  • a1af9a920ccbd61253a6c7125e96be02.jpg
    a1af9a920ccbd61253a6c7125e96be02.jpg
    719.9 KB · Views: 0
  • 258827cedad948ba951afc3903ed6254.jpg
    258827cedad948ba951afc3903ed6254.jpg
    786.1 KB · Views: 0
  • 54f2d6a5cf23edef1d1ce63ad71afbf2.jpg
    54f2d6a5cf23edef1d1ce63ad71afbf2.jpg
    614.5 KB · Views: 0
  • bf999d68e400ccff0031b1a1c7567b44.jpg
    bf999d68e400ccff0031b1a1c7567b44.jpg
    615.2 KB · Views: 0
  • 44e1263de15f4cb4c9f1de707862a778.jpg
    44e1263de15f4cb4c9f1de707862a778.jpg
    685.6 KB · Views: 0
  • 211969585859e7213aba92756c8e90d7.jpg
    211969585859e7213aba92756c8e90d7.jpg
    91.1 KB · Views: 1
Last edited:

LXCam

ALLIANCE MEMBER
Joined
Apr 23, 2013
Messages
19,200
Location
AZ
Great job on the pulley Mike. A few years ago I had to make my own pulleys for a stand alone blower drive system I designed and sold. I now despise making pulleys :p
 
OP
Z

zmotorsports

ALLIANCE MEMBER
Joined
Oct 20, 2009
Messages
21,452
Location
Northern Utah
That's excellent! I love the 6 jaws for stuff like this.

Ryan

Agreed! :thumbup:


Nice lathe work on the pulley Mike! Very nice!


:beer:

Great job on the pulley Mike. A few years ago I had to make my own pulleys for a stand alone blower drive system I designed and sold. I now despise making pulleys :p

Kick *** job on the pulley Mike!

Pulley is really nice. You make / made it look so easy.

Thanks guys, I appreciate the comments.

Cam, if I had to make that many of them I may despise making them as well but to knock one or two out hear and there they are actually fun. I hadn't used my lathe much lately and I looked forward to the opportunity to just turn up the stereo, open the shop doors as it was a nice spring afternoon and make chips.

It was an added bonus that it worked like I had envisioned in my head.:lol_hitti

Thanks again guys.
 
To avoid these ads, REGISTER NOW!
Top Bottom