To avoid these ads, REGISTER NOW!

Early Blackhawk S4 Repair

grandpopduck

Member
Joined
Feb 28, 2019
Messages
7
Location
ohio
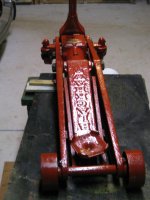
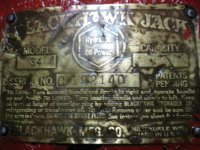
I have an early Blackhawk S4 jack [Model S4, Serial C192140] that I am attempting to repair. It had oil leaks and worked sluggishly. This jack precedes the S-4-1 and S-4-3. I have viewed 100's of internet pictures and have not found a match. It is all cast iron and has a domed top on the rear wheels. In the process of taking it apart I turned it over and 3 large and 1 small ball bearings fell out of the ports. I do not know which balls go into which ports. Also, I can't figure out how to bleed the hydraulics after reassembly. Leads on any parts diagram, repair/overhaul information would be greatly appreciated.
 
Last edited:
To avoid these ads, REGISTER NOW!
OP
G

grandpopduck

Member
Joined
Feb 28, 2019
Messages
7
Location
ohio
2oolhound Thanks for your interest. Attached are 5 photos Showing my S4. Note that the serial number is C192140 not 0192140. Again, thanks for your help; I bought this jack over 40 years ago, and it has served me well. I would hate to lose it now!

Regards; Fred
 

Attachments

  • IMG_0280.jpg
    IMG_0280.jpg
    146.9 KB · Views: 76
  • IMG_0279.jpg
    IMG_0279.jpg
    84.9 KB · Views: 59
  • IMG_0281.jpg
    IMG_0281.jpg
    151.8 KB · Views: 61
  • IMG_0283.jpg
    IMG_0283.jpg
    148.1 KB · Views: 57
  • IMG_0284.jpg
    IMG_0284.jpg
    153.1 KB · Views: 72
OP
G

grandpopduck

Member
Joined
Feb 28, 2019
Messages
7
Location
ohio
930dreamer; I have taken it apart, fixed the leaks; and painted it. My problem is that the steel balls came out of the valve ports and I don't know which balls go into which ports. Also, I don't know how to bleed the system.
Regards; Fred
 

HoldenHR1966

Member
Joined
Nov 4, 2018
Messages
17
Location
Beijing
Grandpopduck hello From Perth Western Australia!
After recently finishing an Old Blackhawk Jack S23 in which I did a complete strip down and rebuild including water cutting new front lifting arm and rewelding in the old lifting pivot barrels, I can say that the hydraulic internals look fairly standard, which means the small ball goes in first and the larger one on top, or goes in last.

If you want to download any S17 or S23 blackhawk manual even from around as late as 1955 you will note a similarity. My jack I think is 1940s and yours could be 1930s but the similarity with the hydraulic internals during a 40 year period I think is similar.

If you get stuck i can send the photos of the diagrams on how to completely strip the jack to individual components.
 
OP
G

grandpopduck

Member
Joined
Feb 28, 2019
Messages
7
Location
ohio
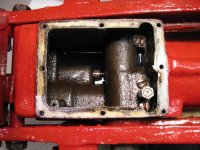
HoldenHR1966; thanks for the reply. I also believe that this S4 is from the 1930s. When I flipped it over, 3 large balls [5/16 dia.] and 1 small ball [7/32 dia.] fell out. While up-side-down I hit the back of the hydraulic case several times; no more balls fell out. I have an instructions and repair manual for Blackhawk S-4-1 & S-4-3 4 ton jacks that shows a parts diagram including part placement If you look at my last photo, the top hole contains a spring loaded pointed plunger; the next hole contains a large ball and a rod connected to the screw-in top; the third hole contains a small ball, a large ball, and a rod connected to a hex head nut; and the last hole [4th] contains a large ball followed by a rod connected to a screw-in top.
I used this configuration when assembling the jack. It did not work. I then removed the top, drained the oil, and then noticed that the screw on hole 2 did not seal against the copper washer. I then unscrewed the rod on hole 4 and found that the hole 4 rod was longer than the hole 2 rod [2 1/2 inches verses 2 inches]. The parts diagram for the S-4-1/3 shows these rods to have the same length and same part number [27 S4.186G]. The last thing I tried was to place the small ball in hole 2 [the hole 2 rod sealed properly], left only the large ball in hole 3, and put 2 large balls in hole 4 [it sealed properly]. The jack did not work. I had this jack over 40 years and the only other maintenance I've done was to tighten the gland nuts about 30 years ago. Before I started this repair the jack was working, but was sluggish and leaking oil. I certainly appreciate any help you can give.

Regards; Fred
 
To avoid these ads, REGISTER NOW!

Hiball

Well-known member
Joined
Apr 30, 2009
Messages
14,032
Location
Missery
If your looking at picture #5, starting at the top and working down

This is the speed side bypass, the adjustment below the plug controls when the high side bypasses once the saddle reaches the load.

5/16 ball and then valve plug with stem.


7/32" ball, 5/16" ball and then the tall hex plug which houses the overload.


5/16 ball and then the valve plug with stem.
 
OP
G

grandpopduck

Member
Joined
Feb 28, 2019
Messages
7
Location
ohio
Hiball, thanks for the information. The 2 "valve plug with stem" are of different lengths. one has a stem that is 2 inches long, while the other has a stem that is 2 1/2 inches long. In either case, if I put the "valve plug with stem" in hole 2 they bottom out against the 5/16" ball and do not seal against the copper washer. My S-4-1/3 parts diagram shows that each "valve plug with stem" are the same size and the same part number [27 S4.186G], but mine our of different lengths. This is my puzzle. All I know is that the jack worked for 40 years before I tried to repair it. Thanks for your input.

Regards; Fred

P.S. The top of the tall hex plug was epoxyed over [sealed] so I think the overload is bypassed.
 

Hiball

Well-known member
Joined
Apr 30, 2009
Messages
14,032
Location
Missery
Get a depth measurement with the Ball in place, Double checking that the 5/16 ball is the only thing in the hole and seat is visible. If one is longer, put the valve plug with the longer stem in that hole.

Epoxy wouldn’t bypass the overload, it weeps out the side when the ball “inside” lifts, my guess is the plug just didn’t seal and someone got creative.
 
Last edited:
OP
G

grandpopduck

Member
Joined
Feb 28, 2019
Messages
7
Location
ohio
Hiball; thanks for the suggestion. I followed your directions, but the valve plug with the longer stem is so long that it would not engage the threads. So I used the shorter one in hole 2. Filled it back up and bled the system, but the jack still would not raise. since the shorter one still was not sealing against the copper washer [ hence it was hard against the ball, I decided to back it off by about 2-3 turns. IT WORKS! Now I need your advice: should I leave it this way, or should I put the long stem valve plug in hole 2 where it will be rest on the ball? By the way, I did not notice if the short valve plug stem was all the way seated when I originally took it out.

Regards; Fred
 

Hiball

Well-known member
Joined
Apr 30, 2009
Messages
14,032
Location
Missery
Hiball; thanks for the suggestion. I followed your directions, but the valve plug with the longer stem is so long that it would not engage the threads. So I used the shorter one in hole 2. Filled it back up and bled the system, but the jack still would not raise. since the shorter one still was not sealing against the copper washer [ hence it was hard against the ball, I decided to back it off by about 2-3 turns. IT WORKS! Now I need your advice: should I leave it this way, or should I put the long stem valve plug in hole 2 where it will be rest on the ball? By the way, I did not notice if the short valve plug stem was all the way seated when I originally took it out.

Regards; Fred

I’m not sure what’s going on, but something isn’t right. The stem should not rest directly against any of the Balls. I would pull the plug and verify that no extra parts are in the holes. Once you get everything out, take a overhead picture of the holes themselves and the components you removed.

Steven
 
OP
G

grandpopduck

Member
Joined
Feb 28, 2019
Messages
7
Location
ohio
Hiball; I followed your directions; there was nothing in the holes except what you suggested . I filled the jack up with hydraulic oil tightened down the valve stem in hole 2. The jack did not work. I backed off the valve stem by about 1/8 inch ant the jack worked. so I cut a fine thread 7/16 nut so that it was 1/8 inch thick. I then inserted a copper washer and then the 1/8 nut on to the valve stem, tightened it down, and tightly inserted the modified valve stem into hole 2. The jack works great, and should last another 40+ years. I think that, before I got it it was repaired using a longer valve stem in hole 2, and was then backed off; which I didn't notice when I started this rebuild.

Thanks for your help; Fred
 
To avoid these ads, REGISTER NOW!
Top Bottom