To avoid these ads, REGISTER NOW!

What did you do "IN" your garage today?

Outlawmws

Well-known member
Joined
Aug 9, 2011
Messages
39,332
Location
The Badlands
Slowly drill a sharp pocket knife thru it. Next time.

If you do nothing right,you'll do nothing wrong!

Yesterday AM the pressure was building up (needed to keep the thumb above my heart for it not to throb a bit) so I sterilized a #57 drill, put it in a pin vise and slowly drilled through one of the better positioned "divots".

"Oil" was struck, barely a twinge when it broke through, and it's been draining ever since; the thumb looks much better, albeit still swollen.

This am it's FAR less tender. :thumbup:
 
To avoid these ads, REGISTER NOW!

Motorman55

Well-known member
Joined
Apr 10, 2016
Messages
2,650
Location
South Jersey
I modified this magnifying task lamp that I got for free but was missing its clamp or base. Cut off the useless bottom tip, drilled and pressed in a bushing for a 5/16 bolt.

Then drilled a hole in the corner bench top added a couple fender washers, lock washer and nut with a little lube.

The lamp is able to swing and easily reach across the motor and electric benches and folds back on the side of my Craftsman machinist box when not needed.
 

Attachments

  • IMG_2609.jpg
    IMG_2609.jpg
    150.1 KB · Views: 113
  • IMG_2611.jpg
    IMG_2611.jpg
    155.3 KB · Views: 113
Last edited:

ezriderga

Well-known member
Joined
Apr 1, 2009
Messages
1,741
Location
NW GA
what product did you use? Quite the improvement!


Sent from my iPad using Tapatalk

It's a process. After masking around headlight to protect paint, I first use a pre-cleaner. On these headlights, I started with 1500 and wet sanded and then went to 3000. Then using a 3" polishing machine and pad I compound first and then I will polish using a 3" polishing pad and a polish. When I finish with that, I clean the residual polish off with alcohol/water mixture. Following that, I make sure they are dry then I apply a protective coating which will cure in 24 hours and should last 3-5 years.
 

mmb617

Well-known member
Joined
Dec 5, 2010
Messages
4,424
Location
PA
Kept getting held up because I didn't have some part I needed. I started trying to get my bike ready for the coming season. It needed a new starter and I also have a new S&S carb I want to install to replace the 30 year old Screaming Eagle that's on it.

Day before yesterday I got into the starter job and it went really well up to a point as everything came apart without any drama at all. Then I discovered that I didn't have the gasket that goes between the starter and primary, so I couldn't mount the new starter till I ordered the gasket. It's a $7 part with shipping but will take a couple days to get here, so that project came to a halt for now.

So yesterday I figured I'd work on the carb replacement. Got the old one off easy enough and then found I was missing a needed part for that job as well. I bought the complete carb and intake kit for the S&S but it assumes you are replacing the stock intake and I wasn't.

Within about a year of buying my bike back in '88 I found out that the stock rubber intake and CV carb were both junk so I replaced the carb and intake. The stock rubber intake used metal flanges to connect the intake to the heads, but I bought an aluminum intake that was all one piece and junked the stock setup.

So now here I am 30 years later and find that I need the stock metal intake flanges to mount my new intake. I was shocked to find that a pair of OEM intake flanges were $65 so I bought a knockoff set for $25, but again they won't be here for a couple days.

So the project is on hold till probably Monday. No sweat really though as riding season is still a ways off in my opinion. I used to ride in the cold and wet weather but I've gone full on wimp in my old age and like it to be 70* and dry before I mount up.
 

Colin Len

Well-known member
Joined
Jan 30, 2013
Messages
1,234
Location
Long Beach CA
It's a process. After masking around headlight to protect paint, I first use a pre-cleaner. On these headlights, I started with 1500 and wet sanded and then went to 3000. Then using a 3" polishing machine and pad I compound first and then I will polish using a 3" polishing pad and a polish. When I finish with that, I clean the residual polish off with alcohol/water mixture. Following that, I make sure they are dry then I apply a protective coating which will cure in 24 hours and should last 3-5 years.
What kind of coating? Last set I did I sanded and then sprayed with standard automotive clear coat. This didn't require the fine grit sanding or polishing since the clear coat provided all the gloss that was needed. Previously on these same headlights I'd done a full sand and polish but it was a lot of work and it ended up clouding again. Fortunately this car is now garaged and rarely sees the light of day but unfortunately that also means I don't get to test how long the clear will last. But, I assume if it's waxed regularly with the rest of the car it could last for many, many years (same as the car's paint).
 

J_J_

Well-known member
Joined
Feb 4, 2015
Messages
66
Location
Carmichael, Ca.
Started welding the 2x6 rock sliders into my XJ. What a PITA it is welding 3/16" to sheet metal. I'm learning . . .
:)Could just weld tabs and bolt it on incase ya ever need to replace them but yeah it can be a pain, best way is to focus on the heavy and flow into the sheet typical back and forth kind of lie a crescent moon. done it lots, take your time :beer:
 

ezriderga

Well-known member
Joined
Apr 1, 2009
Messages
1,741
Location
NW GA
What kind of coating? Last set I did I sanded and then sprayed with standard automotive clear coat. This didn't require the fine grit sanding or polishing since the clear coat provided all the gloss that was needed. Previously on these same headlights I'd done a full sand and polish but it was a lot of work and it ended up clouding again. Fortunately this car is now garaged and rarely sees the light of day but unfortunately that also means I don't get to test how long the clear will last. But, I assume if it's waxed regularly with the rest of the car it could last for many, many years (same as the car's paint).

I use a professional coating which is a little pricey however it is a great coating and is easy to apply. A little goes a long way. It needs to stay dry for 24 hours to fully cure. After I use it I park the car out in the sun for several hours.
 

C2tuck

Well-known member
Joined
Apr 22, 2015
Messages
663
Location
North Texas
What did you do "IN" your garage today?

Finally got my bumpers back from the powder coater...had to redo them due to contamination on the first pass. My painter wanted $600 just to paint the bumpers with me taking them apart, powder was $245! Dude does phenomenal work too!

Before:

3e254e3ac274f1bf6e702d641bd1057d.jpg


After:

01c591cfccbaf881c29a116dba79df1b.jpg


Also added 2wd valence, switchback bulbs, and some Baja designs fogs (those things are BRIGHT!!). Still waiting on my new emblems to get back from being painted. Should have them hopefully next week.

4966a975c732d2308dff585bf56008a6.jpg


Yeah, I know...gotta decide on either LED’s or HID’s.
 

Notgrownup

Well-known member
Joined
May 5, 2014
Messages
5,977
Location
Snow Hill NC
Re: What did you do "IN" your garage today?

Finally got my bumpers back from the powder coater...had to redo them due to contamination on the first pass. My painter wanted $600 just to paint the bumpers with me taking them apart, powder was $245! Dude does phenomenal work too!

Before:

3e254e3ac274f1bf6e702d641bd1057d.jpg


After:

01c591cfccbaf881c29a116dba79df1b.jpg


Also added 2wd valence, switchback bulbs, and some Baja designs fogs (those things are BRIGHT!!). Still waiting on my new emblems to get back from being painted. Should have them hopefully next week.

4966a975c732d2308dff585bf56008a6.jpg


Yeah, I know...gotta decide on either LED’s or HID’s.

Dude, that looks badass....gotta sayi like chrome but that is a very nice balanced look...
 

Notgrownup

Well-known member
Joined
May 5, 2014
Messages
5,977
Location
Snow Hill NC
I use a professional coating which is a little pricey however it is a great coating and is easy to apply. A little goes a long way. It needs to stay dry for 24 hours to fully cure. After I use it I park the car out in the sun for several hours.

EZ, do you think that stuff could fill gouges?
 

601HP

Member
Joined
Jun 25, 2014
Messages
15
On Jan. 23rd I posted this image of work we were doing on my 2004 F350 6.0 Powerstroke engine.

View media item 90005
Later in the project we cleaned, painted, powder coated and re-assembled the engine.

View media item 91453
Then we shoved it back in the hole.

View media item 91454
Then bolted on a lot of stuff.

View media item 91455
Finally ready for startup. We started the project on Jan. 2 and reached this point on March 7. It was very satisfying to hear it come to life in the video below. :bounce:

 
Last edited:
To avoid these ads, REGISTER NOW!

protegeV

Well-known member
Joined
Apr 18, 2018
Messages
13,363
Location
DFW
Re: What did you do "IN" your garage today?

Finally got my bumpers back from the powder coater...had to redo them due to contamination on the first pass. My painter wanted $600 just to paint the bumpers with me taking them apart, powder was $245! Dude does phenomenal work too!

Before:

3e254e3ac274f1bf6e702d641bd1057d.jpg


After:

01c591cfccbaf881c29a116dba79df1b.jpg


Also added 2wd valence, switchback bulbs, and some Baja designs fogs (those things are BRIGHT!!). Still waiting on my new emblems to get back from being painted. Should have them hopefully next week.

4966a975c732d2308dff585bf56008a6.jpg


Yeah, I know...gotta decide on either LED’s or HID’s.

Not a Ford fan, but that looks great. Like a truck version of a PI crown vic.
 

99LeCouch

Well-known member
Joined
Apr 18, 2011
Messages
1,053
Location
Rochester, NY
Replacing my Cruze's PCV system. Which is integrated into the intake manifold and valve cover, so those are in the process of being replaced. Also found a leaky fuel injector o-ring at the fuel rail. No wonder the car had no power and was getting poor gas mileage. 175k miles on those parts isn't a bad run.
 

got2boostit2

Well-known member
Joined
Dec 7, 2012
Messages
693
Location
West of I275 & I94
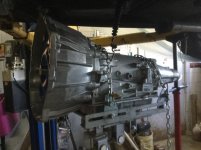
Trying to stuff this 4L65E and LS3 into a 1982 Corvette for a friend.
 

Attachments

  • 8676BC1E-E16E-490F-8F7B-C7549EC83108.jpg
    8676BC1E-E16E-490F-8F7B-C7549EC83108.jpg
    147 KB · Views: 76
  • 61971DEF-A0D5-4E59-B90B-B11D020F7C70.jpg
    61971DEF-A0D5-4E59-B90B-B11D020F7C70.jpg
    82.4 KB · Views: 68

gearhead1960

ALLIANCE MEMBER
Joined
Mar 21, 2019
Messages
1,864
Location
Manassas, VA, a small blot in history
Checked tire pressure in the hidden spares in my car and the old lady's. They need 60psi to work right. Hope to never have to use one, but they don't work too well if they're flat! Too many people forget to check those pressures until it's too late.
 

fordkid88

Well-known member
Joined
Nov 10, 2013
Messages
680
Started teaching my co workers kids to weld. We spent hours running a grinder and an old lincoln buzz box. Last part of the lesson was the mig welder. 3 hours with the buzz box and we were barely making beads. 5 mins with the mig and the these boys were laying actual beads.

Long way to go though.
 

kjdhawkhill

Well-known member
Joined
Jan 19, 2015
Messages
822
Location
Flyover state #4
In the driveway... but... did a 85-90% interior cleaning on my grocery getter. Took the bike rack off. Will hopefully get an exterior cleaning in tomorrow. I might quick turtle wax if I can keep the kids away from it for long enough. New brakes are a shop item for me but after that, my next automotive purchase is going to be a rubber floor mat, as mine has worn all of the way through the "carpet" and the base rubber. My right heel basically sits in 1 spot anytime I'm not on cruise. 175k miles for a floor mat is probably ok.

My wife's car just got new rubber, though, so extravagant automotive purchases like weather tech just might have to wait a bit.
 

Outlawmws

Well-known member
Joined
Aug 9, 2011
Messages
39,332
Location
The Badlands
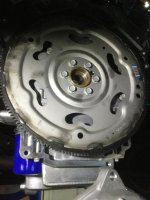
Clutch on the DD Rig - Turns out the plate had a busted out spring and that was why it would not release completely...

Got the new PP and CP in; new TO bearing; tried to get the tyranny slid home but its being stubborn and I ran out of light (driveway job...) So tomorrow is another day.

Job was gong great til that point...
 

isb cornbinder

Well-known member
Joined
Nov 3, 2010
Messages
7,073
Location
Pacific South West, BC, Canada
I went to NAPA and bought NAPA Gold air. oil and fuel filters foe my 5.8 Cummins. I bought a few extra filters and put them in the filter cabinet. OI remeasured my turret punch for a metal table. The rototiller was brought into the shop. I need to get it serviced and ready for garden work this next week.
 

C2tuck

Well-known member
Joined
Apr 22, 2015
Messages
663
Location
North Texas
Re: What did you do "IN" your garage today?

Not a Ford fan, but that looks great. Like a truck version of a PI crown vic.


Won’t hold it against you. I don’t think I’ll ever buy another Chevy that was built past the early 90’s. I use to be a Chevy guy until my last one was in the shop 17 times...

Thanks all who commented. I like it a lot better. The black isn’t powder, I just swapped out the chrome pieces for black ones.
 

JohnnyK8

Well-known member
Joined
Jan 25, 2016
Messages
664
Location
Illinois
Re: What did you do "IN" your garage today?

Adjusted the coilovers and fixed the exhaust to prepare for better weather now that winter is in the past.

The boy did all the work.

Hockey season is just starting so we missed the opportunity to get his hair cut. His coach would be upset if we made and changes. #supersiticious

3eb14f144973a097399253b5c973853e.jpg


Sent from my Moto G (5) Plus using Tapatalk
 
Last edited:

Notgrownup

Well-known member
Joined
May 5, 2014
Messages
5,977
Location
Snow Hill NC
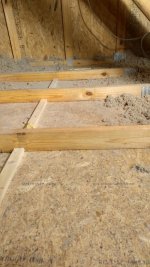
Insulated myshop attic...looks like R20 butthe picture isn’t of the finished thickness
 

Attachments

  • 35260B6E-1ACE-4970-BCFA-1EA499106879.jpg
    35260B6E-1ACE-4970-BCFA-1EA499106879.jpg
    84.7 KB · Views: 109
  • C39E49DE-802B-4438-B33B-222B10AC28B3.jpg
    C39E49DE-802B-4438-B33B-222B10AC28B3.jpg
    84.1 KB · Views: 126
  • F5391042-BC75-450B-99D6-C0922058C986.jpg
    F5391042-BC75-450B-99D6-C0922058C986.jpg
    90.4 KB · Views: 113
To avoid these ads, REGISTER NOW!
Top Bottom