To avoid these ads, REGISTER NOW!

The GDS Skunkworks, 4 FN 27's Shop Projects

OP
4

4 FN 27

ALLIANCE MEMBER
Joined
Oct 19, 2015
Messages
4,635
Location
Minnesnowta
Is William Edwards Deming still required reading for young production engineering students? Thanks, John/CT.

Our internal "Boot Camps", specific classes our employees can take, taught by our employees, as part of their career path development does not require reading Deming's teaching directly. However his thought process is implemented into most all of the courses offered here at the company.

The Classes are pretty specific related to the job they are in or moving into.
 
To avoid these ads, REGISTER NOW!
OP
4

4 FN 27

ALLIANCE MEMBER
Joined
Oct 19, 2015
Messages
4,635
Location
Minnesnowta
Back on the Chevelle project tonight. All my parts came in.

Who said it is just a Press Brake? Pressed the Studs in using a Flattening Punch and a Tube Bottom for a Fixture I made to convert Drum Brake Spindles to Disk Brake Spindles a while back.

The Brake made easy work of the situation.

View media item 94794
Then I had to cut a couple of Slugs so I could press in the new Bearing Races. Cut them about 1/32 small on the OD.

View media item 94795
The "Rattle Can Restoration". All new Steering Components.

View media item 94796
Even mounted the Wheel. Right side done. Well I still have to rebuild and install the Caliper and Brake Hardware. A little project for tomorrow afternoon and Saturday.

View media item 94797
The goal is to have the Chevelle off the Hoist Saturday so we can get the BIL 55 Chevy Pick-up on it so we can raise the Motor up 1 inch and a 1/2 an inch forward. He said his parts came in to today.
 
Last edited:

lilscorpion

Well-known member
Joined
Mar 15, 2010
Messages
3,600
Location
Colorado
Back on the Chevelle project tonight. All my parts came in.

Who say it is just a Press Brake? Pressed the Studs in using a Flattening Punch and a Tube Bottom for a Fixture I made to convert Drum Brake Spindles to Disk Brake Spindles a while back.

The Brake made easy work of the situation.

Damn that's sweet.
 

dkmc

Well-known member
Joined
Jan 20, 2008
Messages
950
Location
NYS--Upstate in the corn fields
The ol'Diacro 17-48 is where I got my start forming parts. Loved those machines. In the shop I use to work at they had 4 of them with NC Back Gages on them.

Came across one of the machines in a warehouse about 15 years ago. Bought it for $8K just to have it. Then one day I found out they traded it off for a new Amada Press. Needless to say I was a bit pissed off. Tried to get it back but it was already sold by the time I found out.

I hit Craigslist about once a week and see tooling every once and a while. There are a few places around the country that sell that style of tooling by the pound.

A 1/32 Top Punch can do almost any material up to 1/4 inch. But you need a variety of Bottoms based on the thickness and tonnage to make the Bend Deductions work out. My rule of thumb is 5 times Material Thickness for the smallest opening and 6 times for the biggest to hold tolerance. I break this rule everyday.

Only having 17 tons you can start out with a big bottom opening and get the bend to 90° and come back and restrike it (coin it) with a smaller bottom and that will produce pretty good results. More work but an easy way to work around the light tonnage machine when it comes to thicker Material and or longer bends.

Thanks for that info Pat, really enjoy this thread. I'm a machinist and welder, but never got into the sheet metal or forming aspect much. The Diacro has sat mostly, and I hesitate to say I got it about 15 years ago as well. Paid all of $950 for it. Motor needed bearings, and I had to address an oil leak, no big deal. Didn't realize I 'stole' it, but guys tell me that when they hear the story. I'm very thankful to have it. I do wanna learn and use it more. Eventually, I'll dig up more tooling for it.

PS
Always really liked that style of Mag you have on your Chevelle!
They look tough.
 
Last edited:

cvairwerks

Well-known member
Joined
Aug 12, 2016
Messages
7,231
Location
Within hearing distance of Texas Motor Speedway
Moving and rearranging is never fun. Can be dangerous too...if and when I add this LVD Brake I may have to rearrange. I'll be calling in the Riggers for that. Been using the same Riggers for 30 years and the owner allows the guys to work at my place on the side using the company equipment.

Always plan the move and work the plan. Design in multiple escape paths and when in doubt, stop and stabilize... If something is bigger than what I have the equipment for, or is more complicated than I can do, I call the pros... Getting squished isn't fun.

Here's the nibbler at the house. Now to unload this weekend and get set up for the next item...
 

Attachments

  • Libert.jpg
    Libert.jpg
    111.6 KB · Views: 102
OP
4

4 FN 27

ALLIANCE MEMBER
Joined
Oct 19, 2015
Messages
4,635
Location
Minnesnowta
Thanks for that info Pat, really enjoy this thread. I'm a machinist and welder, but never got into the sheet metal or forming aspect much. The Diacro has sat mostly, and I hesitate to say I got it about 15 years ago as well. Paid all of $950 for it. Motor needed bearings, and I had to address an oil leak, no big deal. Didn't realize I 'stole' it, but guys tell me that when they hear the story. I'm very thankful to have it. I do wanna learn and use it more. Eventually, I'll dig up more tooling for it.

PS
Always really liked that style of Mag you have on your Chevelle!
They look tough.

Thank you. You or anyone who needs help in the Sheet Metal world, it is all I have done for 40 years. I may not know it all but I have plenty of resources available.

Nice score on the Diacro. Hang onto that. It is a gem. You can more than likely make 8x on your investment if it is clean and the Rails are good.

Here is a nightmare part we made for a customer yesterday. Had to get real creative with the Tooling. "Removable Window" punch as we call it in the business. I'll get a pic of the tooling on Monday. 1 pcs almost $3000 with all the development it took to get it done.View media item 94864
 
Last edited:
OP
4

4 FN 27

ALLIANCE MEMBER
Joined
Oct 19, 2015
Messages
4,635
Location
Minnesnowta
Always plan the move and work the plan. Design in multiple escape paths and when in doubt, stop and stabilize... If something is bigger than what I have the equipment for, or is more complicated than I can do, I call the pros... Getting squished isn't fun.

Here's the nibbler at the house. Now to unload this weekend and get set up for the next item...

I hear you loud and clear. I remember a very long time ago the Riggers came in and rearranged the Punch Press Dept at my former employer. They put a 90 Ton Bliss OBP up on skates and parked it for the night to finish the move in the morning.

One of the guys from the second shift thought he should move it out of the way. He started to push it with the Fork Lift when one of the skates hit a slug on the floor and stopped the skate dead in it's tracks.

The Machine ended up on its side and broke the Flywheel right off the Crankshaft and made a mess out of the floor not to mention the Connecting Rod sheared off. Luck nobody was hurt.

I heard later he found another job...LOL...

We did have the press repaired. Wish I had a picture of it. New Crank but they brazed that massive Connecting Rod. Biggest Brazing Job I have seen yet. Far as I know that press is still running.
 
OP
4

4 FN 27

ALLIANCE MEMBER
Joined
Oct 19, 2015
Messages
4,635
Location
Minnesnowta
I am off to the fabrication floor to organize all the Materials I have accumulated for the last 20 years here to take it home tomorrow.

Also scored a Romer Arm for the shop. We retired it...will be a nice addition to the mix at home. Need to learn how to run it and get a Laser Scanner head for it. Digitizing Engine Blocks and Heads just got a whole easier...I think.
 
OP
4

4 FN 27

ALLIANCE MEMBER
Joined
Oct 19, 2015
Messages
4,635
Location
Minnesnowta
Pat: That wasn't pointed at you, but responding to your comments about being safe.:)

Going to have to build a storage building for your material stash?

Didn't think it was...I am all about safety...well most of the time.

Funny I might build a 3 car Garage across the parking area from the shop for doing Sand Blasting, Body work and Paint. I have plenty of storage room in the shop. Just need to build some racks.

For got to mention that Nibbler is awesome. Wish it could talk and tell it's life story.
 
OP
4

4 FN 27

ALLIANCE MEMBER
Joined
Oct 19, 2015
Messages
4,635
Location
Minnesnowta
Productive weekend. Got the Chevelle off the Hoist and on goes the BIL 55 Pick-up.

View media item 94977
We need to move his Motor 1 inch up and a 1/2 an inch forward. The Oil Pan has been dragging on his Garage Apron since the city redid he street and he redid his driveway. Pretty much has almost warn through the pan.

The Nephew was there to help out and learn the craft. He has hung out with his Dad and I in the shop since he was 2 weeks old but really never got to tear into his ol'Man's Truck.

He gets to do the Reverse Engineering on the new Mounts. We built this Truck 30 years ago at the same time I did my Chevelle. Thus any CAD info is in 2D (pre-Cadkey, Pro-E and Solidworks) and pretty much worthless for what we need to do. He says he wants to watch me do it and learn. I guess I am game for that.

View media item 94978
This was the first Rear End I narrowed. We cut apart a 12 Bolt A-Body GM and gutted a Chrysler 8 3/4 Rear End for the Brakes and Axels. This was a budget build.

We used The Chrysler 8 3/4 since the Axels were big enough the entire length that we could shorten and re-spline them. At the time there were basically no options for after market parts unless you had a budget to work with. Still can't believe this thing has lasted 20K miles on the Street and countless laps at the Drag Strip.

View media item 94979
More on this build later...

Today I made the trip up to the Plant hoping to meet the Nephew there to give me a hand shearing all the Material I had stock piled. He sent me a text he was going to be AWOL and on the Lake with his buds. I get it...no harm no foul.

I got to wrestle the .090 x 36 x 144 and .187 x 48 x 120 4130 Moly Sheets by myself through the Shear. I still got it...LOL...

I also loaded up the Romer Arm in the Company Truck and made the haul home. With the Skid Steer and the Pallet Forks I got everything unloaded by myself. I should have put a loading dock in. Kind of a pain jumping up and down in and out of the Truck to move Pallets from the front to the back where I could get them.

Everything landed safely in the Shop.

View media item 94981
The Romer should add a new dimension to the capabilities in the Shop. I need to learn how to run this thing. I need to check with the QC Department in the morning to see if they have the Operator Manual. I found the Installation Manual and got it fired up but have no clue after that.

It came with a bunch of different Probes and has a Camera on it so you can digitize things I think...thus why I need the Manual.

View media item 94980
I am hoping this next week proves to be as quiet as this past week and I should be able to get a few more things done.

Late this afternoon a buddy of mine called and asked a favor. Asking if he could bring a "Special needs" kid he has been mentoring over for a Shop Tour. Not a problem...the kid was in heaven. My bud said he had never seen him so excited and said all he could talk about the whole trip home was the Equipment and Firearms. Made my day.
 
Last edited:
OP
4

4 FN 27

ALLIANCE MEMBER
Joined
Oct 19, 2015
Messages
4,635
Location
Minnesnowta
Made a Gear for a Radio Controlled Helicopter tonight...well the blank for turning on the Lathe.

My buddy with the Helicopter, his kid is an Engineer/Test Pilot at Bell and he plays with RC Copters. Apparently these Gears wear and fail often. Not a good thing with the terrible Glide Ratio of a Copter.

So I gave it a shot. The Tooth pattern isn't quite right. Tomorrow we will scan the gear to get the correct Diametral Pitch and Pressure Angle. It came out pretty close.

I am impressed with the capabilities of this Omax Machine.

View media item 95040
View media item 95041
 

sberry

Banned
Joined
Jun 18, 2005
Messages
35,747
Location
Brethren, Michigan
Glad someone likes doing all that fussy stuff,,, I just ordered a gear or sprocket I might have been able to make but its tedious. Not that I cant do some machine work but just cant take the tedium, I cant even remember how to work a mic. Last time I use one was checking out of round journal.
Can do most things I really need to do with a simple caliper. One reason,,, so much more stuff is being produced at a cheaper cost and so much easier to get parts than when machines used to be built in job shops, stuff could be copied for repair. I don't have a machine shop, only rarely use a simple drill press and didn't replace one after a fire, a neighbor gave me a simple bench top deal.
I have a neighbor and a couple buds with small shops, its very rare I go there, handful of times in last 10 years. I stock some things I need pronto and order when I have to and so much of what I now use I built from off the shelf or salvage.
All that stuff is impressive but gives me a headache just looking at it. Much rather hang over the edge wrangling chokers and blocks.
 

Pressingonward

Well-known member
Joined
Mar 9, 2016
Messages
522
Location
SW WA
Very cool stuff. Cool to see the in-process sheet metal bending. I've done some manual bending in the past for prototyping brackets but we send most of our stuff out to have it fabbed and I haven't had a chance to see them doing it in person.

My school had an Omax waterjet. It was amazingly useful. We built an 1/8th scale rc car for an engineering competition and most of the parts were waterjetted. The second year car had a 2 speed transmission I designed and we cut all the gears and clutch baskets out on the waterjet. They all came out great. Unfortunately the design didn't hold up and we burnt the clutch packs out in short order, but it was a great learning experience.

Thanks for sharing, I am definitely following along with interest!
 
OP
4

4 FN 27

ALLIANCE MEMBER
Joined
Oct 19, 2015
Messages
4,635
Location
Minnesnowta
Love seeing all the cool stuff you do.

What was the use of that $3000 nightmare part?

Thank you!!!

You know I have no clue what the part was for. I'll look tomorrow to see if the description on the Print will tell the tale. I was going to look yesterday but forgot.
 
OP
4

4 FN 27

ALLIANCE MEMBER
Joined
Oct 19, 2015
Messages
4,635
Location
Minnesnowta
Glad someone likes doing all that fussy stuff,,, I just ordered a gear or sprocket I might have been able to make but its tedious. Not that I cant do some machine work but just cant take the tedium, I cant even remember how to work a mic. Last time I use one was checking out of round journal.
Can do most things I really need to do with a simple caliper. One reason,,, so much more stuff is being produced at a cheaper cost and so much easier to get parts than when machines used to be built in job shops, stuff could be copied for repair. I don't have a machine shop, only rarely use a simple drill press and didn't replace one after a fire, a neighbor gave me a simple bench top deal.
I have a neighbor and a couple buds with small shops, its very rare I go there, handful of times in last 10 years. I stock some things I need pronto and order when I have to and so much of what I now use I built from off the shelf or salvage.
All that stuff is impressive but gives me a headache just looking at it. Much rather hang over the edge wrangling chokers and blocks.

One of my mentors always said "It is better to aim at perfection and miss than to aim at imperfection and hit." To a certain degree believe that in almost everything I do.

But in some cases close enough is good enough. But if you are forever pushing the envelop of personal improvement on all fronts one cannot simple let things be half-assed. A blessing and a curse.
 
OP
4

4 FN 27

ALLIANCE MEMBER
Joined
Oct 19, 2015
Messages
4,635
Location
Minnesnowta
Very cool stuff. Cool to see the in-process sheet metal bending. I've done some manual bending in the past for prototyping brackets but we send most of our stuff out to have it fabbed and I haven't had a chance to see them doing it in person.

My school had an Omax waterjet. It was amazingly useful. We built an 1/8th scale rc car for an engineering competition and most of the parts were waterjetted. The second year car had a 2 speed transmission I designed and we cut all the gears and clutch baskets out on the waterjet. They all came out great. Unfortunately the design didn't hold up and we burnt the clutch packs out in short order, but it was a great learning experience.

Thanks for sharing, I am definitely following along with interest!

Thank you!!!

Love the Water Jet. I am learning something new on it each time I use it. The uses are endless.

Thursday one of our Quality Techs scanned the original plastic Gear for me and converted it to a DXF file. I overlaid it on to my design and found I was close but not close enough.

View media item 95161
With the scanned digitized profile I was able to clean up the file. But I believe the geometry required is beyond what the Jet can do since the diameter of the water steam is .015R (.030 dia) and the bottom of the tooth on the gear is .008. This is impossible to achieve on the Jet. So the Engineer will have to make the call.

The Scanner is made by Starrett. Basically it is a high powered Optically Comparator. We just got it and we need to learn it capabilities. It is pretty cool and if I can find the time I am certain I can find more applications for it in my own little world of fabrication.

View media item 95162
 
To avoid these ads, REGISTER NOW!
OP
4

4 FN 27

ALLIANCE MEMBER
Joined
Oct 19, 2015
Messages
4,635
Location
Minnesnowta
Yesterday I skipped out of work early. Been a little quiet. Took advantage of the time and stole something from MiKe's playbook (ZMotorsports Shop Projects 2.0: https://www.garagejournal.com/forum/showthread.php?t=366802). Built a Rear End Stand adaptor for and old Engine Stand I had at the old shop.

Cut the parts on the Jet. Took them over to the ol'manual Mill and added the secondary ops in.

View media item 95163
By 9 am this morning it was complete and functional.

View media item 95164
View media item 95165
This is the Housing from the Chevelle project. Who ever welded the new ends on did not use and Alignment Fixture. Ended up having to pound the Axels in with a 5 lb Hammer just to get the C-Clips out. Then it was a matter of pounding the Axels out of the Housing. Ended up scrapping the Axels and Bearings in the process. All this was done with the Caps loose.

Even had to make a puller to get the Bearings out of the Housing. They should be a slip fit.

Order all the replacement parts and a new Alignment Fixture since I barrowed my original out some years ago and cannot for the life of me remember who I barrowed it to and when I put the word out no one stepped forward. But I did find my Tubing Bender in the process...should have that back next week. Then fun begins assuming the day job doesn't take over again...

The BIL showed up and we got his 502 out of the Truck. We were talking the history of the motor. He bought the 502 Short Block assembly new in 1992. It was "Marine Use" only back then.

The first build we slammed it together with what we could find available at the time and it made just over 600 HP with Oval Port Heads and a Flat Tappet Cam.

In 1995 we pulled it again and had the Heads and Intake Ported, put a big Roller Cam in it and it made 830 HP on Pump Premium. He broke a lifter in 2003 and we went back to the Flat Tappet. Still makes 630 HP on pump Gas and he and his son drive the snot out of it. Even his Girls at times drove it to work when they were short on vehicles.

We have a few things that needs to be addressed. New Oil Pan, a couple of leaks but nothing major. This will keep us out of trouble for the next few weekends.

View media item 95166
Tomorrow is a work day. Received an email at 6:52 pm while my Wife and I were at a wedding. My customers Engineer finished up the design on a huge project and we are going for the 3rd round of Prototypes. They need the project for testing ASAP. The Project Manager is already asking when they can get it...2 emails tonight already. I'll be in the office bright and early adding the finishing touches to it and writing all the programs and making Shop Drawings so the shop can get cranking on it first thing Monday morning.

The more time I get the shop the easier it is on them to get it done.

Sundays are quiet. No meetings and no interruptions. And when I need a mental break there The Garage Journal.
 
Last edited:

sberry

Banned
Joined
Jun 18, 2005
Messages
35,747
Location
Brethren, Michigan
One of my mentors always said "It is better to aim at perfection and miss than to aim at imperfection and hit." To a certain degree believe that in almost everything I do.

But in some cases close enough is good enough. But if you are forever pushing the envelop of personal improvement on all fronts one cannot simple let things be half-assed. A blessing and a curse.

Yes, I get the concept and follow the perfection idea. I am accurate and I can do craft work but don't enjoy it. Just too tedious. I don't care for body work for the same reason and don't follow some great principles to make it easier.
I can find my way around a brake and some common machine tools but I really don't enjoy,, or like it I guess, I do what I got to do but I am lazy mentally as in don't care for all the calculation and fussy layout.
A pry bar, heavy hammer, Channelock, adjustable wrenches and impacts I can deal with along with a torch.
My ears don't love it but people see me use a 4 1/2 grinder often comment about the skill as they do when I use a pair of lineman pliers.
I probably should have been a lineman or a firefighter.
 

zmotorsports

ALLIANCE MEMBER
Joined
Oct 20, 2009
Messages
21,427
Location
Northern Utah
Pat, the axle stand turned out phenomenal. Just like everything else you do. Now that you showed me up on the axle stand I want to throw mine in the trash and start over.:beer:
 
OP
4

4 FN 27

ALLIANCE MEMBER
Joined
Oct 19, 2015
Messages
4,635
Location
Minnesnowta
Pat, the axle stand turned out phenomenal. Just like everything else you do. Now that you showed me up on the axle stand I want to throw mine in the trash and start over.:beer:

Thank you Mike!!!

You are one of my "Internet Mentors"!!! You can take that as a compliment.
 

iajonesy

Well-known member
Joined
Feb 8, 2009
Messages
2,467
Location
Iowa
Pat, do you have any desire to build another axle stand? I could use one in the near future. let me know. Thanks.

Mike
 
OP
4

4 FN 27

ALLIANCE MEMBER
Joined
Oct 19, 2015
Messages
4,635
Location
Minnesnowta
Pat, do you have any desire to build another axle stand? I could use one in the near future. let me know. Thanks.

Mike

Mike I can.

Can you get me the Diameter of your Engine Stand Pipe??? The OD of the Tube that slips into the Tube at the Head of the Stand?

Do you want to do the weld assembly or would you like me to do it???

I made mine with a Bolster Plate so I can mount other things I might come up with in the future to the "Head". It is more work to do it that way or I can make a direct mount like Mike's that mount to you existing "Head" but I would need your Slot Pattern.

Just let me know...send me a PM with an email address. Email is my go to and keeps it on my radar.
 
OP
4

4 FN 27

ALLIANCE MEMBER
Joined
Oct 19, 2015
Messages
4,635
Location
Minnesnowta
The Alignment Fixture showed up yesterday. Slammed it in last night. Yep the alignment is off on both ends.

In the picture you can see the gap is bigger at the bottom and the top. I couldn't even get the puck all the way inserted. The gap at the top is about 1/32nd and at the bottom about 3/32nd's.

With the Puck not seating all the way it is off center too.

View media item 95204
Doing the quick math the splined end of the Axel is 0.854713491265397 Off Center at 1/16th taper at the Flange. That is a problem on "Slip Fit".

I need to get the Romer Arm up and running. Then I can see in 3d how far off it really is.

View media item 95205
I was pleased to see they did get the Lengths correct. Measuring from the Pinion Centerline to each flange they are spot on. So I am thinking they set up the Center Section, Assembled the Rearend and then Welded without an Alignment Bar assuming the Bearings would keep it straight.

Either way I'll cut it apart and weld on New ends. I don't like Moser Axels anyways. We will be upgrading to Mark Williams stuff.
 
OP
4

4 FN 27

ALLIANCE MEMBER
Joined
Oct 19, 2015
Messages
4,635
Location
Minnesnowta
Awesome job Pat.

If I can ask, where did you purchase the fixture from?

Thank you Mike!

Mittler Brothers. I am not that happy with the Alignment Bar. I chucked it up in the Lathe last night to put a 1/2-13 Hole in each end and a .25 x 45° Chamfer on both ends and it has a slight wobble. I mean slight...so I might look into a Precision Ground Bar today.

Added the 1/2-13 Tapped Holes to add a Square Plate on the end to protect the ends from damage while in storage. And If I need to slip a Tube over the Bar to tighten things up a bit.

The Pucks they supplied are nice. They are marked for each application.

The Pinion Centerline Bracket leaves a little to be desired. The Holes are a little big which adds a little slop. To get around that I used 82° Flat Heads to mount it to the Housing. That put it on Center and no slop.
 
OP
4

4 FN 27

ALLIANCE MEMBER
Joined
Oct 19, 2015
Messages
4,635
Location
Minnesnowta
Thanks for the info Pat. I will keep them in mind for future when I need one.

If I had it to do over again I would buy just the Pucks from them and order a Stainless Precision Ground Bar from McMaster.

https://www.mcmaster.com/1255t25-1255T256

Tonight I'll mic the ID's and see if the McMaster solution will work better.

I like .006 per foot vs 1/16 per foot straightness and no rust issues.
 
OP
4

4 FN 27

ALLIANCE MEMBER
Joined
Oct 19, 2015
Messages
4,635
Location
Minnesnowta
Awesome.

Thanks for the information Pat.:thumbup:

Mike the new Bar came in from McMaster. Night and day difference!!! Straight as an Arrow. And the Pucks are perfect slip fit.

Drilled and Tapped the Ends...now if somebody wants to barrow it they will get the Mittler Brothers Bar. Mine will stay in my Shop.
 
OP
4

4 FN 27

ALLIANCE MEMBER
Joined
Oct 19, 2015
Messages
4,635
Location
Minnesnowta
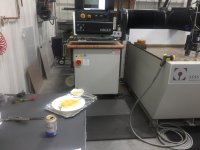
Been a busy week...on SUnday I changed oil on the Water Jet. 30 hours on the pump. Time for some straight 30W non-detergent as recommended.

View media item 95551
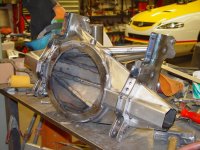
Finished up the BIL new Motor Mounts. Was going to try and make them 1 piece forming both flanges but I would have had to run back to the plant to get the correct tooling or "back broke" the part then flatten it. We opted for the 2 piece construction using Tab and Slots.

View media item 95552
The Press Brake Set-up was simple but yet tricky. Having the ear hanging out and making left and rights we had to do a little planning. Stopping off the radii didn't help matters but we got it.

Mounted my Squaring Arm on the tool via clamping. One of these days I'll take the time to pocket mill the one surface and add the 6 rare earth magnets and eliminate the clamp for this type work.

Adding the clamp in there you really need to be careful when the Back Gauge comes in that it doesn't smash it.

View media item 95553
I am not the best TIG welder but it really doesn't help when you break your glasses the night before. Had to go back to the ol'Cheaters. Man does that **** and it has been sucking since Friday night!!! Eye appointment Monday at 1 pm...

Welded them up and off to the old stove for some fine Krylon and bake cycle at 170°. If it was mine I would have sent them out and had them Zinc Plated.

View media item 95554
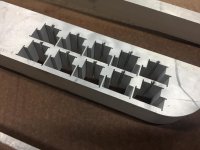
Back to production cutting on the Jet. Received the PO for 390 pcs and cut the 5 piece for the required 1st Article Inspection (FAIR) and process verification. The machine work flawlessly on the FAIR parts. The spec is 1.625 Ø with a Profile of a surface of .004 as the critical to feature dimension.

View media item 95555
I was shocked after we defined the inspection process that the machine is holding .0009 on a diameter. Lowest reading was 1.6257 and the highest 1.6266.

View media item 95556
Last night I was cutting for 7 hours and put a dent in the order. Learned a few things. Even with the lack of heat that a Laser puts into a sheet the Material still stress relieves as you cut. So where I did have .050 clearance between the Nozzle and the Sheet I ended up with 0.000 clearance and plugged a Nozzle. Took me a while to sort out the issue but got there.

Had to install a new Nozzle and I will be ordering a Sonic Cleaner to see if I can salvage the old Nozzle. At least I haven't broke one yet. The guy doing the training said "you will break them quite often so keep them in stock". Well I have them but...ya just gotta be careful. Just like setting up a cutter path in a mill and having clamps and hold downs...ya gotta avoid them. Know where the tip is at all times. Think before you move.

Laying a straight edge on the blank I could see the bow was greater in X than it was in Y. So I started setting the Nozzle distance at the top of the Y travel then in the middle and close to zero taking the average of all 3 measurements. Then run 1 row at a time. Didn't have any issues after that.

Running Machines into the wee hours of the evening reminds me of when we started the Company 22 years ago. I would do my desk job from 6 am until 6 pm and then go run equipment until 3-4 am and getting a couple of hours of sleep in my office.

My Wife would bring me my dinner, usually served on a silver platter...a standing joke at the time. I would phone in my order and she would say "Anything else sir?". I said "Served on a Silver Platter". One night I forgot to put the platter and dishes in my truck. I left it by the Turret and while I was still sleeping the crew showed up and took pictures...still to this day they talk about that.

Well last night she called me to let me know Dinner was ready...I asked and she delivered. Cheesy Chicken and Corn and a Beer. She is a saint...then at 10:15 pm she showed up with a bowel of Ice Cream. I think that was the 5th time she has been in the shop since I built it.

attachment.php


They don't make em like that anymore...

attachment.php


Tonight a birthday dinner with one of my Snowmobile buddies and then back to the grind. Need to have the order completed by Monday am...not a problem.!!!
 

Attachments

  • IMG_7904.jpg
    IMG_7904.jpg
    115.2 KB · Views: 1,015
  • IMG_7906.jpg
    IMG_7906.jpg
    146.3 KB · Views: 1,016
Last edited:

lilscorpion

Well-known member
Joined
Mar 15, 2010
Messages
3,600
Location
Colorado
Mike the new Bar came in from McMaster. Night and day difference!!! Straight as an Arrow. And the Pucks are perfect slip fit.

Meant to comment but never hit submit... :headscrat

I did exactly as you ended up doing - ordered my bar from McMaster and machined all my pucks out of stainless and they've worked flawlessly for years.

A hint on welding the housing - even with the bar, you can significantly increase the straightness of the housing if you stand it on end during the cooling cycle. Weld one end at a time and tip that end up. This allows the heat to transfer over the length of the tubing and out the top (heat naturally rises). Since the tube is not pointing the direction that the heat wants to transfer naturally anyway, the housing/tubing tends to cool more conformity over it's diameter, it's less prone to warpage. This approach works so well that I'll use the alignment pucks to weld on a cup on a 9" ford, stand it on end hot end up, remove the bar and let it cool 'till cold, and then re-insert the alignment bar and find it true. I would never do a customer pay job that way but I've tried it a few times to test the theory and it's worked each time.

The Press Brake Set-up was simple but yet tricky. Having the ear hanging out and making left and rights we had to do a little planning. Stopping off the radii didn't help matters but we got it.

A little trick I use on one-offs, short run parts, or parts where the back gauge is tricky - when I design your part in cad, I design in a little visible "v", flat, or intentional shoulder in the part where you want to break and then you can easily point to point on the knife aligning the tick marks. That's how I used to do it when I didn't have a CNC back-gauge. Continued to do it even when I did given how nice it was to have a visual go/no-go reference.
 
OP
4

4 FN 27

ALLIANCE MEMBER
Joined
Oct 19, 2015
Messages
4,635
Location
Minnesnowta
I did exactly as you ended up doing - ordered my bar from McMaster and machined all my pucks out of stainless and they've worked flawlessly for years.

It really is the way to go.

If I start building Fabricated Top Sportsman or Pro-Stock Rear Ends again I'll build a new Alignment Fixture from 2.250 Precision Ground Hardened Stock. It will also be used during the Machining Process adding the Third Member Stud Holes and machining the face.

attachment.php


A hint on welding the housing - even with the bar, you can significantly increase the straightness of the housing if you stand it on end during the cooling cycle.

Thanks for the tip. I'll give it a try once I get that far.

A little trick I use on one-offs, short run parts, or parts where the back gauge is tricky - when I design your part in cad, I design in a little visible "v", flat, or intentional shoulder in the part where you want to break and then you can easily point to point on the knife aligning the tick marks. That's how I used to do it when I didn't have a CNC back-gauge. Continued to do it even when I did given how nice it was to have a visual go/no-go reference.

I have practiced that same technique for years. I either just put a single line hash mark in the Material or in a case where I do not want a stress riser as the situation with the Motor Mounts I have set them up on a Surface Plate and using a Height Gauge and Scribe put hash marks on the surface towards the Punch. With a sharp tool you can fell when they "click" and make the hit.

However the other issue with the Motor Mount was we used a 1/8 ISR Punch and picking up a Scribe Line or Notch is really difficult.

attachment.php
 

Attachments

  • DNRC02.jpg
    DNRC02.jpg
    144.9 KB · Views: 796
  • IMG_7911.jpg
    IMG_7911.jpg
    148.4 KB · Views: 795
OP
4

4 FN 27

ALLIANCE MEMBER
Joined
Oct 19, 2015
Messages
4,635
Location
Minnesnowta
Sweet pics of the rear end too BTW.

I can only take credit for fabbing the parts. Don Ness did the welding.

If you look real close at the end of the Housing you can see where I used the Laser Notch technique. Setting up a Back Gauge on a parts like these is a real challenge.
 
OP
4

4 FN 27

ALLIANCE MEMBER
Joined
Oct 19, 2015
Messages
4,635
Location
Minnesnowta
Tonight I finally finished up a long over due (like 30 years) project making Covers for the Bed on the Sharp Mill. Had enough cleaning the Tee Slots over the years.

Had some .190 T-6 Plate laying around and downloaded the Solid Model of the Kurt Vise. Added the feature I wanted and out put the DXF.

I still wanted to use my Side stop so I added (5) 3/8-16 Pem Insert Nuts on 2 inch centers.

Now the 1 inch Bar Stop can be removed. It is kind of clumsy and in the way often.

attachment.php


attachment.php


Tried something new on the jet. Cut the profile for the Tee Nuts from 1 inch Aluminum Tooling plate. They came out pretty sweet. Had to leave a Tab on the part so they would not fall to the bottom of the tank. I lost my Aluminum Magnet which makes it hard to go "Part Fishing" in the tank.

Fly cut the Tabs of and drill and tapped them 10-32 with my Viking Drill's I acquired from the Garage Journal offer. Funny thing about that is the CEO of Viking Drill is one of my best friends Father-in-law. One night we were out to dinner and he told me not to buy bits anymore he would get me what I need. I just don't feel right doing that. In the past I have done projects for him and allowed him to pay me in Bits. That works for both of us.

attachment.php


attachment.php


Tonight I am quoting jobs for the Water Jet. Seems they Account Managers are liking the opportunity to expand the company portfolio of work and are asking daily for me to quote small run intricate parts that are not conducive to the Lasers.
 

Attachments

  • IMG_7917.jpg
    IMG_7917.jpg
    111.7 KB · Views: 624
  • IMG_7918.jpg
    IMG_7918.jpg
    125.4 KB · Views: 629
  • IMG_7913.jpg
    IMG_7913.jpg
    146.8 KB · Views: 631
  • IMG_7914.jpg
    IMG_7914.jpg
    126.3 KB · Views: 632

Bigblue&Goldie

Well-known member
Joined
Mar 12, 2009
Messages
10,683
Location
AZ
I like how you incorporated the mounts for the work stop. Do you have 4 t-nuts holding each plate?
 
To avoid these ads, REGISTER NOW!
Top Bottom