To avoid these ads, REGISTER NOW!

What did you do "IN" your garage today?

Outlawmws

Well-known member
Joined
Aug 9, 2011
Messages
39,302
Location
The Badlands
Mostly putting stuff away, but I did get some reloading done for the Lead free hunting test loads for the Contender. I'll take them out next weekend to see what the most accurate load is, then load up for the coming season.
 
To avoid these ads, REGISTER NOW!

Magnum440d100

Well-known member
Joined
Dec 2, 2018
Messages
3,581
Location
Indiana
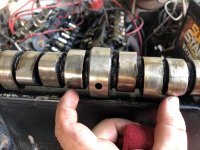
Got the motor fired up. Had a tick or 2.

Ran great when pulled but rough. Figured it was a bad carb.

2 wiped lobes. :(
 

Attachments

  • C1731B28-A051-4689-957C-2B152498FA74.jpg
    C1731B28-A051-4689-957C-2B152498FA74.jpg
    149.6 KB · Views: 153

Maineiacmoose

Well-known member
Joined
Jan 2, 2016
Messages
134
Location
Maine
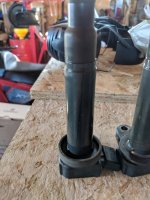
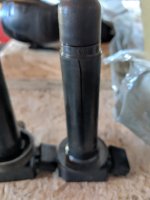
Changed the plugs in my Lexus LX470 they look to be original at 245K miles.... Nothing left to the electrodes. Found two cracked coil's and replaced them with spares. Oil change tomorrow and a quick lube then off to camp.
 

Attachments

  • 68728388_2429654127118350_2982021288538669056_n.jpg
    68728388_2429654127118350_2982021288538669056_n.jpg
    82.4 KB · Views: 27
  • 68756249_738773773222911_8627466348399689728_n.jpg
    68756249_738773773222911_8627466348399689728_n.jpg
    42.2 KB · Views: 30
  • 69237612_375311866508502_3603210878234656768_n.jpg
    69237612_375311866508502_3603210878234656768_n.jpg
    40.1 KB · Views: 37
  • 68849220_2285036005159857_139705313224818688_n.jpg
    68849220_2285036005159857_139705313224818688_n.jpg
    107.3 KB · Views: 38
Last edited:

isb cornbinder

Well-known member
Joined
Nov 3, 2010
Messages
7,073
Location
Pacific South West, BC, Canada
I spent an hour removing the glue-on disc grinder abrasive. I removed the back-plate and soaked it in gun wash.
I will install a Velcro quick change surface. I swept up a bucket of dirt. The dirt washed down the lane from the neighbour's construction.
 

Outlander

Well-known member
Joined
Jul 30, 2010
Messages
5,154
Location
Quebec, Canada
Washed out the back of the pickup truck, spilt some oil (argh) so it needed degreasing. Rain started before I could wash the whole truck.

Got the dog crate washed and ready for the new puppy (reveal on Sept 10th, watch for it in the "show us your garage dog thread".

Napped significantly, both Saturday & Sunday (not in the garage). Slept so deeply that wife, daughter and French Bulldog packed up and left the cottage for home without even waking me up. Place was pretty quiet 2 hours later when I awoke!
 

k-os

Well-known member
Joined
Dec 29, 2012
Messages
995
Location
WI
Worked on cleaning up and organizing the garage this past weekend. Still some work to go (and a hanging gas heater to install).

Before
vMVlNeH-RC1HZPmlf24XZXsJpoKQKdN89tquF7F7YjoU99zPru3YeWmIDM5B4YQroxzVmOfdDRBxenRKGn0FfVxXAfkmOtpVN1-9aaEl2Ub5l5Prlf0TpFLIfmfG2ZlkE_LEROqKzMawYSmzres62JTZILqegqiHQdUIqg15Z4yksbsfyuipZcWPCymRlaEsdOv9TH3DK5ZLDldZ6L5h3N8qabvoFd3DK_RvHgI7svniKA015upL-nThM9ursBdGmsiNNpi87tPIQR3ukVF0BQloYwBqB7qUEcX7ixJLW11nf5KPiULF1ItLg0Q2pVB3KOi48u13zkVz5eT66SZkHwzgf3zijWMvv81RrMOAj6bg_IG4wHJwYs8FnYFo5wAQjukygjJS0W5qzKaXEpQSekYrPQchqaIfTv_H4p8IuQldZWpnk_Zb3vR34dyHn1RWK8R5yqzr_0in1p7IQmJduUQMOt7Zrz5vsoyFXhTU-E9ptfJwXxFrp8GUAh2TtB_aWb3PWuoUveZP_5fLJEofeuXiAjXbjKB5kIDx45577KdT1hbW1p8FXjvwlYH-FRTlYwQ0oKSbLwC2B_yzfUEZlxyfvPFD8S2qK1E0P0Q8-BqvEOmRsLEofuaxRs0wJSGFproi-hT35cfh0zDpwtJ_5sySXSVThy2J=w1410-h640-no


Now
aIN-ynbeO2-6fSHLvQlmrlKTy9VnABwVBas-hFJ5Swg66cdBAAsA9q-3kWer6-aRnCipWHv4ymju6Eh9WLoTsM-aCWXEEGoujenpbdzIZo8TtXthzVXKox9HzItfFSxITOHl4Tk3D5lJDz-F8sBX_lrJkI-Q0azSZoSbhZxdjRFoD3NTOnvO6z7ZcDfGG2qMxPc7m5Lxbs0R_PwPbV6DfT0TfkPWsHLQ3jAV7ktoKoKeFVixMPWmq8ZtkEUSWqdofBQjkoP4BtIjF4_-cTDWH1k3zxELtTIExRZscEq1bBNFkWd_CCvtAlCscQs097VIQeYeBEYSPEv1bgyYf3unniDqy4q4DNnvNAxypnxtMem3brPJU73JA0pJE_j_682c4qH5cv3WH3Msb8hEYW-sB9S6zuYy_HqpS9sZzGoF6jQzmscgT9coJhAuyVJTqzzFm10BpCjIx07LzKqC_Tpx9HQDWqWfVLfO0B5zbzJMEyCinRJr4raCguHIq4eZ5y5LZyASQNjc0yZm4UNB5Rsni_A1v7C2WYUKaxs1VjuWhYkUJ15pUrkRyWZl5w0Apfh7_H_SPPk081iCcPP2D2eDLlmIr7GlEeiYizUS_8JgJdvC326L4OG-n1E6yKWCttKFwNdc_wG8h6nIOLFsMRKWPbm5cm9pC3nx=w1920-h640-no
 

58Yeoman

Well-known member
Joined
Oct 1, 2010
Messages
8,999
Location
Central IL
Replaced the front coil springs on my 63 Galaxie. They were so weak and sagged so much that my air jack wouldn't fit under the front bumpber. I gained 3" after installing the new ones; now it sits where it should. Factory Ford manual said to drop lower CA, then pull out spring, the install new spring. HA! New springs weren't as weak as old, so I had to use my KD spring compressor. Looks much better now.
 

nbock01

New member
Joined
Jun 19, 2014
Messages
1
Painted the garage 2 weekends ago. Moved my racking over to the wall and reset the shelves, utilizing 1 as a bench and reset for storage. Will have to take an updated picture showing setup. Just have one from after the painting.
 

Attachments

  • 20190705_130925.jpg
    20190705_130925.jpg
    85 KB · Views: 59

DeaconSteve

Active member
Joined
Jun 14, 2016
Messages
40
Location
NC, within driving distance to Raleigh
Yesterday's post: Took a tool out of an electrolysis bath which helped a great deal getting most of the rust off. Wire brushed it some more and sprayed it with black primer/paint. Tried to fix my control head for a acid neutralizer on my water system (need to order parts). Changed oil in wife's car.
 

driftpin

Well-known member
Joined
Dec 22, 2016
Messages
11,292
Location
Miami-Dade/Broward Co. Florida
From #33561 (above):

R.E.: worm-drive 8-1/4" Skilsaw

Update II: something that always bothered me about the saw, it wasn't easy to set the bevel adjustment. It would go about 30 degrees, and then you'd need to move the lower blade guard up and lightly-tap with a hammer on the bottom of the shoe, below the bevel adjusting lever/bracket, to get it to go to 45 degrees.

Also, at the rear, the depth adjustment slotted guide that's shaped like a semi-circle, would foul the top of the stationary blade guard if you wanted a full-depth cut, and I'd sometimes have to use a light hammer tap on the bottom of the shoe, there, to get it set. You would look at the slotted guide, and it was hitting/interfering with the upper blade guard.

Nevertheless, I used it like that for decades.

After doing the stuff above, I decided to take a closer-look at the shoe, its points of pivoting, and attachment.

I saw that the front bracket from the front of the shoe to the bevel adjustment appeared not to be a 90 degree angle. The top of the bracket seemed to be bent forward a few degrees, clearly not a right-angle. Perhaps if the saw was dropped from a height, and it struck the front of the shoe on a hard surface, like concrete, that could have caused the bracket to bend.

Then, I checked the rear shoe bracket, for the blade depth/shoe mount. It also appeared to be tweaked, similar to the front.

I removed the shoe (two fasteners) and upon eye-balling things I decided that if I cold-set the front and rear shoe mounting brackets back-to 90 degrees from the shoe, that it would help the alignment. So, that's what I did. No compass, just an 'eye' to getting it close-to 90 degrees, not a black-hair, not a red-hair, but a fine, wispy blonde hair's degree of tolerance.

I threw the shoe in the glass-bead cabinet and cleaned it up. A couple thick accumulations got a squiggly (crimped) wire-brush side-grinder treatment to remove probably 50 years' of construction debris.

When I was satisfied, I slipped the shoe into the mounting points, and was pleasantly-surprised that it went into-position much-easier than it came-apart. I ran the screws in, tightened the bolts/screws, and was very-happy to find that both the front bevel adjustment and the rear depth-of blade adjustment were much-easier to set, from one extreme to the other. No-more pounding on the underside of the shoe to get the bevel or the blade depth set anywhere in their range of adjustment. No-more fouling of the semi-circular bracket for blade depth adjustment on the top of the upper stationary blade guard.

Besides the fact that I've been using it like this for 45+ years, it's satisfying that I finally did all these repairs and tweaks so that it will be easy to use in the future. I have five different circular saws, so it's not-like I need to fix this one to do some work, but now I'm looking for an excuse to cut something, and I am ready for the job to be easier and safer because I showed some love to my 8-1/4" worm-drive Skilsaw.

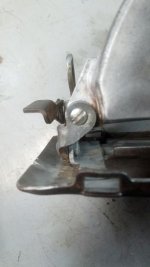
Pics are after the tweaks to the shoe brackets. I'm on a tablet, and I don't have the ability to draw on the pics, but the brackets are easily seen. What I bent were the vertical parts attached to the shoe, front and back. One of the things which was immediately-apparent was the rear semi-circular bracket for blade depth remains the same distance above the fixed blade-guard, despite whatever depth the saw blade is set-to. Prior to cold-setting the front and rear brackets, as you lowered the depth of cut, the rear semi-circular bracket for blade depth would foul the top of the stationary upper blade guard. Now it stays about 5/16" away from it, whatever the depth of cut setting. Much-better, much-easier to-set.

Dedicated members will notice that I've ascribed to the Florida Chapter, Garage Journal Safety and Health Guidelines for proper Florida footwear while in the shop, as approved-by shortykorte.
 

Attachments

  • Skilsaw rear straightening.jpg
    Skilsaw rear straightening.jpg
    63.8 KB · Views: 89
  • Skilsaw front straightening.jpg
    Skilsaw front straightening.jpg
    43.3 KB · Views: 84
Last edited:

Bessy

Well-known member
Joined
Dec 18, 2012
Messages
995
Location
Ontario, Canada
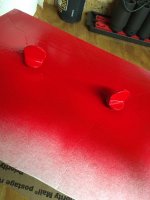
Not today, but over the weekend I shot some rattle can primer on an old RAE 35 vise. That was Saturday evening. Sunday was spent taking down the other half of a 75' maple that split in my parent's back yard. Had to do some chainsaw maintenance (no photos) to get the chain oiler working properly, but it still seemed like the chain was getting really hot. Hot day, hard maple I guess. I'll give it another go over on Friday when I get back there. f60e535b8b318723f30aa290a82b4756.jpg9469e949a1e038ce97546a9a67559415.jpgcfbbd47ba59fd20a1ebc97120980d1c4.jpg

Sent from my Pixel 3a using Tapatalk
 

Attachments

  • f60e535b8b318723f30aa290a82b4756.jpg
    f60e535b8b318723f30aa290a82b4756.jpg
    114.5 KB · Views: 0
  • 9469e949a1e038ce97546a9a67559415.jpg
    9469e949a1e038ce97546a9a67559415.jpg
    93.3 KB · Views: 0
  • cfbbd47ba59fd20a1ebc97120980d1c4.jpg
    cfbbd47ba59fd20a1ebc97120980d1c4.jpg
    112.4 KB · Views: 0

isb cornbinder

Well-known member
Joined
Nov 3, 2010
Messages
7,073
Location
Pacific South West, BC, Canada
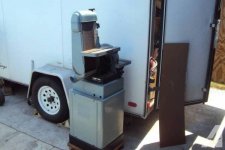
I pushed my new-to-me Rockwell/Delta belt and disc grinder outside and tried to blow decades of wood dust out of it.
I should be able to put some casters under it tomorrow.
 

Attachments

  • 00W0W_bTnFFS2zjsC_600x450.jpg
    00W0W_bTnFFS2zjsC_600x450.jpg
    23.2 KB · Views: 556

DGersic

Well-known member
Joined
Mar 12, 2017
Messages
6,356
Location
DeKalb, IL
Welding practice.

286163df3c8d90ce3f0e863cd073055e.jpg

$4 for a penta socket from Amazon + some scrap round steel I found in the street. I’ll clean it up and hit it with some paint. This will make opening and closing the water shutoff valve container easier.


Sent from my iPad using The Garage Journal mobile app
 

Attachments

  • 286163df3c8d90ce3f0e863cd073055e.jpg
    286163df3c8d90ce3f0e863cd073055e.jpg
    838.1 KB · Views: 0

niget2002

Well-known member
Joined
Oct 2, 2012
Messages
11,190
Location
Josephine, TX
Got the CNC machine put back together after replacing some parts.

Fired up the 500w spindle to do some test cuts. A few minutes into the cut the bit stops turning and smoke starts coming out the top of the spindle :(

Guess I'll have to go back to the much much louder dewalt spindle that I had on there prior. It does pack more power, though, so I guess that's good.
 
To avoid these ads, REGISTER NOW!

Magnum440d100

Well-known member
Joined
Dec 2, 2018
Messages
3,581
Location
Indiana
Not today, but yesterday.

Finally finished the cam swap. Got a larger stock cam in there (360 instead of the 318 cam). Got the transmission lines ran. Got the truck started, and it goes into gear at least. It was too late to back it out or anything.

Still have a few things to address.

Today a new gas tank shows up today. It’s a 33 gallon Bronco tank that I’ll put in the spare tire area of the truck under the bed instead of in the cab. So that’ll get done in the next couple of days.

But it runs :)
 

PhantomEB

Well-known member
Joined
Feb 6, 2006
Messages
6,787
Location
Medicine Hat, AB, Canuckistan
Beat the rain and got the yards mowed also weedwhacked as well whacked the neighbors to clean up the street some while they on holidays.

Now prepping for the one side of the yard’s fence to be ripped down, then rebuilt a foot higher minimum as well pushed up to the front of the house. More room for the dogs.
 

BonzoHansen

Well-known member
Joined
Jun 24, 2005
Messages
1,742
Location
NJ
My 93 K1500 came home on a hook Tuesday night. It just shut off. Got into it yesterday. Module crapped out. Changed that and it started but ran poorly. Coil is old and the terminal was corroded so i put a new one one Much better. Did cap rotor wires plugs while i was there. Good as new.

Back to that pesky golf cart. Running much better. Still have this annoying occasional backfire out the tail pipe to beat. Hopefully this weekend i'll figure it out.
 

chrismenke

Well-known member
Joined
Mar 2, 2014
Messages
1,131
Location
Sam's Clam Disco, CA
Had a 50 gallon flood followed by a $1041 bill for replacing the water heater.

Race to the bottom with those things. I have a 1940 Duplex and the water heater made in 1940 is still chugging along for one unit. The other water heater gets replaced when it fails every 6 or 7 years.

I would gladly pay a giant premium for an 80 year water heater...
 

gtae07

Well-known member
Joined
Mar 6, 2015
Messages
2,980
Location
Fayetteville, GA
Yesterday I finally got around to mounting my air compressor on vibration mounts instead of the shipping pallet it's been sitting on for years. And my son (3) used a socket for the first time, "helping" me install the bolts :bounce:

I also cleaned up and tried to organize so I'll have room to build up my engine in a month or three.

Now to source a replacement air filter for the compressor...
 

ambenz

Well-known member
Joined
Dec 12, 2010
Messages
4,237
Location
NW Chicago Suburbs
Was going thru my security check today and found I couldn't access my garage security cameras from my safe room inside the bunker. I suspected the cheapo power supply providing power to the DVR took a dive since the same one powering the cameras died a week after I got the system. Sure enough, it was the 12VDC 2A supply that died. Lucky for me the newer camera power supply is a 12A and has plenty of spare amps to run the DVR. Just a bit of a hassle but it is all working again!

View media item 95812
 

Magnum440d100

Well-known member
Joined
Dec 2, 2018
Messages
3,581
Location
Indiana
Got the ‘68 running well enough to back out of its spot.

Gonna hang the gas tank today so it isn’t running off a bottle, and so I can move it around more.
 

Magnum440d100

Well-known member
Joined
Dec 2, 2018
Messages
3,581
Location
Indiana
1 step forward and 2 back...

Truck was running great and moving under its own power. Then it broke a transmission cooler line...

Then the Bronco tank I ordered has a 2.25” filler hose whereas the dodge has a 2”. AND, I have to move a crossmember back or cut off my exhaust or both :( to fit the Bronco tank. It’ll fit, but the way that the previous owner ran the true dual exhaust really boogered things up.

One problem at a time now :)
 

ovilla

Well-known member
Joined
Dec 18, 2005
Messages
2,342
Location
Plainfield, IL
Used my tire changer and balancer to swap rims and install new tires - all in the comfort of my home garage.a8c2615acb26777a8d206214561cbd42.jpg396c36782f3572e67ee8e065ad9ec2b0.jpg
e74da54b8d88e869b75894fd75337177.jpg
 

Attachments

  • e74da54b8d88e869b75894fd75337177.jpg
    e74da54b8d88e869b75894fd75337177.jpg
    864.5 KB · Views: 0
  • 396c36782f3572e67ee8e065ad9ec2b0.jpg
    396c36782f3572e67ee8e065ad9ec2b0.jpg
    380.7 KB · Views: 0
  • a8c2615acb26777a8d206214561cbd42.jpg
    a8c2615acb26777a8d206214561cbd42.jpg
    405.7 KB · Views: 1

vertguy

Well-known member
Joined
Apr 6, 2010
Messages
1,262
Location
SE WI
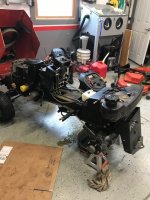
I had to push my Simplicity lawn tractor back in the garage for the 2nd time this summer after losing all hydrostatic control. Only to find the same hard line that failed in May had a crack in a different spot. Not sure what is causing it, but it is a PITA to replace as everything behind the hood requires removal including the rear fender, cowl, steering wheel, floor deck, along with several other fluid lines. If this POS fails again, I am going tractor shopping.

This is what it will look like torn down... which I need to start on today while waiting for the replacement part.
 

Attachments

  • IMG_1081.jpg
    IMG_1081.jpg
    122.4 KB · Views: 146
Last edited:

Outlander

Well-known member
Joined
Jul 30, 2010
Messages
5,154
Location
Quebec, Canada
Still working, slowly, on getting my home office set up. I'll add some lightning today, transfer some wall hangings (whiteboard, robotics memorabilia etc.) and then should be ready to set up my electronics bench, making room for the Raspberry Pi and related IoT playthings.
 

Magnum440d100

Well-known member
Joined
Dec 2, 2018
Messages
3,581
Location
Indiana
Short lived success.

Just as I was cutting the transmission line to flare it, I noticed another drip.

Pinhole farther down the line....

Got an appointment with the junkyard tomorrow haha
 

Outlawmws

Well-known member
Joined
Aug 9, 2011
Messages
39,302
Location
The Badlands
I had to push my Simplicity lawn tractor back in the garage for the 2nd time this summer after losing all hydrostatic control. Only to find the same hard line that failed in May had a crack in a different spot. Not sure what is causing it, but it is a PITA to replace as everything behind the hood requires removal including the rear fender, cowl, steering wheel, floor deck, along with several other fluid lines. If this POS fails again, I am going tractor shopping.

This is what it will look like torn down... which I need to start on today while waiting for the replacement part.

Sounds like it needs a strain relief loop?
 

DGersic

Well-known member
Joined
Mar 12, 2017
Messages
6,356
Location
DeKalb, IL
A little grinding, a little bit of hand filing, and some paint

IMG_7052.jpg

and now I have a tool for the water shutoff valve box cover.

Also made a couple of thumbscrews

IMG_7053.jpg

to finish off the modifications to my yard vacuum. Fall is coming. It’ll be interesting to see how it works out.


Sent from my iPad using The Garage Journal mobile app
 
To avoid these ads, REGISTER NOW!
Top Bottom