From #33561 (above):
R.E.: worm-drive 8-1/4" Skilsaw
Update II: something that always bothered me about the saw, it wasn't easy to set the bevel adjustment. It would go about 30 degrees, and then you'd need to move the lower blade guard up and lightly-tap with a hammer on the bottom of the shoe, below the bevel adjusting lever/bracket, to get it to go to 45 degrees.
Also, at the rear, the depth adjustment slotted guide that's shaped like a semi-circle, would foul the top of the stationary blade guard if you wanted a full-depth cut, and I'd sometimes have to use a light hammer tap on the bottom of the shoe, there, to get it set. You would look at the slotted guide, and it was hitting/interfering with the upper blade guard.
Nevertheless, I used it like that for decades.
After doing the stuff above, I decided to take a closer-look at the shoe, its points of pivoting, and attachment.
I saw that the front bracket from the front of the shoe to the bevel adjustment appeared not to be a 90 degree angle. The top of the bracket seemed to be bent forward a few degrees, clearly not a right-angle. Perhaps if the saw was dropped from a height, and it struck the front of the shoe on a hard surface, like concrete, that could have caused the bracket to bend.
Then, I checked the rear shoe bracket, for the blade depth/shoe mount. It also appeared to be tweaked, similar to the front.
I removed the shoe (two fasteners) and upon eye-balling things I decided that if I cold-set the front and rear shoe mounting brackets back-to 90 degrees from the shoe, that it would help the alignment. So, that's what I did. No compass, just an 'eye' to getting it close-to 90 degrees, not a black-hair, not a red-hair, but a fine, wispy blonde hair's degree of tolerance.
I threw the shoe in the glass-bead cabinet and cleaned it up. A couple thick accumulations got a squiggly (crimped) wire-brush side-grinder treatment to remove probably 50 years' of construction debris.
When I was satisfied, I slipped the shoe into the mounting points, and was pleasantly-surprised that it went into-position much-easier than it came-apart. I ran the screws in, tightened the bolts/screws, and was very-happy to find that both the front bevel adjustment and the rear depth-of blade adjustment were much-easier to set, from one extreme to the other. No-more pounding on the underside of the shoe to get the bevel or the blade depth set anywhere in their range of adjustment. No-more fouling of the semi-circular bracket for blade depth adjustment on the top of the upper stationary blade guard.
Besides the fact that I've been using it like this for 45+ years, it's satisfying that I finally did all these repairs and tweaks so that it will be easy to use in the future. I have five different circular saws, so it's not-like I need to fix this one to do some work, but now I'm looking for an excuse to cut something, and I am ready for the job to be easier and safer because I showed some love to my 8-1/4" worm-drive Skilsaw.
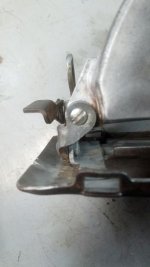
Pics are after the tweaks to the shoe brackets. I'm on a tablet, and I don't have the ability to draw on the pics, but the brackets are easily seen. What I bent were the vertical parts attached to the shoe, front and back. One of the things which was immediately-apparent was the rear semi-circular bracket for blade depth remains the same distance above the fixed blade-guard, despite whatever depth the saw blade is set-to. Prior to cold-setting the front and rear brackets, as you lowered the depth of cut, the rear semi-circular bracket for blade depth would foul the top of the stationary upper blade guard. Now it stays about 5/16" away from it, whatever the depth of cut setting. Much-better, much-easier to-set.
Dedicated members will notice that I've ascribed to the Florida Chapter, Garage Journal Safety and Health Guidelines for proper Florida footwear while in the shop, as approved-by shortykorte.