polexican23
Banned
for a dummy that hasnt done it. why are you lopping off the top of the locks?

for a dummy that hasnt done it. why are you lopping off the top of the locks?
I could be wrong and I frequently am, however I think that is standard for them. The black bumper pads I ordered from them were also always out of stock as well but I ordered them anyway and two weeks later I had them. I'm sure there are alternatives including almost any safety lid support for a child's toybox could be adapted, but if I were you I'd just go ahead and order the Snap-On ones here.
Let us know how long it takes if you do.
^^^^--- this
I just ordered them so we'll see what happens.
I think I f'd up though. Qty 1 is for one set of hinges? I ordered 2 not realizing it said "set". Oh well.
.....But to my credit, I managed to share photos of my work (unlike darkzero) without including background shots of my nice lathe and vertical mill with a right angle indexing chuck, nor my bandsaw. (darkzero, you ****!

for a dummy that hasnt done it. why are you lopping off the top of the locks?
So you can open the drawers with the lid closed.
 I also have an obvious decoy book with the hollow center in it filled with old keys that don't fit anything.
OrderedYep you guys were right. I ordered the hinges yesterday & it said backordered. Just got shipping notification for them.
I also emailed them last night asking if they could change my order to just 1 set of hinges. They emailed me this morning telling me they took care of it.
I should of ordered them a long time ago but on my gen1 I never opened the lid anyway. That is going to change now & also cause my shocks on the gen1 dont seem to be working right anymore.
Thanks
I'll add my frankencart to the thread here too.
dagofast,
Quick solution for the folding side shelf. I used the HF black shelf on a Craftsman box with no mounting holes. I just lined it up where I wanted it, marked/drilled some holes, and used threaded nut inserts for the mounting hardware. This also worked well for a lamp mount. Sorry I have no pics available to show what the final product looks like but this was a pretty straight forward solution that met my needs.
I was careful to avoid anything internal to the box and it gave a nice, clean look if I ever need to take the shelf off.
V/R
Bogie

This place should come with a warning label.
 OH Yeah!

So the hinges came 3 days after I ordered them. Got them installed today and I drilled the holes a little too far forward. I can see the lid slamming down at the wrong time.
For those who did this mod is it better to have it a little past 90 degrees? Seems like that would be better.
Sent from my moto g(6) using Tapatalk
I’ve spent about an hour looking all over this thread for pics of the snap on hinge mod
Older posts have lost pictures and I can’t seem to find any pictures in the newer posts.
I have 2 of these carts, and as expected the one with less use has gas struts that are getting weak.
Duke
Finally sifted enough and found a picture page 157
Post 3135


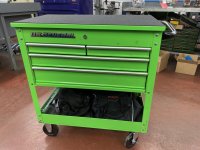
Looks goodI needed to have just a few tools at my new job so I went and picked up a 4 drawer cart the other day. Im used to my Snap on service cart that was a bit shorter so before I put the cart together I chopped off 4" off the legs to better suit my needs. I will be using the top to move product around (turbos) so the lower height helps. For the same reason I went ahead and ordered a mat from amazon to lay over the top. This mat was cut to size and adhered to the top so I can have the top open most of the time and not scratch it up when I load it up. And just because I had one sitting around, I installed a Snap On handle, looks much nicer than the HF one for sure. Hehe.
https://www.amazon.com/gp/product/B07D1Y77X2/?tag=atomicindus08-20
What did you use to adhere the mat to the lid?Looks good
Looks good
Well I tried 3M spray adhesive, that held for like an hour...
Resorted to good ol’ superglue after that [emoji28]


Man, that *****. Sounds like a rash of bad luck. I originally bought an orange cart and opened it, but changed my mind on color after having it in the garage. No broken latches there. I swapped it for green and bought the 72" bottom and 56" top tool box to go with it. No broken latches on them. My cart gets rolled out in the my pebbly driveway, which is a bit of a sharp angle as well and I've had no issues with the latches. Definitely seems weird. I never had a series 1 cart to compare with. My series 1 tool box was a 44" so it didn't have latches. Time will tell and people keep saying I'll have problems. I saw in a thread somewhere that you can order the latches to replace them.


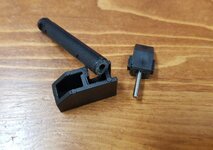
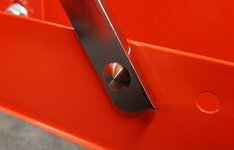
The pinning of that part is smart... great idea. It's something I would have done (without the benefit of a lathe)(too poor)(no room for one)
If I went thru the trouble to fix that one... I would have probably yanked all the clips and drilled and reinforced all of them. Wow... yea... a lathe would help do that to a NOT BROKEN yet clip. Drill right thru the angle into the shaft and insert epoxy and pin.