To avoid these ads, REGISTER NOW!

VISE REPAIR 101 all vise repairs, lubricants, sources for parts and the tricks to fix

bargainhuntingking

Well-known member
Joined
Nov 22, 2013
Messages
434
Location
The Amazing Pacific Northwest
phildrennen; said:
It seems like I hit the trifecta for Parker vise problems...


Despite those problems, it’s a functional vise. Rust is correctable. The washer allows the movable jaws to open correct? It isn’t under much pressure, so it’s just a cosmetic problem. And the slide is perhaps the biggest problem, but the reality is most people don’t open their vise that far unless one is holding a really big item. Working within that limitation, you’ll probably never run into a problem.

Is it perfect? No, but it’s still practical.
 
Last edited:
To avoid these ads, REGISTER NOW!

RTM

Well-known member
Joined
May 13, 2019
Messages
13,200
Location
SF Bay Area
Reed 104-1/2 I recently picked up. How does the main screw separate from the dynamic jaw?

Yeah, hurry up and find out. I need to do this next. I read the vises 101 thread and didn't see it, need to look again.


@drivesitfar:: I like your wrench. I need to take my 203-1/2's swivel nut out to allow access to the pin that holds the spindle nut in place (which Tex doesn't need to worry about), but mine won't spin even tapping it with a drift. Was looking at a Williams SB40 drag link socket. Penetrating oil has been on and off for about 2 days now. Might be buying a big washer on the way home to save $12 and several days waiting.
 
Last edited:

TSR9215

Member
Joined
Sep 13, 2019
Messages
9
Location
Texas
This is how I made a bolt to fit in an old vise with non-standard threads.

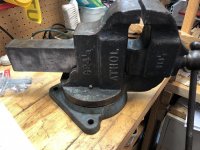
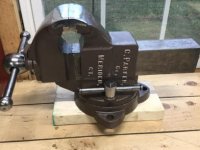
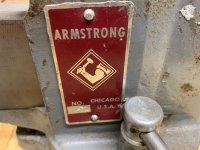
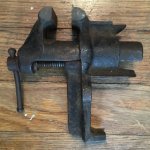
I picked up an Athol 624 ½ several weeks ago at an Estate sale. It was missing it’s swivel base. I managed to find a Starrett base that fit. Athol and Starrett are related, so the base off of a Starrett 624 ½ fit on the Athol 624 ½. There was one problem, the shoulder bolt that holds the base to the vise had different threads.

It turned out that my old Athol, guessing about 90 years old, needed a 7/8” main bolt with 12 Threads Per Inch (TPI). These days, standard threading for 7/8” bolts is either 9 (course) or 14 (fine) TPI. The Starrett base and parts, being newer, conformed to the now standard 7/8-9 thread.

So, do I make the vise fit the bolt or the bolt fit the vise? Having the vise drilled out and sleeve added with correct threads seemed expensive and would alter the original vise and threading. Likewise, having a new shoulder bolt fabricated also seemed expensive…and required finding a shop willing to do it. Looking for a easier (and less expensive) DIY solution, I thought I’d simply buy a 7/8-12 bolt and use a bushing. Simple, right? Nope. I searched extensively online for 7/8-12 bolts, but could not find any. But I was able to find several places selling the odd-ball 7/8-12 tap & dies. Apparently, 7/8-12 used to be a thing, because they still make the taps and dies.

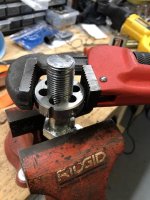
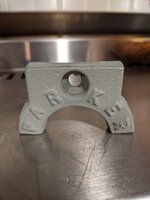
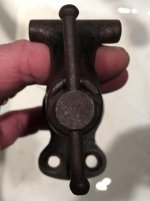
My solution: I made my own 7/8-12 bolt. I bought a 7/8-12 tap and die off of eBay. Then I bought a standard grade 7/8-9 x 4 ½” bolt from the hardware store. The standard bolt had about 2 inches of unthreaded shank, which is what I actually needed. I cut the bolt off at just about the start of the threads, leaving only a couple threads and smooth shank. I didn’t have a die stock handle large enough to fit the 7/8-12 die, so I used a pipe wrench (which worked gloriously, lots of leverage). The die started easily in the remaining thread and I continued, using oil and going back and forth to clear chips, down the shank. Then, in order to replicate the shoulder on the shoulder bolt that I was supposed to be using, I fabricated a bushing from a piece of scrap pipe. I did have to grind down the head of the bolt a little for the vise to sit flat.

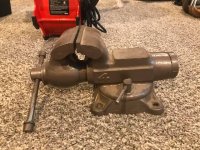
Now my Frankenstein Athol/Starrett vise is fully operational. (Athol 624 ½ static, Athol 614 ½ dynamic, Starrett swivel base.) Note: The only difference between the 614 ½ and the 624 ½ was the 614 ¼ had stationary base and the 624 ½ was swivel. So at some point, a previous owner of this vise replaced either the dynamic or static side.
 

Attachments

  • Athol vise catalog excerpt.pdf
    93 KB · Views: 7
  • YOxdN01OT%elQuvd2kKV3g.jpg
    YOxdN01OT%elQuvd2kKV3g.jpg
    94.6 KB · Views: 46
  • uZAGZaHORtyCMt34+aPwSQ.jpg
    uZAGZaHORtyCMt34+aPwSQ.jpg
    81.7 KB · Views: 48
  • PuDYDYNHREaGLjG4gQHHxg.jpg
    PuDYDYNHREaGLjG4gQHHxg.jpg
    124.3 KB · Views: 47
  • m%YD2Yb9R+KK29Zfi++LlQ.jpg
    m%YD2Yb9R+KK29Zfi++LlQ.jpg
    151.4 KB · Views: 56

Productbob

Well-known member
Joined
Dec 10, 2018
Messages
414
Location
ny
rtm / txlong- the 204 1/2 should have a collar and set screw holding the main screw to the movable (which you can get to by pulling the movable out and flipping it over) or a split nut on the front of the movable behind the spindle ball.

tsr- nice diy solution
 

RTM

Well-known member
Joined
May 13, 2019
Messages
13,200
Location
SF Bay Area
Bob: Thanks, I changed my search terms from Reed 203 to Reed Screw and found all the information I needed, on both the front and back end of my vise. Comment by Carla (RIP) that all 1xx and 2xx were essentially the same. Great video by ABOM79 someone recommended 30 pages back, and questions from KenC that were answered got me going. Now just to get the time and the bottom swivel screw out.
 

Woodreaux

Well-known member
Joined
Sep 30, 2019
Messages
47
Location
Louisiana
Wood: PM me, I just picked up a 974 1/2 this weekend for parts. Broken dynamic jaw but the swivel base is good!

Edit: Just took it apart to inspect. The brake shoes where they go around the pin are both broken and the parts are not still there to weld/braze them. The base, wedge, bolt, wrench, and swivel bolt are all in excellent condition. The shoes will still work, so its fully functional as the wedge is what puts pressure against the base. If you're not interested I'm throwing it out there for anyone needing 974 1/2 parts! Spindle is straight, nut is good, and the static assembly is excellent too.
I'm definitely interested. Sorry I just saw this. I'll pm you now

Sent from my Pixel 3 XL using Tapatalk
 

Woodreaux

Well-known member
Joined
Sep 30, 2019
Messages
47
Location
Louisiana
I would braze weld this. I posted my repair to my 6" Prentiss which had the same area broken off it's jaw shelf too. Not sure if it was this thread or the otehr vise thread. I thought about leaving the chunk, but it bugged me.


You will need to put a lot of heat into your vise to be able to reach brazing temps though, the vise is like a huge heat sink. Still if I could do it on a 130lb 6" Prentiss you will for sure be able to on a 70lb (?) 4-1/2" vise.
I'll search for your braze welding post. I don't have any experience with that but it would be a learning opportunity. And I will likely be bothered by the missing chunk as well.

Sent from my Pixel 3 XL using Tapatalk
 

javie

Active member
Joined
Sep 15, 2019
Messages
37
Location
Missouri
Does anybody know who makes this vise? It looks like a Wilton, but the large 4 on the body is reminiscent of Craftsman, but they typically put those on the side of the jaws, not the body. Any help would be appreciated.
 

Attachments

  • 73220678_2483187981735309_8290096370946146304_n.jpg
    73220678_2483187981735309_8290096370946146304_n.jpg
    112.6 KB · Views: 62

454ragtop

Well-known member
Joined
Mar 24, 2008
Messages
5,011
Location
Carver, MA
Asian Wilton clone, usually Taskmaster or Duralast, something like that, guess some were made in India as well.
 
Last edited:

kenc184

Well-known member
Joined
Feb 25, 2012
Messages
718
Location
Nor Cal
A small set of repairs on the tail end of the crappy 1750 tradesman I bought recently. Some ***** had broken out the pin holes in the end cap. They had also drilled three extra holes to secure the cap. Cowboys to be sure!

I plugged the three holes with short pieces of mild steel rod, heated them to orange and peened them over to make sure they were tight. Filed them flush

On the cap, I built up the broken out cast iron around the pin holes with braze, temporarily replaced the cap and bored them through thw holes in the tail of the vise.

Simple repairs, but it will make for a decent vise without significant kludges. when I bought it the two "replacement" pins stuck out a 1/2" on each side. And the three other holes were plain to see.

wilton1750cap.jpg
 

kenc184

Well-known member
Joined
Feb 25, 2012
Messages
718
Location
Nor Cal
Thanks Kevin, I always enjoy and learn from your fixit posts. Even if I'm not up to repeating them!
 

Woodreaux

Well-known member
Joined
Sep 30, 2019
Messages
47
Location
Louisiana
Making progress on the Parker 674 1/2 restoration. I came very close to leaving it bare with BLO, but decided to proceed with paint.

Hydrolysis, power wash (yes, with a power washer--- it was seriously dirty. Actually, I should have done this before the hydrolysis to get the grease competely off), hair dryer, wire wheel; Followed by Rust-Oleum self etching primer, then a dark gray blue enamel, with light blue-silver lettering (only in the retainer so far).

I'm going to let the enamel on the main parts of the vise dry overnight before doing the lettering and putting it back together. I also still have some work to do cleaning up the screw and handle, and I'm going to polish the slide and contact points. And another member is sending me replacement parts for the swivel base.

More to follow...dc3b5eb586cfeb688c198cb4f2fa29f6.jpgc5ece488e8d0a6ec60680bfdff01236b.jpg20b992d06936ec1aab27ab075b8932c5.jpg6b3a896413f08e8ae032d1225edc8fde.jpg71f2df4ded5bda77ecf13a71a60f7766.jpg

Sent from my Pixel 3 XL using Tapatalk
 

Attachments

  • dc3b5eb586cfeb688c198cb4f2fa29f6.jpg
    dc3b5eb586cfeb688c198cb4f2fa29f6.jpg
    471.1 KB · Views: 0
  • c5ece488e8d0a6ec60680bfdff01236b.jpg
    c5ece488e8d0a6ec60680bfdff01236b.jpg
    501.8 KB · Views: 0
  • 20b992d06936ec1aab27ab075b8932c5.jpg
    20b992d06936ec1aab27ab075b8932c5.jpg
    424.7 KB · Views: 1
  • 6b3a896413f08e8ae032d1225edc8fde.jpg
    6b3a896413f08e8ae032d1225edc8fde.jpg
    447 KB · Views: 1
  • 71f2df4ded5bda77ecf13a71a60f7766.jpg
    71f2df4ded5bda77ecf13a71a60f7766.jpg
    516.2 KB · Views: 5
Last edited:

Jason1972

Well-known member
Joined
Nov 14, 2017
Messages
51
Location
Indiana
Here’s a PARKER 23X I picked up a few years back that I dislodged from its locked up state, stripped clean, painted, lubed, and put back in service. Nothing was broken or missing on the vise. I mounted it on my bench and it gets used regularly now.
 

Attachments

  • 71502AED-A8E1-4A63-BFD2-20C5DE2C05FA.jpg
    71502AED-A8E1-4A63-BFD2-20C5DE2C05FA.jpg
    16.8 KB · Views: 46
  • 5604D7D2-AA84-4EBB-A89B-C0DFBFAC2A91.jpg
    5604D7D2-AA84-4EBB-A89B-C0DFBFAC2A91.jpg
    19.5 KB · Views: 42

Jason1972

Well-known member
Joined
Nov 14, 2017
Messages
51
Location
Indiana
I like the 23X because it doesn’t require the wrench to lock/unlock the swivel found on most Parker vises. I think I own either 4 or 5 Parker vises but this is the only one with the typical lockdowns like most vise manufacturers use
 

jonshonda

Well-known member
Joined
Jul 17, 2017
Messages
4,744
Location
Wisconsin
I finally got a decent electrolysis tank setup after sourcing a beefy 500watt 30amp power supply. I thought my tote was large enough to accommodate the big Prentiss No 5 I picked up, but not so much. So I need to dig around for another tote.

8 gauge wire running from the power supply to the anode and cathode. Enough juice running through that it keeps the water nice and warm! I like the fact I can do other stuff while this is working, but really don't know if I really feel like a good knotted cup or wheel isn't more time effective.


<a data-flickr-embed="true" href="https://www.flickr.com/photos/154822526@N03/48974840287/in/dateposted-public/" title="20191028_095634"><img src="https://live.staticflickr.com/65535/48974840287_95664168b0_c.jpg" width="633" height="800" alt="20191028_095634"></a><script async src="//embedr.flickr.com/assets/client-code.js" charset="utf-8"></script>
 

bastel

Well-known member
Joined
Sep 23, 2019
Messages
162
Location
Saxony
Nice trick using the red wire for - und the black for +, will probably trigger some "oh noes".
 

jonshonda

Well-known member
Joined
Jul 17, 2017
Messages
4,744
Location
Wisconsin
Nice trick using the red wire for - und the black for +, will probably trigger some "oh noes".

I knew it would but it wasn't intentional. The black wire already had a terminal crimped on the end of it, and I'm far too lazy to cut it off just for the sake of colors. Run what ya brung!
 
To avoid these ads, REGISTER NOW!

Woodreaux

Well-known member
Joined
Sep 30, 2019
Messages
47
Location
Louisiana
Paints and finishes:


1: Rustoleum Hammered pay a little extra and go for the $10 per can stuff 2: Wrinkled spray paints names of brand to follow

3: Linseed Oil (boiled linseed oil seems to work the best with a few coats)

4: Mineral Oil

5: Satin paint seems to get the vote for looking the best and taking the best pictures if selling


(any paint you use should probably cure for several days before use at 60-80 degrees and longer if colder or bring inside. some GJ members even have ovens in their shop for preheating before paint and then back in on low for curing (not recommended for use in an oven you cook food in)
I am finishing up the paint on my Parker 674 1/2. I used Rust-Oleum self etching primer (3 coats) followed by an enamel spray paint intended for model making . It's only been about 24 hours, but I'm worried about the enamel because it seems sort of soft. Did I make a bad choice? Or do I just need to give it some more time to cure?
39fefbd55bc629cc426321d95d5c2a05.jpg

Sent from my Pixel 3 XL using Tapatalk
 

Attachments

  • 39fefbd55bc629cc426321d95d5c2a05.jpg
    39fefbd55bc629cc426321d95d5c2a05.jpg
    530.9 KB · Views: 6

Shiftless

Well-known member
Joined
Mar 9, 2014
Messages
14,553
Location
East Bay SFO
Temperature and humidity are major factors in drying time. Be patient and I bet that beautiful paint job will be much harder in a few days. The paint is actually dry but there is a chemical process involved in hardening.
 

Woodreaux

Well-known member
Joined
Sep 30, 2019
Messages
47
Location
Louisiana
Temperature and humidity are major factors in drying time. Be patient and I bet that beautiful paint job will be much harder in a few days. The paint is actually dry but there is a chemical process involved in hardening.
Thanks for the reassurance. What you're saying makes sense: I'm in South Louisiana, so plenty of humidity, and it's been fairly cool this week.

I'll get to work on the handle and screw to keep my hands busy.

Sent from my Pixel 3 XL using Tapatalk
 
OP
D

drivesitfar

Well-known member
Joined
Oct 23, 2013
Messages
36,034
Location
Pacific Northwest
RTM: did you get your Reed's bolt out of it's swivel base yet? if you do (or did) use the washer idea I mentioned instead of buying and using a big drag link or welding up something you might use a an old monkey wrench instead of an eye bolt. it will give you more of an angle and better leverage. sorry I don't have a picture handy of one of my nice old monkey wrenches, but i'll get one if you are not sure what i'm talking about.

Woodreaux: I picked up a hair dryer for the garage to dry BLO (or paint) that isn't quite as hot as my heat gun or if you still have warm weather and sunshine just set it on a chair or bench in the sun for a few days (bring it in at night) and like Shiftless mentioned it will harden up with time and warmer temps. Or if your bride has a hair dryer you can try it if you want a little quicker result. maybe best option is buying a cheap smoker that can sit outside and just put your vises and painted tools inside it to cook on the paint or BLO.

good luck and your vise is looking like a new vise again. WELL DONE!!!

TSR: nice thinking (out of the box sort of) about how to make an old bolt for a great old Athol vise. i'm not entirely sure how you did it, but if I need to make one like that I hope you are around to ask if I need more information. i'm hoping to buy a small metal lathe to make a few of these little projects as I get organized and find space to put it, but your method is doable today for guys like me and I probably have those tap and dies around here someplace since I own a few toolboxes full of them.
 

RTM

Well-known member
Joined
May 13, 2019
Messages
13,200
Location
SF Bay Area
Nah, no luck. Tried several ideas, including clamping metal in a small woodworking vise for a handle. Just bent the metal on everything I grabbed. Drag link arrives tomorrow.

Not sure if I have any decent sized monkey wrenches, think most of mine are under 8”, but a much better idea than a crescent wrench, which failed miserably. Thanks for that idea tho, I like it.

I even tried a huge screwdriver bit in a T handle bitstock driver. Still haven’t found the other shard of the blade, somewhere behind the bench.
 
OP
D

drivesitfar

Well-known member
Joined
Oct 23, 2013
Messages
36,034
Location
Pacific Northwest
RTM: you might squirt a bit of Kroil or PB blaster on that bolt while you are waiting for your drag link. also be careful not to damage the slot so maybe even using your mapp gas plumbing torch to heat it up a bit and a few taps with a brass or lead hammer might break the rusted threads loose.

some guys even say they tightened that bolt a bit (of course not too much) and then loosened it.

good luck!!!
 

va.grouseman

Well-known member
Joined
Mar 26, 2011
Messages
4,965
Location
Southern-Central VA.
What Drive said.---Just like a froze lug nut, if it won't loosen, I hit it in the tightening direction for a few raps, then back to loosen.---Most of the time that will get it to moving.---Of course the hammering of the ratchet action is paramount also, as vibration is an excellent lubricant in it's own right.

Try using your drag link using a 1/2'' impact hammer, manual or electric.
 

kenc184

Well-known member
Joined
Feb 25, 2012
Messages
718
Location
Nor Cal
RTM: you might squirt a bit of Kroil or PB blaster on that bolt while you are waiting for your drag link. also be careful not to damage the slot so maybe even using your mapp gas plumbing torch to heat it up a bit and a few taps with a brass or lead hammer might break the rusted threads loose.

some guys even say they tightened that bolt a bit (of course not too much) and then loosened it.

good luck!!!

ah, the "what the hell" fruitless blast of kroil or pb blaster. If a bolt is truly frozen, this is a total waste of time - at least IMO.
 

RTM

Well-known member
Joined
May 13, 2019
Messages
13,200
Location
SF Bay Area
Thanks guys. Been a bit down that path so far. Liquid Wrench (all I have handy) every time I go past it, spin the base to get it into the area. Tapping with an aluminum drift in both directions. Trying anything screwdriver shaped that fits in the slot (except chisels). Got a 15" breaker bar and a 1/2" electric impact wrench queued up, and the impact driver just for giggles (sometimes it works when the electric fails)

Haven't got the Mapp torch out yet. With the high wind and 15% humidity here, doesn't seem like a wise idea just yet. Holding out for safer weather, don't want to be in the news.

Got the main screw out the other day, and the grossness inside the dynamic jaw could explain why it didn't stay lubed for long. Lots of dried something packed around the screw shaft, but just crumbling away under a screwdriver or pick tip. The grease was more like soft asphalt. Picked up 2g of Simple Green to soak it when I have a few minutes to make a mess.
 
OP
D

drivesitfar

Well-known member
Joined
Oct 23, 2013
Messages
36,034
Location
Pacific Northwest
RTM: we have a lot of members that live in your part of California and I hope you all are doing ok with all the winds and fire that seem to be ruining or changing so many people's lives.

while I agree I don't have a lot of success with Kroil it seems to help some of the bolts that looked rustier than they actually were. hell oil might have helped in some of those cases just as well, but looking at the tests about how it CREEPS into a crack it is worth a shot.

i'm guessing you can't fire up your Mapp gas inside your garage out of the wind and weather? it might not be hot enough, but it might be just enough. the oxy aci torch seems to be a common go to and if you are able to weld a nut onto the end of the bolt and turn it off with regular wrench that is maybe the most popular method with those members with that skill.

hopefully the drag link and a some careful work will get that bolt out of your vise without damaging it.

good luck!!!
 

kenc184

Well-known member
Joined
Feb 25, 2012
Messages
718
Location
Nor Cal
drives

I've never seen any evidence that it creeps anywhere. Of course, a loose or normal joint it may penetrate, but not a corroded joint. I've immersed frozen bolts in kroil etc for DAYS, and had no luck moving the bolt/stud/nut whatever. When finally removed with heat, there is no evidence that the "penetrating" oil did any penetrating at all. I think it's a scam, everyone wants an easy solution so reach for the can of oil, but it never works.
Now, it IS useful for lubing a rusty thread once the fastener has already been loosened by other means - i.e. the oxy torch.

All "IMO" of course.
 
OP
D

drivesitfar

Well-known member
Joined
Oct 23, 2013
Messages
36,034
Location
Pacific Northwest
KEN: you just might be correct, but California rust and PNW rust might be two different animals. you could be correct in your testing and i can't say for sure that KROIL has done anything other than taken my money for a product that barely works sort of like Microsoft that is still trying to convince us that Windows 10 isn't Windows 95 with a ton of fixes. it's the new American way to do GOOD MARKETING instead of good products IMO.

one thing that did work for me that i was surprised about was soaking an old Prentiss in vinegar. it got that slide out, but I set the project aside and i still need to test it to see if it will loosen the main screw cause this vise had sat outside for about 70 years up here in the rain.

I hear you that heat might be our best friend if used correctly, but we all don't have an oxy/acy torch handy or the skills to know when it's too hot and starting to melt our nice old vise.

ALL: anybody else have aluminum jaws on their vises? I'm picking up an Armstrong vise tomorrow and mainly for the aluminum jaws that should fit nicely on my Record quick release, but I didn't know Armstrong made vises too. or maybe it's a Columbian made vise for Armstrong?
 

Attachments

  • Armstrong 4.5 inch with aluminum jaws 1.jpg
    Armstrong 4.5 inch with aluminum jaws 1.jpg
    45.7 KB · Views: 43
  • Armstrong 4.5 inch with aluminum jaws.jpg
    Armstrong 4.5 inch with aluminum jaws.jpg
    55.1 KB · Views: 57

RTM

Well-known member
Joined
May 13, 2019
Messages
13,200
Location
SF Bay Area
RTM: we have a lot of members that live in your part of California and I hope you all are doing ok with all the winds and fire that seem to be ruining or changing so many people's lives

i'm guessing you can't fire up your Mapp gas inside your garage out of the wind and weather? it might not be hot enough, but it might be just enough.

Thanks, the drag link on the electric impact wrench took care of things quickly. Should have just waited, saved some marring of the slot.

I am primarily a woodworker, so not a fan of open flames in the garage. The MAPP usually is used in the driveway, with fire bricks on the workmate. Unfortunately, we are surrounded by eucalyptus trees, so their detritus is everywhere, and flammable.

No fire concerns right here, but PGE decided we were a fire risk, and turned us into a 3rd world country for almost two days, to prevent fires. We had a 60+ acre fire south of us early on, so everyone was on edge. I didn’t want to be “that guy” who burned the neighborhood down.

All the parts are separated, and serially soaking in a Simple Green bucket. At least two, maybe 3 layers of color, gray, bits of red, then a black top coat coming off so far, revealing a 157 on the front jaw. Using lots of scraping to remove the dried grease before soaking.

More news in a few weeks, after the BLO eventually dries. Thanks for all the guidance so far.
 
OP
D

drivesitfar

Well-known member
Joined
Oct 23, 2013
Messages
36,034
Location
Pacific Northwest
RTM: yep i've heard PGE electric company is in a heckuva spot with their power company getting blamed for all the fires whether they started them or not hence them shutting power off when your winds and weather get dicey.

I'm happy to hear you are out of harms way and hope maybe you had a generator to keep the fridge and/freezer and laptop powered up.

glad to hear you got the big bolt out of your vise and yep having flames in a woodshop isn't really a good thing is it.

I personally like the sound of the BLO so hope your paint stripping and prep don't discover any issues to cause you any grief.

good luck!!
 

LesserSon

Well-known member
Joined
Feb 7, 2016
Messages
5,076
Location
PA USA
Could not leave this little table vise behind today. It is unmarked aside from “2-1/2” stamped on the spindle hub, which seems to be the throat capacity. The clamp screw had been broken out, but it has three screw holes in the base, so I cut off the beard and smoothed it up.
I do not know the manufacturer. Guesses?
 

Attachments

  • 3B713FA5-9065-454D-A529-0C28415D8B19.jpg
    3B713FA5-9065-454D-A529-0C28415D8B19.jpg
    146.8 KB · Views: 35
  • 5440CB8F-A609-40EB-9F89-B534C6F0C6D2.jpg
    5440CB8F-A609-40EB-9F89-B534C6F0C6D2.jpg
    112.2 KB · Views: 33
  • 89B9BBDB-7E62-43D2-BCE5-6B5135FEEBEA.jpg
    89B9BBDB-7E62-43D2-BCE5-6B5135FEEBEA.jpg
    114.3 KB · Views: 32
  • 557C2204-3F89-4C3D-924C-9A1D30C25417.jpg
    557C2204-3F89-4C3D-924C-9A1D30C25417.jpg
    47.2 KB · Views: 29
  • C449F4F1-310D-4893-93E4-C2889B52408F.jpg
    C449F4F1-310D-4893-93E4-C2889B52408F.jpg
    125 KB · Views: 38

damon18

ALLIANCE MEMBER
Joined
Jan 24, 2018
Messages
621
Location
Memphis, TN
Trying to clean up and restore an old 5 inch Wilton Shop King. It belonged to my father, not sure if he bought it new or not, but I remember using it at least back to 1970.

First problem I ran into is the swivel base is frozen in place in the position shown in picture. I've tried hitting the swivel adjuster handle with a hammer and trying to loosen the base nut with a wrench but didn't want to damage it with too much force.

Just to be sure, the base is "righty tighty, lefty loosy" correct?

I've doused it with penetrating oil, no results, should I heat it with a torch?
 

Attachments

  • 20191102_163509.jpg
    20191102_163509.jpg
    156.1 KB · Views: 41
Last edited:
To avoid these ads, REGISTER NOW!
Top Bottom