To avoid these ads, REGISTER NOW!

VISE REPAIR 101 all vise repairs, lubricants, sources for parts and the tricks to fix

damon18

ALLIANCE MEMBER
Joined
Jan 24, 2018
Messages
621
Location
Memphis, TN
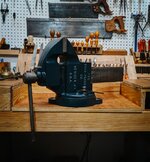
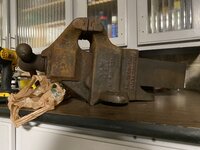
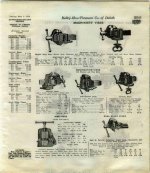
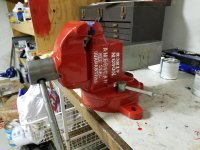
First I found out that this vise was actually purchased in the 1950's by my Grandfather who was an auto mechanic and then given to my Father in the early 70's, so regardless of the "It has an exposed screw so it's ****!" sentiment I'm sure it will serve my needs. ;-)

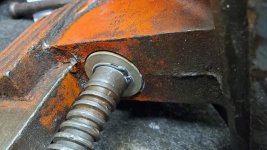
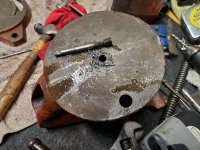
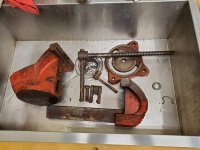
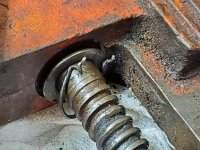
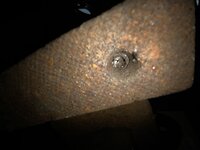
Found the vise had two mechanical problems, the center screw for the swivel base was broken off and the active jaw was held on by bailing wire instead of a clip.

Was never able to find a correct replacement for the center bolt for the swivel so just replaced it with a 3/4" inch long 3/8-16 bolt for now.

After cleaning all the grime off and lubing the main screw decided just to reassemble and use it, and just enjoy the "patina".
 

Attachments

  • 20191105_223830.jpg
    20191105_223830.jpg
    159.4 KB · Views: 9
  • 20191222_120422.jpg
    20191222_120422.jpg
    151.8 KB · Views: 11
  • 20191105_231032.jpg
    20191105_231032.jpg
    146.6 KB · Views: 7
  • 20191222_220629.jpg
    20191222_220629.jpg
    147.6 KB · Views: 11
  • 20191222_211714.jpg
    20191222_211714.jpg
    153.9 KB · Views: 12
  • 20191109_194026.jpg
    20191109_194026.jpg
    155.4 KB · Views: 6
  • 20191109_194801.jpg
    20191109_194801.jpg
    156.7 KB · Views: 6
Last edited:
To avoid these ads, REGISTER NOW!

Outlawmws

Well-known member
Joined
Aug 9, 2011
Messages
39,275
Location
The Badlands
Could not leave this little table vise behind today. It is unmarked aside from “2-1/2” stamped on the spindle hub, which seems to be the throat capacity. The clamp screw had been broken out, but it has three screw holes in the base, so I cut off the beard and smoothed it up.
I do not know the manufacturer. Guesses?

LS looks to be a Colton patent vise:

George A. Colton patent holder, No. 320,224. Patented June 16, 1885. H&B, Inmarks, Phoenix and unmarked examples exist. "Mfg by Moore & Barnes Manufacturing Co. of Phoenix, N. Y.": According to patent info? http://www.datamp.org/patents/displayPatent.php?id=7259
 

LesserSon

Well-known member
Joined
Feb 7, 2016
Messages
5,076
Location
PA USA
Thanks, Outlaw! That’s surely it. The photo example is spot-on, even though the patent drawing is a bit different. Wish mine hadn’t been broken, but I think it turned out pretty well.
Edit - make that certainly it. “Pat June 16 1885” cast right in. Something afterward, but I haven’t made out what it is. Outlaw’s link to Vintage Machinery states many of the vises inexplicably have “H&B” cast on them, but if they are as fragmentary as this, I think it could as easily be “M&B.”
 

Attachments

  • FCD600CC-0CAF-4C32-8020-4CAF8D53D286.jpg
    FCD600CC-0CAF-4C32-8020-4CAF8D53D286.jpg
    97.4 KB · Views: 8
Last edited:
OP
D

drivesitfar

Well-known member
Joined
Oct 23, 2013
Messages
36,033
Location
Pacific Northwest
Damon: best of luck with the old vise restoration. if you read some of the posts for the last month we've talked a lot about rusted bolts. yes righty tighty and lefty loosey is correct for vise's bolts. I'm pretty sure even the English vices are that way too.

heat could help and another thought is to set it in a tub of vinegar for a day or two more or less your call, that might loosen things up a bit. only issue about using vinegar is that you need to rinse it all off and dry it cause it can EAT CAST IRON.

good luck!!
 

damon18

ALLIANCE MEMBER
Joined
Jan 24, 2018
Messages
621
Location
Memphis, TN
Thanks @drivesitfar I'm out of mapp gas, but had a jug of vinegar, so soaking it now. I've read a ton of old restore threads and learned a lot about vises but this is the first one I've tried.

The vise is in overall good shape but the jaw inserts are pretty beat up.
Damon: best of luck with the old vise restoration. if you read some of the posts for the last month we've talked a lot about rusted bolts. yes righty tighty and lefty loosey is correct for vise's bolts. I'm pretty sure even the English vices are that way too.

heat could help and another thought is to set it in a tub of vinegar for a day or two more or less your call, that might loosen things up a bit. only issue about using vinegar is that you need to rinse it all off and dry it cause it can EAT CAST IRON.

good luck!!

Sent from my SM-G973U using The Garage Journal mobile app
 

damon18

ALLIANCE MEMBER
Joined
Jan 24, 2018
Messages
621
Location
Memphis, TN
Reporting back, the two day soak in vinegar worked. After a little encouragement from a 2lb deadblow the base started to move and eventually got the tightening bolt removed.

Overall looks good, I don't see any signs of old repairs or welds. There is what looks like a jury rigged part holding the screw to the dynamic jaw. Was that supposd to be a C-Clip? Anyone know the correct part?

The only other thing keeping me from just cleaning it up more and starting to use it is I'd like to find a replacement for the missing pipe jaw, I only have one. Posted a wanted ad just in case someone has a single in a drawer somewhere. https://www.garagejournal.com/forum/showthread.php?p=8163320

I washed the pieces in hot water to remove the vinegar, dried with air, and hosed down all the parts with WD40 for now. Not sure what my next step will be.
 

Attachments

  • 20191105_224410.jpg
    20191105_224410.jpg
    150.6 KB · Views: 40
  • 20191105_231032.jpg
    20191105_231032.jpg
    146.6 KB · Views: 34
  • 20191105_223946.jpg
    20191105_223946.jpg
    161 KB · Views: 34
  • 20191105_223830.jpg
    20191105_223830.jpg
    159.4 KB · Views: 34
OP
D

drivesitfar

Well-known member
Joined
Oct 23, 2013
Messages
36,033
Location
Pacific Northwest
Damon: i've never restored one of these open screw vises, but there are several posted here on this thread and many members have so maybe they'll give you a better part # or picture of what was original. I don't know if it's called a snap ring or E clip, but it's not a washer and some bailing wire.

as far as where to go now are you wanting to save the red color? if you want to clean it up a bit more and then put BLO on it that will make that old red shine a bit more.

OR if you have a sandblaster that you can use on the body of the vise (not screw) or wire wheel on a bench grinder or dremel is my go to since i don't own a sandblast cabinet to get it NAKED so to speak. THEN either put BLO on it and light coats and warm temps will still take a bit to dry or paint it your favorite color.

need more help there is a lot to read and if you can't find an answer just ask and maybe one of us will be happy to help you.

good luck!!
 

MMM

New member
Joined
Oct 30, 2019
Messages
4
Location
PA
Post 1 for the Reed 106 I bought before pics.

My plans are to clean off what’s caked on with a degreaser, maybe Zep AC flush.

For removing rust I plan to use the Metal Rescue product from Home Depot. It’s non toxic and did a great job in my motorcycle gas tank.

Lastly I’d like to do cerakote for the refinish. I know a guy who’s done some great work on guns for me.

Having said that, and reviewing the tips on the first page, I realize none of the products mentioned above seem to be on the list of recommendations, haha.

I’m here to learn from your wisdom so feel free to direct me on the right path!

(I also promise to try and upload better pictures facing the right way)

ae730bb06db96287207d45f92b03d567.jpg

8644dabb30846c4d8bd74d7aafd4c759.jpg

2f8a3ca1867094ef12f7d67fd54ce4f9.jpg

079bc11cf632211e3752d8928e8110a8.jpg
 

Attachments

  • 079bc11cf632211e3752d8928e8110a8.jpg
    079bc11cf632211e3752d8928e8110a8.jpg
    360.9 KB · Views: 0
  • 2f8a3ca1867094ef12f7d67fd54ce4f9.jpg
    2f8a3ca1867094ef12f7d67fd54ce4f9.jpg
    293.8 KB · Views: 1
  • 8644dabb30846c4d8bd74d7aafd4c759.jpg
    8644dabb30846c4d8bd74d7aafd4c759.jpg
    529.4 KB · Views: 0
  • ae730bb06db96287207d45f92b03d567.jpg
    ae730bb06db96287207d45f92b03d567.jpg
    475.6 KB · Views: 0
Last edited:
OP
D

drivesitfar

Well-known member
Joined
Oct 23, 2013
Messages
36,033
Location
Pacific Northwest
MMM: your picture is upside down, but it still doesn't look like a REED 106. are you sure you posted the right picture or if that is your vise can you get us a few more pictures and tell us what the words say on the casting?

also WELCOME TO GJ!!

if you do have a Reed 106 you did well to find one first of all and I hope you lifted it with your legs and not your back cause it isn't any little thing is it.

good luck!!
 

Productbob

Well-known member
Joined
Dec 10, 2018
Messages
414
Location
ny
Warren, folks approach it both ways. For me, if I'm taking the paint off as part of a cleanup I like to take it off first (whether wire wheel, disk or chemicals). Want as much "uncovered" metal as possible before moving on to rust removal. Sometimes it works out that if you're wire wheeling the paint you can just remove the rust at the same time without using chemicals at all. Good luck with your project!
 

Ststephen7

Well-known member
Joined
Sep 24, 2016
Messages
165
Location
Elkins Park, PA
Parker 87 question...

Does anyone have a Parker 87 WITH the original (or good copy) pipe jaw in the dynamic jaw?

I got a good deal on an 87 and it's missing that one jaw. I made a new one from one of the 2 in the main body of the vise (using it as a template), however... they are not interchangeable.

If anyone is willing I'd like the dimensions l x w, plus the position of the hole if possible. Pictures with dimensions would be great!

Plus I guess... there is a spacer between the 2 in the body of the vise... are they an spacers or washers or anything in the dynamic jaw around the pipe jaw?

Thank you in advance,
Steve
 
Last edited:

MMM

New member
Joined
Oct 30, 2019
Messages
4
Location
PA
MMM: your picture is upside down, but it still doesn't look like a REED 106. are you sure you posted the right picture or if that is your vise can you get us a few more pictures and tell us what the words say on the casting?

also WELCOME TO GJ!!

if you do have a Reed 106 you did well to find one first of all and I hope you lifted it with your legs and not your back cause it isn't any little thing is it.

good luck!!

Sorry, uploading from my phone where they’re right side up. Not sure why it flips. Darn iPhones! I uploaded a few more.
 

454ragtop

Well-known member
Joined
Mar 24, 2008
Messages
5,011
Location
Carver, MA
Parker 87 question...

Does anyone have a Parker 87 WITH the original (or good copy) pipe jaw in the dynamic jaw?

I got a good deal on an 87 and it's missing that one jaw. I made a new one from one of the 2 in the main body of the vise (using it as a template), however... they are not interchangeable.

If anyone is willing I'd like the dimensions l x w, plus the position of the hole if possible. Pictures with dimensions would be great!

Plus I guess... there is a spacer between the 2 in the body of the vise... are they an spacers or washers or anything in the dynamic jaw around the pipe jaw?

Thank you in advance,
Steve
5/8" thick X 2-1/2" X 4-1/8" , step pattern matches the other jaws. After making the jaw, insert it in the pocket and using a drill mark the thru hole, Parker isn't known for real standardized parts, I wouldn't go by someone elses jaw for the hole. There is a triangular shaped spacer behind the pin that holds the other 2 pipe jaws in, sorry, don't want to disassemble my vise at this time, best I can do.
 

Attachments

  • 20191107_154242.jpg
    20191107_154242.jpg
    150.9 KB · Views: 30
Last edited:

WarrenJ

Well-known member
Joined
Feb 10, 2013
Messages
772
Location
East Coast or Right side of country
Warren, folks approach it both ways. For me, if I'm taking the paint off as part of a cleanup I like to take it off first (whether wire wheel, disk or chemicals). Want as much "uncovered" metal as possible before moving on to rust removal. Sometimes it works out that if you're wire wheeling the paint you can just remove the rust at the same time without using chemicals at all. Good luck with your project!

thanks for the response. Finally separated the screw from front jaw. Picked up some Evapo at HF. Moving forward.
 

MMM

New member
Joined
Oct 30, 2019
Messages
4
Location
PA
On one jaw I see old flat head slots. On the other jaw both are snapped. How much do I dare mess with these??

(From post #7611)

d2c93b852575b4c4c7df8c3ade0429e7.jpg

38e5ac08ded3b42ffe134d56ded82fa7.jpg


55a6b0064470268d4ee408f5ffd7c674.jpg
 

Attachments

  • d2c93b852575b4c4c7df8c3ade0429e7.jpg
    d2c93b852575b4c4c7df8c3ade0429e7.jpg
    394.9 KB · Views: 0
  • 38e5ac08ded3b42ffe134d56ded82fa7.jpg
    38e5ac08ded3b42ffe134d56ded82fa7.jpg
    218.4 KB · Views: 1
  • 55a6b0064470268d4ee408f5ffd7c674.jpg
    55a6b0064470268d4ee408f5ffd7c674.jpg
    268 KB · Views: 1
OP
D

drivesitfar

Well-known member
Joined
Oct 23, 2013
Messages
36,033
Location
Pacific Northwest
MMM: some of the members use power drills and others use hand crank drills to drill out the old screw's heads so you can pop off the jaws. then you can determine how you want to remove the studs and proceed as you wish with the jaw supports. if they are cracked then rebuilding them or if they just need some JB WELD or DEVCON to build them up a bit then your call or ask for help.

also you can drill out the studs and retap or there are several other methods posted here on this big thread.

good luck!!
 

Ststephen7

Well-known member
Joined
Sep 24, 2016
Messages
165
Location
Elkins Park, PA
5/8" thick X 2-1/2" X 4-1/8" , step pattern matches the other jaws. After making the jaw, insert it in the pocket and using a drill mark the thru hole, Parker isn't known for real standardized parts, I wouldn't go by someone elses jaw for the hole. There is a triangular shaped spacer behind the pin that holds the other 2 pipe jaws in, sorry, don't want to disassemble my vise at this time, best I can do.

Thanks for getting back to me.

I have the 2 jaws and the spacer in the vise body (main casting/static jaw). They are around 2.5 x 3.

The one in the dynamic jaw looks like it's going to be 2.5 x maybe 1.5 or 2... I guess I'll try to make up a cardboard model?

d3Pw1j7yRo2yd1vaLc30ig.jpg

WzCLJiU%QeO9l%GttINN8A.jpg

uE6nnKYyRpmyMi+IB0RAuA.jpg
 
OP
D

drivesitfar

Well-known member
Joined
Oct 23, 2013
Messages
36,033
Location
Pacific Northwest
MMM: it might be easier to look up FRETTERS in a search to see his posts on his hand vintage drilling out of old screw heads. AND since he's English or some version of that since i think he's from a different part of town he also uses MOLE GRIPS (we call them vise grips) to hold on the stud after the jaws are removed and just unscrews them if possible.

if the studs are still stuck then the heat and retry or then drilling them out to and re tapping if you need to.

good luck!!
 
To avoid these ads, REGISTER NOW!

454ragtop

Well-known member
Joined
Mar 24, 2008
Messages
5,011
Location
Carver, MA
Thanks for getting back to me.

I have the 2 jaws and the spacer in the vise body (main casting/static jaw). They are around 2.5 x 3.

The one in the dynamic jaw looks like it's going to be 2.5 x maybe 1.5 or 2... I guess I'll try to make up a cardboard model?

d3Pw1j7yRo2yd1vaLc30ig.jpg

WzCLJiU%QeO9l%GttINN8A.jpg

uE6nnKYyRpmyMi+IB0RAuA.jpg

Not sure what you're thinking, but that pipe jaw I showed is the correct pipe jaw for a Parker 87, I took it out of my 87 to take the pic. The reason these are so often missing is because they are so long not allowing work to drop down into the vise, hence they were removed.
Pics of my 87 here https://www.garagejournal.com/forum/showthread.php?p=6474650&highlight=Parker#post6474650
 

Attachments

  • 1916 cat 2.jpg
    1916 cat 2.jpg
    148.5 KB · Views: 36
Last edited:

matt1027

Member
Joined
Sep 4, 2019
Messages
15
Location
Illinois
Here are some after-ish pics of the American Red Seal 63N I started to restore (see #7459 – sorry not to have taken #7460).

Well, I just couldn’t leave well enough alone, and in some respects I’m glad I didn’t. I left the nut in place as advised, but took off the jaws. One screw had come out without force, a second yielded to a screw extractor. The other two needed to be drilled (but at least the studs turned freely with vise grips once the jaws were off.

I found a rusty jig saw blade filling a gap between the jaw on the vise body on one of the sides. Glad that’s out of there. The gap is caused by a mismatch between the channel depth on the jaw, and the ledge on the vise body. 0.5mm difference (sorry guys, I used to work for NIST, I do things in metric).

Was all set to just order replacement jaws form benchvisejaws.com, but then I noticed how different my two jaws are. I’m not in the mood for spending what I think fully customized jaws would cost… and I (sadly) don’t have a mill to call my own.

So here is my current plan (please throw things at it as you see fit):
1) Counterbore mounting holes so I can use a 5/16” x ½” low profile SHCS. I’ll oversize the counterbore diameter to give myself some tolerance on the concentricity of the bore with the original screw hole.
2) Patiently use a file to remove 0.5mm of material from the jaw that has a shallow channel (I’d love suggestions that would be less tedious… I wish buying a mill were in my budget).
3) Mount everything up and be done.

Thanks!
Matt

PS: The swivel lock lever is going to have all the extra bolt cut down, and the heads rounded too. I’m just waiting for the JB weld to cure. Also, you can see part of an out of focus Athol 614 on the background... it is next, unless I do my Dad's Shop King 4" next...
 

Attachments

  • 20191108_130945.jpg
    20191108_130945.jpg
    48.9 KB · Views: 49
  • 20191107_100108.jpg
    20191107_100108.jpg
    112.4 KB · Views: 53
  • 20191107_100059.jpg
    20191107_100059.jpg
    149.8 KB · Views: 55
Last edited:

454ragtop

Well-known member
Joined
Mar 24, 2008
Messages
5,011
Location
Carver, MA
Matt, your plan sounds doable, but you need to make sure you can modify the jaw inserts. They're often too hard to drill or counterbore. A lot of times it's easier to modify an existing screw of some sort to fit the jaws. You can chuck the screw shank in a drill, and modify the head on a bench grinder. Good luck.
 

Ststephen7

Well-known member
Joined
Sep 24, 2016
Messages
165
Location
Elkins Park, PA
Not sure what you're thinking, but that pipe jaw I showed is the correct pipe jaw for a Parker 87, I took it out of my 87 to take the pic. The reason these are so often missing is because they are so long not allowing work to drop down into the vise, hence they were removed.
Pics of my 87 here https://www.garagejournal.com/forum/showthread.php?p=6474650&highlight=Parker#post6474650

Holy ****! Thanks for the update! I never imagined it would be that long... no wonder they are removed/lost.

I might just shorten this one so it sits just behind the face of the jaw...
 

AmptGuy

Member
Joined
Sep 23, 2019
Messages
9
Location
In my converted garage in Ampthill, UK
Temperature and humidity are major factors in drying time. Be patient and I bet that beautiful paint job will be much harder in a few days. The paint is actually dry but there is a chemical process involved in hardening.

November is England is cold and wet, typically in the 40s and humid. Is is worth putting off a restoration that requires paint until the spring? Others have commented on using BLO or Shellac (or paste wax) on bare metal, which seems like a fine idea, but won't that require a big stripping process if I decide to prime and paint it? This part of metal treatment is a bit mysterious to me :)
 
Last edited:
OP
D

drivesitfar

Well-known member
Joined
Oct 23, 2013
Messages
36,033
Location
Pacific Northwest
AMPT: i'm guessing your garage or shed doesn't have any heat? BLO works better if temps are over 70 degrees just like paint so getting a heat gun or even a heat lamp or hair dryer could help with your drying process.

stripping everything (paint, primer, crud or grease or ....) off your vice (vise for us on this side of the pond) can be fairly quick if you have a bench grinder with a wire wheel and/or a hand grinder with a wire wheel or dremel so putting on BLO or primer is your call.

here's my big 178 pound Reed 4c that I could spiff up a bit more and add more BLO, but I don't mind a little surface rust and the last time I put BLO on it was maybe 5 years ago.

getting a nice big cardboard box to use as sort of a paint booth will make it easier to also use while you are drying it with one of the types of heat that I mentioned unless you can heat up your garage to 65-70 degrees.

i'm curious which vise you own and that you are working on cause if it's a Record those are not the easiest to take apart. any pics to post of your vice or vices (or vise if you have one from the USA)?
 

damon18

ALLIANCE MEMBER
Joined
Jan 24, 2018
Messages
621
Location
Memphis, TN
As a first time vise fixer I didn't realize one problem my Shop King had until I got it apart and started cleaning.

If you look at the first pic I posted the problem should have been obvious. The center bolt for the rotating base is missing, broken off in the vise body.

I was able to remove the broken bit with an easy-out and now need a replacement. The threads are 3/8 course and needs a large head. I'll search the bins at the local hardware unless someone knows a source for real vise bolts.

Also I did a little light wire cup work on the jaws and anvil surface. Jaws are in better shape than I thought. Leaning to just use it as is once i get the center bolt.

Would really like to find the second pipe jaw though.20191102_163509.jpeg20191109_194026.jpeg20191109_194801.jpeg20191109_204211.jpeg

Sent from my SM-G973U using The Garage Journal mobile app
 

Outlawmws

Well-known member
Joined
Aug 9, 2011
Messages
39,275
Location
The Badlands
Damon, what you will need is a shoulder bolt, However, you can get a bushing and use a std bolt and a washer to get the defect of the larger head and shoulder. You may need to grind the head flatter if the stack gets too high, or you could use a button head socket head optionally.
 

Ststephen7

Well-known member
Joined
Sep 24, 2016
Messages
165
Location
Elkins Park, PA
Post Leg vise mounting...

Hey guys,

I finally made a free standing mount for the 6" post vise I got off Facebook marketplace almost a year ago.

The base is 1/2" steel, with a very heavy truck hub welded on to add some weight.

The vise weighs about 90 lbs, and the base it just as heavy.

However, the base plate deformed a bit, curling up around the outside after welding. Now the edges are perhaps 1/16" higher than the center of the plate.

My garage floor is anything but flat, and it's about 10' x 15', so I want to be able to shuffle it around as needed (and not mount it to the floor.

Should I just shove some shims under it when I need to use it?
Should I weld on 4 (or perhaps on 3) feet?
Should I install adjustable leveling feet?

What has worked for you guys on not flat floors?

Thanks,
Steve

Oq8oKktsT9ietlbekkGh4g.jpg

vN6mGiwZS7ux0K8e%A4ZYA.jpg

MqCciPrXREW2+NwKwto13w.jpg

n4IjzLd6RwChQ8orC3+hYw.jpg
 

Outlawmws

Well-known member
Joined
Aug 9, 2011
Messages
39,275
Location
The Badlands
In addition to the two wheels Phil suggested you can also just weld 4 Feet on the corners. a large nut or heavy washer would do...

Then if it rocks, shim one foot...
 

nutjob

Well-known member
Joined
May 8, 2008
Messages
807
Location
NE, PA
As a first time vise fixer I didn't realize one problem my Shop King had until I got it apart and started cleaning.

If you look at the first pic I posted the problem should have been obvious. The center bolt for the rotating base is missing, broken off in the vise body.

I was able to remove the broken bit with an easy-out and now need a replacement. The threads are 3/8 course and needs a large head. I'll search the bins at the local hardware unless someone knows a source for real vise bolts.

I had the same issue with a Shop King and not having a lathe to make the part I found a shoulder bolt on Ebay that was very close to the specs I needed. But looks like it is sold out. Check out the old auction and you may find the same bolt.

https://www.ebay.com/itm/7-16-20-UNF-SHOULDER-BOLT-9-16-DIA-x-380-SHOULDER-930-DIA-WASHER-5-8-HEX-/332827351236?hash=item4d7e0e58c4

Kevin
 

Woodreaux

Well-known member
Joined
Sep 30, 2019
Messages
47
Location
Louisiana
I have just gotten a Parker 674 1/2, and it has two prominent issues. One is a large chip missing from the jaw just beneath the replaceable jaw plate. For my purposes, I dont this this will affect its use. You can see the missing chip in the photo.

The other and much bigger problem is that I can't get either the swivel set screw or the bottom lug to budge. The set screw is corroded nearly beyond recognition.

I've used Kroil and Liquid Wrench. And I've heated both screws/bolts with a torch. They literally will not move at all. So I am thinking (hoping) I must be doing something wrong.

Question 1: Is there anything to do about the broken piece on the jaw?
Question 2: Are there any other ways that I could try to get the swivel base working again?


I'm relatively new to the forum, and I really appreciate you all being willing to share your opinions and expertise.
Finished the restoration of the Parker 674 1/2.

Thanks to everyone for help along the way, including swivel parts and a wrench from jrobb316.

e118990080e52b0c2696b4c640ec968e.jpgbc46536b1498a8422b1a61082ed1372b.jpg


Sent from my Pixel 3 XL using Tapatalk
 

Attachments

  • e118990080e52b0c2696b4c640ec968e.jpg
    e118990080e52b0c2696b4c640ec968e.jpg
    394.6 KB · Views: 0
  • bc46536b1498a8422b1a61082ed1372b.jpg
    bc46536b1498a8422b1a61082ed1372b.jpg
    282.7 KB · Views: 0

damon18

ALLIANCE MEMBER
Joined
Jan 24, 2018
Messages
621
Location
Memphis, TN
I had the same issue with a Shop King and not having a lathe to make the part I found a shoulder bolt on Ebay that was very close to the specs I needed. But looks like it is sold out. Check out the old auction and you may find the same bolt.

Kevin

Thanks Kevin, that helps picture what kind of bolt I'm looking for, what size was your SK?
 

RTM

Well-known member
Joined
May 13, 2019
Messages
13,199
Location
SF Bay Area
... you can get a bushing and use a std bolt...

I just bought a Desmond Simplex 350, and this was some previous owner's fix. The bushing is a bit too tall, but the fix is old enough that he used a square head bolt.

My Ace hardware used to have some shoulder bolts, so I will be looking, but not expecting to find anything useful.

Turns out my bolt is also used to stop the internal main screw nut from moving. Multi-purpose. Guess that's how they got the cost down on those.
 

nutjob

Well-known member
Joined
May 8, 2008
Messages
807
Location
NE, PA
Thanks Kevin, that helps picture what kind of bolt I'm looking for, what size was your SK?

It was 5" jaws. Another thing I found on that vise was the bottom of the main vise body was not flat. The center was higher than the outside edge and this caused the base to not sit flat. Some time with the belt sander got it close enough.

Kevin
 

RTM

Well-known member
Joined
May 13, 2019
Messages
13,199
Location
SF Bay Area
Simplex Swivel Lock

Hey gang For those who own a Desmond Simplex Utility Vise with swivel (350, 400, 500?), what does the swivel locking nut look like? Carriage bolt, or something fancier like a square head that hits the outer edge?

Here is a quick look at the one I got, where the PO used a hex bolt to lock it in position more or less permanently till you unmount it.

IMG_20191110_123136-X2.jpg
 

Woodreaux

Well-known member
Joined
Sep 30, 2019
Messages
47
Location
Louisiana
Looks really nice, I love the lines of that vise.
Did you braze weld the jaw shelf?
Not yet. That's going to require my learning a new skill, which I hope to do at some point. For now, I'm going to use it as is. I don't think it will affect the use

Sent from my Pixel 3 XL using Tapatalk
 

Thirdyfivepickup

Well-known member
Joined
Nov 15, 2016
Messages
1,949
Location
Portage, Indiana
Ok I've read the first 50 or so pages and I am stuck with a few questions I cant find answers to.

I'll be soaking my Wilton in vinegar after I'm done cleaning it by hand. What's the best method to get it ready for paint after the vinegar?

Next... I want to use a rattle can to paint the vise but I'm unsure how durable regular rustoleum would be. I'm thinking a satin might work better to avoid chips but what say you?

I'll try and get through the remaining 330 pages and maybe answer these questions myself.
 
To avoid these ads, REGISTER NOW!
Top Bottom