
You are using an out of date browser. It may not display this or other websites correctly.
You should upgrade or use an alternative browser.
You should upgrade or use an alternative browser.
REBUILDING my 40 ford
- Thread starter don long
- Start date
drivesitfar
Well-known member
Don: did Paul understand that you wanted to get the Western Town started and finished before your 40 Ford? or maybe he's helping with the Western Town.
sounds like a lot going on at the LONG'S THEME PARK!!
i'm trying to eat less butter, but dang i need to pop some popcorn and have a seat to watch all the pics and progress going on down in your world.
good luck!!!
sounds like a lot going on at the LONG'S THEME PARK!!
i'm trying to eat less butter, but dang i need to pop some popcorn and have a seat to watch all the pics and progress going on down in your world.
good luck!!!
HOTFR8
Banned
Don,
I hope you bring us along on the western town build. Sounds awesome!
You can see the western build in Dons topic in the Gallery section of the forum.
Look for > building my BIG PARTY garage.
Last edited:
Don,
I hope you bring us along on the western town build. Sounds awesome!
=Turducken
Like Hotfr8 said I'm posting my daily activity on the Western town in the Big party garage thread
Don: did Paul understand that you wanted to get the Western Town started and finished before your 40 Ford? or maybe he's helping with the Western Town.
sounds like a lot going on at the LONG'S THEME PARK!!
i'm trying to eat less butter, but dang i need to pop some popcorn and have a seat to watch all the pics and progress going on down in your world.
good luck!!!
Drives.
You are right about lots going on around here. Paul has his hands full at his house with a water leak under his slab and getting that fixed and his house put back together. That's partly why I chose to start the western town construction.
You can see the western build in Dons topic in the Gallery section of the forum.
Look for > building my BIG PARTY garage.
Thanks Simon
HOTFR8
Banned
We all know you have so many projects on the go. This one on hold for a short time will be OK whilst we follow the other topic. 
Thirdyfivepickup
Well-known member
LOVE that color. You were due for a hot rod you can put a logo on!
isb cornbinder
Well-known member
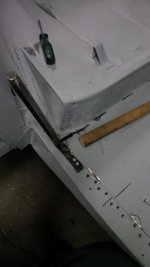
I bought a reproduction floor for my 1940 Ford. It came from Bob Drake Reproductions.
The reproduction floor was a good fit. I expected to have a little fitting. I tried to make the car straighter and have the doors work better than OEM
I had to cut the floor just ahead of the rear step-up and spread the body by 3/16". This allowed the front and back doors to open without making contact.
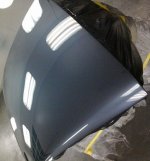
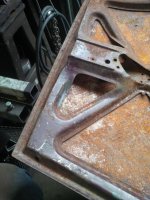
The trunk lid is made up of three other lids. Each lid contributed something good.
I am 74. Your workmanship is admirable.
Clico temporary fasteners are my best new friends.
https://www.rivetsonline.com/rivets/cleco-fasteners-temporary-rivetsside-grips#1
The reproduction floor was a good fit. I expected to have a little fitting. I tried to make the car straighter and have the doors work better than OEM
I had to cut the floor just ahead of the rear step-up and spread the body by 3/16". This allowed the front and back doors to open without making contact.
The trunk lid is made up of three other lids. Each lid contributed something good.
I am 74. Your workmanship is admirable.
Clico temporary fasteners are my best new friends.
https://www.rivetsonline.com/rivets/cleco-fasteners-temporary-rivetsside-grips#1
Attachments



isb cornbinder
Well-known member
Sorry, Don. I got carried away. This is your thread. I am going back to the bleachers.
We all know you have so many projects on the go. This one on hold for a short time will be OK whilst we follow the other topic.
Simon
I'm glad that you understand
LOVE that color. You were due for a hot rod you can put a logo on!
Thirdyfivepickup
I like that color too It was a popular color 15 years ago when this project was started.
I bought a reproduction floor for my 1940 Ford. It came from Bob Drake Reproductions.
The reproduction floor was a good fit. I expected to have a little fitting. I tried to make the car straighter and have the doors work better than OEM
I had to cut the floor just ahead of the rear step-up and spread the body by 3/16". This allowed the front and back doors to open without making contact.
The trunk lid is made up of three other lids. Each lid contributed something good.
I am 74. Your workmanship is admirable.
Clico temporary fasteners are my best new friends.
https://www.rivetsonline.com/rivets/cleco-fasteners-temporary-rivetsside-grips#1
Sorry, Don. I got carried away. This is your thread. I am going back to the bleachers.
cornbinder
Please come back down from the bleachers. I believe that you could be my coach. I've never built a 40 ford before and how you got your doors to fit interests me a lot.
Thanks for sharing.
HOTFR8
Banned
Sorry, Don. I got carried away. This is your thread. I am going back to the bleachers.
I have to agree with Don here. When you see something you can offer your two Bobs worth of help with we all appreciate it. That is the great thing about this forum as we have a great knowledge base to call on.
On a side note I heard some one local had issues with Bob Drake running boards and had to spend time to make them fit. No fun.
isb cornbinder
Well-known member
Somewhere, I have a 1940 Ford assembly, hardcover book from Ford. It may be in reproduction, now.
The book makes special mention of the importance of assembly of the body parts, starting with the hood. After the hood is precisely aligned to the cowl, the next attention should be dorected to the grill' After the grill is aligned to the hood the fenders may be fitted.
The running boards are next then the rear fenders are last.
It is easy to get distracted with the stainless trim not lining up, but that was the way it was. Sometimes it matched and often the trim did not match.
It was more important, to me, to have the doors match, and align with the body than to have the trim match-up.
The side trim on my '40 is not 100% in alignment and I do not really care. I was not prepared to redrill holes for a better fit before the body and paint.
This may not apply to a sedan delivery.
I did not like the way the spring trim clips were not strong enough to hold the trim in place, especially over the rear fenders. I bought two extra packages of the Body Belt Bolts and nuts. This held the trim in place.
It was suggested that I should reform the trim. I was not willing to risk kinking.
Here is a suggestion. I drilled through the center of a fender bolt for each side. This is where I ran the taillight wire.
I suggest you try these guys for your '40 taillights. They are LED and many time brighter than any others. http://www.cool-leds.com/led-taillights-ford.htm
I bought my taillights and LED front turn signal system from them.
https://www.bobdrake.com/FordItem.a...Category=8351593a-c075-42ae-acdc-0c4b5691e544
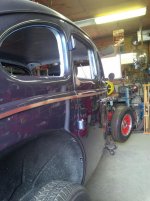
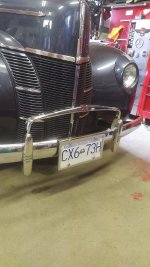
Picture number 2 shows the importance of alignment.
The book makes special mention of the importance of assembly of the body parts, starting with the hood. After the hood is precisely aligned to the cowl, the next attention should be dorected to the grill' After the grill is aligned to the hood the fenders may be fitted.
The running boards are next then the rear fenders are last.
It is easy to get distracted with the stainless trim not lining up, but that was the way it was. Sometimes it matched and often the trim did not match.
It was more important, to me, to have the doors match, and align with the body than to have the trim match-up.
The side trim on my '40 is not 100% in alignment and I do not really care. I was not prepared to redrill holes for a better fit before the body and paint.
This may not apply to a sedan delivery.
I did not like the way the spring trim clips were not strong enough to hold the trim in place, especially over the rear fenders. I bought two extra packages of the Body Belt Bolts and nuts. This held the trim in place.
It was suggested that I should reform the trim. I was not willing to risk kinking.
Here is a suggestion. I drilled through the center of a fender bolt for each side. This is where I ran the taillight wire.
I suggest you try these guys for your '40 taillights. They are LED and many time brighter than any others. http://www.cool-leds.com/led-taillights-ford.htm
I bought my taillights and LED front turn signal system from them.
https://www.bobdrake.com/FordItem.a...Category=8351593a-c075-42ae-acdc-0c4b5691e544
Picture number 2 shows the importance of alignment.
Attachments



isb cornbinder
Well-known member
The body and paint work cost $24,749.03. I waited for a year before installing the trim. I wanted the paint to have lots of time to harden.
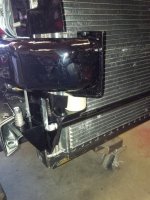
I should have mentioned this. It is necessary for the inner fender apron be installed to hold the grill in place.
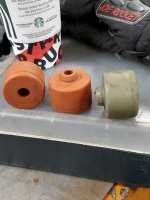
As part of the inner fender support, I used 6V92 Detroit Diesel valve cover seals. I will try and find a picture.
I should have mentioned this. It is necessary for the inner fender apron be installed to hold the grill in place.
As part of the inner fender support, I used 6V92 Detroit Diesel valve cover seals. I will try and find a picture.
Attachments
Last edited: