To avoid these ads, REGISTER NOW!

The •403Garage•

Carter240

Active member
Joined
Sep 23, 2015
Messages
30
The •403Garage•

After seeing The 12 Gauge Garage on here I felt inspired to start my own garage project. It started with a very unfinished 28x22x8 frame and slab and that was about it. The previous owner had run 50 feet of 14/3 to the garage for power. At first I had some shelves added but soon realised they were a little ugly and open storage wasn't a theme I wanted. Here is about where I started:

rsxbl6.jpg


Electrical:
We gutted all the electrical previously installed (Total of 2 lights and 4 wall plugs lol) ran new 6g wire from the house and installed a sub panel and added 9 20A outlets - 3 in each wall. We added 11 light buckets in the ceiling for some 4' LED's or T5's - haven't decided yet. We added 4 220v outlets - 1 for a future compressor and 3 for my future welder/plasma cutter.


The goal for this garage is to make this little 2 car garage as functional as possible as a workshop, but also be able to park 2 cars in it. It'll be used to detail our fleet of vehicles and do regular maintenance as well. All while looking clean and as minimalist as possible without any clutter. We have a lot of work to do.

As bare bones as it was, last winter I managed to rebuild my dads old 82' Virago 920 in the dead of winter with a little propane heater but it was miserable.

JJebny.jpg


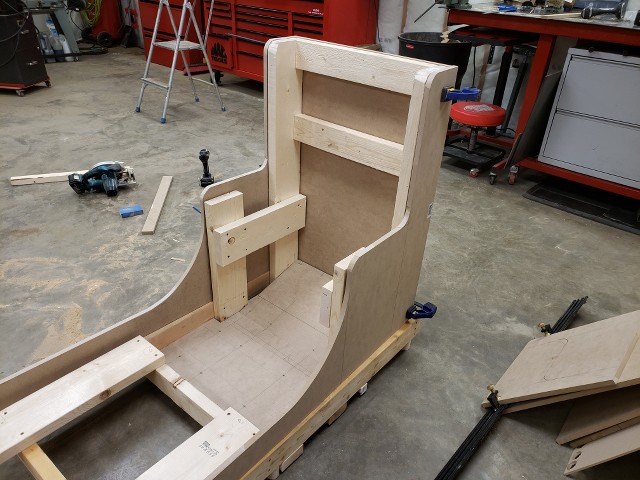
I built this operating table to make life easier, adding power and casters to allow me to tuck it away when I don't need it. At the moment its outside next to the garage because the bike is finished now.

HpiW9E.jpg


Work spaces and storage

Then I needed a swiss army table, it's still a work in progress, but it has been great. My tool tray fits right underneath which helps keep the dirt and dust off it, but also keep clutter to a minimum. I added a 2 drawer filing cabinet I sourced locally for $20 from a government surplus store. I plan on painting it to match my tool box. I plan on adding more brackets and things to it so I can store some steel behind it and make use of every inch of it.

vFxKvi.jpg


xwth8Y.jpg


blai3f.jpg


I do need to create a more organized way of storing my cordless tools but for now this is much better than laying on a work space taking up valuable space.

kNkUDR.jpg


sUFCJN.jpg


While cleaning out the garage I found some spare hardwood from the previous owner, it must of have been extras from our bedroom. I used a few pieces of it to create a top for my tool box. It'll be durable enough because I don't place oils, heavy objects or anything on it. That's what a work bench is for.

My wife and I have lived here for 5 years now, currently 29yrs old, this was our first home. When I was 24, the whole reason I wanted to buy a house was to build my dream work space. We got married this past summer and now I am finally able to start getting some of the important bits out of the way, starting with insulation and a heater.

InpI75.jpg


ZGUWxQ.jpg


Ceiling is close to being done, next will be blowing in the attic insulation and then the walls. Once its painted the real fun can begin and I can start creating work benches, tools and anything else I find a need for.
 
Last edited:
To avoid these ads, REGISTER NOW!
OP
C

Carter240

Active member
Joined
Sep 23, 2015
Messages
30
Wow, time for an update. Been a little busy, since my last update I've: Gotten married, went to Japan twice, Houston twice, Denver once. I managed to get a few things done though so I'll highlight those briefly.

Frame Table Total cost of materials: $160 (Castors and a couple cutting discs)

This is for a future project, an air bagged, body dropped 78' Ford F250. I picked the rolling truck up for $200 off a farmer, one owner, not mint, not clean, literally parked in a field for a few years. I am going for a very farm truck look/feel. Picture it laying rockers on 22/24" steel wheels and completely stock interior. Unsure of drive train options ATM but Im really leaning towards the inline six with a turbo. Possibly LS but since that's lazy I'll keep that for a last resort. I stripped it apart to keep the yard nice. I've since moved the cab and box to the parking stall next to the garage (not pictured) and had my neighbour ask me if I still have the truck lol. It'll remain there until the garage is finished. Having 4 vehicles was always the dream but now I'm finding it to be a bit of a chore (the F250 being a 5th). Luckily I was able to park the Porsche in a hanger with 19 other Porsche's, out of sight and out of mind for the winter.

UYQxMb.jpg


Jr1u9U.jpg


Anyway, I picked the beams up from a job site I was on, they were going to have to pay someone to remove them so I offered to do it for free.

8xXprN.jpg


I hauled them out to my father in laws place where there was more room and a machine to help hoist this sucker onto a table to build it flat and square. His help was invaluable, I learned a lot from him. He is extremely particular and accuracy is his game. It would not have turned out as well as it did without his help. He doesn't go on here but I figured I'd give him the shout out anyway because he deserved it. Oh, he also had a broken ankle while we did this.

qC4J5q.jpg


J8Dljv.jpg


Ct1zAF.jpg


MEnPyB.jpg


5wm3nB.jpg


We added wheels and used some giant nuts he had laying around to make adjustable legs. I do not want it moving once its in place, and I do not have a crane to move it at home so this was the best option. I later welded some smaller nuts on top of the threaded rods to speed up adjustments.

Had to paint it so it looked like its a tool and not a piece of scrap iron, also painted the swiss army table while I had the stuff out. Much better now.

WYv7D7.jpg


RgLUu9.jpg


da9kib.jpg


VLj0og.jpg


ib6X6D.jpg


Next I finished insulating the walls, and drywall on the ceiling. I used some temporary lights to help see in there and thought that was pretty slick. That was until this week when I found a guy selling 4x2 T8 fixtures for $10 a fixture with bulbs and everything. :eyecrazy:

mdaeVA.jpg


Lighting Total invested $250

11 fixtures installed, 4 bulbs per fixture, 0.26amps and 2850 lumens per bulb. In this 616sqft shop thats ~125,000lm or 203lm per sqft. All on their own circuit of course. I've NEVER been in a shop or garage and thought "you what this shop needs? Less light". I am over the moon with the results, especially for the cost. I had to buy a box of bulbs so I could get them all to match for $110 and some BX wire and some fittings for the two near the garage door so I could move them over to the centre more.

It's actually SO pleasant to detail my cars in there now. Its warm, and now I can see. I can't wait to see how much brighter it gets with painted walls. I've spent the last couple days in there and haven't found it too bright. Just enough. There is barely any shadows and I can pop the hood (on the darker side of the shop no less) and see clearly into the engine bay for doing maintenance and repairs.

dAO8DR.jpg


0gm5Y2.jpg


INoWVM.jpg


2Jw4lc.jpg


XKYbpH.jpg


QSXfEd.jpg


That's all for now, I'll be working on my attic access next and having the blow in insulation installed before it gets too much colder out. Then windows, then drywall and paint. Then cabinets...this felt like a huge undertaking being my first garage but I'm glad its almost finished.

Oh, and technically its a 3 car garage now that I bought a Kei car lol.

v2KXCL.jpg
 
Last edited:
OP
C

Carter240

Active member
Joined
Sep 23, 2015
Messages
30
So I decided that the only storage in this garage/shop would be covered. No open shelves, nothing hanging on the walls. I wanted it to be clean and tidy. So this mess had to be fixed. At first I thought the shelf would be great but in reality its just an eye sore, so it got punted to the shed.

4rcvBL.jpg


I decided to paint the cabinets with Tremclad and match them to the tool box so they appeared to be a matched set. I picked these up a few years ago from a government auction place for $30 a cabinet. They are steel and sturdy as hell. It took a lot of redneck engineering to get them up to test fit them but now I've got a system that works. These will need to be dropped in a few weeks for drywall but I had the time and was curious if the cabinets were too tall for my short ceiling.

Kz1gMh.jpg


xr3HrS.jpg


cNh0x3.jpg


lwMyta.jpg


Once they were hung, a friend suggested I add a floating shelf and he couldn't have been more right. All my tool box space is now back, and the stereo is now out of the way but still reachable. I used 2x2 for the frame, some 3/4 steel tubing for the supports and covered in 1/4 MDF. I may rebuild this out of aluminium of I ever get the opportunity to buy a tig.

Tvergx.jpg


8zRKEN.jpg


H6l0zu.jpg


Once they're installed permanently I will add some LED lighting up under the shelf.

YQtvQ9.jpg


I also plan on adding shelves inside one of these, I do have a third identical cabinet to hang across the garage on the other wall but I will likely wait for it to be drywalled before I do that.

XpdleR.jpg
 
Last edited:

zmotorsports

ALLIANCE MEMBER
Joined
Oct 20, 2009
Messages
21,435
Location
Northern Utah
Coming along nicely.

When I had my smaller shop I was constantly going through and completing 5S events (Sort, Shine, Straighten, Standardize, Sustain) a couple times a year to keep the work space open and clutter free. I didn't dare tackle another large restoration or full-on vehicle build because I had outgrown my space but I could at least keep it orderly for smaller projects.

One shop I admired and used for inspiration was Richard Pollock's garage/shop, owner of Mule Motorcycles. This is his 2-car garage he converted into his workshop and I always liked how clean and organized it is kept even while in the middle of projects.
Not to sidetrack but if any of you ever get the time to drive on a test track under controlled conditions so you can duplicate EXACTLY from tire to tire and placement to placement you would be surprised.

Here is a link to his workshop.
https://thekneeslider.com/mule-motorcycles-workshop-lots-of-ideas-from-a-working-garage/
 
OP
C

Carter240

Active member
Joined
Sep 23, 2015
Messages
30
I agree, large scale projects are way tougher in a small space. Ideally once the garage is finished I can get a start on the chassis. I should be able to fit the three cars and the table/chassis and have only 1 car parked outside. That shop you posted makes me want to start another bike project. They take up so little room it's hard not to. I just have to keep telling myself "one project at a time" otherwise nothing gets finished.
 

lakelandcat

Well-known member
Joined
Sep 25, 2017
Messages
7,327
I just installed the same fixtures in my shop. Its hard to explain the difference it makes. I used LED T8 4' and I uses the "Daylight" bulbs 6500K lumens. My shop is a little smaller but I am only going to need 4 fixtures. You can spend $79 for a box of 16 or do like I did and wait till they had a box with a broken bulb and I got the box for $8. Then use the DL over your workbench or tool box. Even though the fixtures had a ballast and came with fluorescence bulbs, the LEDs still work. They are not designed for dimmers. Looks good, love the scoot. Mike
 
OP
C

Carter240

Active member
Joined
Sep 23, 2015
Messages
30
Holy heavy duty table batman!!!

Nice work!

Thanks, I could have built it a bit lighter...but I scored a chunk of frame off a friend's body dropped (or channeled for the older folks) S10 that he never finished. Basically he chopped the frame horns off and welded 3x3 1/4" wall to those, I just wanted the rear part. He only wanted $40 and it was already 6'x3'. I just happen to have some 3x3 laying around and gave it legs and a top lol. It has all sorts of storage in the ends and stuff for long lengths of anything smaller than 3" in diameter.
 
OP
C

Carter240

Active member
Joined
Sep 23, 2015
Messages
30
Re: The •403Garage•

It's been awhile, time for a project dump of everything I've built in the garage since my last post. I haven't moved forward on the drywall just yet because I wanted windows, and I wanted to do those when it's at least above 10C outside.

First up was my drill press I got for free from my father in law. Being a Porsche enthusiast I used some inspiration from the Porsche tractor from way back.

vETQdN.jpg


MpPuvC.jpg


Next up is my racing Sim rig. I built this right before everyone was locked down in the homes so I had this to keep me busy. It's been great, I have it hooked up to my wife's PC (which has been her dream/project for the last 3-4 years) and I run iracing and Assetto Corsa on it. I'm addicted now, the force feedback wheel really helps tell you what the car is doing.

I started with a seat from a 2000 Toyota Celica from pick pull for $15, the rest was just lumber and paint really. Fairly simple design that I wanted to capture a bit of arcade feel with. I painted it to match our favourite F1 drivers car. The wife has set up an F1/Suzuka themed room where it sits and it's the perfect piece of functional hardware to entertain guests with.

gi4Eyw.jpg


VGQ5AE.jpg


bTKtFw.jpg


hrM1XA.jpg


uYgMeU.jpg


UI9Jry.jpg


Next, I undertook striping the whole interior out of my Tacoma and installed a dynamat equivalent and topped that off with a sound deadener. The truck is now as quiet as my Mercedes on the highway, even with the 34" tires. It's AMAZING the difference it made. I did the whole roof, floor, doors and back wall. Then I built a sub box and had it Line X'd and installed some car audio stuff I had laying around.

8qy0Bf.jpg


eG596z.jpg


uBi4Ti.jpg


pBWfuB.jpg


edkJml.jpg


r8NQsa.jpg


This week I built a cart for an airless paint sprayer for detailing. I use this for cleaning the wheels, as I like to use PnS Brake Buster to dissolve to iron particles left on the Porsche/Mercedes wheels. It works very well, considering I don't have running water in my garage, or a floor drain, and I live in Canada so outdoor water is out of the question 6 months of the year.

It's 1500 psi and 0.29 gal/min. Which means it uses very little water but still is enough to blast away soap suds. I usually fill the bucket underneath with a water and ONR mix. After a solid 30 second blast it leaves about 0.5L on the floor per wheel. After I'm done I'll squeegee it out the door and then my floor also gets a cleaning. Now, this isn't a very good replacement for a pressure washer. However, its great for washing door jams, engine bays, motorcycles, wheels, and presoaking my cars in ONR before doing a no rinse wash.

nV2qkT.jpg


qX9XFZ.jpg


O43woD.jpg


Excuse my amature video commentary, I am very much a introverted person and freeze up on camera almost instantly lol

Video demonstration:

 
Last edited:
To avoid these ads, REGISTER NOW!

PhantomEB

Well-known member
Joined
Feb 6, 2006
Messages
6,787
Location
Medicine Hat, AB, Canuckistan
May I ask where abouts in the 403 you are?

Did you get your insulation blown in yet as I have a contact for you if not. R50 into mine last fall and I ain’t regretting it one bit.
 
OP
C

Carter240

Active member
Joined
Sep 23, 2015
Messages
30
May I ask where abouts in the 403 you are?

Did you get your insulation blown in yet as I have a contact for you if not. R50 into mine last fall and I ain’t regretting it one bit.


I'm actually in Calgary as well haha. I did get the ceiling blown in already just before winter hit. What a difference it made. It was toasty in there all winter. I appreciate your offer though, wish I could have given your contact the work. Especially right now with so many people out of work.
 

dubber

Well-known member
Joined
Dec 31, 2012
Messages
5,326
Location
Canada's Capital
Very cool space you have created. And man that light situation is top notch, especially at such a rock bottom price.
 

jmx747

Member
Joined
May 8, 2018
Messages
6
Awesome Garage. Jealous of your cars, loving the red theme and digging the racing sim! I'm an idiot for selling mine, I miss it.

Also More info on that little hatch please!
Enjoy
 
OP
C

Carter240

Active member
Joined
Sep 23, 2015
Messages
30
Awesome Garage. Jealous of your cars, loving the red theme and digging the racing sim! I'm an idiot for selling mine, I miss it.

Also More info on that little hatch please!
Enjoy

Ahhh the Altoworks RSR. I had owned one of these breifly about 6 or 7 years ago and loved it but sold it to help put down a larger down payment on my Tacoma. The gf always wanted to try drive it but didn't get the chance before it sold.

Then we got married years later and went to Japan for our honeymoon to see Formula 1 at Suzuka (where we got to meet Charles Leclerc, many stories on that alone). We fell in love with these Kei cars all over again and decided to look for one when we got home. We found this unit on Kijiji for $4k because the owner thought it needed a clutch as it was slipping badly. We bought it as my wife's first car project but when we got it home I noticed the pedal adjustment screw was backed all the way out and the lock nut was missing. After threading it back in and installing a new nut thr clutch as been fine ever since. I still have the OS Giken clutch sitting in a box for when the time comes but for now we'll just enjoy it.

Its a 600kg car that came with turbo 660cc engine making 64hp, after some simple mods it's at about 85hp. It's awd and is a beast in the snow. I installed an exhaust from a Yamaha R6
to replace the straight pipe it came with and it actually sounds a bit like a street bike now, yet quiet and not obnoxious like the Porsche. The blow off valve makes it fun, and it feels like a race car but without the speed, although it's no slouch. At 60km/h it feels like you're doing 120. Fuel capacity is just under 30L and that'll get us about 400-450km of range around the city. It is easily one of the most fun cars to drive around. There's a ton of space in the back so it's actually quite practical despite its low stance.

MwpFmS.jpg


6NUEeh.jpg


L59dil.jpg


DAoA7D.jpg


GJMRcx.jpg


j8qB8q.jpg


Its small enough I can 3 point turn it in the garage haha

W9DsGi.jpg
 
Last edited:
To avoid these ads, REGISTER NOW!
Top Bottom