
You are using an out of date browser. It may not display this or other websites correctly.
You should upgrade or use an alternative browser.
You should upgrade or use an alternative browser.
Modifications to the HF 4 and 5 drawer service carts - what changes have you made?
- Thread starter ndnchf
- Start date
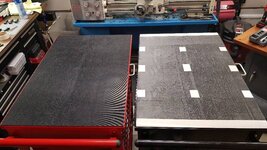
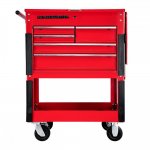
Installed matting on both carts today also. I went with a fine rib rubber mat. Figured it will help revent things from rolling off it & give a bit better traction for things. Plus it matches the mat that came with my HF hydraulic lift cart. ")
I used carpet tape, no glue, seems to be holding pretty good. That's how I attached the mat to the lift cart too. Time will tell. Just need to clean all the white **** off them still.
Edit: Doesn't look all funny like that in person, it's from the photo resizing app I used.


I used carpet tape, no glue, seems to be holding pretty good. That's how I attached the mat to the lift cart too. Time will tell. Just need to clean all the white **** off them still.
Edit: Doesn't look all funny like that in person, it's from the photo resizing app I used.
Attachments


Last edited:
taumac
Well-known member
I posted this cart alittle while ago I found at curb.

I looking to turn this into a shop cart/ mobile work bench idea. The original height on 5” casters is just too tall. First I made plywood insert for bottom that was all beat up.

I have work bench’s in my garage which is good working height for me. I wanted to keep 5in casters to keep it easy to move so to get height I needed I cut 6” off the bottom of the legs.

Once I add a work surface I’ll be about 35” tall.

I’ll probably cut out the front and make a slide out drawer like was recently posted.
Since I didn’t have a top or struts I flipped the side divider over which will give me more room to make more holes or store bigger stuff.

I looking to turn this into a shop cart/ mobile work bench idea. The original height on 5” casters is just too tall. First I made plywood insert for bottom that was all beat up.
I have work bench’s in my garage which is good working height for me. I wanted to keep 5in casters to keep it easy to move so to get height I needed I cut 6” off the bottom of the legs.
Once I add a work surface I’ll be about 35” tall.
I’ll probably cut out the front and make a slide out drawer like was recently posted.
Since I didn’t have a top or struts I flipped the side divider over which will give me more room to make more holes or store bigger stuff.
Attachments


MushCreek
Well-known member
Pinned the rest of them. Epoxied in & used epoxy putty to fill the holes. I'll wait for the rivets to dry overnight & reinstall them tomorrow.
I know you guys are probably sick of all my latch posts. Ok no more. That should be the end on my drawer latch saga.


Nice work! Who's going to be the first GJ'er to make replacement ones out of solid steel?
Attachments


fartymarty
Well-known member
Nice work! Who's going to be the first GJ'er to make replacement ones out of solid steel?
I was thinking it would be aluminum except for the spring. Some CAD guru would start spitting them out and selling them here.
Nice work! Who's going to be the first GJ'er to make replacement ones out of solid steel?
Thanks. Well I hope it's not me! Metal wouldn't be my first choice anyway if I did need new ones. I was thinking to just find someone 3D print new ones.
MushCreek
Well-known member
Delrin would be nice.
Installed matting on both carts today also. I went with a fine rib rubber mat. Figured it will help revent things from rolling off it & give a bit better traction for things. Plus it matches the mat that came with my HF hydraulic lift cart.
I used carpet tape, no glue, seems to be holding pretty good. That's how I attached the mat to the lift cart too. Time will tell. Just need to clean all the white **** off them still.
Edit: Doesn't look all funny like that in person, it's from the photo resizing app I used.


Where are you getting the ribbed mat? I went to a couple stores locally, closest thing I found was flat rubber at HD. Smells like a tire factory and is kind of stiff.
Attachments


Where are you getting the ribbed mat? I went to a couple stores locally, closest thing I found was flat rubber at HD. Smells like a tire factory and is kind of stiff.
I ordered online cause no one around me sells the fine rib anymore.
For the top I bought from Rubber-Cal but through Amazon (can order from their website too). $35 shipped for 3'x6'x1/8" but I had 2 tops to make & needed a bit extra for something else. Kind of expensive but I wanted a thicker mat for the tops. In the end I'm happy but I would not buy this stuff again. Nasty smell & stunk like crazy for a while & had to spend time getting rid of all the blooming.
https://www.amazon.com/gp/product/B004N25KEW/?tag=atomicindus08-20
I also bought another 25' roll for $50 shipped but it's vinyl & not as thick. I used to buy this same stuff locally to use for drawer liners. Much cheaper than what I used to pay for it locally. Haven't got around to using any of this roll yet though.
https://www.amazon.com/gp/product/B07C57LWBH/?tag=atomicindus08-20
Last edited:
Radio Flyer
Well-known member
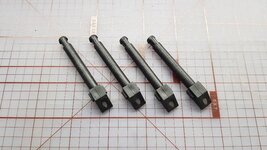
So, I bought an Orange cart on BF and the folding side shelf in orange as well. Put it together today and when I went to install the shelf it's no big enough to reach the bolts?? It fits perfectly inside the uprights. Anyone else had this happen?
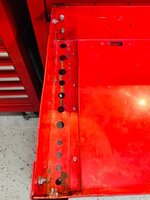
5 drawer side tray
4 drawer side tray
This is a pic of the 4 drawer side tray that I took cause I wanted to use it for something else.
4 drawer side tray
This is a pic of the 4 drawer side tray that I took cause I wanted to use it for something else.
Attachments
Last edited:
Yep grabbed it this morning to take it back and noticed it was for a 4 drawer. My loca HF has all the color matching accessories piled in the corresponding boxes so I just grabbed the shelf and paper towel magnets without even looking. When I went back today I went back to grab the correct one and the black cart was the only one with the correct shelves. The manager was like,”oh ****! We sold out of every color cart during the weekend. Every one of those shelves will be coming back!” I didn’t even realize they were making colors in the 4 drawer so didn’t even cross my mind
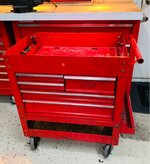
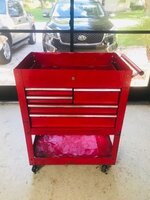
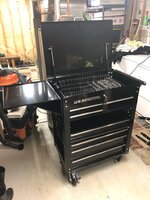
My two black 5 drawer carts showed up at the local HF store today; just got them home and somewhat unboxed. I’ll be combining the two and documenting the build.
I have the 64033 models. I can’t compare with the other two models but the build quality seems fairly stout and I have nothing to complain about, yet anyhow.

*edit* Yes, that’s a 2007 Ford Focus Sedan in the background and yes, I did bring both carts home in it at the same time.
I have the 64033 models. I can’t compare with the other two models but the build quality seems fairly stout and I have nothing to complain about, yet anyhow.
*edit* Yes, that’s a 2007 Ford Focus Sedan in the background and yes, I did bring both carts home in it at the same time.
Attachments

Loose Ctrl
Well-known member
My two black 5 drawer carts showed up at the local HF store today; just got them home and somewhat unboxed. I’ll be combining the two and documenting the build.
I have the 64033 models. I can’t compare with the other two models but the build quality seems fairly stout and I have nothing to complain about, yet anyhow.
*edit* Yes, that’s a 2007 Ford Focus Sedan in the background and yes, I did bring both carts home in it at the same time.

Those are going to make a nice cart. I can't wait to see your build.
Glad to hear the Focus made it home with both of them. Usually they are Found On Road Dead.

I have owned more than my fair share of Furds. I currently have three in my line up.

Glad to hear the Focus made it home with both of them. Usually they are Found On Road Dead.
I have owned more than my fair share of Furds. I currently have three in my line up.
Meh, I’ve always had good luck with the Fords I drive; cheap and easy to maintain.
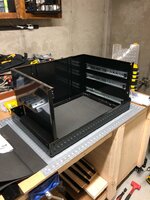
Got one of the top boxes separated. Not sure of the construction of the older boxes, but I had to drill out two spot welds for the center drawer divider and one on each side, as well as the rivets all the way around the perimeter. Pretty straight forward.

Need to mock up the upright supports and mark out where to cut the front of the tray for the bottom drawer to clear. Then I’m thinking I’ll rivet the bottom drawer section to the tray, flip the whole assembly over and drill out anything covering the caster holes. Mount the casters, flip, and start drilling out drawer slide rivets.
Attachments
cdsloop
Well-known member
I haven't kept up on this thread for well over a year, so if this has already been addressed, my apologies. For those that have had a drawer slide failure on the Gen 1 5 drawer carts, the 16" Richelieu drawer slides sold at Lowe's in the hardware section are a very close replacement. My lower drawer slide failed earlier this summer, and I just got around to repairing it last night. Most of the mounting holes line up with the original holes on the cart and the drawer. I only had to drill one hole in each slide, the rear-most hole for the cart side. The other three on the cart side lined up with the original holes. The three holes on the drawer side lined up perfectly. I used aluminum 3/16" rivets on the drawer, and used #8-32 machine screws with lock nuts for the cart side. I did have to enlarge the drawer side holes a tiny bit to allow the use of the 3/16" rivets. The quality of the Richelieu slides seem to be slightly better than the originals that came on the cart. The drawer slide that failed was the lowest/deepest drawer. I have it loaded with my 1/2" sockets, both chrome and impact, in SAE and metric. I also have my 3/8" impacts in that drawer, so it is rather heavy. It does not get a ton of use in my home shop environment, so I was surprised that it failed. Time will tell if the slides from Lowe's will hold up. They are rated at 100 lbs.
Bottom section is pretty much done.
Drilled out rivets for the top three drawer slides (two on left, one on right). Made two spacer blocks out of wood to align the drawer slides in their new position. The spacing is the same between all of the slides in the bottom section so this was pretty easy. Position the new slides, drill holes, and mount the slides with new rivets. All three drawers lined up nicely.
The middle drawer will need a hole drilled in the side for the latch mechanism to catch. The top drawer utilized the existing hole for the latch so no modification necessary there.


PelicanPines
ALLIANCE MEMBER
Before you cover that edge with trim... consider a spritz of rattle can gloss black. If the cart hangs out with moisture is in the air... it will rust on that fresh cut.
I did that cut for a different modification and hit it with paint... glad I did.
I did that cut for a different modification and hit it with paint... glad I did.
Before you cover that edge with trim... consider a spritz of rattle can gloss black. If the cart hangs out with moisture is in the air... it will rust on that fresh cut.
I did that cut for a different modification and hit it with paint... glad I did.
Good call. That was the plan to touch up the areas I modified (cut edges and rivets) as well as the nicks and scratches from shipping before I do the final assembly.
In other news, no picture, but I did get the casters mounted. I swapped out the two non-swivel casters for two that do swivel; the ones found at HF. Swapped the blue wheels for the black ones, and put the locking casters both at the face of the cart. I only put three bolts in for each caster as the lower drawer section interfered with them and it would be more work than I’m willing to do to get those bolts through both the lower drawer section and the tray. I think some rivets placed around the perimeter of the lower drawer section will hold just fine; this cart won’t be moving much around my garage anyway.
Going to mock-up the uprights and get the upper drawer section installed to check for clearances and alignment, hopefully tonight or tomorrow. I think I can use some spacers and bolts to secure the upper and lower sections together. I’d also like to utilize all the cross bars that support the upper section so I may have to modify the front bar, similar to how the bottom tray was cut.
All in all, I’m finding this combination incredibly easy and I’m surprised that only a handful of other members (that I’ve seen in this thread anyway) have done this.
PelicanPines
ALLIANCE MEMBER
I utilized the bottom open space uniquely... I incorporated space for modified metal dewalt tool boxes... seven of them... quite useful. My mods are somewhere close to page 55...
...
All in all, I’m finding this combination incredibly easy and I’m surprised that only a handful of other members (that I’ve seen in this thread anyway) have done this.
I think the reason why more haven't modded them like this is that it isn't a real money saver over buying a full drawered cabinet. Really the mod you are performing is to eliminate the open bottom shelf and add drawers. It's a cool mod but IMO it isn't worth the effort for me. Two 5 drawers will run $340ish after coupon. A 44" full cabinet can be had for $400 or a 26" is $240ish. Don't get me wrong I love my 5 drawer and 4 drawer carts but they aren't worth modding to me.

I think the reason why more haven't modded them like this is that it isn't a real money saver over buying a full drawered cabinet. Really the mod you are performing is to eliminate the open bottom shelf and add drawers. It's a cool mod but IMO it isn't worth the effort for me. Two 5 drawers will run $340ish after coupon. A 44" full cabinet can be had for $400 or a 26" is $240ish. Don't get me wrong I love my 5 drawer and 4 drawer carts but they aren't worth modding to me.
Cheaper than a 44 with comparable storage space and a much smaller footprint. Space savings and modularity is my driving factor here. YMMV.
Last edited:
Some progress...

Bad picture but you get the idea.
I got the bottom drawer section touched up with some gloss black enamel. Uprights and cross bars (all but the front) are installed. I cut up some of the drawer liner material and put pieces in between the bolting junctions to hopefully cut down on noise and vibration when rolling. Then set the top in place and loosely secured with hardware. I’ll be at this stage for a bit I think.
Next steps are to modify the top drawer section. Drill out rivets for center drawer divider and drawer slides that will be relocated. I’m also removing the locking mechanism for the drawers when the top lid is in the closed position. The rear cross bar would need to be modified in order to connect the locking mechanisms together for the top and bottom sections and it’s more work than I’m willing to get involved with. This is a home box anyway so I don’t need/want the drawer locks anyway; the latches will suffice for my needs. Should free up a little extra space under the lid as well.
Attachments

Last edited:
I got a little excited, started laying out how I was going to fit all my tools in the cart and adding some accessories.

In doing this, with all the weight added, I realized how flimsy the whole cart is. So I’m thinking that the top and bottom sections absolutely need to be secured to each other. Not sure how I’m going to accomplish that, but I think either bridging the gap with a piece of plywood and screwing the sections together, or using leftover material from the bottom tray cutout and riveting both sections together will suffice.
That, and I’m trying to figure out how to recreate the center drawer divider for the top section without having to go buy additional material. I think I’ve got it figured out, just need some additional time to tinker.
Still really happy with how this is turning out. Can’t wait to get it buttoned up, get my tools in it, and start modding it.
Attachments
Motorman55
Well-known member

jmhinkle
Well-known member
They must watch this thread for ideas of what to offer. Cheaper and less work than the Snap-off bumpers.
PugetDude
ALLIANCE MEMBER
They must watch this thread for ideas of what to offer. Cheaper and less work than the Snap-off bumpers.
If companies really monitored GJ threads that closely, Zen would have a free Tesla by now.
Loose Ctrl
Well-known member
If companies really monitored GJ threads that closely, Zen would have a free Tesla by now.
aka Larry
Well-known member
If companies really monitored GJ threads that closely, Zen would have a free Tesla by now.
Nice!

Okay, one side of the top section done...

Had to drill out the rivets for one slide and add two slides. I made two new spacer blocks out of wood to get the slides square and it worked great.
Note to anyone who may attempt this mod, take the time and cover all of your slides with masking tape. I now have metal shavings stuck in some of the slides and they will need to be taken apart and cleaned. There is no easy way to take these slides apart.
Attachments

Odd-job
Well-known member
Okay, one side of the top section done...
Had to drill out the rivets for one slide and add two slides. I made two new spacer blocks out of wood to get the slides square and it worked great.
Note to anyone who may attempt this mod, take the time and cover all of your slides with masking tape. I now have metal shavings stuck in some of the slides and they will need to be taken apart and cleaned. There is no easy way to take these slides apart.

Impressive effort there. This is coming from a guy who realized he could squeeze a husky intermediate chest in the bottom and took the lazy way out. Not the same draw depth though like you did.
If harbor freight is listening can they make a magnetic garbage can that can attach to tool carts and boxes. I am too lazy to make one myself.
Attachments

mangorockfish
Active member
About to go get a new cart at the Black Friday price and have almost made up my mind to get an orange one. The green, yellow and red are still in the running. I already have a red one , but need another one for our vacation house.