To avoid these ads, REGISTER NOW!

ZMotorsports Shop Projects 2.0

To avoid these ads, REGISTER NOW!
OP
Z

zmotorsports

ALLIANCE MEMBER
Joined
Oct 20, 2009
Messages
21,432
Location
Northern Utah
do you even bother priming these pieces before paint since they are 99.9% likely to get scratched up?

No, parts or shop equipment like these I generally don't prime. I just bead blast and go right to paint. Like you say, they are going to get scratched up a lot. I debated on even painting them because I like the bare metal look so much as well but figured a little paint will help to ward off any flash rust although in our dry climate we don't get that very bad at all.

If it was something I used more frequently I probably may not have painted them at all.
 
OP
Z

zmotorsports

ALLIANCE MEMBER
Joined
Oct 20, 2009
Messages
21,432
Location
Northern Utah
One step closer to completing my axle fixture.

I cut the 4” x 1” bar stock then cleaned up the ends in the mill before measuring the bolt centers and drilling the through holes.

Horizontal bandsaw does such a nice job of clean square cuts.
6d081fc3fe943cc52d40e6a532cfddf7.jpg

3140f842a9d1d01f1411f34da8d5f681.jpg

8d8923279c3b6a082f5a4c1233aa0c36.jpg

Ends cleaned up and milled to exact same as the bottom.
a9d698f3cc668dc34b247f60050c2b83.jpg

Mocked into position prior to drilling the holes.
967649d495db7350bd6dbd9629b3a3b6.jpg

Edges located and measurements plugged into the DRO for the through holes.
3791d7d345daa243d42ceb37d73b7e98.jpg

One down one to go.
3a8a70ed2bd014542c39aa2f2093002a.jpg

The holes drilled and ready for the next step which will be cutting the V grooves in the upper halves.
b7d2709547daa7ebcbf7ceedb47cb8fe.jpg

Thanks for looking.
 

Attachments

  • a9d698f3cc668dc34b247f60050c2b83.jpg
    a9d698f3cc668dc34b247f60050c2b83.jpg
    775.5 KB · Views: 0
  • 967649d495db7350bd6dbd9629b3a3b6.jpg
    967649d495db7350bd6dbd9629b3a3b6.jpg
    713.9 KB · Views: 0
  • 3a8a70ed2bd014542c39aa2f2093002a.jpg
    3a8a70ed2bd014542c39aa2f2093002a.jpg
    643 KB · Views: 0
  • b7d2709547daa7ebcbf7ceedb47cb8fe.jpg
    b7d2709547daa7ebcbf7ceedb47cb8fe.jpg
    658.1 KB · Views: 0
  • 3791d7d345daa243d42ceb37d73b7e98.jpg
    3791d7d345daa243d42ceb37d73b7e98.jpg
    780.6 KB · Views: 0
  • 6d081fc3fe943cc52d40e6a532cfddf7.jpg
    6d081fc3fe943cc52d40e6a532cfddf7.jpg
    842.1 KB · Views: 0
  • 3140f842a9d1d01f1411f34da8d5f681.jpg
    3140f842a9d1d01f1411f34da8d5f681.jpg
    855.3 KB · Views: 0
  • 8d8923279c3b6a082f5a4c1233aa0c36.jpg
    8d8923279c3b6a082f5a4c1233aa0c36.jpg
    802.6 KB · Views: 1
Last edited:
OP
Z

zmotorsports

ALLIANCE MEMBER
Joined
Oct 20, 2009
Messages
21,432
Location
Northern Utah
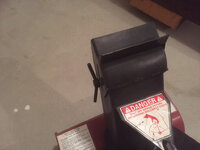
I was able to complete my axle fixture tonight.

There are several ways I could have cut the V grooves in the upper halves. The easiest probably would have been to cut along the scribe lines with the vertical bandsaw and then touch up on the belt sander but I wanted to machine the grooves. Besides my mill was already a mess so I may as well add to the chips.

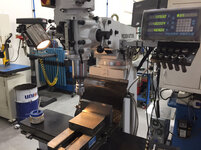
On the mill I could have clamped the plates at a 45-degree angle upright in the vise and cut the V from the end but I didn’t have an end mill long enough to reach the bottom of the V, plus there would have been some deflection in the end mill. I also could have clamped it to my rotary table and indicated in on either the X or Y axis, milled to the bottom then turned the table 90-degrees and milled to the other line. I opted to clamp it directly to the table atop my 1-2-3 blocks and indicate in on one axis and cut using the X and Y travel.

Measurements transferred to the plates. You can see my center punch marks. My plan was to drill a 3/8” hole and have that radius at the bottom of the groove. To accomplish that I offset the hole half of the 3/8” and center punched for drilling.
23d546b355a9d4687b1b88d521aa52ca.jpg

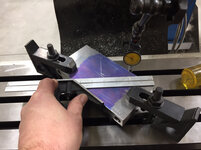
After snugging the clamps I used my combination square as the reference for indicating in on the X axis.
de7ab6d73dcffe4f02b66e0f30a58b67.jpg

After using my wiggler to find the center punch I zeroed both X and Y on the DRO. I then moved off of the cut lines by .100” and made the rough cuts before switching over to a 4-flute end mill and snuck up on the measurements.
2e5eb9d9f61f597638264de630280fad.jpg

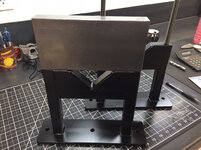
Final pass completed.
b2a30bffc7ad96c5279f866f81566f66.jpg

One down one to go.
4ab438f7831faf491cdd6337f771155e.jpg

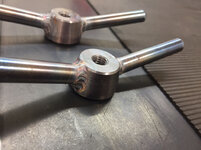
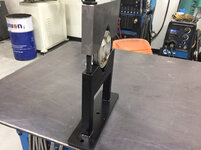
Mocked up with a smaller diameter tube. This should be the closest the upper and lower clamps should come to one another and still has 3/8” clearance with plenty of surface area contact for secure clamping. This would be even smaller than a Dana 30 or 44 which I will more than likely be working with.
cad2c78d21d40e2eb80d60f7549f4048.jpg

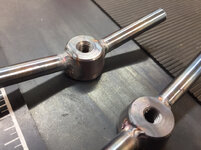
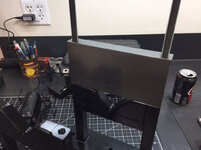
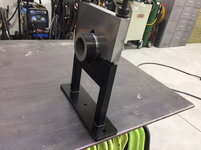
Mocked up with probably the largest tube diameter I will come across. This would be indicative of a Dana 70, 80 or even an AAM or GM 14-bolt axle.
5ee1e4aea3ca28e7e382d8d2b5c1765d.jpg

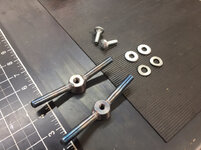
Approximately where they will reside on my fabrication table when in use.
668f8ce7988e96a337169bba662cf067.jpg

Thanks for looking.
 

Attachments

  • 668f8ce7988e96a337169bba662cf067.jpg
    668f8ce7988e96a337169bba662cf067.jpg
    725.5 KB · Views: 2
  • 5ee1e4aea3ca28e7e382d8d2b5c1765d.jpg
    5ee1e4aea3ca28e7e382d8d2b5c1765d.jpg
    698.9 KB · Views: 1
  • cad2c78d21d40e2eb80d60f7549f4048.jpg
    cad2c78d21d40e2eb80d60f7549f4048.jpg
    684.7 KB · Views: 1
  • 4ab438f7831faf491cdd6337f771155e.jpg
    4ab438f7831faf491cdd6337f771155e.jpg
    730.8 KB · Views: 1
  • b2a30bffc7ad96c5279f866f81566f66.jpg
    b2a30bffc7ad96c5279f866f81566f66.jpg
    756.8 KB · Views: 1
  • 2e5eb9d9f61f597638264de630280fad.jpg
    2e5eb9d9f61f597638264de630280fad.jpg
    801.2 KB · Views: 1
  • de7ab6d73dcffe4f02b66e0f30a58b67.jpg
    de7ab6d73dcffe4f02b66e0f30a58b67.jpg
    689.4 KB · Views: 1
  • 23d546b355a9d4687b1b88d521aa52ca.jpg
    23d546b355a9d4687b1b88d521aa52ca.jpg
    811.6 KB · Views: 1
Last edited:

OutlawDrifter

Well-known member
Joined
Jan 20, 2015
Messages
3,878
Location
KS
Those turned out great Mike! I would love to add a mill to my toy box someday...I've got a few other wants before I get there, however, like a Huth/Ben Pearson Exhaust tubing bender.
 
OP
Z

zmotorsports

ALLIANCE MEMBER
Joined
Oct 20, 2009
Messages
21,432
Location
Northern Utah
Mike you're work just leaves me in awe. really like your work and talent. Thank you for sharing


Thanks JC. I appreciate that and thanks for continuing to follow along.


Those turned out great Mike! I would love to add a mill to my toy box someday...I've got a few other wants before I get there, however, like a Huth/Ben Pearson Exhaust tubing bender.


Thanks Marc. Yeah, a mill is a nice piece of equipment when the need arises. There are times when an exhaust tubing bender would be nice as well but my exhaust work is few and far between.

I enjoy learning machining and the various sequences through the process. Wish I had more time to play on my mill and lathe. When I use them it’s usually for a project rather than playing or experimenting.

Thanks for checking in on my projects.
 
Last edited:

Bigblue&Goldie

Well-known member
Joined
Mar 12, 2009
Messages
10,684
Location
AZ
Looks great as expected. Did you go full depth of cut with the end mill when cutting the "V's"? What were the spec's on the bit used for the through rod holes?
 
OP
Z

zmotorsports

ALLIANCE MEMBER
Joined
Oct 20, 2009
Messages
21,432
Location
Northern Utah
Looks great as expected. Did you go full depth of cut with the end mill when cutting the "V's"? What were the spec's on the bit used for the through rod holes?

Thank you.

I used a 1/2" roughing end mill and advanced the table .100" at a time and plunged the end mill. Once the material was roughed out I switched over to a 4-flute 1/2" end mill and crept up on the final measurement where I took .015" on the final cut and bumped my speed up a bit for a nicer finish and climb milled. Once removed from the mill table I ran over the cut edges with a fine toothed flat file to knock the sharp corners down.

The through holes started with a center bit, then a 1/4", 3/8", 1/2" and finally a 17/32" before adding a slight chamfer at the opening of each side.
 
OP
Z

zmotorsports

ALLIANCE MEMBER
Joined
Oct 20, 2009
Messages
21,432
Location
Northern Utah
That's a cool trash can! lol!

Thanks. I've had that 16-gallon drum turned into trash can for nearly 30 years now. I got it shortly after building my last shop as before that it was my dad's from his little workshop on the family farm.

When I was nearing completion on my new shop I bought a Valvoline and a Mobil 1 16-gallon oil drum and turned them in to garbage cans. I have my Valvoline one between my main toolbox and my bench with my vise and my Mobil 1 garbage can right next to the main entry door into the shop. I actually get more comments about my garbage cans than I ever thought I would.

Thanks for following along and picking up on the "little things".
 
Last edited:
OP
Z

zmotorsports

ALLIANCE MEMBER
Joined
Oct 20, 2009
Messages
21,432
Location
Northern Utah
Mike you're work just leaves me in awe. really like your work and talent. Thank you for sharing

Thank you JC, I'm flattered.

Stay tuned as I have video footage of the build and will be posting to my YouTube channel as soon as I have time to do the editing, hopefully this weekend.
 
To avoid these ads, REGISTER NOW!
OP
Z

zmotorsports

ALLIANCE MEMBER
Joined
Oct 20, 2009
Messages
21,432
Location
Northern Utah
Mike, I wonder do you sleep at night with all this stuff you do? Burning the candle 24/7? :lol_hitti

I salute you......:beer:

Thank you Mark.

I actually have a bit more "down" time these days compared to what I used to have when I was running my side business. I am able to get some quality time in my shop to not only maintain my assets but also to get some not so high of priority projects completed and most importantly, some quality time with my wife as well. In the warmer months I actually look forward to getting home and mowing my lawn and keeping the yard looking nice. I look forward to when I am able to spend more time or all day with my wife traveling and enjoying life after we retire.

I'm not gonna lie though, I kind of like the less frantic life my wife and I have now compared to the previous 25+ years of working full-time, running a side business and racing. I could easily get used to this slower lifestyle the older I get.:beer: I never thought I'd say that because I always felt like in order to get ahead I had to be going 90 MPH all the time.

Don't get me wrong, I am grateful for the opportunities that I have been blessed with to work and provide for my family but as I've gotten older I've discovered I can still get ahead while slowing down to smell the roses as well.

Thank you for stopping by and I hope you like the content of my thread.
 

jackson1701

Well-known member
Joined
Jan 13, 2015
Messages
157
Location
Jarrettsville, MD
great stuff as always Mike, I have a few days off over the holidays and will be catching up on your latest shop videos with my son. Thanks for the great posts and inspiration with your builds! Steve
 
OP
Z

zmotorsports

ALLIANCE MEMBER
Joined
Oct 20, 2009
Messages
21,432
Location
Northern Utah
great stuff as always Mike, I have a few days off over the holidays and will be catching up on your latest shop videos with my son. Thanks for the great posts and inspiration with your builds! Steve

Thank you Steve.

I hope you enjoy the last few videos and thanks for taking the time to watch as well as follow along.
 

rattle_snake

Well-known member
Joined
Jun 25, 2015
Messages
5,213
Location
Chandler, AZ
Nice work on the axle fixture.

But, what about a square tube 2.5T Rockwell? I could see you swapping in a set to run 54/19.5 Boggers on your jeep
:)
 
OP
Z

zmotorsports

ALLIANCE MEMBER
Joined
Oct 20, 2009
Messages
21,432
Location
Northern Utah
My son picked up a single stage Snapper snowblower exactly like the one we had years ago. He said it brought back some childhood memories when he saw it.

He has been refurbishing it in his own home garage. I told him he could bring it over to the shop that is heated to work on it but he said he wanted to work on it in his own garage and I completely understood.

He went through the carb, bought new flappers and some plastic bushings for it but one thing he couldn’t locate were the large wingnuts for the chute diffuser so I told him I’d make him a couple.

Started with 1” round stock.
89b6ce55a5fbfe40689b768fbcc4a004.jpg

I machined about a 12-degree taper to weld the 3/8” stock onto after drilling & tapping to 5/16”-18 thread.
eda2efc65d35528ad5b2126d313ae4ba.jpg

Cutting four small lengths of 3/8” round stock. These linear style clamping pliers sure work great to keep round items from turning while cutting.
b152a7023fe233dc98b37883302d8460.jpg

All of the components.
eaee92880bd2209b8c7c526d5dbc84d3.jpg

Wiped with acetone and ready to weld.
74834e5fbdebbcc30ad76d91d9e466a6.jpg

Welded.
5b30b682546158843a2bcd5bf099b80b.jpg

8d334d9807e57aa9b74d04a19dcd39db.jpg

d81ffb58a30230e6049749b5e110cedd.jpg

e9c4d03d2fc25b7e202b02e4f47a7cb2.jpg

Bead blasted and painted with some semi-gloss black.
d86fc7f869dcc989734a198c1086139d.jpg

I’ll have to have him take a picture or two once he installs them.

Thanks for looking.
 

Attachments

  • 89b6ce55a5fbfe40689b768fbcc4a004.jpg
    89b6ce55a5fbfe40689b768fbcc4a004.jpg
    648.6 KB · Views: 0
  • eaee92880bd2209b8c7c526d5dbc84d3.jpg
    eaee92880bd2209b8c7c526d5dbc84d3.jpg
    801.3 KB · Views: 0
  • eda2efc65d35528ad5b2126d313ae4ba.jpg
    eda2efc65d35528ad5b2126d313ae4ba.jpg
    798.8 KB · Views: 0
  • b152a7023fe233dc98b37883302d8460.jpg
    b152a7023fe233dc98b37883302d8460.jpg
    1 MB · Views: 0
  • 74834e5fbdebbcc30ad76d91d9e466a6.jpg
    74834e5fbdebbcc30ad76d91d9e466a6.jpg
    803.7 KB · Views: 0
  • 5b30b682546158843a2bcd5bf099b80b.jpg
    5b30b682546158843a2bcd5bf099b80b.jpg
    705.6 KB · Views: 0
  • 8d334d9807e57aa9b74d04a19dcd39db.jpg
    8d334d9807e57aa9b74d04a19dcd39db.jpg
    730.8 KB · Views: 0
  • d81ffb58a30230e6049749b5e110cedd.jpg
    d81ffb58a30230e6049749b5e110cedd.jpg
    764.3 KB · Views: 0
  • e9c4d03d2fc25b7e202b02e4f47a7cb2.jpg
    e9c4d03d2fc25b7e202b02e4f47a7cb2.jpg
    696.4 KB · Views: 0
  • d86fc7f869dcc989734a198c1086139d.jpg
    d86fc7f869dcc989734a198c1086139d.jpg
    558.6 KB · Views: 0
Last edited:
OP
Z

zmotorsports

ALLIANCE MEMBER
Joined
Oct 20, 2009
Messages
21,432
Location
Northern Utah
Did you line up those wing nut arms any particular way or did you just eye them up and weld?

Just eyeballed them. It wasn't super critical and I was in a hurry to get them knocked out so didn't have time to make a fixture to hold everything.

I cut the angle on the center piece so I could hold the 3/8" rods to each side and blast tack them on then go right to welding.

I'm sure they're off a few thou but to the eye you can't tell.
 
OP
Z

zmotorsports

ALLIANCE MEMBER
Joined
Oct 20, 2009
Messages
21,432
Location
Northern Utah
Here are a few pictures of the wing nuts installed on my son’s snowblower.


I think they turned out well and my son loves them.

6a8b6a244e6f0a372746677f81b098ac.jpg

db85cf95452f94e94ddd5312a661f17d.jpg

656c607882bb5451f1d3021e628a6677.jpg
 

Attachments

  • 656c607882bb5451f1d3021e628a6677.jpg
    656c607882bb5451f1d3021e628a6677.jpg
    502.5 KB · Views: 0
  • 6a8b6a244e6f0a372746677f81b098ac.jpg
    6a8b6a244e6f0a372746677f81b098ac.jpg
    595.3 KB · Views: 0
  • db85cf95452f94e94ddd5312a661f17d.jpg
    db85cf95452f94e94ddd5312a661f17d.jpg
    598.7 KB · Views: 0
Last edited:
To avoid these ads, REGISTER NOW!
Top Bottom