To avoid these ads, REGISTER NOW!

The GDS Skunkworks, 4 FN 27's Shop Projects

zmotorsports

ALLIANCE MEMBER
Joined
Oct 20, 2009
Messages
21,426
Location
Northern Utah
Pat, do you have any resources you could point a guy towards to learn more about these parameters consider when drilling? Didn't even know I didn't know about such a thing, if the drill bit doesn't go in I just push harder! :dunno:


Mike, same question for you - any direction you could point me in to learn the proper technique and equipment needed to sharpen drill bits? I remember my Grandpa always sharpening his bits, but by the time I got old enough to see the value of it he was well past the point of puttering in his garage any more.

Otherwise I'll just be a typical millennial and google it!

Thank you!

Kyle

Kyle, not to hi-jack Pat's thread but I was fortunate to have a shop teacher get me interested and show me the basics way back in Jr. High School and I have just continued to fine tune the skill ever since.

That being said there is a good section in the Machinery's Handbook, no matter the edition as they're all pretty much the same. Another thing critical to drilling almost as much as how the bit is sharpened is the speed at which you drill the material. Each material has a specific speed at which it should be drilled and learning these as well as practicing their use will not only result in better finished results but also not require as much sharpening of your drill bits.

For a quick visual of sharpening twist drill bits, Tom from Tom's Techniques is one of the better videos.

Hope that information is helpful. Just remember, it's similar to welding with theory being 10% and actual hands on practice being 90%. Once you learn the basics just continue to fine tune the skill by doing it.
 
To avoid these ads, REGISTER NOW!
OP
4

4 FN 27

ALLIANCE MEMBER
Joined
Oct 19, 2015
Messages
4,635
Location
Minnesnowta
Pat, do you have any resources you could point a guy towards to learn more about these parameters consider when drilling? Didn't even know I didn't know about such a thing, if the drill bit doesn't go in I just push harder! :dunno:

Best resources are listed below by Bd and Mike...

Not trying to interject, but a fantastic resource that covers both of these topics (and pretty much everything related to machining) is the Machinery's Handbook. The newest version (30) is ~$80 on Amazon, but I wouldn't hesitate to pick up an earlier version like 28 or 29 on the used market to save some money (I found used paperback versions of 28 on Amazon for $30, hardcover is $50). I have 27 from "back in the day" and don't think that I'm missing out on much by not having the latest version. It has a sections that cover bit sharpening and calculating feeds and speeds, along with tables that cover pretty much any material you can think of.

YouTube is also a great resource on these topics if you are more a visual learner. This Old Tony has a great video on hand sharpening drill bits:

Kyle, not to hi-jack Pat's thread but I was fortunate to have a shop teacher get me interested and show me the basics way back in Jr. High School and I have just continued to fine tune the skill ever since.

That being said there is a good section in the Machinery's Handbook, no matter the edition as they're all pretty much the same. Another thing critical to drilling almost as much as how the bit is sharpened is the speed at which you drill the material. Each material has a specific speed at which it should be drilled and learning these as well as practicing their use will not only result in better finished results but also not require as much sharpening of your drill bits.

For a quick visual of sharpening twist drill bits, Tom from Tom's Techniques is one of the better videos.

Hope that information is helpful. Just remember, it's similar to welding with theory being 10% and actual hands on practice being 90%. Once you learn the basics just continue to fine tune the skill by doing it.


Not trying to interject[/url]

Kyle, not to hi-jack Pat's thread

Gents no worries. As I understand it, the only person(s) that can truly Hijack the thread would be a Moderator(s).

I appreciate you stepping up and filling in as I was in a business meeting all afternoon. And I am grateful I have a Staff...a very wise and knowledgeable Staff. You gents are wise and progress can be found in sharing ones wisdom with those who wish to learn!!! A little satire...with a compliment. And I mean it.

This is a great place to learn.
 

Stuart in MN

Well-known member
Joined
Sep 8, 2005
Messages
23,135
Location
Minneapolis
Not trying to interject, but a fantastic resource that covers both of these topics (and pretty much everything related to machining) is the Machinery's Handbook. The newest version (30) is ~$80 on Amazon, but I wouldn't hesitate to pick up an earlier version like 28 or 29 on the used market to save some money (I found used paperback versions of 28 on Amazon for $30, hardcover is $50).

I found an older edition in great condition at a yard sale recently for $4. :) Not a common occurrence, but they are worth looking for.
 

Monza Harry

Well-known member
Joined
Dec 29, 2018
Messages
1,433
Location
Windsor ON
You guys are making me feel old! MY Machinery's Handbook was the very latest 22nd edition
[1985, during my 1st year in the trade.] If it isn't in these books you really don't need to know it, Ok, there isn't any *** advice, but out side of that? Harry
 
OP
4

4 FN 27

ALLIANCE MEMBER
Joined
Oct 19, 2015
Messages
4,635
Location
Minnesnowta
You guys are making me feel old! MY Machinery's Handbook was the very latest 22nd edition
[1985, during my 1st year in the trade.] If it isn't in these books you really don't need to know it, Ok, there isn't any *** advice, but out side of that? Harry

LOL...

I have the 21st addition on my desk here at work. Was a high school graduation present from one of my mentors. Have a downloaded version at the home shop in PDF format.


Time for an update...

Been lots of exciting things going on. First we had somebody illegally dump a truck load of Car Parts and garbage in remote area of the company property. Got Video of them coming in and leaving. Took a couple of still shots from the Video and posted them on a local Facebook page.

attachment.php


Had the all the guys intel short of his SS number within 3 1/2 hours of placing the post.

Called the Sheriff and had him trespassed and sited for illegal dumping. The Sheriff is moving forward with charging him and also made him come back and clean it up.

Note to self: When doing something illegal drive a "Belly Button" car...not a 1 of a kind lifted Chevy Half Ton with big Tires and a obvious sticker across the back window.

I headed north with the guys for our annual retreat to northern MN. The weather wasn't the best but we still had a great time. Rained and snowed the whole weekend. No shortage of smart *** comments and sarcasm. many trips were made to the "Vise Garage", a pole barn on the property where everyone practices a given vise. Me beer...just a couple. Cigars for the rest of the crew.

The we had to get the Pontoon out. The Dodge got stuck so we ended up hooking a chain to my truck and the 2 of us got it up and out. Unfortunately I only got 1 picture.

attachment.php


Picked up my new Ditch Pickle in Cannon Falls. I had Black Diamond Machine go through the whole sled instead of doing it myself. For the price they offered I would be a fool to do it myself. Had to weight it in before and after fueling.

attachment.php


But while there we found a number of goodies for the "Wife's" sled...Can, Pipe, Clutch Kit and Helix. Installed all that stuff this weekend. Made for a fun little project. So nice having a Hoist to work on the sleds with at a comfortable height.

attachment.php


attachment.php


Had to make a quick and dirty Helix changing tool from junk I had laying around. Worked slick. Way better than the tools you can buy.

attachment.php


attachment.php


No I am looking forward to some SNOW!!!
 

Attachments

  • IMG_8081.jpg
    IMG_8081.jpg
    151.5 KB · Views: 1,302
  • IMG_8110.jpg
    IMG_8110.jpg
    148.1 KB · Views: 1,289
  • IMG_8117.jpg
    IMG_8117.jpg
    120.3 KB · Views: 1,288
  • IMG_8107.jpg
    IMG_8107.jpg
    139.4 KB · Views: 1,285
  • IMG_8118.jpg
    IMG_8118.jpg
    138.6 KB · Views: 1,290
  • IMG_8106.jpg
    IMG_8106.jpg
    148.3 KB · Views: 1,290
  • IMG_8095.jpg
    IMG_8095.jpg
    155.7 KB · Views: 1,301
Last edited:

zmotorsports

ALLIANCE MEMBER
Joined
Oct 20, 2009
Messages
21,426
Location
Northern Utah
Aaaaw. I remember the nights of thrashing on a new sled project in the shop. Being so excited for snow that I could hardly sleep and watching the snow line creep down the mountain side each fall.

Now I can't wait to see that **** go away each spring.

Cool looking projects Pat. Hope you have fun on them this year.
 

jjeffries

Well-known member
Joined
Sep 7, 2013
Messages
91
The guy dumping all that stuff on your property... glad you ID'd him and got the police to handle it. A couple of days in some old-time stocks on the village green would be appropriate. John
 
OP
4

4 FN 27

ALLIANCE MEMBER
Joined
Oct 19, 2015
Messages
4,635
Location
Minnesnowta
The guy dumping all that stuff on your property... glad you ID'd him and got the police to handle it. A couple of days in some old-time stocks on the village green would be appropriate. John

Guys like this don't learn even from public shaming. Found it is not his first rodeo.

His brother called me to apologize...to me that is completely unacceptable. When I told him we are proceeding forward with having him charged his brother told me his mother is a personal friend of the Sheriff. Talk about enabling bad behavior. He **** the bed now let him sleep in it or do the laundry.

But I like the way you think John!!!
 
OP
4

4 FN 27

ALLIANCE MEMBER
Joined
Oct 19, 2015
Messages
4,635
Location
Minnesnowta
That isn't garbage,,, he was giving you free parts.

sberry I would agree if the parts were a LS7or any Big Block Chevy stuff...

They charged him!!!


Over the weekend between trips around the yard mowing up todays leafs and tomorrow compost I made a mount for a Pelican 1450 Case on Mrs 4 FN 27's sled.

Water Jetted a couple of Backing Plates which also doubled as Fixtures for the additional ø.266 holes we needed. Used the Hougen Rotabrouh Bits I purchased a few months ago. Worked slick for getting through the thin soft Aluminum with out leaving a burr.

attachment.php


Had to make 4 shims to bolt through the Case. Jetted them from 3/16 304 SST. Gave them each a little dab of Ultra Blue just to hold them in place.

attachment.php


Found a few SST Fender Washers and raided the hardware surplus in the shop and came up with the correct length hardware...all in Stainless to boot. I love Stainless with just a dab of Anti-Seize.

attachment.php


Bolted it together with the help of the BIL. He was poking fun at me again for making everything a "Slip Fit". If I followed his lead I would only need a 1 in Drill and all kinds of washers. NO!!!

attachment.php


I like it. Have to see how it works on the trail...to save a little weight I removed the handle.

attachment.php


Then cruising through the shop this morning I saw something that caught my eye...looks like we are getting into the Clipper Blade business. Pretty trick little parts making an assembly. And are these things sharp!!!

The Cool Part of the Day!!!

attachment.php


attachment.php
 

Attachments

  • IMG_8136.jpg
    IMG_8136.jpg
    58.6 KB · Views: 649
  • IMG_8135.jpg
    IMG_8135.jpg
    72.1 KB · Views: 649
  • IMG_8132.jpg
    IMG_8132.jpg
    138.4 KB · Views: 650
  • IMG_8134.jpg
    IMG_8134.jpg
    146.5 KB · Views: 653
  • IMG_8133.jpg
    IMG_8133.jpg
    147 KB · Views: 650
  • IMG_8131.jpg
    IMG_8131.jpg
    139.2 KB · Views: 653
  • IMG_8130.jpg
    IMG_8130.jpg
    122.4 KB · Views: 657
Last edited:
OP
4

4 FN 27

ALLIANCE MEMBER
Joined
Oct 19, 2015
Messages
4,635
Location
Minnesnowta
Are you able to share with us how the bevels on the blade teeth are cut?

I'll have to find out??? And wouldn't you know it...all of the Engineers have left the building...they all have been working a 14-16 hour grind for the last couple of weeks...lots of Prototypes rolling through...

I believe we had an outside source do it. But I'll let you know.
 

customh

Well-known member
Joined
Feb 18, 2013
Messages
562
Location
East Bethel, MN
Used the Hougen Rotabroach Bits I purchased a few months ago. Worked slick for getting through the thin soft Aluminum with out leaving a burr.
Side note: I was looking for a tool to drill 7/8" holes with my limited machinery at work and found that Viking makes carbide "hole cutters" (quite similar to hole saws) Related because I was going to give you **** about buying Hougen vs Viking but it doesn't look like they make these in small sizes.

I like it. Have to see how it works on the trail...to save a little weight I removed the handle.
Are you at all concerned about throwing off the balance of the sled with the case all the way back on the tunnel? Or should I read "Wife's sled" again?
 

zmotorsports

ALLIANCE MEMBER
Joined
Oct 20, 2009
Messages
21,426
Location
Northern Utah
Excellent work as always Pat on the Pelican mounting apparatus.

I love my Rotabits as well and for the tunnel holes I'm sure they worked perfectly.

Almost makes me miss my snowmobiling days. ALMOST!:lol_hitti

Also, I work with a few guys that have the same mentality about drilling holes. Bigger is better and if they don't line up that's what their BFH is for.:headscrat
 
OP
4

4 FN 27

ALLIANCE MEMBER
Joined
Oct 19, 2015
Messages
4,635
Location
Minnesnowta
Are you able to share with us how the bevels on the blade teeth are cut?

Checked with the guys. The Blades are supplied to us by the customer.

We then add the Keyhole on one half and add a Hole on the other for the "Rivet". And we assemble the "Rivet" to the half with the hole.

The features are added by Lasering the parts on a fixture.

We also add the Offsets to each half in the Press Brake.
 
OP
4

4 FN 27

ALLIANCE MEMBER
Joined
Oct 19, 2015
Messages
4,635
Location
Minnesnowta
Side note: I was looking for a tool to drill 7/8" holes with my limited machinery at work and found that Viking makes carbide "hole cutters" (quite similar to hole saws) Related because I was going to give you **** about buying Hougen vs Viking but it doesn't look like they make these in small sizes.

LOL...Viking is still my go to for Drill Bits. Gotta support local besides in the picture above of the Pontoon getting pulled out...well that is the CEO of Viking Drill Pontoon.

Are you at all concerned about throwing off the balance of the sled with the case all the way back on the tunnel? Or should I read "Wife's sled" again?

Wife's Sled would be the preferred pronoun...

Not real concerned about the front to back ratio. More concerned about raising the center of gravity as it is a "trail sled".

The Sled fueled weighs 608 lbs and the Case with contents is about 10-12 lbs. The weight bias as the sled is set-up from the factory are (prior to all the Mods):

Left Front: 136 lbs
Right Front: 151 lbs
Front of Track: 219 lbs
Rear of Track 102 lbs

47.2% of the weight is on the front skis until you add the rider. I mean proportionally the ideal position would be somewhere towards the Left Front Ski to balance the sled left to right. But this aint a race car. If it was we would be replacing parts with lighter materials and figure out the ultimate balance based on data. The ROI on weight savings was (the Pro Stock Car) if it costs more than $200.00 per pound removed it was not a good decision. Less than $200.00 per pound...make that investment.

Need to weigh in again now that the Mods are installed. But the hoist is ******* with the rest of the mods on the ********* Mountain Sled.
 
OP
4

4 FN 27

ALLIANCE MEMBER
Joined
Oct 19, 2015
Messages
4,635
Location
Minnesnowta
Excellent work as always Pat on the Pelican mounting apparatus.

I love my Rotabits as well and for the tunnel holes I'm sure they worked perfectly.

Almost makes me miss my snowmobiling days. ALMOST!:lol_hitti

Also, I work with a few guys that have the same mentality about drilling holes. Bigger is better and if they don't line up that's what their BFH is for.:headscrat

Thank you Mike!!!

You can always rent one for a day...you may get the bug again!!!

I believe in Precision and Accuracy. Takes just as long to drill a hole in the correct spot as it does in the wrong spot.

Some people really do wish these bolts exist:

attachment.php
 

Attachments

  • Special Bolts.jpg
    Special Bolts.jpg
    103.9 KB · Views: 605

jjeffries

Well-known member
Joined
Sep 7, 2013
Messages
91
Great bolt chart! You can tell its from England or one of the satellite colonies (just kidding) by the use of the term "Mole Grips", English trade name for Vise Grips...I'll now need to look up who invented them first. Best, John
 
To avoid these ads, REGISTER NOW!
OP
4

4 FN 27

ALLIANCE MEMBER
Joined
Oct 19, 2015
Messages
4,635
Location
Minnesnowta
Fun uninterrupted weekend in the shop in the Shop.

Started out Saturday morning hitting the Gun Range with a new combo I put together. A Remington M24 SWS (Sniper Weapon System). Been looking for one of these for about 10 years. Finally found one. Put a US Optic on top using Ken Farrell Rings. On paper at 100 yards first shot. Didn't even bore sight it.

attachment.php


Put 20 rounds through it. So far 1/2 MOA on factory Hornady Ammo.

Then it was back to the shop. The BIL and Nephew showed up and we cut wood for about 4 hours filling his Truck and a Trailer with some prime Oak.

Then we fire up the Water Jet and cut all the flats for 2 projects.

First one being a Prototype set of Dollies for the new Sleds. Not happy with what is on the market. The new Mountain Sleds have 3 inch tall paddles and all the Dollies offered are made for 3/4 lugs.

This is the rear Dolly upside down. Made from .074 and .120 SST. All Tab and Slot construction thus no fixtures require.

View media item 98158
Still getting use to welding with Progressive Lenses. Man I wish I had my eye from 10 years ago!!! Need to practice more.

View media item 98159
Once welded I had to test it. Well wouldn't you know it...I guessed at the Track width and I was wrong. I was supposed to remember to measure and adjust the Cad Model. Well I didn't.

However all was not lost...one must redeem themselves. Cut the thing in half and welded in a filler part. Good thing I didn't tear the set-up out of the Press Brake.

View media item 98160
View media item 98165
Guess that is why we call them Prototypes.

And it works!!!

View media item 98162
Also made a set for the front Skis. Need to order some HDPE tomorrow. Thought I had the right size in stock but NOT! I'll get that ordered in the morning and hopefully be machining Tuesday night to test.

The front Dollies are made from the same Materials .075 and .120 SST. The Goal is to be able to run the sleds across the Driveway or Shop floor without the Carbides chewing up the concrete and to be able to steer.

View media item 98163
The second project is a Mini Pole Bard for my buddy who painted the Plow I built last year. His Grandson wants to be a Farmer. He has lots of small toy tractors and no shed to keep them in. He asked so I deliver...

I need to install the Pem Nuts I'll have to do that at the plant. Was going to take a run at it in the Press Brake but if I did before I formed the parts I would have had to relieve all the tooling to miss the Pems. Or I could have made a set-up and some tools and ran it off the end of the Brake. I don't like to do this because it is not on dangerous but hard to control the tonnage on small hardware with slop on the Ram of the machine.

Bigger hardware is not much of an issue but the smaller stuff is more touchy. Too much pressure and you can push them right through or they will not hold.

I'll get pics once he has it all painted.

attachment.php


attachment.php
 

Attachments

  • IMG_8141.jpg
    IMG_8141.jpg
    134.4 KB · Views: 1,361
  • IMG_8159.jpg
    IMG_8159.jpg
    121.3 KB · Views: 1,350
  • IMG_8161.jpg
    IMG_8161.jpg
    100.2 KB · Views: 1,352

moab11

Well-known member
Joined
Nov 22, 2015
Messages
567
Location
Thunder Bay, Ontario
love the sled dollies, I agree there really isn't much on the market for tracks with much more than a 1" lug.

What size wheels did you use for the fronts and rear?
 
OP
4

4 FN 27

ALLIANCE MEMBER
Joined
Oct 19, 2015
Messages
4,635
Location
Minnesnowta
love the sled dollies, I agree there really isn't much on the market for tracks with much more than a 1" lug.

What size wheels did you use for the fronts and rear?

Thank you.


Rear Dolly:

McMaster #87845T81

Threaded-Stem Swivel Caster, 3/8"-16 Stem Thread, One 2" Diameter x 7/8" Wide Firm Wheel

Front Dollies:

McMaster #2328T72

Static-Control Rubber Wheel, 3" Diameter x 15/16" Wide
 

moab11

Well-known member
Joined
Nov 22, 2015
Messages
567
Location
Thunder Bay, Ontario
Thank you.


Rear Dolly:

McMaster #87845T81

Threaded-Stem Swivel Caster, 3/8"-16 Stem Thread, One 2" Diameter x 7/8" Wide Firm Wheel

Front Dollies:

McMaster #2328T72

Static-Control Rubber Wheel, 3" Diameter x 15/16" Wide
Thank you, please keep us updated on how well your dollies work!
 
OP
4

4 FN 27

ALLIANCE MEMBER
Joined
Oct 19, 2015
Messages
4,635
Location
Minnesnowta
Thank you, please keep us updated on how well your dollies work!

Finished them up Saturday morning. They work great.

Might have a revision in the works. The HDPE is OK but I think I might make a set of Stainless "Shoes" and try that too.

Time to go into production mode.

attachment.php
 

Attachments

  • IMG_8168.jpg
    IMG_8168.jpg
    130.2 KB · Views: 1,048
OP
4

4 FN 27

ALLIANCE MEMBER
Joined
Oct 19, 2015
Messages
4,635
Location
Minnesnowta
A buddy brought his 2 boys out over the weekend. They Deer hunted Saturday morning and Saturday evening. They harvested 1 Button Buck.

IMG_8166.jpg

This afternoon I put the Snowblower on the John Deere and did all the Maintenance. It is ready to go.

IMG_8167.jpg

Friday at the Plant the guys put the finishing touches on the first of many "Chambers". These Chambers will be used to make Cancer Treating Drugs...can't say much more than that.

It was quite the Design and Engineering effort. All Stainless Steel and 100% Fabbed.

There several more Cabinets that get assembled to this Chamber to complete it. Those should be ready this week.

IMG_8164.jpg

IMG_8165.jpg
 

customh

Well-known member
Joined
Feb 18, 2013
Messages
562
Location
East Bethel, MN
Why is the HDPE only OK? Seems like that would be the perfect material for that job. What keeps the dollies on the skis when using them under power?

The Chambers are a good looking project, expect nothing less from the plant!
 
OP
4

4 FN 27

ALLIANCE MEMBER
Joined
Oct 19, 2015
Messages
4,635
Location
Minnesnowta
Why is the HDPE only OK? Seems like that would be the perfect material for that job. What keeps the dollies on the skis when using them under power?

That is the issue...the HDPE is too slippery.

The design right now counts on the Taper of the Ski to hold it in the Center. The Keel on the Ski tapers front to back getting slightly wider as you go. Thus tight tolerances.

I will try a Stainless Bolt on "Tray" that is ramped and polished. All part of the continuous improvement program.


The Chambers are a good looking project, expect nothing less from the plant!

Thanks buddy...

Did you get your Shaft Sleeved? (LOL...this may get some interesting offerings of new posts).
 

JRDUCKS

New member
Joined
May 14, 2016
Messages
4
Check out the Caliber ski dollies, I personally do not have a set but have had an eye on them for awhile! I'd post a link but I don't have enough posts yet :lol_hitti
 

customh

Well-known member
Joined
Feb 18, 2013
Messages
562
Location
East Bethel, MN
Did you get your Shaft Sleeved? (LOL...this may get some interesting offerings of new posts).

The second try went far better than the first rolling .090" Aluminum in a Hazard Fraught slip roller. First try went as first trys do with amateurs at the controls. It was good enough to hammer in.
 

sberry

Banned
Joined
Jun 18, 2005
Messages
35,747
Location
Brethren, Michigan
I can wheel the skid right outside to the snow, drive on. Its got 2 planks across the pallet in a v shape of sorts and guides for the skis. It actually works quite well. I can forklift it to a shelf.
 
OP
4

4 FN 27

ALLIANCE MEMBER
Joined
Oct 19, 2015
Messages
4,635
Location
Minnesnowta
I hope everyone had a fine Christmas!!!

I enjoyed the time off playing in the shop non-stop. I stayed away from the office for the whole 5 days...but I did go into the plant to pic up some material for projects.

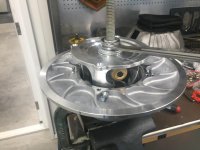
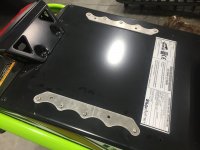
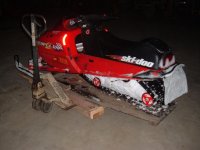
Over the last few weeks I managed to cross quite a few things off the "Tado" list. Started out making a set of Hand Guard Mounts for the new Sled. Everything on the after market or factory stuff was junk and over priced. So I made 10 complete sets of Left and Rights.

The test run went well and had no issues...well with the Hand Guards...but the Motor in the sled...more down below...

View media item 99630
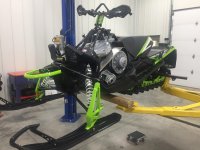
The test run was at my buddies Cabin. We headed up after they go 30+ inches of snow. The conditions were perfect. Great base of snow and temps staying around 10°...absolutely perfect.

We ventured out with 23 miles on my sled and 51 one my buddies. they are set up identical and both bought on the same day form the same dealer. Needless to say mine burnt down. Smoked a Piston and a Cylinder.

Story goes we left his cabin and headed north. We stopped to get lunch after going about 30 miles. When we stopped we added a tad bit of Fuel and both checked our Oil since my buddies low Oil Light was flashing. I figured I had an extra 28 mile worth of oil compared to him.

We headed out got about 5 miles down the trail and his Light was glowing so he stopped and we took a stick and put in the Oil Tank to fined it was about 1/3 full still. My light was still off and I could still see oil in the Tank. About 5 miles after that the motor seized. Looked in the Tank and it was bone dry. No Indicator Light.

We towed it out to a road about 2 miles and I rode "*****" 30 miles back to his Cabin. We grabbed my truck and trailer and head to pick the Sled up. Dropped it off at the Dealer and said they would work with me on it. I was thinking they would not cover it under the warranty.

Heard back from the dealer and they found a short in the Wiring Harness...thus no light. So it sucked 3 quarts of Oil in 66 miles. Now they are going to use more Oil during the break in period of 6 hours but 3 quarts??? My buddies Sled burned less than 3 quarter in 157 miles.

The factory is covering it 100% and they will reset the ECM to make it run the full break in cycle again. I am happy...except we got 12-16 inches more snow the next weekend and I had to ride the spare Mountain Sled...oh so many first world problems. The riding was the best ever for this early in the season.

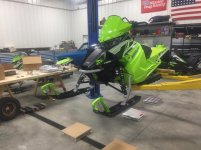
In between snowmobiling my Car Sales buddy informed me he was leaving the dealership to pursue a career in Finance and he would give me an awesome deal on a new truck...timing is everything...the ol'2016 HD2500 was having issues with the Fuel System thus it got traded off for a 2020 HD3500 and a new 8 1/2 foot Boss Plow.

View media item 99631
Absolutely love this truck!!! For the break-in it went right into service plowing a 6 inch snow the day I picked it up. Then the next day we hauled the Sleds north to ride.

Wrapped up the Snowmobile Dolly Build...12 complete sets. Now there should be no shortage of Dollys between my place, my buddies place and his Cabin!!!

The Rear Dollys:

View media item 99633
The Front Dollys:
View media item 99634
And the completed assemblies... and they nest together, an unplanned surprise:

View media item 99635
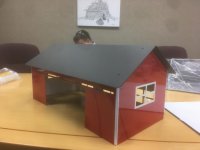
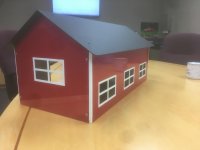
Next project is to build a "Barton Wand" for removing the spent Garnet from the Water Jet Tank. Barton gets $2900 for one without the Pressure Washer to run it. I looked at it when I was at the Fab-Tech show last month and decided to build one.

Sat at the computer for about 5 hours and designed it. Made the parts over the weekend but had to place an Order with McMaster which would only allow me to get so far with the fabrication.

The Wand works by running 2.5-3 Gallons a minute @ 2500-3000 psi up a Tube to create a venture effect and **** the Garnet up the tube to a diffuser where the solids settle out and the water returns to the tank. I am into it for $190 in parts and 1 Pressure Washer. Need to add a dedicated 230V Outlet near the Jet too.

Water Jetted all the parts and machined the Tube. Being a perfectionist I made "stars" to center the Pressure Tube in the middle of the Wand...we will have to see how that works.

The WJ parts:

View media item 99639
Mock-up Assembly...need to do a little tweaking. I am tooling limited on my Press Brake thus using what I have on hand is not the best but it will do.

View media item 99640
McMaster delivered today so we will see how far I get tonight. I need to make a Tubing Bender to put a 180° bend in 3/8 x .065 Wall DOM Tubing. That should be fun...not sure if I will do it in the Press Brake or make a conventional Bender???

Then yesterday I woke up early and headed to the shop rubbing my chin thinking what can I do today before we have to leave for the Family stuff??? Walking by the Plow Truck I noticed the Plow Harness hanging out...I noticed it before and thought I need to do something about that. So off to the computer...

View media item 99641
Put the Truck on the lift and started measuring, checking clearances and second guessing...by 10 am I had a design. Spit out the programs and started cutting and machining.

Had to make a couple of Spacers where the Recovery Hook was. The 35 year old Oven in the back of the shop did it job again kicking the Paint over in about 20 minutes.

View media item 99642
Man I love Stainless...304 Series .120 thick even installed Pem Nuts to allow for easier assembly.

View media item 99643
Did a little Machining too:

View media item 99644
Then my Wife called to remind me we had to be to my sisters in a half an hour...off to the Shower I went. Ended up at my sisters 7 minutes late, had dinner, BS with the Nieces and Nephews that were in town and at 5 o'clock I said it is time to go...got projects to finish. So I missed the gift opening but I was glad to get out of there.

The finished product...nice and clean...

View media item 99645
All in all 2019 was an awesome year. The company did very well...not quite where we wanted to end up on Bookings but we made the Sales numbers we were targeting which means we did not grow as much as we wanted but when they set the 2019 goals they set them pretty high and I warned them. It is a tough call but when you set the goals they should be a challenge but they bit off more than they could chew.

So this year we backed the growth percentage down a tad but it will still be a challenge and the troops are ready...they are salty and hungry for more.

One of the guys came across a picture of when we built the facility. I think this was taken summer of 2001. The building on the right was the Race Car Shop and Storage Building. The Black Marks in the parking lot are from breaking in tires on the Race Cars. Oh what fun it was. The pic must have been taken on a Saturday. No cars in the lot and it looks like the Crew was at the Shop. We must have been getting to roll somewhere.

The builds are now connected by an addition in 2004 and the final addition completed in 2007. All the trees planted tower over the Light Poles...

View media item 99632
I am grateful and looking forward to a great 2020!!!
 
Last edited:
OP
4

4 FN 27

ALLIANCE MEMBER
Joined
Oct 19, 2015
Messages
4,635
Location
Minnesnowta
Forgot to update one thing. The Pole Barns are painted...they turned out great.

Got a note back saying the Grandkids love them!!!

attachment.php


attachment.php
 

Attachments

  • IMG_8307.jpg
    IMG_8307.jpg
    74.1 KB · Views: 1,254
  • IMG_8306.jpg
    IMG_8306.jpg
    57.9 KB · Views: 1,238
Last edited:
OP
4

4 FN 27

ALLIANCE MEMBER
Joined
Oct 19, 2015
Messages
4,635
Location
Minnesnowta
Lots of cool things, the barns look really neat all finished up. Best of luck for 2020.

Thank you!!

I like the barn.

Thank you!!!


The guy I made them for has one of the best Powder Coating shops in the Midwest. Returning a favor. He paint the plow I rebuilt last year.

We send him a lot of business every year. Been working together going on 32 years. First shop I have seen using Robots to sand filler on parts. Very high tech.
 
To avoid these ads, REGISTER NOW!
Top Bottom