To avoid these ads, REGISTER NOW!

The VISES of Garage Journal

To avoid these ads, REGISTER NOW!

trijeff

Well-known member
Joined
Jan 21, 2015
Messages
1,359
Location
Northern Cali
The show Pony is finally done and has it's parking spot on a desk in my dad's den, along with a photo of the '66 Stang it was styled afterdc87b60a91d9a77c609707903f93e323.jpgca8dd57daa2a8be40b813dd704bc4d28.jpg

Sent from my Moto G (5) Plus using Tapatalk
 

Attachments

  • ca8dd57daa2a8be40b813dd704bc4d28.jpg
    ca8dd57daa2a8be40b813dd704bc4d28.jpg
    354.6 KB · Views: 0
  • dc87b60a91d9a77c609707903f93e323.jpg
    dc87b60a91d9a77c609707903f93e323.jpg
    505.6 KB · Views: 2

Shiftless

Well-known member
Joined
Mar 9, 2014
Messages
14,551
Location
East Bay SFO
tj:
Spectacular showpiece you have created there for your Dad.
Your painting and polishing skills are unbeatable. :bowdown:
 
Last edited:

Productbob

Well-known member
Joined
Dec 10, 2018
Messages
414
Location
ny
Jeff awesome job on the Mustang special, it's something that your family can enjoy for generations! :thumbup:
 

Productbob

Well-known member
Joined
Dec 10, 2018
Messages
414
Location
ny
no vise stuff over the holidays was the agreement but I put a bottle in the picture so it's really a holiday photo! One more scrub down tomorrow and the Reed 34 is going to join it's other 6" buddies on the shelf. Hopefully the next day or so... Happy New Year!!
 

Attachments

  • IMG_2733.jpg
    IMG_2733.jpg
    135.5 KB · Views: 77
  • IMG_2734.jpg
    IMG_2734.jpg
    140.6 KB · Views: 78

Vise

Well-known member
Joined
Apr 16, 2019
Messages
575
Location
NE
Damn Jeff! Looks fantastic.

XCM - I’ve heard the American Scales have traditionally had some issues (jaws not aligning, misc quality issues), though I have never seen one in person. Having said that, I think the 66 is fairly heavy, so if it doesn’t have issues it could be worth decent money ($300?).
 

aggiegrads

Well-known member
Joined
Jan 14, 2019
Messages
61
Location
Oregon
Anybody looking for the big bad Reed 406 that doesn’t care what it costs? There is an overpriced ($500) one on Portland Craigslist. Looks like everything moves, including the swivel pin and adjustable static jaw.

If you want to pay less than “a dollar a pound”, you can buy the 1200 pound table with it for another $150.
 
Last edited:

tool_scrounge

Well-known member
Joined
Jul 20, 2010
Messages
4,194
Location
Southern California
So I came across an American Scale 66 today at an antique/2nd hand store. Out of curiosity what is the typical going rate for large vises like the 6" swiveling American Scale? As a general rule of thumb is there a certain dollar amount per pound?

I picked up a 6" fixed base one earlier in the year. The dovetail in the main casting holding the leadscrew nut was broken. KMScott speculated the previous owner clamped down on something too wide and it bent the nut too much. I suspect he is right. The other contributing issue was the casting was very porous looking at the failure point, which weakened the structure. So it was worth the $40 to my neighbor who will probably bolt the nut in place to fix it. But at least on a sample of one I was not too impressed in the casting quality.

So if you are looking at buying one, take the slide out and look carefully. The wishful adage was $1 per pound. Years ago I think that was true for 4" vises. But with this thread being the first thing Google pulls up, prices have risen. The last 6" Columbian I saw was a $1.50 a pound and the seller got a lot of calls. But value is location, condition, and brand dependent, like most things.
 
Last edited:

rusty65

Well-known member
Joined
Mar 20, 2012
Messages
2,279
Location
Pekin,IL
This is my vise collection of 3in and smaller vises. The first picture is when I started the year and the rest are of my collection ending the year. Some vises have stayed and others gone. I definitely didn’t stop adding new stuff. 5fc0457469b69a45c22d4645d937c8a3.jpg554a487361ebf967fb8b615ad039f5b4.jpg6523b3cc38bafc2d88bc68875b68c1b9.jpg95c9e15fabeb1e508ad16af36aeae733.jpgcac454975dc0d347a02463ffcea98d8e.jpg9a27e1f61cc97941b51fd97cdde8319f.jpgdd4916125f231e92b3fdad604e955906.jpgec6785451c9d4c8822b653c0d84cd9d2.jpg3907697abbfb90bc6ebc0501f3ad2f25.jpg


Sent from my iPhone using Tapatalk
 

Attachments

  • 5fc0457469b69a45c22d4645d937c8a3.jpg
    5fc0457469b69a45c22d4645d937c8a3.jpg
    522.5 KB · Views: 3
  • 3907697abbfb90bc6ebc0501f3ad2f25.jpg
    3907697abbfb90bc6ebc0501f3ad2f25.jpg
    1.2 MB · Views: 1
  • ec6785451c9d4c8822b653c0d84cd9d2.jpg
    ec6785451c9d4c8822b653c0d84cd9d2.jpg
    1.2 MB · Views: 0
  • dd4916125f231e92b3fdad604e955906.jpg
    dd4916125f231e92b3fdad604e955906.jpg
    1.2 MB · Views: 0
  • 9a27e1f61cc97941b51fd97cdde8319f.jpg
    9a27e1f61cc97941b51fd97cdde8319f.jpg
    1.2 MB · Views: 0
  • cac454975dc0d347a02463ffcea98d8e.jpg
    cac454975dc0d347a02463ffcea98d8e.jpg
    1.2 MB · Views: 0
  • 95c9e15fabeb1e508ad16af36aeae733.jpg
    95c9e15fabeb1e508ad16af36aeae733.jpg
    1.4 MB · Views: 0
  • 6523b3cc38bafc2d88bc68875b68c1b9.jpg
    6523b3cc38bafc2d88bc68875b68c1b9.jpg
    1.3 MB · Views: 0
  • 554a487361ebf967fb8b615ad039f5b4.jpg
    554a487361ebf967fb8b615ad039f5b4.jpg
    1.1 MB · Views: 0

rusty65

Well-known member
Joined
Mar 20, 2012
Messages
2,279
Location
Pekin,IL
23965ebbcbd838214855ce82ee54a631.jpg2b05d3337c80b166ca59220910200a16.jpg7cbe79f3dd4a8c24d7c37a2686f3d04d.jpg41ad334db8f68f1c8203737c181a55b7.jpg


Sent from my iPhone using Tapatalk
 

Attachments

  • 23965ebbcbd838214855ce82ee54a631.jpg
    23965ebbcbd838214855ce82ee54a631.jpg
    959.8 KB · Views: 0
  • 2b05d3337c80b166ca59220910200a16.jpg
    2b05d3337c80b166ca59220910200a16.jpg
    1.3 MB · Views: 0
  • 7cbe79f3dd4a8c24d7c37a2686f3d04d.jpg
    7cbe79f3dd4a8c24d7c37a2686f3d04d.jpg
    1.3 MB · Views: 0
  • 41ad334db8f68f1c8203737c181a55b7.jpg
    41ad334db8f68f1c8203737c181a55b7.jpg
    1.2 MB · Views: 1

Shiftless

Well-known member
Joined
Mar 9, 2014
Messages
14,551
Location
East Bay SFO
Rusty:
Impressive collection. You’ve got more than a few quite valuable little guys.
Looks like you’ve at least doubled your number of smaller vises. :thumbup:
Have you built some shelves or do they stay on that table/workbench year round?
 

Fierljeppen

Well-known member
Joined
Jan 26, 2018
Messages
1,159
rusty65...Very nice collection!

What is the model no. of the Hollands vise?

attachment.php
 

Attachments

  • rusty65_hollands_vise.jpg
    rusty65_hollands_vise.jpg
    78.5 KB · Views: 429
To avoid these ads, REGISTER NOW!

XCMTB83

Well-known member
Joined
Mar 22, 2015
Messages
108
Location
Iowa
I picked up a 6" fixed base one earlier in the year. The dovetail in the main casting holding the leadscrew nut was broken. KMScott speculated the previous owner clamped down on something too wide and it bent the nut too much. I suspect he is right. The other contributing issue was the casting was very porous looking at the failure point, which weakened the structure. So it was worth the $40 to my neighbor who will probably bolt the nut in place to fix it. But at least on a sample of one I was not too impressed in the casting quality.

So if you are looking at buying one, take the slide out and look carefully. The wishful adage was $1 per pound. Years ago I think that was true for 4" vises. But with this thread being the first thing Google pulls up, prices have risen. The last 6" Columbian I saw was a $1.50 a pound and the seller got a lot of calls. But value is location, condition, and brand dependent, like most things.

Thanks for the insight. I was going to go back today just to take a picture of the beast to share it on here. The handle is bent I do know that much. I would maybe be a player at $1.50/lb just because I think it is so dang cool but even at that price I don't NEED it. The seller is asking just under $4.00/lb. I believe it is approximately 155 lb vise.
 

rusty65

Well-known member
Joined
Mar 20, 2012
Messages
2,279
Location
Pekin,IL
Thank you for the kind words boys. This was a weird year and hoping for a big 2020.


Sent from my iPhone using Tapatalk
 

XCMTB83

Well-known member
Joined
Mar 22, 2015
Messages
108
Location
Iowa
My Monday evening included more progress on the 143B since its last mention on page 3839.

My goal was to get the bottom surface machined to be compatible with a newer style RI swivel base I picked up off of eBay. This required machining the bottom flat, taking the center locator down to 1.375" diameter and then finally squaring up the end of the locator. Squaring up the end of the locator is so I can bolt down a stepped retainer ring that will keep the swivel base attached to the main body of the vise even when there aren't swivel-lock-down bolts installed. I will share more of this process later.

As you can see in the pictures I was using pretty much all of the Z-axis height that the machine has and the entire usable diameter of the rotary table. My stand-offs were hanging off the edge of the rotary table on each side. Having just enough clearance is what makes projects like this just a little more fun.

The end of the locator wasn't without a small challenge. In order to get the end of the locator machined I had to remove the 3/4-10 bolt that had been holding everything in place and rely on my trusty jack screws to apply the clamping force, they worked surprisingly well. :thumbup:

I thought I was done at this point but the 37/64" diameter mounting holes that a previous owner drilled into the main body were really bugging me. The holes weren't centered whatsoever and one of the locations was going to give me compatibility issues with the swivel base. I considered punching the holes out oversized to remove any evidence of the two poorly located holes and then use an insert in the base. However that was going to require a 1 inch diameter hole for 100% cleanup on two equally spaced holes and it would be getting into the vertical side wall of the vise more than I liked. This would have further weakened an area of the base that was never designed to be a mounting location in the first place. To maintain as much strength as possible I opted to just plunge a 5/8" diameter endmill through the base in two equally spaced locations that will be ideal for the swivel base circle opening. As you can see in the pictures these two new holes partially intersected the existing holes. The washers that I plan to use will cover of this oddly shaped hole. If this oddly shaped hole gives me issues I think I have a work-around.

Next up is deciding how important it is for me to make the swivel-locks tool-less with a traditional built-in handle or just use two 5/8-11 SHCS and a 1/2" Allen wrench for tightening and loosening. Of course the latter would be an easier and faster solution. :headscrat I also kind of like the idea of a self-contained adjustable handle clamp but I am too frugal to buy a set, perhaps I can make some instead?
 

Attachments

  • 20191230_232926.jpg
    20191230_232926.jpg
    94.6 KB · Views: 84
  • 20191230_230240.jpg
    20191230_230240.jpg
    111.6 KB · Views: 86
  • 20191230_233007.jpg
    20191230_233007.jpg
    79.4 KB · Views: 87
  • VideoCapture_20191231-125130.jpg
    VideoCapture_20191231-125130.jpg
    109.2 KB · Views: 88
  • 20191230_182941.jpg
    20191230_182941.jpg
    103.7 KB · Views: 88
  • Screenshot_20191231-191159_Photos.jpg
    Screenshot_20191231-191159_Photos.jpg
    44.9 KB · Views: 85
  • 20191230_182902 2.jpg
    20191230_182902 2.jpg
    96.9 KB · Views: 92

Adderall

Well-known member
Joined
Oct 26, 2019
Messages
52
Location
Illannoy
Is there a preferred method for keeping the swivel clamps from crunching a new paint job? I use nylon washers for the swivel base bolts which works great. The nylon is still too hard and I find it chips up the finish too.

Sent from my SM-G950U using The Garage Journal mobile app
 

Shiftless

Well-known member
Joined
Mar 9, 2014
Messages
14,551
Location
East Bay SFO
How long do you let the paint cure before clamping down hard with the hold downs? What paint do you use and what’s the temperature and humidity?
Maybe you don’t need a softer washer but more time or different conditions curing the paint.
 

Adderall

Well-known member
Joined
Oct 26, 2019
Messages
52
Location
Illannoy
On my first vise, it was 2 months before I really put a crushing force down. Haven't snuggled down the clamps on my second one.
How long do you let the paint cure before clamping down hard with the hold downs? What paint do you use and what’s the temperature and humidity?
Maybe you don’t need a softer washer but more time or different conditions curing the paint.

Sent from my SM-G950U using The Garage Journal mobile app
 

Serrat Yasargil

Well-known member
Joined
Aug 30, 2019
Messages
75
Location
New Mexico
Is it natural for a grown man to have tears well up when looking at the glory that is the small vise collection of Rusty?

Is it natural ...................to have........ bulge ..................when looking at that **** vise Trijeff restored?

Serrat Yasargil, you now have been banned from GJ!
 

Productbob

Well-known member
Joined
Dec 10, 2018
Messages
414
Location
ny
Rusty- very nice collection of vises and enjoyed looking around at the pocket knives, micrometers, clocks, etc. A bit like a treasure hunt!

XCM- impressive repair work :thumbup:
 

Old Radar

Well-known member
Joined
Apr 17, 2019
Messages
2,755
Location
San Antonio, TX
my monday evening included more progress on the 143b since its last mention on page 3839.

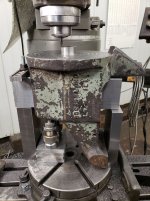
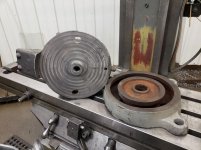
My goal was to get the bottom surface machined to be compatible with a newer style ri swivel base i picked up off of ebay. This required machining the bottom flat, taking the center locator down to 1.375" diameter and then finally squaring up the end of the locator. Squaring up the end of the locator is so i can bolt down a stepped retainer ring that will keep the swivel base attached to the main body of the vise even when there aren't swivel-lock-down bolts installed. I will share more of this process later.

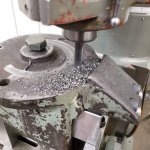
As you can see in the pictures i was using pretty much all of the z-axis height that the machine has and the entire usable diameter of the rotary table. My stand-offs were hanging off the edge of the rotary table on each side. Having just enough clearance is what makes projects like this just a little more fun.

The end of the locator wasn't without a small challenge. In order to get the end of the locator machined i had to remove the 3/4-10 bolt that had been holding everything in place and rely on my trusty jack screws to apply the clamping force, they worked surprisingly well. :thumbup:

I thought i was done at this point but the 37/64" diameter mounting holes that a previous owner drilled into the main body were really bugging me. The holes weren't centered whatsoever and one of the locations was going to give me compatibility issues with the swivel base. I considered punching the holes out oversized to remove any evidence of the two poorly located holes and then use an insert in the base. However that was going to require a 1 inch diameter hole for 100% cleanup on two equally spaced holes and it would be getting into the vertical side wall of the vise more than i liked. This would have further weakened an area of the base that was never designed to be a mounting location in the first place. To maintain as much strength as possible i opted to just plunge a 5/8" diameter endmill through the base in two equally spaced locations that will be ideal for the swivel base circle opening. As you can see in the pictures these two new holes partially intersected the existing holes. The washers that i plan to use will cover of this oddly shaped hole. If this oddly shaped hole gives me issues i think i have a work-around.

Next up is deciding how important it is for me to make the swivel-locks tool-less with a traditional built-in handle or just use two 5/8-11 shcs and a 1/2" allen wrench for tightening and loosening. Of course the latter would be an easier and faster solution. :headscrat i also kind of like the idea of a self-contained adjustable handle clamp but i am too frugal to buy a set, perhaps i can make some instead?

attachment.jpg


Serious Tool Envy! :drool: :bowdown::bowdown::bowdown:

I'm attempting to make a grinder stand out of an old brake drum off a semi, a crankshaft (from a Jeep, I think) and 1/4" steel plate.

Tools at my disposal:
Angle Grinder w/ cut-off wheels, flap wheels and wire brushs
Bench-top Drill Press
Neighbor's welding skill
Mark-One Eyeball w/ TLAR Gauge (That Looks About Right)

I'm struggling just trying to drill pilot holes in the steel, especially the center hole where the crankshaft will go. Roughly 1-7/8" diameter (TLAR again), I'm hoping overlapping holes will do the trick before I break too many drill bits...

Top1.jpgTop2.jpgScrap.jpg

Parts.jpgBase.jpg


Sorry for highjacking the thread, but I just had to give way to my envy.
 

Productbob

Well-known member
Joined
Dec 10, 2018
Messages
414
Location
ny
Happy New Year! finished cleaning up the Reed 34 and moved it onto the shelf. here's some updated pics: in the first 2 pictures the middle shelf is all 6" as are the left three vises on the top shelf. remainder of the top shelf are 5".
 

Attachments

  • IMG_2753.jpg
    IMG_2753.jpg
    159.2 KB · Views: 106
  • IMG_2759.jpg
    IMG_2759.jpg
    155.4 KB · Views: 113
  • IMG_2761.jpg
    IMG_2761.jpg
    159 KB · Views: 103
To avoid these ads, REGISTER NOW!
Top Bottom