lilscorpion
Well-known member
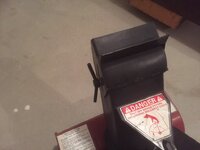
Here are a few pictures of the wing nuts installed on my son’s snowblower.
I think they turned out well and my son loves them.


They look fantastic and should make them easy to handle with gloves on!

Here are a few pictures of the wing nuts installed on my son’s snowblower.
I think they turned out well and my son loves them.
They look fantastic and should make them easy to handle with gloves on!

Nice job Mike!
Merry Christmas to you and your family.
Thanks Matt. That was my EXACT thinking. I wanted them a bit larger so they could be adjusted with gloves on but not so large they either looked odd or were too much weight on the discharge chute.
Thanks for the comments and for stopping by.
I hope you and your family have a Merry Christmas my friend.


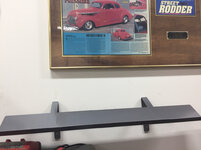
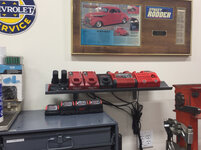


That shelf looks great, nice, tidy way to get the chargers organized!
That shelf turned out great Mike. I like the downward slope attitude.
Happy New Year!
another nice little add to the organization of your shop Mike, well done.
When you service the fluids on your wifes care, you just doing LOF or do you do more "mike"...errr i mean extensive work?
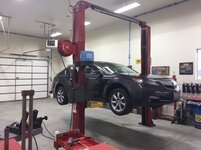
I haven’t been in the shop much over the past ten days or so but I had to get my wife’s car serviced yesterday morning so we could bring dinner in to my in-laws in the afternoon.
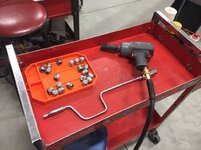
For starters I was able to try out my new GRYPMAT that I received from my Secret Santa last week. I think I’ll like these.
I racked the Acura so I could drain fluids and rotate tires.
While fluids were draining I fabricated a small shelf for my battery chargers to get them up off if my drawers and make them a bit more tidy looking. This was the last shop related item on my white board at this time and I wanted it complete before the end of the year.
Once again, I utilized scrap metal from my supply so zero out of pocket cost on the shelf.
After finishing the shelf installation, filling the car with fluids, torqued the wheels on, vacuumed and wiped the interior down I swept up the shop and gave it a good cleaning so it was ready to go into 2020.


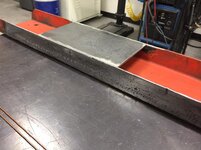
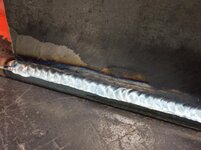
Great job, I could look at your welding all day long.
Thank you.
I have a 23-point checklist that I go through when I service my cars which includes a basic engine oil & filter change then rotate tires. I also check a multitude of other things such as brakes, suspension bushings, struts/shocks, windshield wipers and then a lot of other fasteners and such.
I had my old carbon pile tester give up the ghost a few months back and I contacted my buddy at my local NAPA store where I bought it years ago and he finally worked out a warranty deal so I obtained my new carbon pile tester about two weeks ago and tried it out yesterday on the wife's car to confirm the alternator was putting out proper amperage when loaded, but that was a bit out of the norm for a standard service.
cool. I always fear flushing the coolant. Always have even though i have done it a thousand times. But one day i am going to get a stupid air pocket and F myself someone while away from home. Just watched some Discovery show where their race truck developed a air pocket. Brought some nightmares to me.
Mike,
Tell me about the Street Rodder picture display in post 3527.
Thanks,
Mike
Nice 1940, Mike. No longer own it? What is/was under the hood?
Mike
Sounds terrific, Mike. You have exceptional talent and drive to bring your ideas to reality!


That should keep her in line.


")
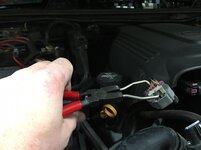
I'm going to need a part number for those connector pliers please. I have a bit of a "problem" when it comes to specialty pliers. I see it... I need it...
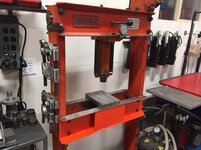
Some damn nice welds Mike! Press is good to go now.
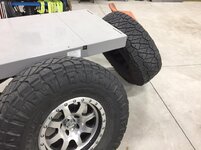
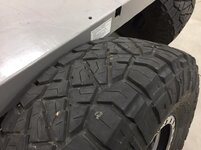
Getting good miles on those tires. Wish I’d tracked mine more closely. I’m going to get a gauge so I can do a better job going forward.
Mike,
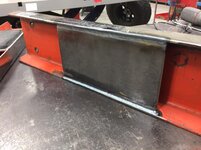
Nice repair on the table, but I have to ask, how did you straighten it up? I would guess you used a torch set/rose bud, but can't ever remember seeing one in your shop.
Also I thought I saw some of that white **** in one of your photos, good luck with that, we were 54°F this morning at 4 when I left for work, I'll take it.
JB

I'm going to need a part number for those connector pliers please. I have a bit of a "problem" when it comes to specialty pliers. I see it... I need it...
Strong work Mike!
I too have an obsession with specialty pliers....Inquiring minds want to know make model and part number.
Ah ****, I wasn’t going to ask because, if I did, I know I’d have to have them. I’m already ordering the damn tire tread gauge he showed...so I’d like the number too please. [emoji1787]
Looking good as always Mike. But the cheby orange should keep that press table true, flat and super fast for the rest of its life
And I gotta commend you on the engine oil drain locations. Being I’m a modern hemi guy Chrysler has made a complete **** show outta everything for the last 15 years when it come to servicing fluids. And this past weekend while cussing a trans service on my ram I was just so excited to see how their exhaust engineer elected to F with the service side. That sumbitch had a foot in either direction to route the crossover to the other side, it would have been no problem moving it a few inches fore or aft. But nooooooo, mr comedian decided to put it directly under the drain plug and the top of the tube is relieved so it creates a lovely swimming pool to boot. And just to add to the cluster f, adding fluid requires the engine running with temps around a hundy but the fill location has you delicately trying to fish the fill tube right into the port directly adjacent to the Y pipe. It’s a lovely battle of trying to pump in a few quarts of fluid before the exhaust gets hot enough to scorch the hand.
Btw it’s been a while since we’ve caught up. But my boy child came to work for me out in Phoenix a couple months back. As luck would have it my big project out here has hit a dead period for a few weeks. So I’m sending my crew up to the Draper project in your neck of the woods. If possible would ya keep an eye on the boy and if he gets outta hand slap him around for me. Thanks!

Nice work as usual
Q about your Jeep wheels.
I recently bought similar style Method wheels for my 4Runner
After mounting a tire I noticed the faux bead lock lip is going to hold water (and dirt).
Do you have to wipe inside to clean out water?
Does water puddle behind the lip when it rains?