To avoid these ads, REGISTER NOW!

Am I doing this wrong? Welding a nut to a broken bolt

Ipassgas

Well-known member
Joined
Jul 21, 2015
Messages
1,041
Location
Grand Strand, SC
I have a 110v Horror Freight flux core welder. (Yes. I know. I need a real welder to weld. Thank you. In the mean time . . .)
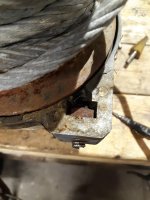
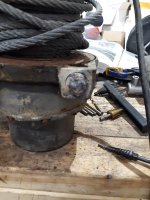
I bought a Warn winch that turned out to have problems. One of the problems was the stand it was on, to mount to a reciever hitch. Two of the bolts I was able to coax out with a PB Blaster and a propane torch. Two of them broke.

I tried welding a nut to one of the broken bolts. It seemed to have good penetration on the nut and the nut was glowing when I quit welding. The nut promptly spun right off. I tried again. Same story. I ended up drilling and retapping.

I have one more to try. Any suggestions other than get a 220v MIG machine? It's in the cards for eventually.
 

Attachments

  • 20200210_112258.jpg
    20200210_112258.jpg
    68.9 KB · Views: 537
  • 20200210_114642.jpg
    20200210_114642.jpg
    75.8 KB · Views: 502
To avoid these ads, REGISTER NOW!

pc36

Member
Joined
Aug 7, 2013
Messages
13
Try welding a washer with a big hole in it first then weld the nut to it
 

ghnl

Well-known member
Joined
Mar 27, 2009
Messages
1,372
Location
Mebane, NC
Where was it broken off? If it was flush/below with the surface your weld likely did not penetrate the broken bolt adequately (if at all).
 
OP
I

Ipassgas

Well-known member
Joined
Jul 21, 2015
Messages
1,041
Location
Grand Strand, SC
The bolt was proud by 1/4" or so. It was shorter than the 3/8" nut.

I could have let it cool off more.
 
Last edited:

Moosefire

Well-known member
Joined
Oct 26, 2018
Messages
754
Location
Detroit
Looks too cold. Crank up the amps. This is just a google image I found, but you can see how flat the weld is from the heat. Making sure uts clean and free from rust too if at all possible a64f81b08521d9f00652c851cdf49561.jpg

Sent from my SM-N960U using Tapatalk
 

Attachments

  • a64f81b08521d9f00652c851cdf49561.jpg
    a64f81b08521d9f00652c851cdf49561.jpg
    71.4 KB · Views: 17

BD1

Well-known member
Joined
Mar 18, 2007
Messages
4,602
Location
north side
Definitely need to run hot as with a plug weld . Even though it's flux core , I would clean both pieces especially if you don't have enough amps.
 

cmandp

Well-known member
Joined
Dec 22, 2011
Messages
1,277
Location
New Jersey
I had that problem the first time I used my flux core mig to take a broken exhaust manifold bolt out. You need to change your wire feed speed. I changed it (I cannot remember if it was up or down), got good penetration and was able to get the bolt out.
 
Last edited:

Kenstone1

Well-known member
Joined
Oct 2, 2015
Messages
734
Any PREHEAT will greatly improve weld penetration with that low heat welder.
Sure, the nut got hot and glowed but that stud/casting acted as a heat sink and never got hot enough.
Very apparent by the grainy appearance of the twist-off break in your 2nd pic.
… or it could have been oily.

Preheat it, even with a propane torch if it's all you have.
:bounce:
 
Last edited:

king nero

Well-known member
Joined
Dec 27, 2010
Messages
1,469
Location
Belgium
You need to either turn up the amperage like others said OR lower you wire feed (which has a similar effect).

Amps and wire feed are the same, this doesn't make sense to me?


Very apparent by the grainy appearance of the twist-off break in your 2nd pic.

I see in the second pic a drilled out hole, but nothing that has snapped off ?
 

cmandp

Well-known member
Joined
Dec 22, 2011
Messages
1,277
Location
New Jersey
Amps and wire feed are the same, this doesn't make sense to me?

Ah well I was thinking stick welding with adjusting amperage but forgot with MIG you set voltage and wire feed speed. I knew wire feed speed was amperage but after some reading it seems higher feed speed is higher amperage with the opposite being true as well. My statement is not correct so it's confusing.

Anyway I had set my machine up to weld steel the thickness of the nominal bolt diameter. It didn't work I got no penetration and the nut just popped right off. I don't think I remember correctly which way I went with wire feed but I changed it and got the nut to stick well enough.

This shows that I can stick two piece of metal together (maybe) but am not a welder :lol_hitti
 
To avoid these ads, REGISTER NOW!

Kenstone1

Well-known member
Joined
Oct 2, 2015
Messages
734
Amps and wire feed are the same, this doesn't make sense to me?
HF welder being used has hi/lo AMP switch, AND rheostat switch for wire speed, not the same

I see in the second pic a drilled out hole, but nothing that has snapped off ?
Yep, I see that now, thanks for the critique.
Got anything helpful to add :headscrat
:bounce:
 
Last edited:

king nero

Well-known member
Joined
Dec 27, 2010
Messages
1,469
Location
Belgium
Nope, just trying to learn something here. Good to know the HF welders have a hi/lo amp switch :bounce:
 

MoonRise

Well-known member
Joined
Nov 5, 2010
Messages
4,028
Location
NJ
Sometimes it takes more than one 'cycle' of weld-the-nut-to-the-broken-bolt/stud before you are successful.

And you absolutely do have to get a 'good' weld between the end of the bolt/stud and the ID of the nut.

And if the end of the bolt/stud is recessed into the bolt, it can make it a little bit harder for a less-experienced welder to get the weld started TO the end of the bolt/stud before the weld puddle is filling into/onto the ID of the nut.

Clean things as best you can before welding.

And watch the PUDDLE of molten metal you are making when you weld, and NOT the bright light of the arc itself.

Start the weld STRAIGHT down onto the end of the bolt/stud and THEN swirl or flow the weld puddle to the ID of the nut (if needed).

Let it all cool before torquing the nut.

Repeat if needed. I think the most I had to repeat the weld-cool-torque-repeat sequence was 5-7 times. :lol:

Practice, practice, practice.

Some 0.035 flux core wire might (or might not) have just enough oomph to get a successful weld to the end of a 3/8" bolt. Depends on which HF welder you have.
 

Kenstone1

Well-known member
Joined
Oct 2, 2015
Messages
734
Nope, just trying to learn something here. Good to know the HF welders have a hi/lo amp switch :bounce:

OK, you got me again, it's more a MIN/MAX CURRENT switch :bowdown:

"Current Switch: This controls the output amperage of the Welder."(from the HF manual)

Not that any of that info will change anything else I have posted here...like pre-heating :wtf:
got any other helpful questions or corrections?
:thumbup:
 

Ohmthis

Well-known member
Joined
Jan 20, 2013
Messages
3,009
Location
Outside of Louisville KY
Sometimes it takes more than one 'cycle' of weld-the-nut-to-the-broken-bolt/stud before you are successful.

And you absolutely do have to get a 'good' weld between the end of the bolt/stud and the ID of the nut.

And if the end of the bolt/stud is recessed into the bolt, it can make it a little bit harder for a less-experienced welder to get the weld started TO the end of the bolt/stud before the weld puddle is filling into/onto the ID of the nut.

Clean things as best you can before welding.

And watch the PUDDLE of molten metal you are making when you weld, and NOT the bright light of the arc itself.

Start the weld STRAIGHT down onto the end of the bolt/stud and THEN swirl or flow the weld puddle to the ID of the nut (if needed).

Let it all cool before torquing the nut.

Repeat if needed. I think the most I had to repeat the weld-cool-torque-repeat sequence was 5-7 times. :lol:

Practice, practice, practice.

Some 0.035 flux core wire might (or might not) have just enough oomph to get a successful weld to the end of a 3/8" bolt. Depends on which HF welder you have.

This is the best advice I’ve read yet. I think you welded the top of the nut with very little getting to the bolt. I see a little hole in your weld, that means all of it didn’t get to the bolt. I weld the nut on, then as it is cooling to gray color I spray a penetrating oil/solvent on it, then when it is warm I try and turn it out. I have had to do it a few times to get it done.
 

clubairth

Banned
Joined
Dec 24, 2014
Messages
263
I agree. Max heat and burn that nut in hard!!
BUT be aware depending on what you have this method can fail. I have had broken bolts where I welded the nut on a dozen times and never got it to move!

I also spray water on the nut. But sometimes remove them when hot.

I also use the tab method as I have had good luck tapping the tab back and forth with a hammer compared to a wrench. Just depends and I swap back and forth between the nut and the tab method.

This is an exhaust bolt right next to the firewall on a 1949 IHC KB3 truck.
This one came out and proved the worth of a right angle air powered drill.

attachment.php


Now when things go really wrong I have had to use a mag drill and a solid carbide drill bit. I got a Chinese bit for around $30. Yes they are VERY expensive.

But I now have a great appreciation for the monster mag drill! What a beast!

attachment.php


I had 5 broken head bolts!!

attachment.php


That old cast iron was just so hard! I broke everything I had on the 2 that would not come out with heat/welding.

Drilled one OK and partially sheared the carbide bit on the last one but got thru it.
.
.
 

Attachments

  • Head removed-Broken Bolts Repair-Mag Drill.jpg
    Head removed-Broken Bolts Repair-Mag Drill.jpg
    53.6 KB · Views: 576
  • Engine-Broken Exhaust Stud in Head-Repair-Stud Coming Out with Welded Tab.jpg
    Engine-Broken Exhaust Stud in Head-Repair-Stud Coming Out with Welded Tab.jpg
    84 KB · Views: 578
  • Block With 5 Broken Head Bolts.jpg
    Block With 5 Broken Head Bolts.jpg
    90 KB · Views: 578

fnieto

Well-known member
Joined
Aug 27, 2013
Messages
1,401
Location
Tucson,Arizona
Like others have mentioned, you need a hot plug weld like Moosefire's photo.
You should be able to achieve this with your flux core baby mig.
This technique has yet to fail me.
Use anti-seize when you reassemble.
 
OP
I

Ipassgas

Well-known member
Joined
Jul 21, 2015
Messages
1,041
Location
Grand Strand, SC
And the update.

I cleaned the broken bolt with a wire brush on a grinder. I welded a washer to the bolt. I welded a nut to the washer, around the outside. I welded the ID. I made a good puddle. So much so that one side of the nut flowed away. I let it cool. The nut wouldn't budge, until it came off without the bolt. I gave up and drilled it.

I have oxy-acetylene but was worried about melting the aluminum the bolt is stuck in. I could have used propane, but didn't see the suggestion until it was too late. I didn't use water to cool it, but the thermal shock idea has merit, like breaking a hot glass with ice water. I didnt use any wax. These are good ideas for next time. Thank you.
 

Attachments

  • 20200211_110637.jpg
    20200211_110637.jpg
    80 KB · Views: 90
  • 20200211_111203.jpg
    20200211_111203.jpg
    99.8 KB · Views: 90
  • 20200211_111209.jpg
    20200211_111209.jpg
    81 KB · Views: 91
  • 20200211_111211.jpg
    20200211_111211.jpg
    67.5 KB · Views: 91
  • 20200211_113944.jpg
    20200211_113944.jpg
    101.1 KB · Views: 106

MP&C

Well-known member
Joined
Oct 21, 2009
Messages
4,401
Location
Leonardtown, MD
The wrung off bolt is in a big heat sink, and will require more heat than you would normally use for a bolt/nut by their lonesome.. My suggestion is to aim the weld directly at the bolt, not the nut. The bolt needs to be heated up, so heat it first and let the weld pool fill in the nut (plug weld) without actually touching the nut with the wire..
 

plinker

Well-known member
Joined
Feb 28, 2007
Messages
4,286
Location
Northern Wi
Sometimes it takes more than one 'cycle' of weld-the-nut-to-the-broken-bolt/stud before you are successful.

And you absolutely do have to get a 'good' weld between the end of the bolt/stud and the ID of the nut.

And if the end of the bolt/stud is recessed into the bolt, it can make it a little bit harder for a less-experienced welder to get the weld started TO the end of the bolt/stud before the weld puddle is filling into/onto the ID of the nut.

Clean things as best you can before welding.

And watch the PUDDLE of molten metal you are making when you weld, and NOT the bright light of the arc itself.

Start the weld STRAIGHT down onto the end of the bolt/stud and THEN swirl or flow the weld puddle to the ID of the nut (if needed).

Let it all cool before torquing the nut.

Repeat if needed. I think the most I had to repeat the weld-cool-torque-repeat sequence was 5-7 times. :lol:

Practice, practice, practice.

Some 0.035 flux core wire might (or might not) have just enough oomph to get a successful weld to the end of a 3/8" bolt. Depends on which HF welder you have.

This, practice/experience is a big thing. I have had success with removal when hot (not glowing), just depended on the situation. The weld quality from the nut to broke off piece tends to make or break things IME. A few times I've seen the weld look like it shouldnt have worked, but did. Coarse threaded nuts seem to work the best, preferably flange style or with a flat washer.

The truck shop I worked at had a Miller pulse/mig welder w/ .045" wire and it would do a very nice job.
 

Kenstone1

Well-known member
Joined
Oct 2, 2015
Messages
734
And the update.

I cleaned the broken bolt with a wire brush on a grinder. I welded a washer to the bolt. I welded a nut to the washer, around the outside. I welded the ID. I made a good puddle. So much so that one side of the nut flowed away. I let it cool. The nut wouldn't budge, until it came off without the bolt. I gave up and drilled it.

I have oxy-acetylene but was worried about melting the aluminum the bolt is stuck in. I could have used propane, but didn't see the suggestion until it was too late. I didn't use water to cool it, but the thermal shock idea has merit, like breaking a hot glass with ice water. I didnt use any wax. These are good ideas for next time. Thank you.

OK, thanks for the update

The pics you posted reveal a lot of important info about what was going on there that we didn't know before.
Knowing the housing is aluminum is more reason to have pre-heated per my suggestion and it looks like the bolt appears to go thru the aluminum casting and threads into a captured steel square nut, not a blind hole in the aluminum.

Knowing all that initially, I would have suggested drilling it out, just as you did :thumbup:
You now have some different tricks for next time.
Thanks again for posting and reading what other's have posted here,
:bounce:
 
Last edited:

MoonRise

Well-known member
Joined
Nov 5, 2010
Messages
4,028
Location
NJ
The washer is to help minimize welding the broken bolt to the thing it is stuck in (if it were a steel item).

Don't bother welding the washer to the bolt.

Don't bother welding the nut to the washer.

Just run a 'hot' weld onto the end of the broken bolt/stud and get the weld to really fuse/penetrate well to the bolt. And then (or at the same time :lol: ) you need to get the weld to fuse/penetrate to the ID of the nut.

Not just 'fill the ID of the nut with a weld bead'.

Remember, with a wire feed welder (solid wire OR flux core wire), the wire will 99.999% of the time melt. It's all about getting the weld to properly melt the thing(s) you are welding and getting those things to Become-One-Thing-Welded-Together.

Glad you got the task done. :beer:

Remember to use Never-Seize when you put the new bolts into the aluminum. :D
 

The Other Sean

Well-known member
Joined
Oct 10, 2019
Messages
72
Location
Minneapolis
Do you have a Dremel? I'd go at that square nut inside the housing. See if you can grind enough of a groove in the side to split the nut itself. Then you might not need much force to spin the bolt out. There should not be any threads in the housing if I know my winch mounts.
 
To avoid these ads, REGISTER NOW!
Top Bottom