To avoid these ads, REGISTER NOW!

Low Slope Roof - Replacing Rafter Ties?

spAdam

Member
Joined
Nov 23, 2017
Messages
16
Location
SoCal
Hello all, sorry if this is an annoying cross-post, I thought it might have been a little aggressive to post my whole technical question in the member intro section!

I've been staring at this garage for a few years now letting my brain spin around with ideas so I figured it was time to start asking questions.
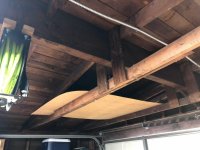
I searched a bit but didn't find anything that looked familiar. I've got a late 50's built garage here in Southern California that I'm contemplating the feasibility of finishing out. The slope is 16" over 120", so only about 13%, but it's got this awesome large ridge beam (without getting up on the ladder, pretty sure it's 4x12):

(See attachment)

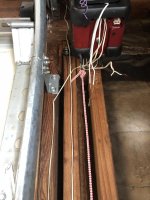
The rafter ties are looking pretty shoddy, they are sistered together, are kind of saggy probably from being used as storage, and are just kind of beat up and sad looking. Also, some of the diagonal corner ties were cut by whomever installed the current garage door too.

I'd love to eventually finish out the garage walls and ceiling and have a more habitable workspace, combined with the fact that it's also where the laundry gets done so having a nicer space for that and culling what I like to refer to as "The Spider Ranch" would be nice for everyone who uses it.

Thoughts on options -

1) Do nothing, except likely replace the rafter ties and clean up/paint the whole thing a lighter color so it's not so dark up there. Leaves it a bit more serviceable than current, wiring and air lines stay nice and accessible.

2) Replace the rafter ties and supplement with one at every rafter instead of every other, then hang insulation board and add ceiling. Gains me some insulation, but leaves me with only an 8' ceiling.

These are the two options I really like, but my or may not be a good idea:

3) Replace the rafter ties with ones the slope up to the bottom of ridge beam using adjustable joist hangers - then

a) insulate (thinking foam board here) and add ceiling - most finished look
- or
b) paint and leave open - might actually be pretty nice looking if done
properly.

Either leaves me with a bit more headroom, not much but enough to get my lights and hose reel up at a height I don't have to worry about banging into.

What say the garage experts? Which of these seems feasible, which are a pipe dream, which leave me at risk of the whole garage falling over? I'm not a structural expert so I won't claim to know much on the loading issue. No snow here but wind can be a thing. The carpentry to do any of these would be pretty straightforward though, plus I have a friend who is still more qualified at that part to help.
 

Attachments

  • IMG_9582.jpg
    IMG_9582.jpg
    123.1 KB · Views: 221
To avoid these ads, REGISTER NOW!

Kaizen

Well-known member
Joined
Jan 9, 2015
Messages
6,948
Location
New England
Welcome aboard. A rafter tie or collar tie has the primary job of keeping walls from spreading apart. If your rafters are attached well to that beam then the load is carried to the ground at its ends. You don’t need a tie at every joist. Probably don’t even need to replace what you have.
Is this a detached garage? If so you could later jack it up to get better headroom. If attached I’d just paint it and maybe insulate a little to make it more usable. Probably not worth doing too much to it as money would be better spent raising it or tearing off the roof and reframing with a tall pitch


Sent from my iPhone using Tapatalk
 
OP
S

spAdam

Member
Joined
Nov 23, 2017
Messages
16
Location
SoCal
Thanks for the reply.

Yeah it's a detached. Reframing to a tall pitch wouldn't really be an option, aesthetically, since the house shares the same pitch - the open beams are kind of the main design theme of the house. Realistically, raising will probably never happen either since there is just so much work that the whole property needs. Was kind of hoping this would be an opportunity to get in there and do some structural work myself, and end up with a more palatable workspace in the process.

If I could just get rid of those rafter ties altogether, somehow, and get the ceilings painted a color that doesn't **** all the light up, I'd be relatively content. I need to figure out the ceiling before I do the walls since, if I decide to do a finished ceiling, the drywall needs to go up there first.
 

Vintage Veloce

Well-known member
Joined
Feb 27, 2015
Messages
1,076
Location
San Diego
I'm in San Diego, and I have a 94 year old garage with a similar shallow roof area. The roof was badly sagging before we repaired it.
And I have done much of what you are considering.

Here are my advice and comments:

- Check thoroughly for termite damage.

- Not sure about the late 50s where you are, but my buildings were old built with beautiful old growth redwood.

- I decided I wanted to keep the beautiful open ceiling

- I replaced the sagging 2x4 rafter ties with new 2x6.

- The building had exposed rafter tails that were badly eaten by termites. I cut those off and sistered in new ones, milled to match the original dimensional 2x4 lumber.

- All the new lumber was douglas fir, but I stained it to match the old redwood. Do this BEFORE you install the new pieces, it is a nightmare after.

- I put a thermostat controlled exhaust fan in the center of the roof. For air intakes, there are bird holes (with screen) all around the eaves. You need a LOT of bird holes to allow enough air intake to match the exhaust fan, I'd suggest additional intake vents. I have the fan set to about 90-95 degrees F, and it never gets hotter than it is outside.

- I did sheetrock and finish the walls.

- I used 6 Ikea lamps, and hung them in the ceiling. Very cheap, and they look great and period up there.

Inside showing wall and ceiling. Note the "bird holes" in the eaves.
View media item 103833
Thermostat controlled roof fan
View media item 103834
Lights and rafter ties. You can also see I used a slight extra lift for the garage doors to get the rails as close to the ceiling as possible. The lights clear the garage door by about an inch and sit just below the line of the rafter ties.
View media item 103835
Top of the wall, rafter ties and rafter tails. You can see one of the rafters is also sistered with a metal plate to the rafter tail. That rafter was particularly badly eaten and needed reinforcement. The rafter tails, ties and the few replacement roof boards have been stained to match the old redwood.
View media item 103836
 
Last edited:

Vintage Veloce

Well-known member
Joined
Feb 27, 2015
Messages
1,076
Location
San Diego
A few more comments about temperature control in hot environments. If you are going to open the doors it's likely to quickly become the same temperature inside as out... so insulation won't really help. And even with insulation and the doors closed, it's likely to get pretty warm in there.
It's hard to imagine you are going to spend much time in there on a hot day with the doors closed!
That's why I did no insulation but installed the roof fan. That way it never gets warmer than outside, and it's shaded.
Another idea, if you don't care about the looks, is to install a radiant barrier under the roof. I didn't do that in this building, but when we put new roof shingles up, I did use *white* energy star rated roof shingles. https://www.owenscorning.com/roofing/shingles/trudefinition-duration?color=shasta-white
 
Last edited:

Kaizen

Well-known member
Joined
Jan 9, 2015
Messages
6,948
Location
New England
Thanks for the reply.

Yeah it's a detached. Reframing to a tall pitch wouldn't really be an option, aesthetically, since the house shares the same pitch - the open beams are kind of the main design theme of the house. Realistically, raising will probably never happen either since there is just so much work that the whole property needs. Was kind of hoping this would be an opportunity to get in there and do some structural work myself, and end up with a more palatable workspace in the process.

If I could just get rid of those rafter ties altogether, somehow, and get the ceilings painted a color that doesn't **** all the light up, I'd be relatively content. I need to figure out the ceiling before I do the walls since, if I decide to do a finished ceiling, the drywall needs to go up there first.


You can normally move them up 1/3 the total height. So up touching the underside of the beam. They would bolt or screw on the side of the roof rafters. I wouldn’t do anything else without a structural inspection. An engineer could spec cables and turnbuckles or threaded rod possibly through the beam but imo not worth the cost of asking.


Sent from my iPhone using The Garage Journal mobile app
 

firebirdparts

Well-known member
Joined
Jun 8, 2016
Messages
10,635
Location
Kingsport, TN
If those were holding the roof up, you really shouldn't move those up, as they're at such a weak angle already. I think, though, the beam is actually holding the roof up and those aren't really rafter ties. You decide.
 
OP
S

spAdam

Member
Joined
Nov 23, 2017
Messages
16
Location
SoCal
I'm in San Diego, and I have a 94 year old garage with a similar shallow roof area. The roof was badly sagging before we repaired it.
And I have done much of what you are considering.

Here are my advice and comments:

- Check thoroughly for termite damage.

- Not sure about the late 50s where you are, but my buildings were old built with beautiful old growth redwood.

- I decided I wanted to keep the beautiful open ceiling

- I replaced the sagging 2x4 rafter ties with new 2x6.

- The building had exposed rafter tails that were badly eaten by termites. I cut those off and sistered in new ones, milled to match the original dimensional 2x4 lumber.

- All the new lumber was douglas fir, but I stained it to match the old redwood. Do this BEFORE you install the new pieces, it is a nightmare after.

- I put a thermostat controlled exhaust fan in the center of the roof. For air intakes, there are bird holes (with screen) all around the eaves. You need a LOT of bird holes to allow enough air intake to match the exhaust fan, I'd suggest additional intake vents. I have the fan set to about 90-95 degrees F, and it never gets hotter than it is outside.

- I did sheetrock and finish the walls.

- I used 6 Ikea lamps, and hung them in the ceiling. Very cheap, and they look great and period up there.

Inside showing wall and ceiling. Note the "bird holes" in the eaves.
View media item 103833
Thermostat controlled roof fan
View media item 103834
Lights and rafter ties. You can also see I used a slight extra lift for the garage doors to get the rails as close to the ceiling as possible. The lights clear the garage door by about an inch and sit just below the line of the rafter ties.
View media item 103835
Top of the wall, rafter ties and rafter tails. You can see one of the rafters is also sistered with a metal plate to the rafter tail. That rafter was particularly badly eaten and needed reinforcement. The rafter tails, ties and the few replacement roof boards have been stained to match the old redwood.
View media item 103836

That all looks really great! Yours is definitely made of far nicer wood than mine. It's a slapped-together late 50's tract home built in the typical style of a lot of the older neighborhoods just north of LA.

The fan and the lighting are great. I've been torn as to keeping the ceiling open in mine as the center beam is a cool architectural feature, and also the house shares an open joist ceiling with the same beams. But it ***** up so much light and dust and dirt. Maybe I just need to paint it and get on with things. I already know what I want to do for finishing the walls, at least.

If those were holding the roof up, you really shouldn't move those up, as they're at such a weak angle already. I think, though, the beam is actually holding the roof up and those aren't really rafter ties. You decide.

I think they are more supposed to be in tension, holding the walls in. With the sag they have I don't thing they are doing much in any direction. This is one of those times when I need to be friends with a Civil engineer, lol... One might just tell me to pull them all out!
 

Vintage Veloce

Well-known member
Joined
Feb 27, 2015
Messages
1,076
Location
San Diego
I'd really hesitate to paint the cool under-roof beams and wood. Really consider just putting more lights up.
Another idea, if you must paint, might be to whitewash it... that way it would retain some of the wood look...
21-such-a-high-whitewashed-ceiling-can-make-the-space-not-very-cozy-or-intimate.jpg
 

Vintage Veloce

Well-known member
Joined
Feb 27, 2015
Messages
1,076
Location
San Diego
I think they are more supposed to be in tension, holding the walls in. With the sag they have I don't thing they are doing much in any direction. This is one of those times when I need to be friends with a Civil engineer, lol... One might just tell me to pull them all out!

Is the roof sagging or just the rafter ties? Can you get a ladder up outside and sight down the peak of the roof to see if it is straight?
How are the ends of your ridge beam supported? You are correct that rafter ties are in tension, typically. BUT... other roof styles with substantial roof beams (like yours) often do not need any rafter ties at all. If the ridge beam is strong enough and supported well enough to hold the whole roof and building up on it's own, that can mean the rafter ties are unnecessary. But of course, you need an engineer to tell you for sure.

You might also take some measurements, like: Are the opposing walls vertical? Is the distance between opposite walls the same at the top at the bottom?
My roof was badly sagging, and we jacked it up (pulling to top of the walls together) before putting in the new rafter ties.
 
OP
S

spAdam

Member
Joined
Nov 23, 2017
Messages
16
Location
SoCal
I'd really hesitate to paint the cool under-roof beams and wood. Really consider just putting more lights up.
Another idea, if you must paint, might be to whitewash it... that way it would retain some of the wood look...
21-such-a-high-whitewashed-ceiling-can-make-the-space-not-very-cozy-or-intimate.jpg

That's actually brilliant! Officially rethinking the finished ceiling now. Another bonus is that I wouldn't have to empty the entire garage and could do the work in sections if I leave it open.

Is the roof sagging or just the rafter ties? Can you get a ladder up outside and sight down the peak of the roof to see if it is straight?
How are the ends of your ridge beam supported? You are correct that rafter ties are in tension, typically. BUT... other roof styles with substantial roof beams (like yours) often do not need any rafter ties at all. If the ridge beam is strong enough and supported well enough to hold the whole roof and building up on it's own, that can mean the rafter ties are unnecessary. But of course, you need an engineer to tell you for sure.

You might also take some measurements, like: Are the opposing walls vertical? Is the distance between opposite walls the same at the top at the bottom?
My roof was badly sagging, and we jacked it up (pulling to top of the walls together) before putting in the new rafter ties.

I need to get up there, have a look, and also take a lap around with a level and plum bob and see what is what. I'm just barely into the spitballing phase on what I want to do with it, but it's time to start getting some additional plans down and that's step 1.
 

3onthetree

Well-known member
Joined
Nov 14, 2018
Messages
191
With a true ridge beam, no rafter ties are needed. The design of a ridge beam includes the support at each end. So in your case, the ridge beam looks substantial, but the post support and the overhead door header, as well as the rafter size and spacing, should be looked at. If you attach vertical posts to the ridge beam to help hold up any ceiling joists for storage, then this ridge beam needs to account for that loading too.

Collar ties do not hold the walls in, they prevent the rafters from disconnecting at the ridge from uplift. These can also be metal straps on the top side of the sheathing, as opposed to 1x4 framing on the underside.
 
OP
S

spAdam

Member
Joined
Nov 23, 2017
Messages
16
Location
SoCal
Hopefully this picture sums up the construction of the beam. You can see where a previous owner cut the diagonal corner ties when installing the garage door. Don't mind the junction box, I was up there last night trying to solve some of the wiring mysteries of this garage - the old hard conduit was abandoned and has a hole worn in it from the garage door jackshaft :facepalm: The rafters are 2x6 and all the ties are 2x4.

attachment.php


I'm now thinking I might be able to (soda?) blast the wood clean and do a whitewash up there to get the effect from a couple of posts up. Then run wiring around the garage, finish the walls, and run air right down the ridge beam.

All of the walls are still vertical, I need to get up on the roof and confirm there is no sag but it looks good from the inside. The exterior (of the house as well) needs to be gone around to be cleaned, inspected, and repaired as needed. I already replaced a dry rotted section of one of the ridge beams on the house a couple years ago and I need to replace a couple of the barge rafters. At that point I'll get the stucco fixed up on both and repaint the whole property.
 

Attachments

  • IMG_9628.jpg
    IMG_9628.jpg
    149.9 KB · Views: 297
Last edited:
To avoid these ads, REGISTER NOW!
OP
S

spAdam

Member
Joined
Nov 23, 2017
Messages
16
Location
SoCal
Another option to handle the rafters:

attachment.php


Running 2x6 like this would move the lowest part of the ceiling up about 4" (not my primary goal but I'll happily take a little extra height) and increase the tensile strength even if they are single sided (not double like pictured). This would also keep the ties in the lower 1/3rd of the pitch. There is a small amount of sag in the ridge beam maybe about 1" at the very middle, it's interestingly mostly toward the ends and levels toward the middle of the beam length. All walls are still plumb though. The bad part, some of the rafters are not flush anymore where they meet the side of the beam, they are all toe nailed to it.

Speaking to an engineer/carpenter colleague, he suggested it would be worth jacking the beam a little near the ends to preload it upward, then bracket the rafters to the ridge beam with Strong Ties or similar. He suggested we could run the rafter "ties" up to beam as I originally envisioned, but that it would be easier and stronger to do them as in the picture above, particularly since they would be unbroken from one side of the garage to the other. They could also be bracketed where the meet the ridge beam in the middle, this would shore up the whole assembly and not allow any sag in the future. He did comment that what is there right now isn't accomplishing much of anything and that we can only make it better from where it is, lol.
 

Attachments

  • Annotation 2020-05-15 082633.jpg
    Annotation 2020-05-15 082633.jpg
    21.4 KB · Views: 258

paredown

Well-known member
Joined
Jan 12, 2012
Messages
545
Location
Pomona, NY
I'm in San Diego, and I have a 94 year old garage with a similar shallow roof area. The roof was badly sagging before we repaired it.
And I have done much of what you are considering.

Here are my advice and comments:

- Check thoroughly for termite damage.

- Not sure about the late 50s where you are, but my buildings were old built with beautiful old growth redwood.

- I decided I wanted to keep the beautiful open ceiling

- I replaced the sagging 2x4 rafter ties with new 2x6.

- The building had exposed rafter tails that were badly eaten by termites. I cut those off and sistered in new ones, milled to match the original dimensional 2x4 lumber.

- All the new lumber was douglas fir, but I stained it to match the old redwood. Do this BEFORE you install the new pieces, it is a nightmare after.

- I put a thermostat controlled exhaust fan in the center of the roof. For air intakes, there are bird holes (with screen) all around the eaves. You need a LOT of bird holes to allow enough air intake to match the exhaust fan, I'd suggest additional intake vents. I have the fan set to about 90-95 degrees F, and it never gets hotter than it is outside.

- I did sheetrock and finish the walls.

- I used 6 Ikea lamps, and hung them in the ceiling. Very cheap, and they look great and period up there.

Inside showing wall and ceiling. Note the "bird holes" in the eaves.

Thermostat controlled roof fan

Lights and rafter ties. You can also see I used a slight extra lift for the garage doors to get the rails as close to the ceiling as possible. The lights clear the garage door by about an inch and sit just below the line of the rafter ties.
Top of the wall, rafter ties and rafter tails. You can see one of the rafters is also sistered with a metal plate to the rafter tail. That rafter was particularly badly eaten and needed reinforcement. The rafter tails, ties and the few replacement roof boards have been stained to match the old redwood.
Lovely job & great taste in cars!
 

theoldwizard1

Well-known member
Joined
Feb 22, 2011
Messages
43,212
Location
SE MI
Welcome aboard. A rafter tie or collar tie has the primary job of keeping walls from spreading apart. If your rafters are attached well to that beam then the load is carried to the ground at its ends. You don’t need a tie at every joist. Probably don’t even need to replace what you have.
Concur !
Assuming that massive beam is properly supported at each end. What is the size of the door header ?
 

Attachments

  • Capture.jpg
    Capture.jpg
    90.2 KB · Views: 28
Last edited:

ddawg16

Well-known member
Joined
Jul 11, 2008
Messages
21,005
Location
S. California
Welcome to GJ.

What part of SoCal? From the look of your house, I'm thinking you might be close to the 110 fwy. If you are on the west side of it, them you don't have to worry about it getting too hot....but once you start going east....oh boy, summer can get toasty.

I'm west of it....so, it's not bad on the hottest days....and we don't have AC.

Tough call on those rafters. You would be amazed at how more stable the temps become when you drywall the ceiling. You don't really need insulation....

Not a whole lot of storage 'opportunities' up there....short of changing your pitch, it's kind of a lost cause for storage.

If it was me, I'd add more rafter ties using the correctly length lumber and drywall it. Ceiling first, then walls. It will do wonders for the dust control.

Besides laundry, what else are you using the garage for?
 
OP
S

spAdam

Member
Joined
Nov 23, 2017
Messages
16
Location
SoCal
Thanks! I'm up in the Santa Clarita area. This tract is actually the oldest actual housing development in the valley. It's kind of a neat, eclectic collection of slapped-together houses with detached garages at odd angles to the houses and other fun stuff that really upsets LA county code enforcement (lol).

It does get hot up here. There's at least a dozen days above 110F every summer. 2018 was more. That was one of the things that was originally driving closing is and insulating the ceiling, an exhaust fan does look like a decent alternative though too. There are inlet vents near the floor at the rear of the garage which, unfortunately, are easy entrances for the rats that stream out of my rear neighbor's yard every night if I don't keep them smartly fenced off.

The garage has the laundry (nowhere in the house to move it to without building an addition), otherwise the garage is my shop, storage for my project car and bicycles, and whatever else needs to go in there. If I can get rid of a couple more things and build some smart bike storage I might be able to get a second car in there too. I'm not super concerned about losing storage up there, I wouldn't put anything heavy up there anyways. It's taken me five years to adjust to being in a house with no attic - the answer was to **** it up and get a storage unit... which adds a constant helpful pressure to get rid of ****!

Concur !
Assuming that massive beam is properly supported at each end. What is the size of the door header ?

It seems like it's well supported. The door header is 4x12 nominal. Ridge is 4x14 nominal (I mis-measured the other day and reported it as 4x12 also).
 

Vintage Veloce

Well-known member
Joined
Feb 27, 2015
Messages
1,076
Location
San Diego
It seems like it's well supported. The door header is 4x12 nominal. Ridge is 4x14 nominal (I mis-measured the other day and reported it as 4x12 also).
I think people are asking something a bit different. It looks like that ridge beam is supported by the door header.

How is the ridge beam supported by the header? Just 2x4's on either side of the ridge beam that go down to the header? Can you insert a 4x4 directly under the ridge beam to the header?

How is the header supported? A single 2x4 to the ground on each end of the header from the isn't enough... I don't know the math, but I'd want a bunch on each end...
 
OP
S

spAdam

Member
Joined
Nov 23, 2017
Messages
16
Location
SoCal
Gotcha. Too much stuff to move on one side and the opener on the other side so it’s hard to get a pic of how the header is supported. I’ll try not to replace one picture with 1000 words.

It’s three 2x4 under each end. The inboard pairs are sistered together and there is a gap to the third spaced by small pieces of 1x4. Then there is a similar gap with 2x4 spacers to a fourth stud that attaches to the end of the beam. Hope that makes sense.

The door header is then capped with a 2x4 that serves as the bottom of a simple truss, same as the rear of the garage. The ridge beam is supported in the middle of all of that by what appears to be a chunk of 4x4.

See attachments.
 

Attachments

  • AB3542CD-F30B-49B4-A6C6-2D1BB629D661.jpg
    AB3542CD-F30B-49B4-A6C6-2D1BB629D661.jpg
    95.8 KB · Views: 36
  • A4BE6ADC-E8C8-4137-87CE-C6D7BBEEC992.jpg
    A4BE6ADC-E8C8-4137-87CE-C6D7BBEEC992.jpg
    96 KB · Views: 45

Vintage Veloce

Well-known member
Joined
Feb 27, 2015
Messages
1,076
Location
San Diego
That's a good description of the door side. Hopefully some people who know more can comment... but it looks possible that that is enough to me.


What about the opposite end of the ridge beam?
 

rayra

Well-known member
Joined
Dec 1, 2014
Messages
4,724
Location
Escaped from Los Angeles
Another option to handle the rafters:


Speaking to an engineer/carpenter colleague, he suggested it would be worth jacking the beam a little near the ends to preload it upward, then bracket the rafters to the ridge beam with Strong Ties or similar. He suggested we could run the rafter "ties" up to beam as I originally envisioned, but that it would be easier and stronger to do them as in the picture above, particularly since they would be unbroken from one side of the garage to the other. They could also be bracketed where the meet the ridge beam in the middle, this would shore up the whole assembly and not allow any sag in the future. He did comment that what is there right now isn't accomplishing much of anything and that we can only make it better from where it is, lol.

Very likely true, but I suggest not cutting all the old out before you put in the new. Jack the main beam, set your new ties, removing each old as you go. If you aren't wholly jacking the main beam.

We had a crack develop in our two-car door header beam, flaw goes back 50yrs to the original tract build, those worthies used a header beam with a big knot near the middle of the span AND put the beam with the knot down. Knot in tension instead of compression. So about ~35yrs in it dries, cracks and sags. I wound up using a 16' x 4" piece of steel angle iron as a splint, jacked up against the header with about 1" of positive curve and lag bolted the hell out of it all over. Worked well enough. Still there. Lowest bid to shore up the garage overhang and roof and excise and replace that header was $24,000. No thanks.
Now I'm thinking to re-do that work and glue and screw that flaw with some nice structural GRK screws and a better surface plate on the inner face. And set some more positive arch when I do it.
 

ddawg16

Well-known member
Joined
Jul 11, 2008
Messages
21,005
Location
S. California
Thanks! I'm up in the Santa Clarita area. This tract is actually the oldest actual housing development in the valley. It's kind of a neat, eclectic collection of slapped-together houses with detached garages at odd angles to the houses and other fun stuff that really upsets LA county code enforcement (lol).

It does get hot up here. There's at least a dozen days above 110F every summer. 2018 was more. That was one of the things that was originally driving closing is and insulating the ceiling, an exhaust fan does look like a decent alternative though too. There are inlet vents near the floor at the rear of the garage which, unfortunately, are easy entrances for the rats that stream out of my rear neighbor's yard every night if I don't keep them smartly fenced off.

The garage has the laundry (nowhere in the house to move it to without building an addition), otherwise the garage is my shop, storage for my project car and bicycles, and whatever else needs to go in there. If I can get rid of a couple more things and build some smart bike storage I might be able to get a second car in there too. I'm not super concerned about losing storage up there, I wouldn't put anything heavy up there anyways. It's taken me five years to adjust to being in a house with no attic - the answer was to **** it up and get a storage unit... which adds a constant helpful pressure to get rid of ****!


It seems like it's well supported. The door header is 4x12 nominal. Ridge is 4x14 nominal (I mis-measured the other day and reported it as 4x12 also).

If you are where I think you are, nice and hilly in that area. It's similar to Old Pasadena.
 
OP
S

spAdam

Member
Joined
Nov 23, 2017
Messages
16
Location
SoCal
That's a good description of the door side. Hopefully some people who know more can comment... but it looks possible that that is enough to me.


What about the opposite end of the ridge beam?

It's supported in a similar way but atop a typical stud wall on 16" centers rather than the garage door header beam... which reminds me, I keep meaning to mention how jealous I am of your pull through garage!

Very likely true, but I suggest not cutting all the old out before you put in the new. Jack the main beam, set your new ties, removing each old as you go. If you aren't wholly jacking the main beam.

We had a crack develop in our two-car door header beam, flaw goes back 50yrs to the original tract build, those worthies used a header beam with a big knot near the middle of the span AND put the beam with the knot down. Knot in tension instead of compression. So about ~35yrs in it dries, cracks and sags. I wound up using a 16' x 4" piece of steel angle iron as a splint, jacked up against the header with about 1" of positive curve and lag bolted the hell out of it all over. Worked well enough. Still there. Lowest bid to shore up the garage overhang and roof and excise and replace that header was $24,000. No thanks.
Now I'm thinking to re-do that work and glue and screw that flaw with some nice structural GRK screws and a better surface plate on the inner face. And set some more positive arch when I do it.

That would pretty much be the plan of attack. I feel you on the old tract house work - this house can be a nightmare with that combined with 60 years of work done by people that probably shouldn't have touched it. Every time I plan a two hour job I go ahead and pencil in a ten hour window because I'm terrified of what I'm going to find when I really start getting in to it - Just hanging some lights in the kitchen last weekend required a half rewire and fabrication of brackets for the backsplash "mounted" switches that turned out to be mostly floating in space :shocking:

If you are where I think you are, nice and hilly in that area. It's similar to Old Pasadena.

It is beautiful up here! Just a string of little canyons filled with old houses. Lots of car guys in the neighborhood too. You can hear people working on their projects on any given Saturday afternoon. You gotta be okay with full suburbia mode though.
 
OP
S

spAdam

Member
Joined
Nov 23, 2017
Messages
16
Location
SoCal
Fast forward precisely three years....

Careful what you wish for. Roofers started tear off on my house a couple of weeks ago and were piling up all of their scuttle on the garage roof because 'the dump truck was late'. I walked out to grab a seltzer, noticed one of my lights was hanging crooked, then the broken rafter tie, then heard the popping and looked up, and holy *!#$, they broke my ridge beam!!The contractor made it right, got his engineer uncle out to assess, brought in the framing crew, and left it better than they found it.


image_6db873a4ee1d2e49ca40c4e712e362a860f14d7d.png
image_b4051963b03aa9385a15b64d438f074f7892964a.png
image_da1cd43c9ee2c24a72dcadde095afa7cdd752dfd.png
image_5a3373a422185ea168702b7b2cda3b8c214cf615.png

New doubled up 2x14 LVL ridge, removed the rafter ties, put it all together with strong ties, added the 2" ledger over the garage door. It's a whole new space.

I got up in there and hung and (temporarily) hooked up most of my new Barrina lights - Had just started on that project when the roof began. Garage is a total disaster from clearing it to work on so step one is cleaning up and getting things back in order... then to figure out my permanent wiring situation for the whole garage and execute on that. Stressful couple of weeks but it all worked out and now they can get on with the solar.


image_2f96fa5eab892c2702dc9bc38beaad79ec43b004.png
image_19d4d73ac852741ce83d4aa053aa05b18ba2eec9.png
 
To avoid these ads, REGISTER NOW!
Top Bottom