To avoid these ads, REGISTER NOW!

VISE REPAIR 101 all vise repairs, lubricants, sources for parts and the tricks to fix

Shiftless

Well-known member
Joined
Mar 9, 2014
Messages
14,580
Location
East Bay SFO
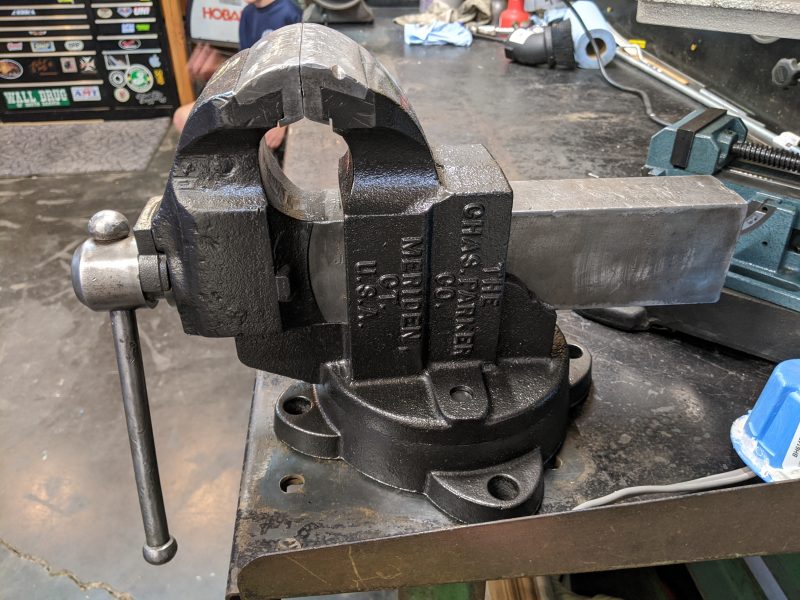
Check it out on their website. They have a huge variety of very high grade finish products. Other members, have used this black oil with VERY good results. KMScott and Smitty are two others who come to mind.

bagged: Welcome back and may I say that your Lewis looks fantastic!


.
 

Attachments

  • 7C24CA69-C57B-4F8E-AE6A-C432D235AD20.jpg
    7C24CA69-C57B-4F8E-AE6A-C432D235AD20.jpg
    110.6 KB · Views: 53
Last edited:
To avoid these ads, REGISTER NOW!

Leviton

Well-known member
Joined
Feb 25, 2019
Messages
924
Location
Oregon
Check it out on their website. They have a huge variety of very high grade finish products. Other members, have used this black oil with VERY good results. KMScott and Smitty are two others who come to mind.

I like the vises i have seen with their black metal oil. Unfortunately, there are no distributors in my state and the shipping for a quart of it costs more than the oil itself. :(
 

Shiftless

Well-known member
Joined
Mar 9, 2014
Messages
14,580
Location
East Bay SFO
I like the vises i have seen with their black metal oil. Unfortunately, there are no distributors in my state and the shipping for a quart of it costs more than the oil itself. :(

Unless you’re planning to redo about 50 vises, you don’t need a quart. If you want to give it a try, get the small jar. That will still cover several vises.
 

JasonMcElroy

Well-known member
Joined
Sep 5, 2012
Messages
378
Location
San Jose by way of Philly & NYC
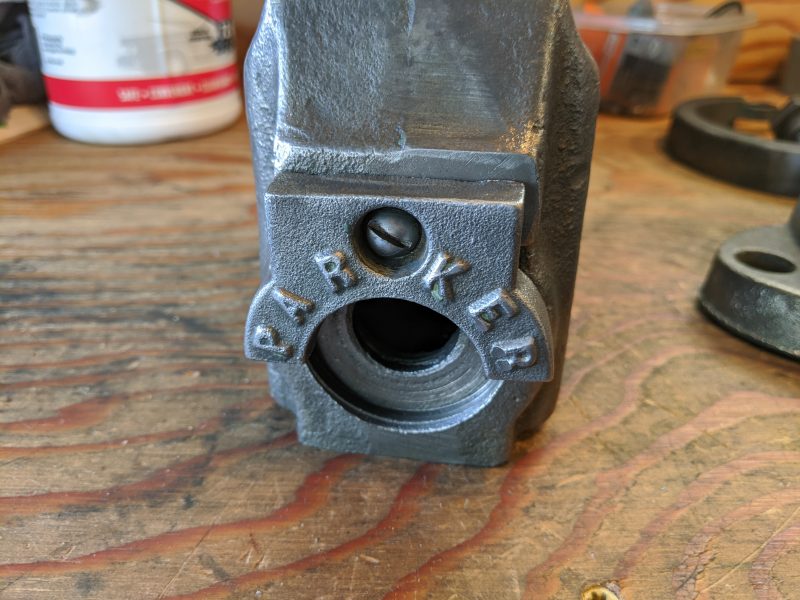
I rebuilt a Parker 974 last weekend.

The house I was renting when we first moved here had an old garage with a hand-built workbench and a nice old vise. I used it for three years and became attached to using it. I asked the landlord if they’d sell it when we moved (after buying a house two doors away) but they told me it was their grandfather’s and had sentimental value. I can certainly appreciate that. So I have been looking out for listings off and on for the last few years for a Parker 974 just like that one.

Two weeks ago I found one at a decent price with reasonable shipping charges, free in this case. Weighing around 80lbs, shipping cost is a big consideration. This one comes from Connecticut and has definitely seen some hard use but nothing is broken. My intent is to actually use it (more hard use!) so this suits me fine.

When it got here I was impressed by the care the shipper took in crating it. That’s always a good sign. I was going to just bolt it down and use it but then spontaneously disassembled it and starting cleaning it up and looking for any needed repairs. The rest of this article tells the tale.

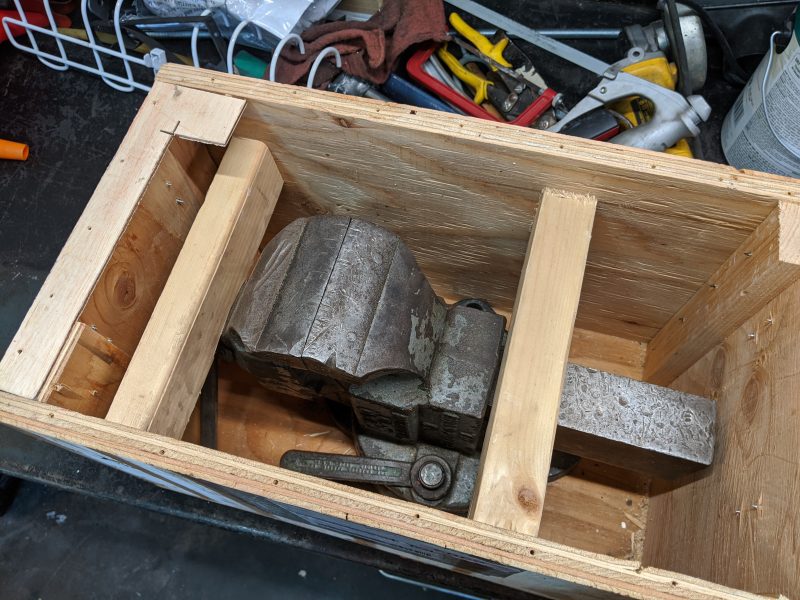
This is how the vise arrived. Well made crate with the vise secured inside. I half expected it to arrive packed loosely in a huge wood box. . . and bent or broken.

parkervise-shipping-box-800x600.jpg


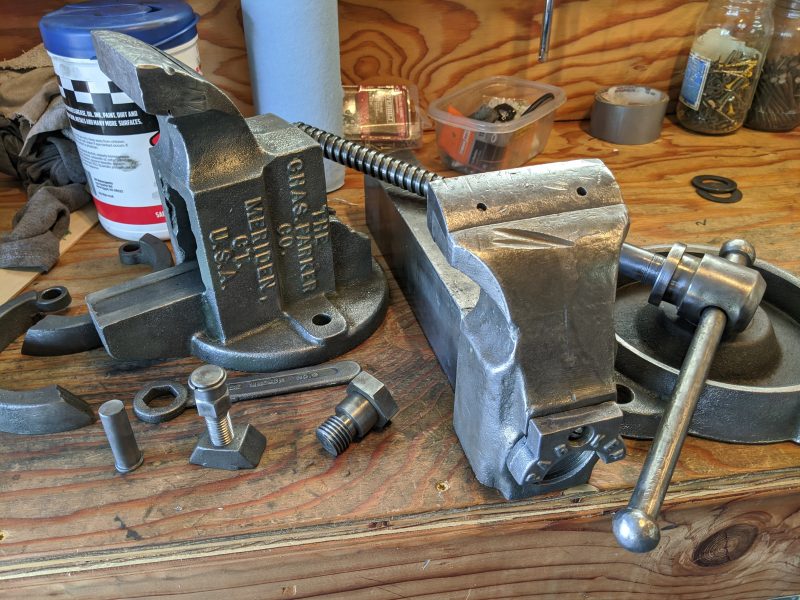
Within an hour of having received it, I had it complete disassembled. I used a wire wheel to strip three layers of paint away. Was originally black, then someone painted it mint green, then someone painted it machine grey.

parkervise-all-stripped-800x600.jpg


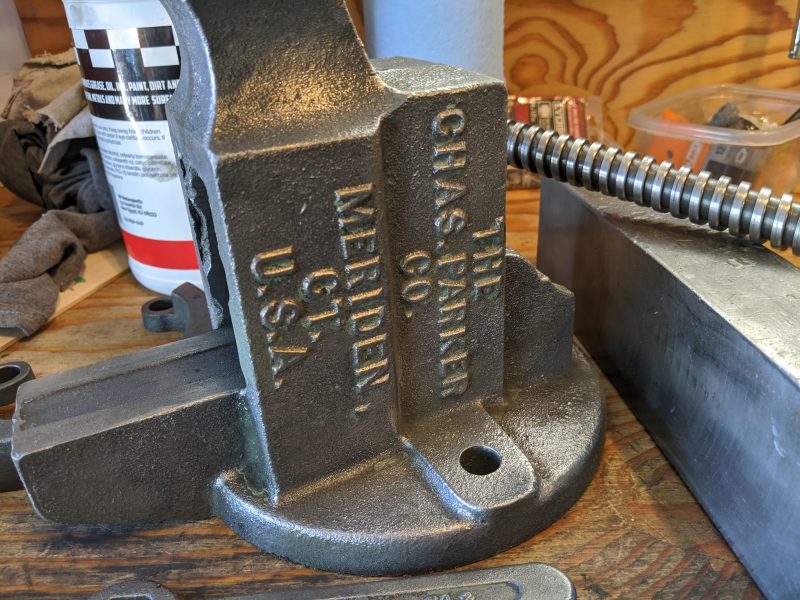
Main vise body/receiver after stripping and inspection. No cracks. All good. This is a stout casting.

parkervise-receiver-stripped-800x600.jpg


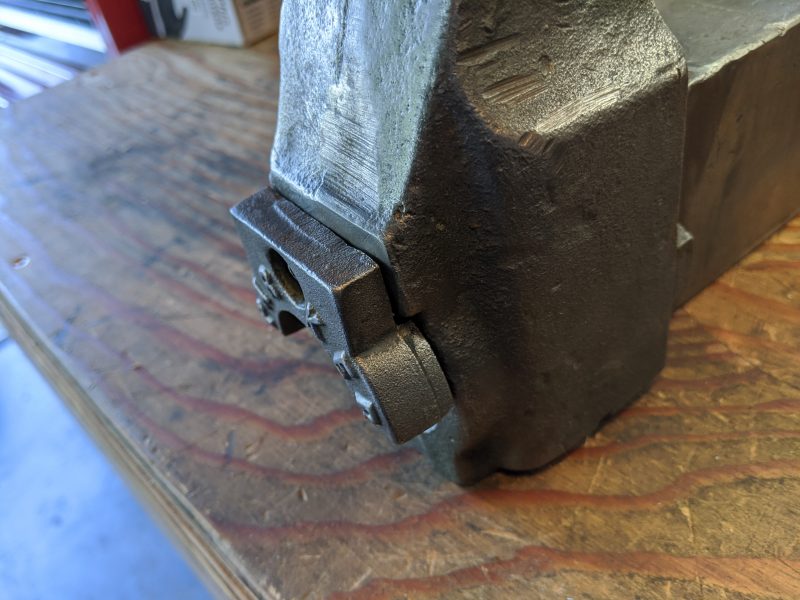
The slide jaw retainer (connects the main screw to the sliding jaw for opening the vise) had a large gap where it meets the jaw. Didn’t matter for 80 years but I ground it down for a better fit anyway. I’ve got the time.

parkervise-retainer-misalign-800x600.jpg


Sliding jaw retainer after stripping and repair for better fit.

parkervise-retainer-repaired-800x600.jpg


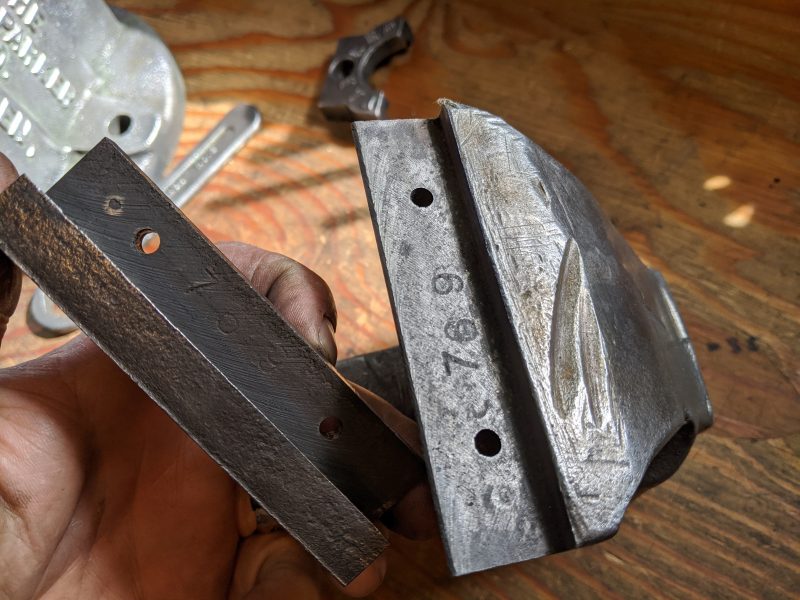
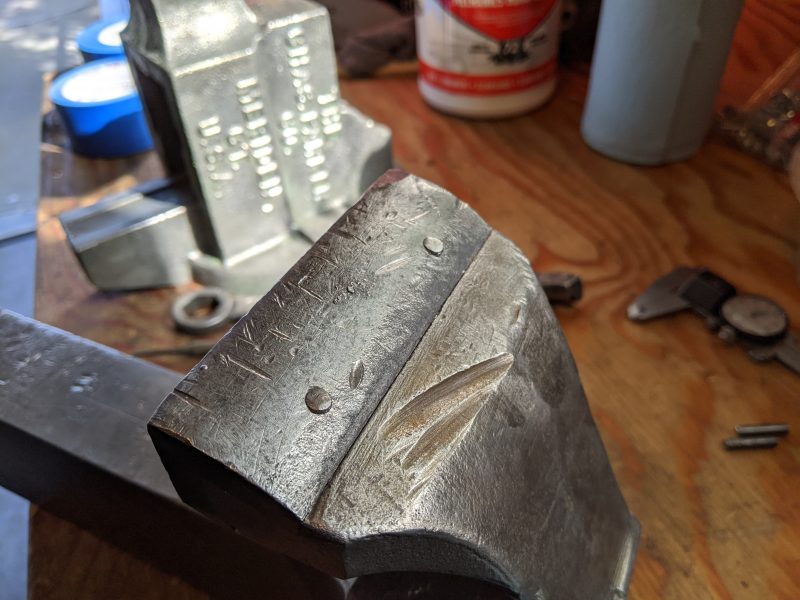
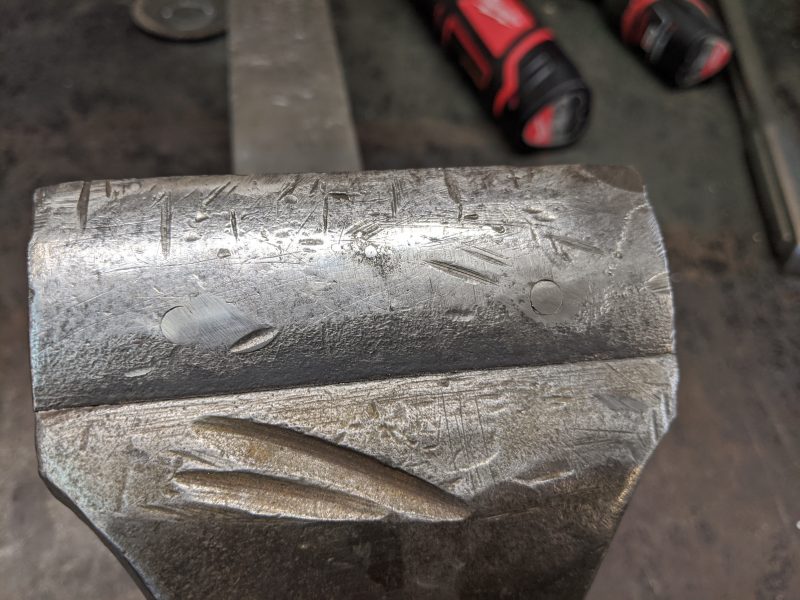
The hardened steel replaceable jaw was loose when I got it. They are pretty tough to find once broken so I decided to fix it. The holes are for press-fit steel pins used to secure the jaw to the casting. I removed them with a drift pin and took a pic of the part numbers for future reference.

parkervise-jaw-disassembled-800x600.jpg


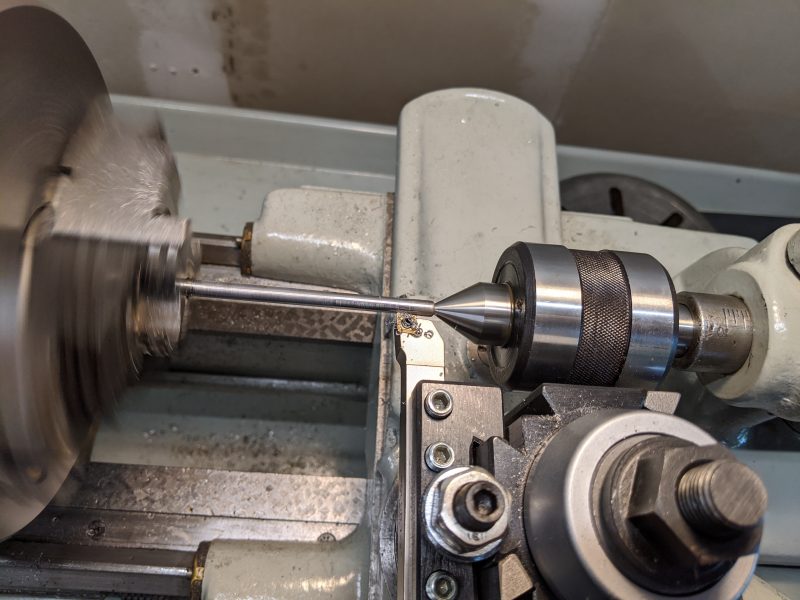
Making new slightly oversize pins to secure the jaws. The ones I removed were around .008″. I did not inspect the holes so I just made the new ones at .010″ to force them in place for a secure fit. Lathe is a 1944 South Bend 10L I recently put back into service.

parkervise-lathe-jawpins-800x600.jpg


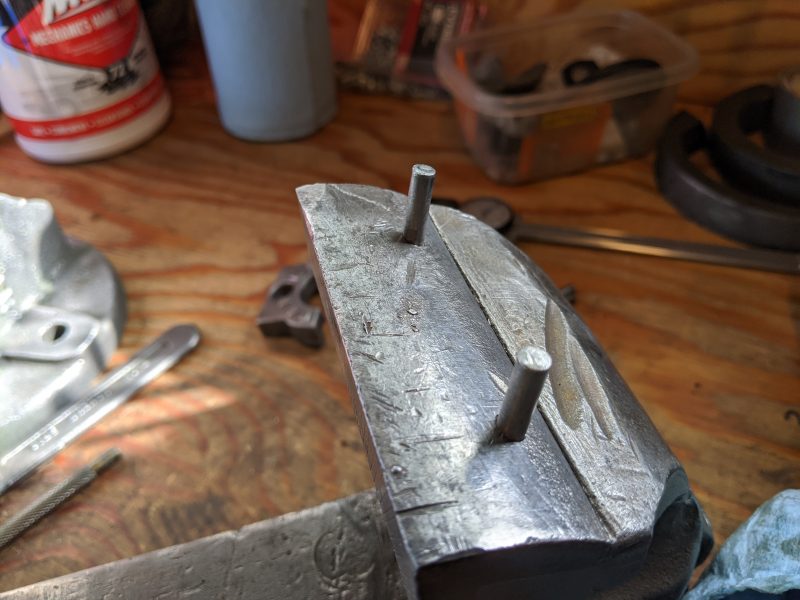
Jaw reinstalled with the new oversize retainer pins. Pins were a nice tight fit requiring some force to install but not enough to risk cracking anything.

parkervise-jaw-pinsinserted-800x600.jpg


New jaw retainer pins cut off near flush for finishing.

parkervise-jaw-pinscut-800x600.jpg


Retainer pins ground flush with a flap wheel.

parkervise-jaw-repaired-800x600.jpg


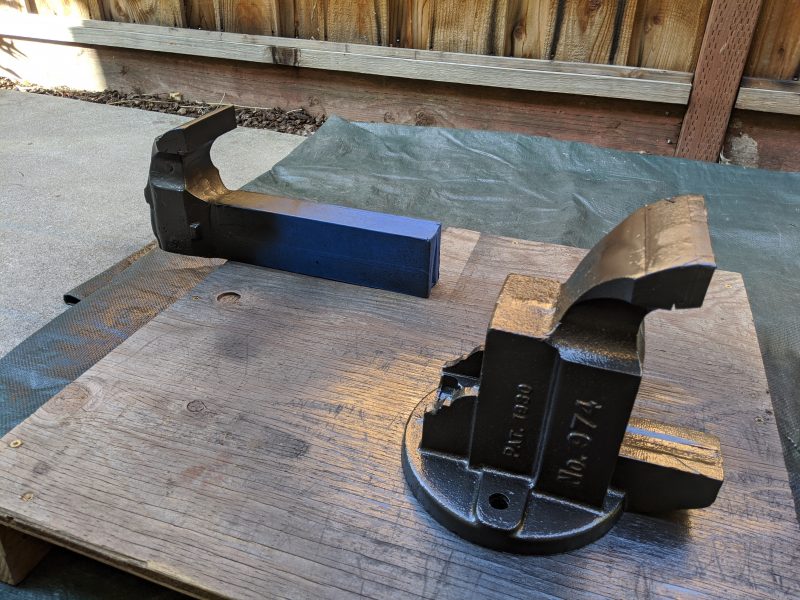
After carefully masking off the machined and sliding surfaces I took outside to paint. I used whatever hammered finish paint they had at the hardware store. I think the color was called “carbon”. Had the usual annoyances with the ****** can and nozzle design blowing spatters everywhere.

parkervise-painting-800x600.jpg


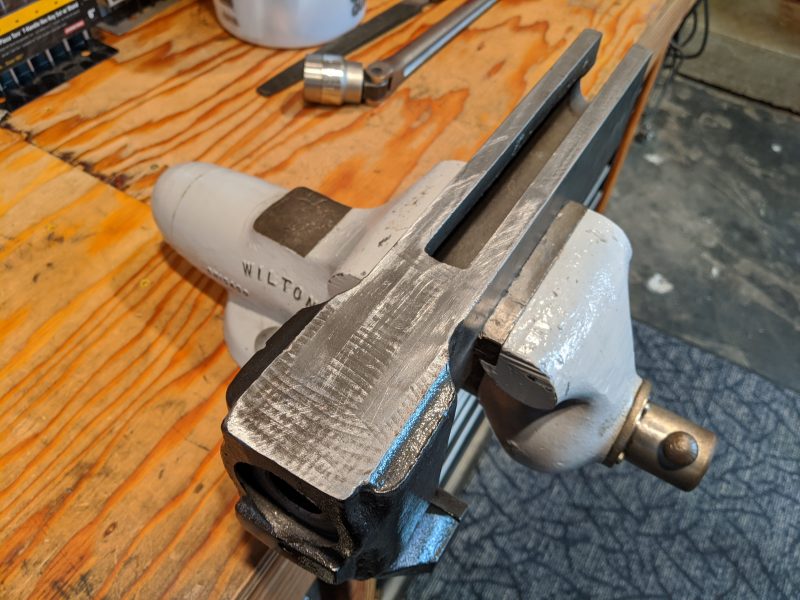
I cleaned up the sliding surfaces with a hand file and a whetstone. Didn’t go nuts on it, just made sure it was clean with no burrs.

parkervise-receiver-ground-800x600.jpg


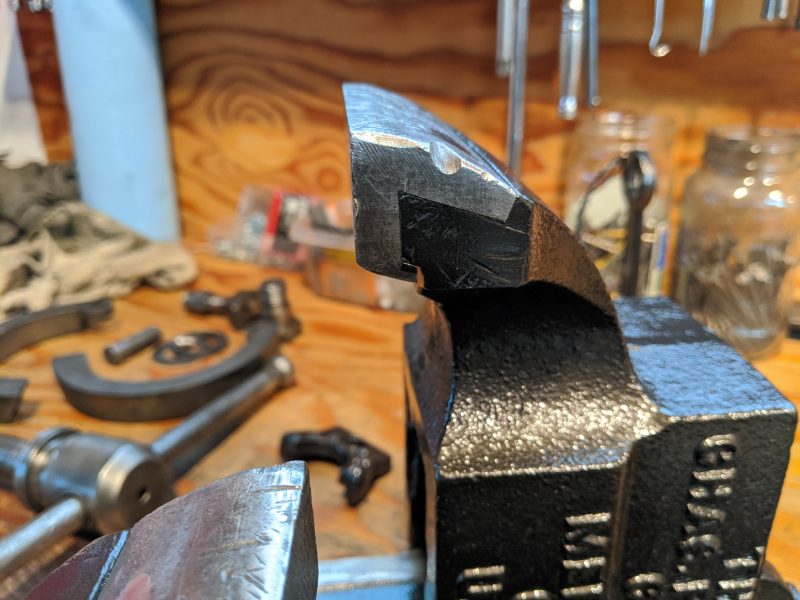
I cleaned up the sliding surface of the moving jaw with a hand file and whetstone too.

parkervise-slidingjaw-ground-800x600.jpg


Finished jaw repair after painting and removing masking tape.

parkervise-slidingjaw-painted-800x600.jpg


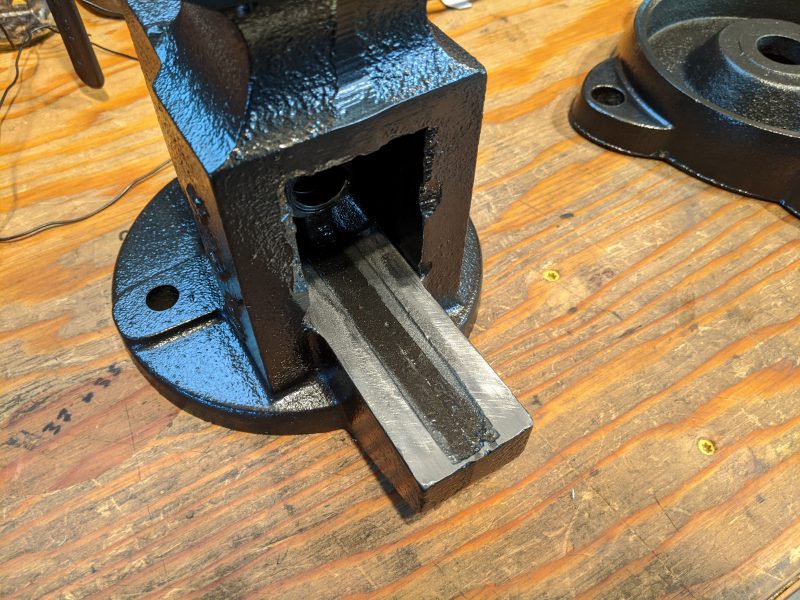
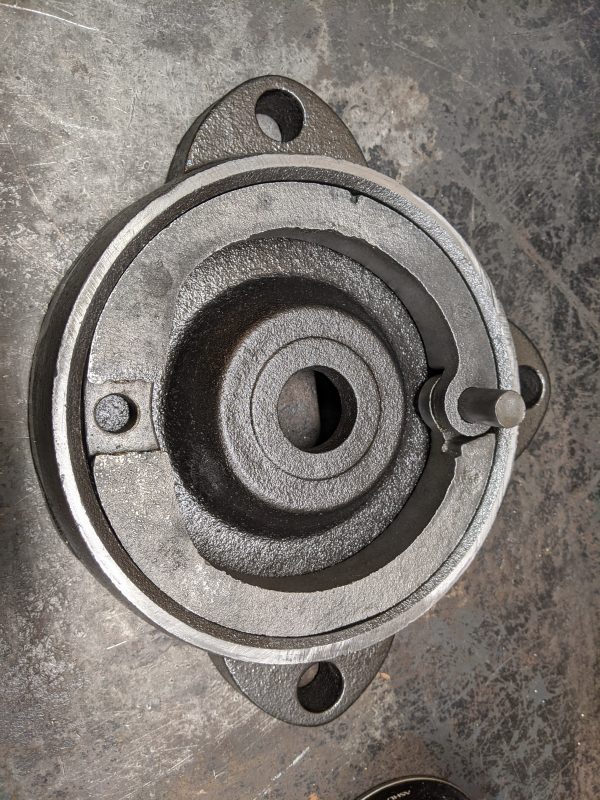
You guessed it . . . more hand filing and whetstone. This time the sliding surface where main body/receiver rotates on the base casting. This vise has a cool lock design that allows it to rotate and lock in an infinite number of positions. The two things that look like old drum brake shows? They pretty much are. The set screw from the top pulls up the expander wedge locking the vise securely in place. The main body/receiver is also drilled symmetrically so you can mount the set screw on the right or left side. My bench as a side rail on the right so I mounted the set screw on the left. The old vise was really difficult to lock and unlock in cramped quarters.
parkervise-base-ground-600x800.jpg


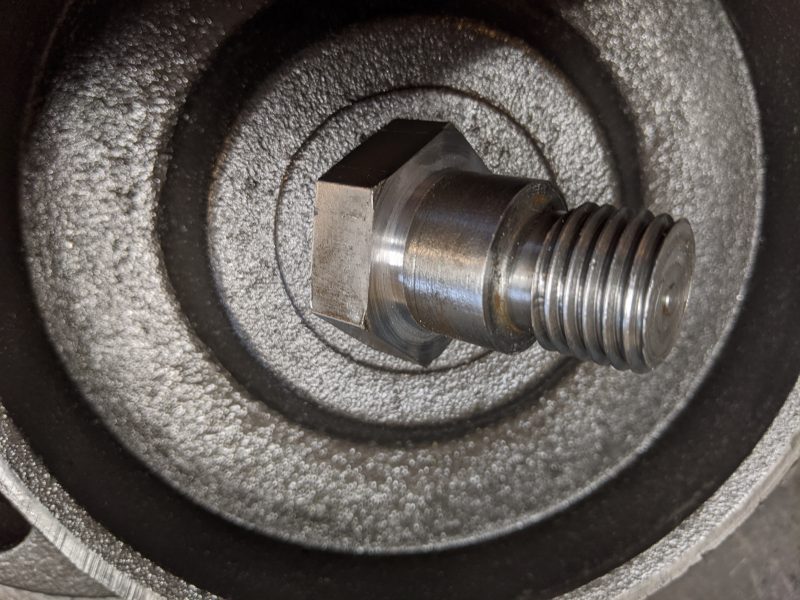
When rebuilding the vise I found that the main retainer screw could not be fully tightened without binding, preventing the vise from rotating on the base. It’s a shouldered screw so I removed some material from under the head so it could be bottomed without binding. Think I took off around .006″. Now it can be tightened fully. Yes, I know I could have bought some shims but I’m a man with a hammer (lathe) and this looked like a simple nail.

parkervise-mainscrew-800x600.jpg


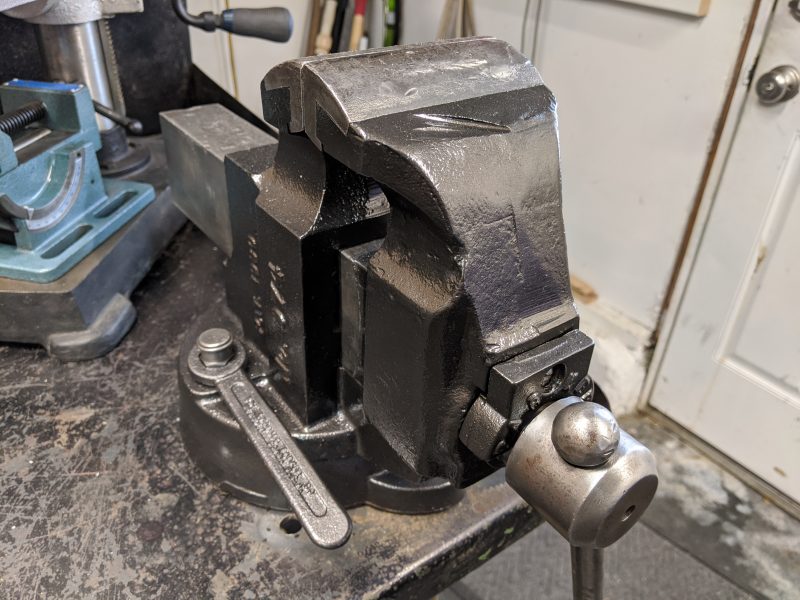
Completed vise. Looks great! Even has the original captured vise wrench.

parkervise-finished-front-800x600.jpg


Finished vise from the side. Ready for the next 100 years of service. Maybe my boys will have this one in their workshop after the worms have eaten me.


parkervise-finished-side-800x600.jpg
 
OP
D

drivesitfar

Well-known member
Joined
Oct 23, 2013
Messages
36,060
Location
Pacific Northwest
JASON: just curious how shipping was FREE cause that would cost me $100 to ship even at my business rates via Fed Ex or UPS? whoever built that crate knew what he was doing. is he a member here on GJ?

thanks for taking the time to restore or spiff up your old Parker the right way and really appreciate the pictures with all the good explanations too.

WELL DONE!!

ALL: Carla (maybe the handiest GJ member man or woman around a vise I knew) used to live close to Jason near San Jose and it looks like he received some of her skills. also since I think it's been a year or maybe 2 now since Carla passed i just wanted to give her a shout out (read some of her posts on this thread if you want to learn more about these old vises and old tools and cast iron in general.

CARLA may you be resting in peace or enjoying the golden tools you deserved here. thanks again for all your help.
 

JasonMcElroy

Well-known member
Joined
Sep 5, 2012
Messages
378
Location
San Jose by way of Philly & NYC
JASON: just curious how shipping was FREE cause that would cost me $100 to ship even at my business rates via Fed Ex or UPS? whoever built that crate knew what he was doing. is he a member here on GJ?

thanks for taking the time to restore or spiff up your old Parker the right way and really appreciate the pictures with all the good explanations too.

WELL DONE!!

Seller noted free shipping so I went for it ;-0. All the others I looked at had between $40 and $100 shipping fees. Was expecting to get what I paid for but was pleasantly impressed.

Not sure if GJ member. Bought off Ebay and didn't ask.

This is probably the first time I painted a tool I've rebuilt. My usual is to rebuild as close to mechanical perfection as I can and just use the thing. This applies to the vintage bikes I've built, my old Chevy truck, and all the tools I've fixed.

No idea why I painted it.

I used to document a lot of the project I did in my shop (over the last twenty some years) here: http://www.greasygringo.com.

Being locked down from COVID lately and trying to keep busy has me creating new articles for the first time in awhile.

Check it out if you have time to kill. Everything from building land speed record motorcycle engines to restoring old panheads to building toys and tools.

Jason
 

Shiftless

Well-known member
Joined
Mar 9, 2014
Messages
14,580
Location
East Bay SFO
drives:
Thanks for mentioning Carla.
Her contributions to GJ were many. I’m sure others will agree with me that she was a great machinist and a wonderful teacher. Her willingness to share her experience in such a detailed manner was extraordinary.

RIP Carla.


.
 
Last edited:

2oolhound

Well-known member
Joined
Dec 18, 2010
Messages
5,918
Location
BC Canada
Drives: Thanks for mentioning Carla (from me as well). I really enjoyed her participation here but hadn't heard of her passing and wondered why there were no more posts. Her years of wisdom will be missed.
 
OP
D

drivesitfar

Well-known member
Joined
Oct 23, 2013
Messages
36,060
Location
Pacific Northwest
JASON: at the moment I barely have time to read a few threads here on GJ and comment on them, but if you wanted to start a garage gallery thread and put the link in your sig line i bet more than a few of us would like to follow along.

thanks again for posting up all the great vise pictures and I bet that old PARKER is very happy it found it's way to your garage.

SHIFT & 2OOL: yep i surely miss Carla posting up her wisdom and sharing what she learned in her many many years working as a machinist. I did talk with her on the phone one or two times and it was always a pleasure.

ALL: anybody else have pictures of an old vise they've bought and fixed up or maybe have one that needs some love and maybe you need some help just post up or ask questions cause some of us enjoy our vise and tool pics more than going to an art gallery.

cheers
 
OP
D

drivesitfar

Well-known member
Joined
Oct 23, 2013
Messages
36,060
Location
Pacific Northwest
some of you might know DON LONG because of his PARTY GARAGE thread and I asked him how he removes all the rusty bolts that he does so here's how he does it.

he sprays on Wurth RUST OFF on the rusty bolts each day for 2 days and rarely has any issues getting rusty bolts out of his old rusty projects and cars.

as I was looking up information on how to buy this product I'm not sure if it's related to the German company WUERTH that makes primer, but I watched a video on it's application and if I every paint anything I'll be looking to use this primer too.

another youtube video I saw a kid in Eastern Washington go to the Auto parts store and pick up all the rust protection products they had. surprisingly WD40 did pretty well, but it was only an 8 week test and i'm sure WD was maybe about gone cause it dries up pretty quick. Sta-Bil rust stopper seemed to be the best along with the yellow can of wax and Boe shield and other products were not nearly as good. in fact some promoted rust and the pieces of steel and cast that were in each of the 9 test groups were worse than the untreated one that was in the group.

we all fight rust on just about everything so if any of you have a favorite product you like to use let us know cause i'm sure some of the younger members would benefit from our failures and successes without having to learn them on their own.

have a great day!!
 

Woodreaux

Well-known member
Joined
Sep 30, 2019
Messages
47
Location
Louisiana
Alright Drivesitfar, since you asked for it....

I picked up a Columbian #3 post vise at auction a while back and I'm finally getting to the point of de-rusting and restoring. I plan to mount it on a tool stand next to my gas forge.

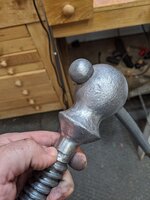
I used evaporust on the small parts and it did an incredible job. As you can see in the pics, evaporust + wire wheel to remove the evaporust 'scale' = bright silver cast iron.

For moving jaw, I wire cupped and put some linseed and it has a very nice patina. Still haven't done the static jaw/post except some wire cup work.

I thought that if I heated the small parts and coated them in linseed then I would get some of the darkness back, but that has not proven to be the case.

So my questions:.

1. Should I try to get the linseed oil off the bright parts and do something to make them darker? I'm reluctant to paint them. I was thinking I should have used something like the black metal oil.

2. I am considering leaving it as is, but will it look strange to have silver bolt/screw, retainer plate, etc, with dark jaws? I guess I could reassemble and find out....
238589cb461dca2aee514309ec3ecc75.jpg273f8d9cc1e475c23513625c03180743.jpg8f2e7750a5ec44bdcec75186a383b0f4.jpg88fd286bb9912ebe82c531bd14fa0188.jpg

Sent from my Pixel 3 XL using Tapatalk
 

Attachments

  • 238589cb461dca2aee514309ec3ecc75.jpg
    238589cb461dca2aee514309ec3ecc75.jpg
    541 KB · Views: 0
  • 273f8d9cc1e475c23513625c03180743.jpg
    273f8d9cc1e475c23513625c03180743.jpg
    539.3 KB · Views: 0
  • 8f2e7750a5ec44bdcec75186a383b0f4.jpg
    8f2e7750a5ec44bdcec75186a383b0f4.jpg
    596 KB · Views: 0
  • 88fd286bb9912ebe82c531bd14fa0188.jpg
    88fd286bb9912ebe82c531bd14fa0188.jpg
    538.7 KB · Views: 0

LesserSon

Well-known member
Joined
Feb 7, 2016
Messages
5,086
Location
PA USA
Woodreaux:
The cast parts (meatball, etc) will darken further on their own. I think it’s something with the carbon content. I would leave them alone and see how they look in a few days. Perhaps, you put the BLO on too soon after wire wheel, and will have to strip the BLO off to let more oxygen get to the surface. Then wait a few days, and reapply the BLO. I don’t think every part will darken alike, but it seems aesthetically honest for different materials to have a different gleam. Otherwise, why strip them in the first place?
Are you using BLO, or raw linseed oil?

All:
I’ve got a question of my own-
I took apart a 1-3/4” table vise that other than some missing paint and oxidation, looks unused.
But when I backed the dynamic/slide clear of the tower, the main nut tumbled out!
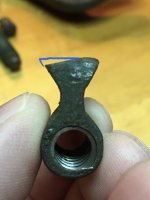
It looks to have been ground on the bottom of the dovetail, so it is actually too narrow to stay put. I suspect the worker who assembled it drove the retaining pin in before sliding the nut into the slot, so they ground it down enough to drop in.
The question is, would building it back up with a steel shim and 50/50 solder work? Experience/skill-wise, I have soldered copper but not iron. I have never brazed anything. Obviously, it’s not going to be subject to torturous forces, but I don’t want a repair to fail if it was put to use. (I’m ashamed to admit it, but SteelStik also crossed my mind.)
 

Attachments

  • 4C762324-77DF-4EE6-8767-9CFA712EF48D.jpg
    4C762324-77DF-4EE6-8767-9CFA712EF48D.jpg
    75.1 KB · Views: 14
  • 9BA25095-2299-405B-BEF2-DC28D72EBBC9.jpg
    9BA25095-2299-405B-BEF2-DC28D72EBBC9.jpg
    146.6 KB · Views: 16
  • 7DEBADDB-1E90-41F3-B04C-F4048B8F390A.jpg
    7DEBADDB-1E90-41F3-B04C-F4048B8F390A.jpg
    52.1 KB · Views: 14
Last edited:

gf0012-aust

Well-known member
Joined
Apr 17, 2011
Messages
172
Location
Adelaide
another youtube video I saw a kid in Eastern Washington go to the Auto parts store and pick up all the rust protection products they had. surprisingly WD40 did pretty well, but it was only an 8 week test and i'm sure WD was maybe about gone cause it dries up pretty quick. Sta-Bil rust stopper seemed to be the best along with the yellow can of wax and Boe shield and other products were not nearly as good. in fact some promoted rust and the pieces of steel and cast that were in each of the 9 test groups were worse than the untreated one that was in the group.

Is that the project farm YouTube site?

He’s pretty rigorous and isn’t sponsored by vendors, so he’s worth watching
 

Outlawmws

Well-known member
Joined
Aug 9, 2011
Messages
39,321
Location
The Badlands
LS, 50/50 isn't exactly high strength. I think you might be OK with silver solder. Higher temps, but much higher strength.
 

LesserSon

Well-known member
Joined
Feb 7, 2016
Messages
5,086
Location
PA USA
Thanks, Outlaw.
I was thinking this particular patch doesn’t need to be all that strong, because the slide keeps most of the force parallel. So the proposed joint itself is exposed to much lighter perpendicular force. The job of the dovetail is just to keep the nut from slipping out of position (and thus wearing). I suppose the truth of that last assertion depends on how well the nut fits into the groove, and whether the face of the nut base contacts the terminal ledge of the groove.
I have a “farmers” vise with a crudely-fitted main nut that just rests in a vertical hole. It still stands up to light clamping. (Someday, I’ll see about a fix, because I think neither the nut nor the screw are original.)
My sense of thrift reminded me that I have several small bottles of propane and no MAPP. And relict soft solder from MrsLS’s stained glass class years ago (might be even more than 50% lead). I know I have lead-free solder too.
I’ll need to remove the retaining pin in order to access the dovetail slot in the static tower first, anyway, since a repaired nut won’t slide in with it in place. Plenty of time for more suggestions...
 
Last edited:

Woodreaux

Well-known member
Joined
Sep 30, 2019
Messages
47
Location
Louisiana
Woodreaux:
Otherwise, why strip them in the first place?
Are you using BLO, or raw linseed oil?

I'm using boiled linseed oil.

The vise was really rusty and dirty. I would have evaporusted the whole thing but it's too big for my setup. I would have needed a barrel of the stuff. In retrospect,, electrolysis might have been a good option for the larger parts.

At this point, I've got sparkling small parts covered with BLO, a somewhat rusty and dirty 'static jaw'/post (no BLO on it yet), and a clean dynamic jaw with a nice patina (sealed with BLO).

I'm thinking I'll finish cleaning up the static jaw best I can with the wire wheel, put some oil on it, and reassemble. If it looks weird I can always take the small parts off and find a different solution.

Sent from my Pixel 3 XL using Tapatalk
 

LesserSon

Well-known member
Joined
Feb 7, 2016
Messages
5,086
Location
PA USA
I think that’s a good plan. I’m sure it’s going to look better than as found!
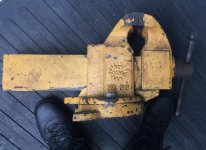
There are so many examples of equipment with dissimilar components, and they don’t look weird assembled. They’re different materials because they have different functions. The head and haft of a hammer, the shank and grip of a screwdriver, chrome bling on just about any machine I can think of.
When things are entirely one color and sheen, they look sort of fake to me, like an unfinished movie prop or a blow mold toy.
A lot of the guys who paint their vises wind up accenting the raised numbers and letters with a different color, and of course, they don’t paint the slide or screw or handle. Even the “naked” ones have variation. Plus, BLO itself darkens over time.
 
Last edited:

akasrick

Well-known member
Joined
Apr 10, 2017
Messages
795
Location
south jersey
LesserSon,

Picture of my Bonney Lehigh 1010 vise.
Same bevel on underside of the nut, pin looks to have never been removed.
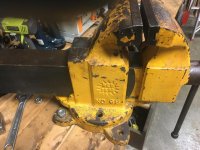
Maybe a feature :) I'll have to wiggle mine back in now. :headscrat

attachment.php


akasrick


All:
I’ve got a question of my own-
I took apart a 1-3/4” table vise that other than some missing paint and oxidation, looks unused.
But when I backed the dynamic/slide clear of the tower, the main nut tumbled out!
 

Attachments

  • Bonney1010nut&pin.jpg
    Bonney1010nut&pin.jpg
    96.6 KB · Views: 186

Shiftless

Well-known member
Joined
Mar 9, 2014
Messages
14,580
Location
East Bay SFO
Woodreaux:

Here’s a tip for Evaporust treatment of large vise parts.

Get a heavy duty plastic bag, zip lock or other.
Put the vise part in the bag and pour in a lot of Evaporust.
Then immerse the bag in a 5 gallon (or bigger) bucket full of water being careful to not let water into the bag.

I have not used this technique but others here on GJ have. Maybe somebody who has used it can chime in.
 
Last edited:

Woodreaux

Well-known member
Joined
Sep 30, 2019
Messages
47
Location
Louisiana
That's a great idea. I would need a barrel for the post vise, but the idea would still work. And cost a fraction of a barrel of evaporust

Sent from my Pixel 3 XL using Tapatalk
 
To avoid these ads, REGISTER NOW!
OP
D

drivesitfar

Well-known member
Joined
Oct 23, 2013
Messages
36,060
Location
Pacific Northwest
GF: Fireball Tool did the 8 week rust prevention test with 7 products from the auto parts store that I was mentioning. if you like another Youtuber's video better for this sort of test can you put up the link?

here's the kid in Eastern Washington's video (Fireball Tool) and I don't think i've met him and no affiliation just thought good information:


Wood: I agree giving old parts time to get darker and age after putting BLO on them after being stripped will lesson shiny look. also in case you might have newer bolts you might want to find old bolts to clean up and put BLO on to get a closer match.

I agree with Shift that you save using a large amount of Evaporust if you put large items in a bag and shake it a little or turn the bag a few times. have you tried using electrolysis? those big plastic farm feeders are great for large vises and big stuff. another option i've heard guys do for electrolysis tanks is to dig a big hole (think small pond) and put in liner and use them for car frames and bigger stuff.

Lesser: I'm not a welder so my options might have to be Devcon or JB Weld to build up the vise nut. wow a vise barely used (probably the reason why is what you found) and someone damaged it that way.
 

LesserSon

Well-known member
Joined
Feb 7, 2016
Messages
5,086
Location
PA USA
Bonney Lehigh 1010 vise.
Same bevel on underside of the nut, pin looks to have never been removed.
Maybe a feature :)

1 indicates a lazy employee.
2 suggests corporate sabotage!
Maybe those devils over at Victor Vise Co sent in a mole.
 
Last edited:

akasrick

Well-known member
Joined
Apr 10, 2017
Messages
795
Location
south jersey
1 indicates a lazy employee.
2 suggests corporate sabotage!
Maybe those devils over at Victor Vise Co sent in a mole.

Thinking about it. I'm leaning the other way. Surprised one of the family missed out on a patent.
All the garage grease had to go somewhere, would have been a pain to knock the pin out to clean.
Looks like they wanted to sell garage related tools.

attachment.php


akasrick
 

gf0012-aust

Well-known member
Joined
Apr 17, 2011
Messages
172
Location
Adelaide
GF: Fireball Tool did the 8 week rust prevention test with 7 products from the auto parts store that I was mentioning. if you like another Youtuber's video better for this sort of test can you put up the link?

here's the kid in Eastern Washington's video (Fireball Tool) and I don't think i've met him and no affiliation just thought good information:


Have seen the fireball vid (actually subscribe to his vids as well)

Also subscribe to project farm. They both come across as honest and diligent in their vids
 
Last edited:

VRobb

Member
Joined
Oct 4, 2016
Messages
5
Hello gents, this may be my first post.

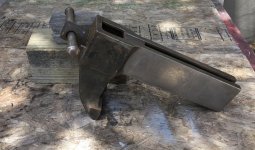
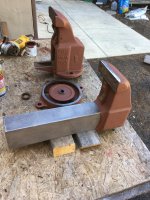
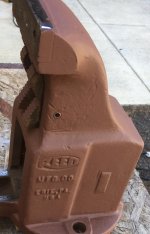
I purchased this American Scale Co Red Seal no. 66 vise. A lady was liquidating her deceased husband's tools and this was listed for $75.

I posted the pics to coax a little help from the gurus (with many vises).

This vice is missing the 5/8" swivel cleats and handles. What is the best way to fabricate or source this hardware? I bought some 5/8 carriage bolts but the flats don't quite fill the swivel slot. My next thought is to use T-nuts in the slots and grind them to fit the curved slot.

Thus far I have wire wheeled and greased all the machined surfaces. There was a lot of paint where it didn't belong. BTW what was the original color? I'm inclined to leave the paint as-is to show the age and history, but I will oil it liberally. I removed the jaws, clean and greased under them. The darn thing is so big, 24" long and 156lbs, that I may build an outdoor workbench for it. I already have a decent HF 5" vise/anvil that I like in my garage. I don't really have room for big bertha in there.

Enjoy the pics gents!
 

Attachments

  • red seal 66 arm.jpg
    red seal 66 arm.jpg
    127 KB · Views: 37
  • American Scale Co.jpg
    American Scale Co.jpg
    99.9 KB · Views: 41
  • red seal 66 base.jpg
    red seal 66 base.jpg
    123.4 KB · Views: 39
  • My new red seal no 66.jpg
    My new red seal no 66.jpg
    149.5 KB · Views: 47
  • red seal 66 nut.jpg
    red seal 66 nut.jpg
    112.2 KB · Views: 41
  • red seal 66.jpg
    red seal 66.jpg
    149.9 KB · Views: 43
  • red seal 66 and HF vise.jpg
    red seal 66 and HF vise.jpg
    146.7 KB · Views: 43

VRobb

Member
Joined
Oct 4, 2016
Messages
5
One more thing, the swivel handle bolt holes are 5/8" on my red seal 66. What is the diameter of the factory bolts? If the factory used 1/2" I don't want to waste my time trying to source 5/8" hardware for this vise.

Although this is 1/2" Wilton brand hardware, it's exactly what I'm missing.
 

Attachments

  • Wilton swivel hardware.jpg
    Wilton swivel hardware.jpg
    149.8 KB · Views: 26
Last edited:

Outlawmws

Well-known member
Joined
Aug 9, 2011
Messages
39,321
Location
The Badlands
I have the same # 66 RS, unfortunately, mine lacks the swivel base, so I can't advise. I have a Kurt machinist base I'm going to use on it though.
 

Shiftless

Well-known member
Joined
Mar 9, 2014
Messages
14,580
Location
East Bay SFO
I’m renovating a well used Reed 3CA
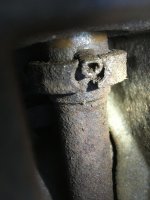
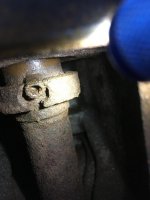
There is a lot of free play in the main screw and here is why. I’ve never seen a worn out collar. Too bad the P.O. didn't put a dab of grease there once in a while.

I can’t fit a hex key in there any more. I tried a couple of different sized EZ outs but no go with that.

Any options but to drill out the set screw? (I don’t weld :( )
 

Attachments

  • 627800DA-FA83-4E20-B728-65A1B7208FF1.jpg
    627800DA-FA83-4E20-B728-65A1B7208FF1.jpg
    78.6 KB · Views: 46
  • 3E8838D7-A757-456A-9D3C-236A2BD84F5F.jpg
    3E8838D7-A757-456A-9D3C-236A2BD84F5F.jpg
    65.5 KB · Views: 40
Last edited:

RTM

Well-known member
Joined
May 13, 2019
Messages
13,241
Location
SF Bay Area
I have always kept broken thread extractors, as the stubs are goos for things like that, a wide shallow hole. Occasionally need to clean up the end to get rid of shards.
 

nutjob

Well-known member
Joined
May 8, 2008
Messages
808
Location
NE, PA
Any options but to drill out the set screw? (I don’t weld :( )

On the few vises I have worked on with a collar and set screw the shaft was not tapped, just a hole drilled the size of the OD of the set screw. Pliers to try to pull it out?

If it is screwed into the shaft do you have ball end hex wrenches? Start small and tap it into the setscrew. This may work to "form" the hex back to shape and than try the next larger size until it fits good than try to remove.

Do you have needle nose vise grips? Might be enough room for those after you get the collar out of the way.

Get a nut that just fits the OD of the screw, cut a slot in it, put over set screw and try the vise grips to squeeze the nut tight onto the set screw.

Good luck!

Kevin
 

Shiftless

Well-known member
Joined
Mar 9, 2014
Messages
14,580
Location
East Bay SFO
Thanks for your suggestions guys.

RTM:
Yeah, an extractor with the tip ground off might be the right tool.
First I will try drilling a small hole in the middle of that screw to allow my new condition extractor to fit more properly into the set screw.
Needless to say, I’ve been soaking the area with penetrating oil to better my odds of success.

nut job:
Right...I’ve never seen a tapped hole in a main screw shaft. Just a rounded depression or a blind hole. I tried needle nosed pliers. No go.
Interesting phrase of yours “get the collar out of the way” Once the collar is out of the way, vise grips will be unnecessary. That set screw will fall out.
As you see in the pic, the hole in the collar is not quite worn enough to be able to slide the collar out of the way...but almost is.
I’m going to try assembling the vise, clamping the jaws together and using the handle to try and open the vise. That little bit of metal left on the collar might just break off. If that doesn’t work, maybe a Dremel end mill might reach in and remove a tiny bit of critical metal.
Wait a minute! I’ll do the Dremel bit first. Then go with that brute force idea with the clamps. Like most of the rest of you guys, I’ve got some serious C clamps.


.
 
Last edited:

nutjob

Well-known member
Joined
May 8, 2008
Messages
808
Location
NE, PA
Interesting phrase of yours “get the collar out of the way” Once the collar is out of the way, vise grips will be unnecessary. That set screw will fall out..

The collar is already broke at the set screw. Use a punch to spread the collar apart and than it should slide out of the way. As you tap on the punch on one side of the break, the other side putting pressure on the set screw might push it out.

Try 2 screw drivers or some type of levers on each side of the collar and force it back past the set screw.

Also, have you tried hitting the set screw with a punch, gentle taps to see if it moves at all?

Kevin
 
Last edited:

Shiftless

Well-known member
Joined
Mar 9, 2014
Messages
14,580
Location
East Bay SFO
progress!

Using a big punch and a dead blow hammer I spread out the ends of the broken collar (thank you nut job) to the point that it would clear the set screw. Good!

That made it clear that the set screw was not just engaged in a divot as expected but threaded into the main screw shaft. Unfortunate!

I gripped it with vise grips, twisted... no go. Squirted on more penetrating oil and letting it sit for a while.

Question: would heating it with a propane torch ruin the temper and make it easier to grind off with a stone on my Dremel? I tried drilling with a quarter inch carbide drill bit. That doesn’t really work. Just polishes the top.
I’d much rather unscrew it and preserve the threaded hole to re use with a new collar.

BTW: that’s a 13 inch long 7/8“ diameter handle.

6x6 and a couple of 2x4s stacked up for blocking the handle in the right position for punching the collar and for a sense of scale. This is a fairly large vise. 5 1/2 inch jaws, 95 pounds

I’m now thinking rather than excessive wear, that this is a wrong sized replacement collar that somebody added at some point.

I have no experience with these late model Columbian Reeds.

.
 

Attachments

  • CC7FEEAF-7C08-41EE-81EE-1FE22A1963A8.jpg
    CC7FEEAF-7C08-41EE-81EE-1FE22A1963A8.jpg
    151.1 KB · Views: 25
  • 734868A2-E7EE-4EE4-A567-ADCD601995AF.jpg
    734868A2-E7EE-4EE4-A567-ADCD601995AF.jpg
    153.7 KB · Views: 33
  • 447697D6-F5FE-4CAA-BDEE-4372887BCAF5.jpg
    447697D6-F5FE-4CAA-BDEE-4372887BCAF5.jpg
    109.4 KB · Views: 34
Last edited:

Outlawmws

Well-known member
Joined
Aug 9, 2011
Messages
39,321
Location
The Badlands
Shift, get some heat on it anyway as heat will often break the grip of the rust. Then go again with the vise grips. get a wrench on those and tap on the head with a punch while you turn (Yeah, you will need a second pair of hands for all that...)
 

Shiftless

Well-known member
Joined
Mar 9, 2014
Messages
14,580
Location
East Bay SFO
Shift, get some heat on it anyway as heat will often break the grip of the rust. Then go again with the vise grips. get a wrench on those and tap on the head with a punch while you turn (Yeah, you will need a second pair of hands for all that...)

Those are all good ideas if I had more room.

I heated that area of the shaft with a propane torch for about a minute and then froze the screw with a shot from an aerosol duster can held upside down. You know...what the can says NOT to do. That’s because liquid shoots out and gasifies instantly at maybe 100 or more below zero. Twist immediately with vise grips.

Nope...even that didn’t work.

So out came the Dremel tool with a cylindrical stone to grind the screw flush. It was slow going because those screws are incredibly hard. But in the end, the screw pulled right out.
 

Attachments

  • 744BD638-685D-4068-878D-9CAC5F70FDF1.jpg
    744BD638-685D-4068-878D-9CAC5F70FDF1.jpg
    99.4 KB · Views: 29
  • 7463500B-291A-4E91-8C7F-0B62D619D0AC.jpg
    7463500B-291A-4E91-8C7F-0B62D619D0AC.jpg
    147.2 KB · Views: 35

steaks&anvils

Well-known member
Joined
Oct 15, 2016
Messages
2,470
Location
Colorado
progress!

That made it clear that the set screw was not just engaged in a divot as expected but threaded into the main screw shaft. Unfortunate!

I gripped it with vise grips, twisted... no go. Squirted on more penetrating oil and letting it sit for a while.

Question: would heating it with a propane torch ruin the temper and make it easier to grind off with a stone on my Dremel? I tried drilling with a quarter inch carbide drill bit. That doesn’t really work. Just polishes the top.
I’d much rather unscrew it and preserve the threaded hole to re use with a new collar.

The set screw looks like the hex hole is still functional? Just deformed into a lozenge shape? Can you scrape more of the crude out of it (with a dental pick)? Then maybe you can customize a hex key with a file so that it will fit the deformed hole? maybe cut the short leg off the key and use a matching socket and breaker bar on it? Kind of like making a custom hex key socket (wouldn't want to destroy a good one).

Edit: too late you cut it off already.
 

Shiftless

Well-known member
Joined
Mar 9, 2014
Messages
14,580
Location
East Bay SFO
s & a:

Thanks

Those are more good ideas. I tried to hammer a slightly oversized hex key into that hole. The steel is too strong and won’t bend and conform. I ground a round hole in the middle of it with a tapered stone in my Dremel and tried an ez out. That didn’t work either.
 
Last edited:

steaks&anvils

Well-known member
Joined
Oct 15, 2016
Messages
2,470
Location
Colorado
s & a:

Thanks

Those are more good ideas. I tried to hammer a slightly oversized hex key into that hole. The steel is too strong and won’t bend and conform. I ground a round hole in the middle of it with a tapered stone in my Dremel and tried an ez out. That didn’t work either.

You're welcome, glad you got it out anyway.

I was that kid who was always taking things apart. So I know a few tricks. However, I am not that kid who could put anything back together again...:lol_hitti
 

Shiftless

Well-known member
Joined
Mar 9, 2014
Messages
14,580
Location
East Bay SFO
On second thought, whatever replacement collar I end up using might not need a hole in that exact spot any way. There are plenty of spots left to drill a new hole to receive the new set screw securing the new collar.

Success with getting the screw problem solved encouraged me to clean and prime the pieces.
The screws holding the jaws seem stuck just as badly as the collar screw so I decided to leave them in and paint around ‘em. This never was intended to be a top shelf restoration. But I will be mounting a pair of Kevin Scott custom made swivel hold downs on the factory 3/4 - 10 studs once those super rusty pieces come out of their Evaporust bath.
 

Attachments

  • 7DAF2DC3-8AC7-4A71-8B8A-FCEF22E077B7.jpg
    7DAF2DC3-8AC7-4A71-8B8A-FCEF22E077B7.jpg
    147.9 KB · Views: 50
  • AA605075-B77C-4542-AE69-F13B145AD1B6.jpg
    AA605075-B77C-4542-AE69-F13B145AD1B6.jpg
    68.6 KB · Views: 49
  • AB59CCA3-6EA4-4CF2-9A4C-4BE730A52C6F.jpg
    AB59CCA3-6EA4-4CF2-9A4C-4BE730A52C6F.jpg
    92.2 KB · Views: 44
Last edited:
To avoid these ads, REGISTER NOW!
Top Bottom