To avoid these ads, REGISTER NOW!

Dumb question, how to cut baseboard to go around a half pole?

NewShockerGuy

Well-known member
Joined
Oct 12, 2010
Messages
2,481
Location
Northern Virginia / DC
Dumb question, how to cut baseboard to go around a half round pole?

The basement is pretty much done. The only thing I have left which I am going to do this weekend is putting the baseboard around my modding room... Everything else is complete, floor done, paints, speaker wire run, tv hung..etc. it will be nice to use the basement as a tv room and general chill area.

I made a thread a while back asking what I should do with the poles that are in the room. Some recommended boxing them in, but a lot said just paint the walls. I did that. Painted and they aren't as bad as I had expected.

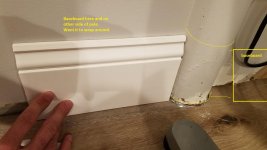
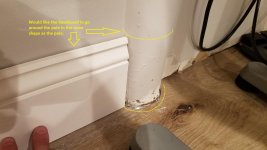
The problem is that half the pole is sticking out. How exactly would I cut baseboard so that it goes around the pole in a half circle going then to the other side of the base board?

IE:
Straight baseboard /angle cut/angle cut \angle cut\angle cut\ straight baseboard to the other wall

IE: So far the only thing I've faced has been 45' (22.5) degree angle cuts and 90' degree angle cuts for corners and half angled walls. I can't imagine this is going to be too difficult for someone that does wood working all day every day but looking at this I'm not sure what I need to do... hence the dumb question, but I've never done it before. I know I am going to have to make a ton of angled cuts but not sure how to calculate?

Couple pics. Sample baseboard that I am using, (I have a lot, this is just a scrap piece). And a picture of the half pole sticking out from the wall.


Thanks,
-Nigel
 

Attachments

  • baseboard1.jpg
    baseboard1.jpg
    112 KB · Views: 371
  • baseboard2.jpg
    baseboard2.jpg
    108.5 KB · Views: 286
  • pole.jpg
    pole.jpg
    47.2 KB · Views: 280
To avoid these ads, REGISTER NOW!

MoonRise

Well-known member
Joined
Nov 5, 2010
Messages
4,031
Location
NJ
You want some flat baseboard trim to go around a curved pole? :lol:

Mini box around the bottom of the pole (your choice of if you want just square 90 deg corners on the box out, or 45 deg, or 22.5 deg, etc), baseboard goes on the boxed out section. Top of the box gets a scribed curve-cut piece of 'wood' (wood, MDF, whatever you want) to cover the top edge of the box/baseboard.

Find some 'bendy' baseboard and bend it around the pole.

If your baseboard is actual wood and not just sawdust (aka MDF), you -might- be able to "kerf bend" the baseboard. Do a test run first if you want to try that approach.

https://www.finehomebuilding.com/2012/02/22/how-to-bend-baseboard-around-a-curved-wall

https://sawdustgirl.com/how-to-make-your-own-flexible-moulding-bend-moulding/

Approximate the curve of the pole by angle cutting and gluing up LOTS of small width/length 'slats' of baseboard into a curved shape. The smaller the width/length of the slats, the smoother the baseboard can approximate the curve. Think cooper barrel and its staves. And then putty or wood filler to really smooth it out.

https://www.houseofhepworths.com/2019/06/26/bend-a-baseboard-around-a-tight-curve/
 

Siegel1719

Well-known member
Joined
Nov 12, 2014
Messages
75
Location
Farmington Hills, MI
Make 4 equal length short pieces with 67.5 degree miters. This will make a half an octagon. Then caulk the small gaps at the top from the trim to the pole. In my opinion this has been very easy to do and looks very nice.

Thanks
Jeremy
 

larry4406

Well-known member
Joined
Jan 27, 2006
Messages
19,603
Location
Northern Virginia
Obviously ship has sailed but I would have either shifted wall ~1-2” so drywall cleared post or boxed it out.

Curfing the back of the base molding to try to get it to bend or buying flex trim are your options now short of boxing it in.
 

kwb

Well-known member
Joined
May 1, 2009
Messages
1,781
Location
PNW
I would back miter the piece on the wall to get close to tangent. Caulk and paint. Small section of pole doesn't have baseboard.

Its the basement and you already have a bump in the wall from the pole so you weren't going for grade-A finishing or you would have firred the wall out and hidden it completely.

Hope that doesn't read as harsh.
 
Last edited:

tcianci

Well-known member
Joined
Feb 7, 2009
Messages
4,242
Location
Walpole, Ma
Fit the baseboard tight to the post on either side and then just paint the pole the same color as the trim matching the height of the base.
 

LXCam

ALLIANCE MEMBER
Joined
Apr 23, 2013
Messages
19,206
Location
AZ
Buy one of these and create a trowel matching the profile of the molding

1_750b209d-2844-4965-ad3d-c6f1c575f646_900x.jpg

A bag of fix-all and get crafty. :spit:
 

Lennyzx11

Well-known member
Joined
Apr 7, 2020
Messages
61
Location
Bennington Vermont
Re: Dumb question, how to cut baseboard to go around a half round pole?

The contour gage or a cardboard template if you must have the curve.
I’d go for a box myself.


Sent from my iPhone using Tapatalk
 
OP
N

NewShockerGuy

Well-known member
Joined
Oct 12, 2010
Messages
2,481
Location
Northern Virginia / DC
Make 4 equal length short pieces with 67.5 degree miters. This will make a half an octagon. Then caulk the small gaps at the top from the trim to the pole. In my opinion this has been very easy to do and looks very nice.

Thanks
Jeremy

I think this is exactly what I'm going for honestly. Thank you! Would the 67.5 degree miters be on both sides of the wood being cut? Just want to make sure I understand it.


MoonRise:
The first half of what you said I wish I understood..lol I'm just not familiar with the terminology or how it's done so to speak. The second part of what you listed helps greatly! My baseboards are wood, not the mdf ****.


Everyone:

The reason why I didn't box this in is because the poles aren't centered in the room. If boxing them in it would have made it even more noticeable. I did do a mock up with pieces of wood and my wife didn't like the look. If they were centered in the room it wouldn't have been as bad. But how it sat it made it even more noticeable.

I wasn't going to shift the wall either as that would have been way too much work for me plus I'm not 100% confident by doing such it wouldn't have made the walls look worse. IE: With taping/mud..new door trim or have to figure out what to do with the doors if they would have been fine...etc. I feel like it would have looked worse by even attempting to make the walls come out more. Previous owner did this or had someone do it so if it was empty and I was getting basement done this wouldn't have been visible at all.

If I back miter the piece of baseboard (previous people did that before, but there was carpet) you would still see the gap in the picture around the round part of the pole.

I don't mind filling in and sanding..etc. That's perfectly fine. I'm trying to do the best as I can since I want to do this once. All joints so far that I've done have been coped which I think looks nicer than the standard 45' and caulk.

I think this all helps now. I just wasn't sure about the angle or how to go about it.

-Nigel
 

Dumber than lumber

Well-known member
Joined
Dec 19, 2015
Messages
1,958
Put a 45* on each of the ends either side of the pole.
So there should be a triangle gap on either side of the pipe. For each side of the pole cut the end of a piece of base with the 45 going the other direction. Trim that mitered piece of trim just short enough to fit in the triangle gap.
Same thing, but other direction for the other side. A little bit of carpenter’s on the ends of the trim will hold it better than a nail.
Wish i could explain it better.
Finish Carpenters call it a return.
 

atch

Well-known member
Joined
Apr 4, 2006
Messages
843
Location
Columbia, Missouri
I was going to write up a long winded procedure but the link that MoonRise posted above in response #4

https://www.houseofhepworths.com/2019/06/26/bend-a-baseboard-around-a-tight-curve/

is pretty close to what I would have written. After I looked at the links there was no reason for me to write it up. I believe that this will give you the best results. Of course they were doing an inside curve and you're doing an outside curve, but the results will be the same. You might want to put a slight angle on all of your cuts to make these small pieces fit even better.

Please post pix of the finished product, regardless of how you do it.
 
OP
N

NewShockerGuy

Well-known member
Joined
Oct 12, 2010
Messages
2,481
Location
Northern Virginia / DC
Put a 45* on each of the ends either side of the pole.
So there should be a triangle gap on either side of the pipe. For each side of the pole cut the end of a piece of base with the 45 going the other direction. Trim that mitered piece of trim just short enough to fit in the triangle gap.
Same thing, but other direction for the other side. A little bit of carpenter’s on the ends of the trim will hold it better than a nail.
Wish i could explain it better.
Finish Carpenters call it a return.

No, I think I understand what you are saying, plus I have enough scrap pieces of small baseboard I can do this on Saturday without worrying that I will be short on baseboards. I was planning on using construction adhesive just a little bit to bond it to the pole for each cut but carpenters glue on the ends would be way less messy!


Since it's paint grade, flexible moulding is available, and that pattern is common. You may check with where you got it, or at a local lumber yard, but here is one example on Amazon.https://www.amazon.com/dp/B006R983Y8/?tag=atomicindus08-20

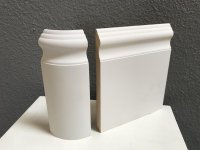
That profile looks just like mine! That's a neat product. I read that they said it should be 6" radius so I'll have to figure out if mine is too small. It's not a large pole, just the typical type that holds up the metal beam that spans the length of the house. But that would completely take the cake if it works. I need about 8 total inches though between both poles. I'm not sure what I'd do with the rest of the 7'..lol


I was going to write up a long winded procedure but the link that MoonRise posted above in response #4

https://www.houseofhepworths.com/2019/06/26/bend-a-baseboard-around-a-tight-curve/

is pretty close to what I would have written. After I looked at the links there was no reason for me to write it up. I believe that this will give you the best results. Of course they were doing an inside curve and you're doing an outside curve, but the results will be the same. You might want to put a slight angle on all of your cuts to make these small pieces fit even better.

Please post pix of the finished product, regardless of how you do it.


Yep that is a good link that was posted above. I'll probably end up trying this as well. My only fear is the base part of the board and seeing a line from the bend. I watched a YouTube video and the dude that was doing this made it work but you could clearly see the shoddiness in the quality because he did a half *** job of filling, making a mess, and then not cleaning anything up on the bottom of the baseboard so you saw a distinct crack/line in it. I'll definitely post pics once I'm done.

As with anything I'm sure this is going to take longer than I think. Hell it took me like a day to actually get my cope joints looking good, now it's no problem.

I did find something like this. It would make it super easy but I can't find the same profile as my baseboard.

-Nigel
 

Attachments

  • round piece.jpg
    round piece.jpg
    113.2 KB · Views: 79

Gotcha640

Well-known member
Joined
Jan 27, 2015
Messages
948
Location
Houston TX
Re: Dumb question, how to cut baseboard to go around a half round pole?

Make a bookshelf/side table/flower pot that sits right in front with a curve cut out of the back?

I haven't looked to see what the room looks like.
 

Dustball

Well-known member
Joined
Jun 25, 2011
Messages
2,081
Location
Hudson, WI
Have someone design/3D print a cap to go around the pole and has the same profile as your baseboard. Once it's painted, should blend in.
 

egdede

ALLIANCE MEMBER
Joined
Dec 20, 2009
Messages
2,103
Buy one of these and create a trowel matching the profile of the molding

1_750b209d-2844-4965-ad3d-c6f1c575f646_900x.jpg

A bag of fix-all and get crafty. :spit:

This for sure. Use the contour gauge to match the profile. Tape the back side pins with blue masking tape, Use this as a contoured trowel to form some fix-all, plaster of paris, or hot-mud. The curved profile will look damn-cool. If you were doing more linear footage, I'd use the contour gauge to make a trowel. But for the small job, tape the pins.
 
Last edited:
To avoid these ads, REGISTER NOW!

Miss the Pontiacs

Well-known member
Joined
Nov 7, 2016
Messages
16,541
Location
Saskatchewan Canada
Would a lathe work? Duplicate the profile on the blank. Hollow it out and cut in half or cut where needed to match to baseboard. Maybe cut it and then hollow out. Only the top has to be a good fit the remainder could be roughly scooped out. Then place baseboard.
 

Innovate1

Well-known member
Joined
Jul 28, 2014
Messages
4,300
Location
Illinois near St. Louis, Missouri
I see someone else already suggested 3d printing. Find someone with a printer, give them a sample of the straight board and the diameter of the pole and it should be pretty easy. Your local maker space should be able to help.
 
OP
N

NewShockerGuy

Well-known member
Joined
Oct 12, 2010
Messages
2,481
Location
Northern Virginia / DC
I'd do 8 pieces, cut at 11 1/4 degrees to make a faceted skirt around it. Use caulk behind to fill the gap. It'll look okay, and not be a lot of work. Or, do like the link above and do a bazillion pieces and use them as kind of a form to guide making a putty baseboard the right shape.

You can also do 4 pieces at 22 1/2 degree cuts, but you need to use a oscilating spindle sander or a bunch of round gouge chisel work on the back to reduce the amount of gapping to make it look good. I've found the 11 1/4 degree angles to be about the sweet spot in balancing looks with work.

I will also try this as well!

I was digging through my pile of scraps and I don't know the angles on the sides that I cut however... I did find 3 of them that fit together. And as you can see if I had more I could put them all together to circle around the pole.
See pic below. Do you thnk the 11 1/4 degrees would produce the similar result? Seems like the middle piece is the best, but I have to figure out what angle that is on both sides and then mimic it.


All:

I don't own a lathe, or router table. That would be nice but I just don't have the room. I do have a hand held router that I used for the door lock plates and mortise hinge plates. I don't know anyone with a 3d printer as that might not be a bad thing as well.
I'll get pictures up here of the room. **** is a mess only because I've been having to move stuff from the one side to the other and back and forth out of the room as I've been finishing different areas of the basement. So the room would not normally be this full of ****. Actually it will be quite clean once this is all done. My desk is gigantic only because I'll have multiple computers and my lab to setup. But this is just my computer/gun/work mod room.

Definitely not going for 100% flawless wood working look as I've realized how much time goes into making baseboards look nice and little details. I just want to hide the gap on the floor around the pole, but didn't want to a break from baseboard, then you see the bottom of the pole, then baseboard again.

I think we are getting close. I'm moving stuff out of the room in about an hour and then will start playing will the ideas tossed around here.


Thanks,
-Nigel
 

Attachments

  • roundpole2.jpg
    roundpole2.jpg
    26.9 KB · Views: 133
  • roundpole1.jpg
    roundpole1.jpg
    24.6 KB · Views: 156

CraigStu

Well-known member
Joined
May 22, 2014
Messages
4,057
Location
Blacksburg, Va
Look at your first picture. Clean up the couple of rough spots on the pipe. Use a tiny bit of caulk at the edge of the trim piece and paint. I would try painting the bottom of the pipe the white trim color on one, and wall color on another. Look at them for a week or so and decide which color looks best. Obviously it's up to you how much time you want to devote to this but it's not the White House or a period museum.
 

CTyankee

Well-known member
Joined
Jan 13, 2013
Messages
3,803
Location
CT
Look at your first picture. Clean up the couple of rough spots on the pipe. Use a tiny bit of caulk at the edge of the trim piece and paint. I would try painting the bottom of the pipe the white trim color on one, and wall color on another. Look at them for a week or so and decide which color looks best. Obviously it's up to you how much time you want to devote to this but it's not the White House or a period museum.

I'm in this camp too. When all is said and done, the rest of the pipe is still going to be there. Sometimes we get tunnel vision and get so focused on a minor detail that will not be given a second glance in a week or so. I understand the whole OCD thing..and for something that's going to be in your face and noticed everyday, I can see wanting to make somethings appearance more eye-pleasing. Not seeing that in this case. Personally, I would have boxed it in, centered or not. But without out a picture of the whole wall it's hard to tell what the best solution would be. JMO.
 

Bert_

Well-known member
Joined
Dec 24, 2016
Messages
9,778
Location
NW Iowa
The little strips look decent. My worry with that is how do you attach it? I wouldn't want to deal with it coming loose down the road.
 

Innovate1

Well-known member
Joined
Jul 28, 2014
Messages
4,300
Location
Illinois near St. Louis, Missouri
If you go with the sectioned approach I would cut kerfs from the back and leave a little of the front side. Angle the kerfs both ways so they aren't really wide at the front and you can get the small radius. That will help hold everything together.
 

John Timmins

Well-known member
Joined
Sep 1, 2008
Messages
861
Location
Flagler Beach, FL
You molding will have a number on the back of it which is the profile of the molding. Use that number and buy RUBBER molding which is made for that purpose.
I bought mine at a place that makes molding. They ordered it for me. I'm sure you can find some online if you search for " rubber molding # _____".
 
OP
N

NewShockerGuy

Well-known member
Joined
Oct 12, 2010
Messages
2,481
Location
Northern Virginia / DC
Almost done with the baseboards now. I am just finishing up the poles. Rest of the room is pretty much done as far as cuts. I just have the few pieces leading up to the poles that I will have to cope leading into the pole trim.

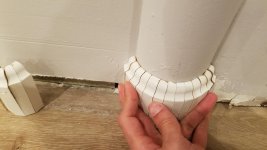
I played around with different angles and sizes and seemed to have found the sweet spot. It's right around 6 degrees and then the pieces are smaller than I initially thought. I was going to do around 8 pieces but found that 13 do a much better job.

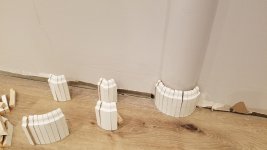
Here is a super rough cut using smaller baseboards since it's easier to play around with than the taller ones. Plus these were getting thrown out so figured chop up the crappy small baseboards to test.

Anyways. Appreciate all the help. I know some thought this was a waste or too much time. But it's ok. For the amount of time I spend on other things this really wasn't crazy. I wish I knew how to box things in. I'll try that another time with some things, I just didn't know how it would attach to the drywall since there aren't studs right by the pole.

I found that trying to hold all the pieces and take a pictures was harder than cutting everything..lol. Very minimal gaps at all when held and squeezed together. The tape sort of illustrates that but not perfect.

I plan on gluing the pieces then filling in any type of gaps or rough spots and smoothing everything out. They should be done today and then I can paint all the baseboards later and in the morning. I'm still running Ethernet drops in the room since my computer desk is changing sides but all in all, I think this will look good.

The reason I couldn't just paint the pole white at the lower section is because with the flooring you would have seen a clear gap that had to be left around the pole. So it would not have looked right and it would have looked unfinished.

Anyways, pics below of rough everything. Will update with finished look here in a couple days.

-Nigel
 

Attachments

  • trim1.jpg
    trim1.jpg
    108.4 KB · Views: 119
  • trim2.jpg
    trim2.jpg
    102.7 KB · Views: 119
  • trim3.jpg
    trim3.jpg
    107.9 KB · Views: 129
  • trim4.jpg
    trim4.jpg
    135.3 KB · Views: 119
Last edited:

Bert_

Well-known member
Joined
Dec 24, 2016
Messages
9,778
Location
NW Iowa
After putty and paint that's gonna look killer.

Lookin' forward to tomorrow's pix.

Ha, you know what they say. "A little putty and paint makes a carpenter what he ain't"

In all seriousness it will look decent.

I think if you wanted it 100% the way to do it would be to glue up some boards and cut it out to fit the curve. Then mould the profile on it. I know that would be well above my abilities thought.
 

PelicanPines

ALLIANCE MEMBER
Joined
Apr 30, 2014
Messages
38,144
Location
New Jersey, USA, Earth, My own reality
Impressive job. Something done by trim carpenters 100 years ago. Lost art of doing a job correctly, with skill.

Be proud of the end result...

I would have liked the missile fin suggestion too... but... you chose the right trim direction.
 

CraigStu

Well-known member
Joined
May 22, 2014
Messages
4,057
Location
Blacksburg, Va
That is looking great. Can any of you suggest a good filler? I use paintable caulk but that is just in corners. Here he needs something that will sand well almost like automotive body filler.
 

CraigStu

Well-known member
Joined
May 22, 2014
Messages
4,057
Location
Blacksburg, Va
That looks great. Can anyone recommend a good filler. I use paintable caulk but just in corners. Here he needs something that will sand well almost like an automotive body filler.
 

PelicanPines

ALLIANCE MEMBER
Joined
Apr 30, 2014
Messages
38,144
Location
New Jersey, USA, Earth, My own reality
That looks great. Can anyone recommend a good filler. I use paintable caulk but just in corners. Here he needs something that will sand well almost like an automotive body filler.

The people that make body filler... make a wood filler. It holds up well and can be sanded.

Smells just as bad as body filler tho... stay ventilated...
 
To avoid these ads, REGISTER NOW!
Top Bottom