To avoid these ads, REGISTER NOW!

What would you recommend to fill this gap?

CarCrazyRDM

Well-known member
Joined
Oct 24, 2015
Messages
298
Location
Raleigh, NC
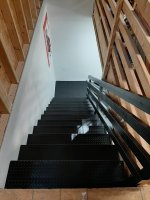
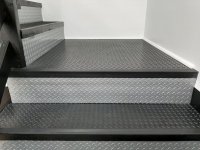
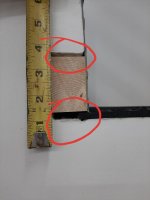
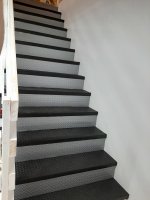
After 4+ years of having my garage built and the interior mostly finished, I'm finally getting around to cleaning up how the stairs have looked. I may create a whole separate post about it when I'm done but my question at hand currently is what would you recommend filling the 1/4" + gap pictured below?

I'm not looking for this to be as perfect as the surrounding sheetrock but I do plan on going over the end of the 2x3 with some spackle and smoothing it out as much as possible before paiting the area, including that wall, black. I just don't know what my best option is for the large gap. I was going to just fill it an inch deep or so with construction adhesive and then top it with spackle but wasn't sure if I was better off using joint compound (i have little experience with JC). I didn't know if it might shrink too much in this large of a gap.

Thanks for any input.
 

Attachments

  • 20200613_202651.jpg
    20200613_202651.jpg
    75.4 KB · Views: 431
  • 20200613_225532.jpg
    20200613_225532.jpg
    53.5 KB · Views: 375
To avoid these ads, REGISTER NOW!

The Cobbler

Super Moderator
Staff member
Joined
Oct 24, 2013
Messages
25,926
Location
Niagara Region, Ontario, Canada
one way would be take a 2x12 (or whatever the stringer width is) and nail it to the side of the stringer. it would look like a "housed stringer"
cut the top & bottom of it to match .
 

didit

Well-known member
Joined
Feb 11, 2020
Messages
892
Location
S.W. Ontario
Why not just run a 1" X 10" trim board with the top edge running bullnose to bullnose and the bottom edge covering the gaps? I have some stairs done that way.

edit: guess that's the same as Cobbler suggested.
 
Last edited:

Bogie1632

Well-known member
Joined
Feb 18, 2018
Messages
1,303
Location
Southeastern Wisconsin
Covering with a board, trim, or even finished ply will likely be your best, long term solution. I've filled some gaps similar to those hoping for the best, only to see cracks form a couple years later from wood expansion movement.

I see some diamond plate. Aside from cost, why not cover the edge with that? Might look pretty sweet if done well.

V/R
Bogie
 

Mack425

New member
Joined
Jun 5, 2020
Messages
3
Location
Richmond,Va
Bondo would make it disappear. You could also cut pieces of 1/4” Lauan Plywood to cover the side of the entire riser and glue, nail and paint it.
 

NUTTSGT

Super Moderator
Staff member
Joined
Sep 14, 2009
Messages
51,004
Location
Northern Central Ohio
It's either the 1x10 or caulk. Joint compound will crack and fall out.

I'm agreeing with Kay on this one. Paintable caulk that will remain slightly flexible as to not crack. It should also allow movement with humidity changes.

The other option to cut some type of wood product and cover it is going to take some work to make all the cuts. Going to need some patience on that for all the trimming.
 

yeldogt

Well-known member
Joined
Jan 2, 2012
Messages
18,184
What was used prior ?

Whoever built the steps did not do them correctly -- you either extend the threads or capture them with the stringer. Normally with utility steps ... it's the latter

It looks like someone must have covered the uppers with something already ?
 
OP
C

CarCrazyRDM

Well-known member
Joined
Oct 24, 2015
Messages
298
Location
Raleigh, NC
Thanks for all the suggestions guys. Can someone show me a pic of what Cobbler and didit are talking about. I have little experience with detail wood work and have never finished stairs before so please excuse my ignorance. I'm not looking for anything fancy here, just looking to hide/blend the end of these boards with some method that isn't going fail and cause me work down the road.

yeldogt, the pics below may help better explain why things are "finished" the way they are. These were just functional stairs in an unfinished detached garage. They weren't ever intended to be finished. I've just put down some commercial rubber treads and a silver diamond plate matting as a riser and had to add the 2x3 to close in the riser so there was something to attach the matting to. I just want to "blend" the end of those boards in with the existing drywall... all of which I am going to paint black.
 

Attachments

  • 20200524_220130.jpg
    20200524_220130.jpg
    95.4 KB · Views: 171
  • 20200612_193633.jpg
    20200612_193633.jpg
    80.1 KB · Views: 153

Dumber than lumber

Well-known member
Joined
Dec 19, 2015
Messages
1,909
That is a janky way they built that. Gap at top and bottom of each filler strip. Do you think the gaps along the entire length of each step will start to bug you later?
 

egdede

ALLIANCE MEMBER
Joined
Dec 20, 2009
Messages
2,094
Did the builder make a run-riser miscalculation (been there done that)?
 

Dustball

Well-known member
Joined
Jun 25, 2011
Messages
2,081
Location
Hudson, WI
Thanks for all the suggestions guys. Can someone show me a pic of what Cobbler and didit are talking about. I have little experience with detail wood work and have never finished stairs before so please excuse my ignorance. I'm not looking for anything fancy here, just looking to hide/blend the end of these boards with some method that isn't going fail and cause me work down the road.

It's a deck but similar concept.

Stairs_Trex_Signature.jpg
 
To avoid these ads, REGISTER NOW!
OP
C

CarCrazyRDM

Well-known member
Joined
Oct 24, 2015
Messages
298
Location
Raleigh, NC
That is a janky way they built that. Gap at top and bottom of each filler strip. Do you think the gaps along the entire length of each step will start to bug you later?

Well I've filled those gaps with 2x3's now... if we're talking about the same gaps. I had to in order to have something to attach the silver diamond mat to.


Did the builder make a run-riser miscalculation (been there done that)?

I'm not sure what you mean egdede. All the steps are the same dimension (mostly anyway, lol).


It's a deck but similar concept.

Stairs_Trex_Signature.jpg

Thanks for the pic Dustball, now I see what they were talking about. This is an idea I had not thought of and may consider. Except the drywall throughout the side of the stair rise is complete on both sections, so I hate to cover it all up. I may try filling these gaps and putting some paint on it and if I don't like how it turns out then running this "housed stringer" may be the best option.
 

egdede

ALLIANCE MEMBER
Joined
Dec 20, 2009
Messages
2,094
It looked like a 2x4 was put on the face of every step. If the top tread depth was 1 1/2 " short, you would do this to fix it. As you made the top tread deeper, the next one is shallower, and so on.

You could also use a narrower board to cover 1/2 the width of the stringer. I'll get a picture of that up later.
 

Firstram

Well-known member
Joined
May 16, 2017
Messages
1,391
If it was an unfinished garage to begin with, those 2x4 risers were only there to meet code. You can't have an open rise of more than 4". Leftover short 2x's are cheap and all over a construction site.

I would glue in door shims as previously mentioned.
 
OP
C

CarCrazyRDM

Well-known member
Joined
Oct 24, 2015
Messages
298
Location
Raleigh, NC
If it was an unfinished garage to begin with, those 2x4 risers were only there to meet code. You can't have an open rise of more than 4". Leftover short 2x's are cheap and all over a construction site.

I imagine you are exactly right about the reason for the riser 2x4.

Buy some 1x3 pine and zig-zag (mitered or **** joints) up the stairs covering the ends of the treads and risers. The finished product will look a little like the picture below except the ends of the treads will be covered by the 1x3 instead of extending beyond it.

https://hw.menardc.com/main/store/2...ponsive/2_Cate_InstallingStairRailsSplash.jpg

Lynden, this isn't a half bad idea. I could use some kind of molding to make it a little "decorative" if I wanted. I might throw a couple of pieces of something up and see what it looks like. Because in the end this might be easier than trying to fill in all these odd ball shapes, and then spackle and sand etc.
 

Lynden

Well-known member
Joined
May 23, 2015
Messages
672
Location
Southern California
Lynden, this isn't a half bad idea. I could use some kind of molding to make it a little "decorative" if I wanted. I might throw a couple of pieces of something up and see what it looks like. Because in the end this might be easier than trying to fill in all these odd ball shapes, and then spackle and sand etc.

Watch this video. He's making false treads in a waterfall design, which is not what you need. You only need the zig-zag part (starting at 18 seconds) that attaches to the outside stringer. Also, you don't need to assemble all of the pieces before attaching them. Each piece can be cut and attached individually.


I would use 1x3s or rip 1x3s down to 2" wide, whichever looks better. Attach all of the horizontal pieces first, each one mitered at the back and square cut at the front. If you want, you can glue on a small piece to cover the end of the bullnose at each tread. Cut and fit each vertical piece, mitered at the bottom and square cut at the top.
 
OP
C

CarCrazyRDM

Well-known member
Joined
Oct 24, 2015
Messages
298
Location
Raleigh, NC
Watch this video. He's making false treads in a waterfall design, which is not what you need. You only need the zig-zag part (starting at 18 seconds) that attaches to the outside stringer. Also, you don't need to assemble all of the pieces before attaching them. Each piece can be cut and attached individually.


I would use 1x3s or rip 1x3s down to 2" wide, whichever looks better. Attach all of the horizontal pieces first, each one mitered at the back and square cut at the front. If you want, you can glue on a small piece to cover the end of the bullnose at each tread. Cut and fit each vertical piece, mitered at the bottom and square cut at the top.


Thanks Lynden, this was useful. I just may do this. In the end covering up the end of my 2x4's is going to look nicer and this method may even be less work than what I had originally planned. I'll throw up a few pieces next weekend and see how it looks. The "skirt" may even give me a nice visual accent if I only paint it black, as opposed to the entire stringer. I'll have to experiment with that as well.
 

pgilmore7

Well-known member
Joined
Feb 12, 2015
Messages
141
Location
Riverview Florida
Thanks for all the suggestions guys. Can someone show me a pic of what Cobbler and didit are talking about. I have little experience with detail wood work and have never finished stairs before so please excuse my ignorance. I'm not looking for anything fancy here, just looking to hide/blend the end of these boards with some method that isn't going fail and cause me work down the road.


yeldogt, the pics below may help better explain why things are "finished" the way they are. These were just functional stairs in an unfinished detached garage. They weren't ever intended to be finished. I've just put down some commercial rubber treads and a silver diamond plate matting as a riser and had to add the 2x3 to close in the riser so there was something to attach the matting to. I just want to "blend" the end of those boards in with the existing drywall... all of which I am going to paint black.


I see an SVT banner in the background of one of your pics. Nice choice of artwork.
 

Copymutt

Well-known member
Joined
Sep 3, 2016
Messages
3,392
Location
Colorado
I’ve filled same w/ door shims. Does it look repaired? Kinda, but not real noticeable and a permanent fix.
 
OP
C

CarCrazyRDM

Well-known member
Joined
Oct 24, 2015
Messages
298
Location
Raleigh, NC
I think I've about decided to go the route of using some 1x3's and just building a little skirt on the side of the stringer. I built a quick mock up for a few steps last night and then painted them... hoping to have the wife hold that up there for me this evening so I can decide for sure (and/or what color to paint it). Thanks again for all the suggestions.


I see an SVT banner in the background of one of your pics. Nice choice of artwork.

Yeah, I have a V, SVT and SRT flag up across the back wall. I've owned three SVT's and three SRT's and my current car, V wagon, is my first V and first GM product ever. I'm just a HP junky at heart... don't care who makes it. :)
 
OP
C

CarCrazyRDM

Well-known member
Joined
Oct 24, 2015
Messages
298
Location
Raleigh, NC
I just wanted to say thanks to Lynden for the suggestion of finishing it out this way. The whole project was a LOT more work than I anticipated but I think the finished product turned out quite nice. I'll probably make another dedicated post about it at a later date. For now, here are some before, during and after pics...
 

Attachments

  • 20200627_143402.jpg
    20200627_143402.jpg
    75.8 KB · Views: 14
  • 20200601_212607.jpg
    20200601_212607.jpg
    132 KB · Views: 14
  • 20200527_214347.jpg
    20200527_214347.jpg
    138.2 KB · Views: 13
  • 20200524_194833.jpg
    20200524_194833.jpg
    80.3 KB · Views: 13
  • 20200524_194752.jpg
    20200524_194752.jpg
    71.3 KB · Views: 13
  • 20200524_194732.jpg
    20200524_194732.jpg
    66 KB · Views: 14
  • 20200524_220130.jpg
    20200524_220130.jpg
    95.4 KB · Views: 14
OP
C

CarCrazyRDM

Well-known member
Joined
Oct 24, 2015
Messages
298
Location
Raleigh, NC
More pics...
 

Attachments

  • 20200712_165649.jpg
    20200712_165649.jpg
    151.5 KB · Views: 14
  • 20200712_153541.jpg
    20200712_153541.jpg
    94.5 KB · Views: 13
  • 20200712_153446.jpg
    20200712_153446.jpg
    77.1 KB · Views: 13
  • 20200712_153424.jpg
    20200712_153424.jpg
    151.1 KB · Views: 13
  • 20200712_153225.jpg
    20200712_153225.jpg
    108.7 KB · Views: 14
  • 20200712_153208.jpg
    20200712_153208.jpg
    93.9 KB · Views: 18
  • 20200712_170748.jpg
    20200712_170748.jpg
    86.4 KB · Views: 11
To avoid these ads, REGISTER NOW!
Top Bottom