To avoid these ads, REGISTER NOW!

VISE REPAIR 101 all vise repairs, lubricants, sources for parts and the tricks to fix

8t6elcamino

Well-known member
Joined
Jul 18, 2019
Messages
58
Location
Texas Panhandle, USA
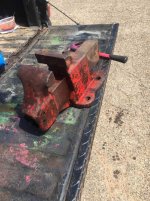
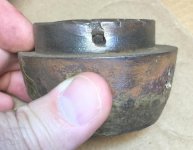
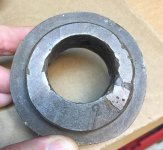
Any ideas on how to separate these two Reed 104 1/2 R halves. They are rusted solid. Finally got it halfway disassembled


Also really kinda damaged the split but nooks where the punch goes in. Any trick to re-square up or re-file these without affecting the threads? IMG_0312.jpgIMG_0313.jpg
 
To avoid these ads, REGISTER NOW!

8t6elcamino

Well-known member
Joined
Jul 18, 2019
Messages
58
Location
Texas Panhandle, USA
Does anyone happen to have measurements for a Chas Parker 436 swivel bolt? It's the bolt that holds the swivel base to the static jaw base.

I bought this vise, and it had been spot welded to a little metal cart, and the swivel mech was seized, so I had no idea that it was missing. Turns out to be a difficult part to come across.

My wife's dad runs a machine shop back home, so I just need the bolt measurements to get another made.

Any help would be greatly appreciated! b12036ec94f893ce8fa598dd84560e70.jpg

Sent from my SM-G960U using Tapatalk


Can you take the main nut/ spindle nut to HD or even better your local faster supply store and get something that fits? If it is too long you can cut the bolt to size with a grinder or hacksaw and chamfer the end.

I was missing the same bolt on a craftsman 51871- mine went thru the swivel base and then engaged with the triangular shaped main nut) and Home Depot had a bolt that worked fine.

As long as it isn’t a crazy acme thread you should be able to find it easy at the store. It just won’t be ‘OEM’


Sent from my iPhone using The Garage Journal mobile app
 

Attachments

  • b12036ec94f893ce8fa598dd84560e70.jpg
    b12036ec94f893ce8fa598dd84560e70.jpg
    80.2 KB · Views: 2

Outlawmws

Well-known member
Joined
Aug 9, 2011
Messages
39,321
Location
The Badlands
Does anyone happen to have measurements for a Chas Parker 436 swivel bolt? It's the bolt that holds the swivel base to the static jaw base.

I bought this vise, and it had been spot welded to a little metal cart, and the swivel mech was seized, so I had no idea that it was missing. Turns out to be a difficult part to come across.

My wife's dad runs a machine shop back home, so I just need the bolt measurements to get another made.

Any help would be greatly appreciated! b12036ec94f893ce8fa598dd84560e70.jpg

Sent from my SM-G960U using Tapatalk

Can you take the main nut/ spindle nut to HD or even better your local faster supply store and get something that fits? If it is too long you can cut the bolt to size with a grinder or hacksaw and chamfer the end.

I was missing the same bolt on a craftsman 51871- mine went thru the swivel base and then engaged with the triangular shaped main nut) and Home Depot had a bolt that worked fine.

As long as it isn’t a crazy acme thread you should be able to find it easy at the store. It just won’t be ‘OEM’


Sent from my iPhone using The Garage Journal mobile app

He's talking about the swivel base center bolt it pivots on.

Your best bet is a std. bolt, a fender washer, and a sleeve cut so its just a bit longer than the thickness of the web of the base.
 

Attachments

  • b12036ec94f893ce8fa598dd84560e70.jpg
    b12036ec94f893ce8fa598dd84560e70.jpg
    80.2 KB · Views: 1

8t6elcamino

Well-known member
Joined
Jul 18, 2019
Messages
58
Location
Texas Panhandle, USA
Any ideas on how to separate these two Reed 104 1/2 R halves. They are rusted solid. Finally got it halfway disassembled


Also really kinda damaged the split but nooks where the punch goes in. Any trick to re-square up or re-file these without affecting the threads? IMG_0312.jpgIMG_0313.jpg


Got them apart, I had to drill out the set screw and in the process mangled the piss out of the pin that holds the set screw. My new plan is to tap the hole in the base where the pin friction fit with some thread of the appropriate diameter and run a thick set screw up and have it be my new pin. Then I will drill through the set screw with a drill press and put a taper pin to interact with the main nut. Picture attached to explain.

Please feel free to suggest a better way, I am sure you all have suggestions/ better ideas. Adjustments.jpg
 

VRobb

Member
Joined
Oct 4, 2016
Messages
5
Hello gents, this may be my first post.

I purchased this American Scale Co Red Seal no. 66 vise. A lady was liquidating her deceased husband's tools and this was listed for $75.

I posted the pics to coax a little help from the gurus (with many vises).

This vice is missing the 5/8" swivel cleats and handles. What is the best way to fabricate or source this hardware? I bought some 5/8 carriage bolts but the flats don't quite fill the swivel slot. My next thought is to use T-nuts in the slots and grind them to fit the curved slot.

Thus far I have wire wheeled and greased all the machined surfaces. There was a lot of paint where it didn't belong. BTW what was the original color? I'm inclined to leave the paint as-is to show the age and history, but I will oil it liberally. I removed the jaws, clean and greased under them. The darn thing is so big, 24" long and 156lbs, that I may build an outdoor workbench for it. I already have a decent HF 5" vise/anvil that I like in my garage. I don't really have room for big bertha in there.

Enjoy the pics gents!

Since my Red-Seal 66 swivel cleats were missing, I first tried using carriage bolts but the heads spun in the slot. Then I purchased some T-nuts as shown, and I ground a subtle radius where they ride in the slot. See yellow lines. Right now I'm just using hex bolts with the t-nuts. It locks up nice and solid now and it swivels just fine. I may try to find a dedicated wrench for the swivel bolts and cut it down a bit.
 

Attachments

  • T nut.jpg
    T nut.jpg
    100.8 KB · Views: 38
  • base slot.jpg
    base slot.jpg
    148.9 KB · Views: 36
Last edited:

cmccoy

Active member
Joined
Sep 2, 2019
Messages
26
Location
S. W. Indiana
Hey 8T6ElCamino, I have a video on the restoration of one of those Reeds. I also have restored many others. Here's a link to the Reed......maybe it will help you. They are amazing vises!
 

kcheves

Active member
Joined
Jul 10, 2016
Messages
25
Hello all. I have a Reed 105 swivel vise that I cleaned up a few years ago, but never fully re-assembled. Getting this sorted is one of my Pandemic projects, but I have an issue.

In the photo below you can see the collar that pushes on the movable jaw, and the hole in the screw that it attaches to. Using a small machine screw.

What is the correct method or sequence for connecting the collar to the screw? When the vise is fully closed, The opening on the bottom of the slide has moved under the fixed jaw such that I no longer have access. If I open it enough to have access, the jaws won’t close fully after I attach the collar.

Thanks in advance for any help.


Kit
San Diego, Ca
 

Attachments

  • 61EF4412-D360-4088-9BC7-7E28F6F2024B.jpeg
    61EF4412-D360-4088-9BC7-7E28F6F2024B.jpeg
    62.1 KB · Views: 36

Outlawmws

Well-known member
Joined
Aug 9, 2011
Messages
39,321
Location
The Badlands
Are you saying that if you don't attach the collar, the dynamic jaw WILL close, but collar o,n it won't?

That makes no sense from here. :dunno:

More pics?
 

8t6elcamino

Well-known member
Joined
Jul 18, 2019
Messages
58
Location
Texas Panhandle, USA
Hey 8T6ElCamino, I have a video on the restoration of one of those Reeds. I also have restored many others. Here's a link to the Reed......maybe it will help you. They are amazing vises!


I actually saw this one. Your vid was the only reason I knew which direction to beat the pin from.
 

8t6elcamino

Well-known member
Joined
Jul 18, 2019
Messages
58
Location
Texas Panhandle, USA
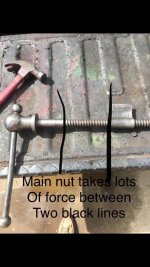
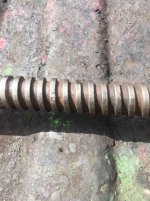
Gents is there any danger to sandblasting the acme thread and on a main handle?

I have a vise that had been outside for 50 or so years and part of the spindle handle is just pitted and nasty as ****. It won’t engage will with the main nut once the vise is within four or so inches of being closed. I don’t have access or the space to rig up an electrolysis tank so I believe sandblasting May be my only option- if it won’t wear down the threads too much.

Let me know talla thoughts.

Adjustments.jpgIMG_0316.jpg
 

VRobb

Member
Joined
Oct 4, 2016
Messages
5
I would start with a wire wheel. It should be less abrasive, depending on which grit you use. A brass wheel would be even safer on the threads.
 

nutjob

Well-known member
Joined
May 8, 2008
Messages
808
Location
NE, PA
Don't sandblast machined surfaces. Period.

It is media blasting. I have never used sand in my cabinet. I have used a fine glass bead on machined parts of a vise, when it is rusted / pitted bad this is not going to make it any worse. Big difference between some vise parts and a lathe ways.

But, if you have a wire wheel on a bench grinder I would use that first. Sometimes I will glass bead than use the wire wheel, this makes the metal look like new.

Kevin
 

GETRIDAONE

Well-known member
Joined
May 21, 2013
Messages
1,549
Location
Auburn, GA
Hello all. I have a Reed 105 swivel vise that I cleaned up a few years ago, but never fully re-assembled. Getting this sorted is one of my Pandemic projects, but I have an issue.

I would remove the slide from the housing then install the collar on the screw and make sure it is not binding. Put grease on the washer, collar, and on the shaft going through the dynamic jaw. Sometimes turning the collar around will make a difference in snug and jamming up. The next thing is the nut has to have a little movement in the mounting slot or could be in backwards ? and also check to make sure the screw is not bent.
Good Luck on getting it fixed.
 

AngryBeaver

Well-known member
Joined
Jul 12, 2017
Messages
1,705
Location
Lake Milton Ohio
Hello all. I have a Reed 105 swivel vise that I cleaned up a few years ago, but never fully re-assembled. Getting this sorted is one of my Pandemic projects, but I have an issue.

In the photo below you can see the collar that pushes on the movable jaw, and the hole in the screw that it attaches to. Using a small machine screw.

What is the correct method or sequence for connecting the collar to the screw? When the vise is fully closed, The opening on the bottom of the slide has moved under the fixed jaw such that I no longer have access. If I open it enough to have access, the jaws won’t close fully after I attach the collar.

Thanks in advance for any help.


Kit
San Diego, Ca

Take the removable jaw out of the vise. install the lead screw into the end of the dynamic jaw and install the collar through the slot/acces area. then install the lead screw all the way into the jaw. then move the collar down to where it is supposed to sit and tighten the set screw on the collar.

you can now reinstall the complete assembly into the vise.

you'll never get the collar in place, trying to open and close the jaw while it is together.

pro tip* when trying to insert the jaw assembly into the main body of the vise, you will have to push in on the center of the lead screw to get the threads to engage on the nut.
 

RTM

Well-known member
Joined
May 13, 2019
Messages
13,241
Location
SF Bay Area
you can now reinstall the complete assembly into the vise. ....


pro tip* when trying to insert the jaw assembly into the main body of the vise, you will have to push in on the center of the lead screw to get the threads to engage on the nut.

I turned my static jaw vertical, and dropped the dynamic into it, it made centering the screw into the nut a bit easier when there is slop in the screw.
 

cmccoy

Active member
Joined
Sep 2, 2019
Messages
26
Location
S. W. Indiana
Gents is there any danger to sandblasting the acme thread and on a main handle?

I have a vise that had been outside for 50 or so years and part of the spindle handle is just pitted and nasty as ****. It won’t engage will with the main nut once the vise is within four or so inches of being closed. I don’t have access or the space to rig up an electrolysis tank so I believe sandblasting May be my only option- if it won’t wear down the threads too much.

Let me know talla thoughts.

Adjustments.jpgIMG_0316.jpg

You can but wire wheeling would be less invasive and probably do everything you need. I also use a straight Muriatic Acid soak for a few hours if my part is super rusty and crusty. It will come out without any rust....just clean metal. The fact that this part is machined is irrelevant now that it is pitted and rusty. The point being, you'll likely do no further harm than what has already been done and you just may get a usable vise again!
 

Shiftless

Well-known member
Joined
Mar 9, 2014
Messages
14,580
Location
East Bay SFO
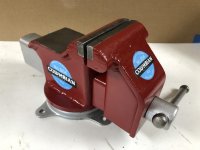
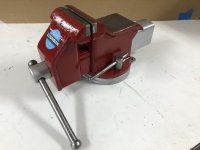
I’m starting a resto on one of those old all steel welded Columbians. Model 804
Bright red glossy paint with reproduction stickers is my plan.

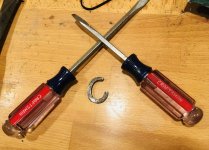
To disassemble completely I need to spread the ends of this retainer clip. The ends were almost touching when I started in with 2 flat blade screwdrivers. This is as far as I got.

Any suggestions on how to spread the ends another 1/8 th so it can release the spindle?

No OXY torch here so that’s out.

WAY too heavy to clip with diagonal cutters.
 

Attachments

  • 2FE45EC2-6818-4645-AB8B-DA5086CB3F8D.jpg
    2FE45EC2-6818-4645-AB8B-DA5086CB3F8D.jpg
    77.8 KB · Views: 44
Last edited:

Tinkerer2

Well-known member
Joined
Jun 19, 2020
Messages
345
Location
Central Florida
I cut into mine with a dremel cutoff wheel. I cut it 180 degrees from the split and went from the end of screw side toward the jaw with the wheel parallel with the screw - shaving off some of the ring. Just wanted to remove some of the metal. This made it weaker so I could more easily spread it apart.
 

va.grouseman

Well-known member
Joined
Mar 26, 2011
Messages
4,965
Location
Southern-Central VA.
I just bought my 4th one of those Shift.---spruced one up and gave it to my youngest son.---He's just starting a new life with a new bride and a new house with a new shop, and he asked me to recommend and find him a good solid vise that could take a licking.---He's pretty rough and tumble so I recommended the 804.---If there was a TRUE anvil vise, the 804 would be it.

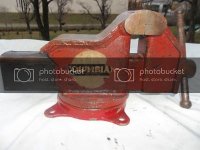
Pics before I spruced it up.---Also hijacked by Photobucket.
 

Attachments

  • 100_0919.jpg
    100_0919.jpg
    21.1 KB · Views: 42
  • 100_0918.jpg
    100_0918.jpg
    18.5 KB · Views: 47
To avoid these ads, REGISTER NOW!

RTM

Well-known member
Joined
May 13, 2019
Messages
13,241
Location
SF Bay Area
I popped a clip off of a Columbian M440, and was thankful I was wearing safety glasses. It shot up, hit me in the glasses, and then ran off to hide in some uncharted section of the garage. Still haven't found it, bought a hardware store hairpin to hold it for now. I just used a big PH screwdriver with a massive tip, and a crescent on the shank to give me controllable leverage. The twisting is probably why it didn't go where it was aimed, and decided to attack me instead.
 

Tinkerer2

Well-known member
Joined
Jun 19, 2020
Messages
345
Location
Central Florida
I haven't gotten my 804 together yet but I bought a 3/4 inch collar with a set screw and have made a divot in the screw for the set screw. Don't think I would ever get another one of those split washer things back on. Hope to finish my project this weekend.
 

Shiftless

Well-known member
Joined
Mar 9, 2014
Messages
14,580
Location
East Bay SFO
Thanks for all of the input guys.
I found success with the 2 screwdriver technique. At the suggestion of friend and fellow GJ member Outlawmws, I put a small object (in my case a drill bit) in between the screwdrivers to act as a fulcrum to get more prying force and distance separation.
I was ready to pullout my Dremel tool to partially slice through on the opposite side as Tinkerer2 recommended. But with a bit more work, this ring popped off.

KMS:
No, I don’t have a replacement yet and I certainly agree that the old one can’t be reused. I imagine the factory clamped them on with a hydraulic squeezer or specialized pliers of some kind.
I plan to use a collar with set screw as a replacement.

Tinkerer2:
Do you plan to use the shaft collar from McMaster-Carr? I see that the regular one is 9/16 inch wide. Have you planned on where the set screw will land in relation to the rather deep groove in the shaft? Might there be a problem there?
Maybe stack 2 shaft collars together?
A big stack of e-clips seems rather inelegant... I suppose a thick washer or 2 and one e-clip would work.

va:
You’re right about the unique ability of the 804 to take abuse. Steel plate will withstand more than a bit of hammering. ;)
(For me, it’s a short piece of railroad rail that serves as my anvil)
 

Attachments

  • 82C2F45C-A375-44FC-B0CC-8EEAB9F65F64.jpg
    82C2F45C-A375-44FC-B0CC-8EEAB9F65F64.jpg
    154.2 KB · Views: 28
Last edited:

Tinkerer2

Well-known member
Joined
Jun 19, 2020
Messages
345
Location
Central Florida
I ordered mine from eBay
(2) 3/4" SHAFT SOLID STEEL ZINC PLATED SET SCREW COLLAR STOP
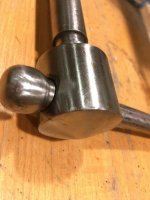
I did have to file the inside a bit to get it to fit the cleaned screw. I put the screw in the dynamic jaw and with the set screw removed I slid the collar on the screw. Once the set collar was in place and allowed maybe 1/16" or less of slack, I marked the center of the set screw hole on the screw with a sharpie. Then I took it apart and bored a small divot for the set screw when I put it back together. And since I removed some (maybe all since I don't know how thick it was) of the zinc plating I thought I'd coat the inside with grease before installing to help prevent rust.

Note that one side of the collar tapers and my plan is to put that side against the back of the jaw to help reduce friction/wear.

I also thought that I'd put a drop of blue locktite on the set screw. Is that a good or bad idea?
 

Attachments

  • IMG_4949.jpg
    IMG_4949.jpg
    107.2 KB · Views: 39
Last edited:

Shiftless

Well-known member
Joined
Mar 9, 2014
Messages
14,580
Location
East Bay SFO
Tinkerer2:
You’re solution looks fine to me. I’d say that the locktite is unnecessary.

Does anybody reading these pages have experience with a shaft collar coming loose even in a vise that is used every day?
 

txlonghorn1989

Well-known member
Joined
Feb 27, 2017
Messages
2,786
Got questions about two vises but I'm gonna ask separately.

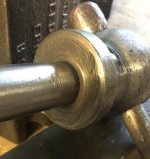
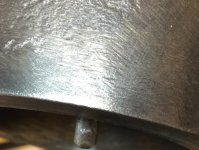
First, I'm cleaning up a Reed 104-1/2 I picked up last year. It appears to have a manufacture date of 11/29 on it. I removed the spindle and main screw from the dynamic jaw. Is there supposed to be any washer sitting between these two parts? You can see some considerable wear on the inside of the spindle where it meets the dynamic jaw. Just want to put it back together like it would have come from Reed back in '29.

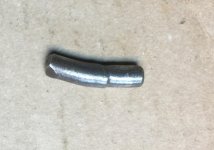
Also, the pin that keep the main screw nut from moving has a pretty good bend in it. Also, that pin measured .2410 (& .2405) for about 3/8" and then gets larger in diameter. The result is, of course, that I can get the pin in 3/8" and that's it. It doesn't sit flush with the bottom. Is that how they were manufactured? Any reason I should consider picking up a replacement?

This is the first time I've removed the main screw nut on a vise. There was maybe 90 years of grease and gunk in there. I had to pound the main screw nut out with a small piece of 3/4" ply. I thought the main screw nut might go back in easily but I can't put it in there with just my hand. I was just checking for a good fit. I haven't put any lubrication on anything yet. I may have to have the 3/4" piece of ply to get the nut back in place after lubrication. Is that normal that it's that kind of tight?

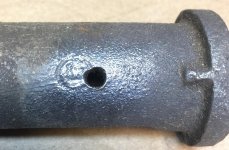
Should I be using grease for all the spots this vise needs lubrication? Was wondering if oil would be better for the dovetailed way of the main nut and where the spindle and dynamic jaw meet? Clearly, Reed thought oil for the main screw given that there's a hole labeled "Oil" to lube the screw. Thoughts appreciated.

Thanks!
 

Attachments

  • IMG_0925.jpg
    IMG_0925.jpg
    76.8 KB · Views: 19
  • IMG_0907.jpg
    IMG_0907.jpg
    91.6 KB · Views: 21
  • IMG_0906.jpg
    IMG_0906.jpg
    112.4 KB · Views: 18

txlonghorn1989

Well-known member
Joined
Feb 27, 2017
Messages
2,786
Second vise is this Wilton 9350 Bullet I also picked up last year. I know some thoughts were shared about it last year but I'm now in the middle of trying to clean it up and see if it's worth saving. Some of you might recall seeing it last year. I picked it up at an estate sale for $40 but it's got some damage. The screw and end piece appear to have been pulled off without removing the two pins holding those parts in place. I know some one speculated that the end piece had probably suffered considerable damage and been repaired. I couldn't say last year but after breaking it down I think that's is correct but I don't have a trained eye in this stuff. Also, the dynamic jaw is seized up and won't come loose from the static which I hope is due to some rust. Hopefully, after an electrolysis bath that'll be resolved. Got a few questions about how I should proceed.

Wondering if I can get what's left of the two old pins out by using a punch and hammer from the outside? IF all things work out would new pins be put in place in the same manner?

I've included pics of the deformation caused when the main nut and end piece were removed with the pins still in place. Also, pics of the holes in the end piece at this point. Even though I've never used JB Weld myself it looks like something like that was used to repair the end piece when it was blown out during removal.

First off, I'm wondering if the vise could still be usable and reliable as is with new pins considering the deformation of the holes on both the main nut and the end piece? Are these bad enough that I should consider looking for replacement parts for both?

Where can I find replacement pins? This is a model 9350. ??

Pics below and I'll add pics of the end piece next post.

Thanks.
 

Attachments

  • IMG_0919.jpg
    IMG_0919.jpg
    153.2 KB · Views: 17
  • IMG_0908.jpg
    IMG_0908.jpg
    107 KB · Views: 18
  • IMG_0911.jpg
    IMG_0911.jpg
    124.8 KB · Views: 18
  • IMG_0912.jpg
    IMG_0912.jpg
    140.9 KB · Views: 18
  • IMG_0917.jpg
    IMG_0917.jpg
    158.4 KB · Views: 17

txlonghorn1989

Well-known member
Joined
Feb 27, 2017
Messages
2,786
Pics of the damaged and repaired end piece (or whatever the proper name of this part is)...
 

Attachments

  • IMG_0915.jpg
    IMG_0915.jpg
    127.7 KB · Views: 26
  • IMG_0913.jpg
    IMG_0913.jpg
    141.7 KB · Views: 25
  • IMG_0916.jpg
    IMG_0916.jpg
    146.5 KB · Views: 31

Outlawmws

Well-known member
Joined
Aug 9, 2011
Messages
39,321
Location
The Badlands
TX, you should be fine punching the pins though. IIR they are not tapered.

You have plenty left in the nut to just go again with pins, but unless you want it 100% factory I'd tap the housing and put in set screws with pin tips. Then you can get them out at a later date..
 

Tinkerer2

Well-known member
Joined
Jun 19, 2020
Messages
345
Location
Central Florida
Finished

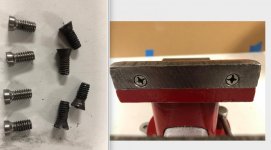
I cleaned, primed, painted and clear coated my Columbian 804. I was able to get the jaw screws out. 2 required an impact screwdriver to remove. Thankfully the thread was standard 1/4-20 and they were 5/8" long. I ordered some machine screws in stainless. The heads were too big so I chucked them in my bench top drill press and used a file to make them smaller. See photo.

Paint was Regal Red and Titanium Silver. I left the anvil section unpainted. I wiped on some Fluid Film to prevent rust. I've had the can of FF for quite a few years. A little goes a long way. Oh, and the anvil section and where the jaws go was taped before painting even though it looks like the areas were painted in the photos. It is actually paint over tape.

I used the collar stop on the screw. I put the smaller tapered side against the dynamic head and put just a drop of blue loctite on the set screw. That 1/16" or so space that I left when I marked the spot to create a divot for the set screw was perfect. Handle turns perfectly and there isn't any noticeable slop.

My daughter is excited to get this vise since it was her great grandfathers whom she never met. She also has his handmade wooden toolbox that he used at work. It's tall enough to sit on (ok maybe a little short) but I was told they sat on their toolboxes when they ate. It's very sturdy.

Well, here are the before, during and after photos:
 

Attachments

  • IMG_4959.jpg
    IMG_4959.jpg
    98.6 KB · Views: 87
  • IMG_4894.jpg
    IMG_4894.jpg
    100.7 KB · Views: 62
  • IMG_4912.jpg
    IMG_4912.jpg
    124.5 KB · Views: 71
  • IMG_4919.jpg
    IMG_4919.jpg
    150.5 KB · Views: 66
  • IMG_4926.jpg
    IMG_4926.jpg
    153.8 KB · Views: 72
  • IMG_4957.jpg
    IMG_4957.jpg
    90.4 KB · Views: 79
  • Jaws with new screws.jpg
    Jaws with new screws.jpg
    93 KB · Views: 70
Last edited:

txlonghorn1989

Well-known member
Joined
Feb 27, 2017
Messages
2,786
TX, you should be fine punching the pins though. IIR they are not tapered.

You have plenty left in the nut to just go again with pins, but unless you want it 100% factory I'd tap the housing and put in set screws with pin tips. Then you can get them out at a later date..

Outlaw, you're talking about threading the existing holes?
 

txlonghorn1989

Well-known member
Joined
Feb 27, 2017
Messages
2,786
Roger that.

I didn't know there were set screws with pin tips. However, a quick search shows only set screw with very short tips. Are you suggesting to also thread the holes of the end piece and then the pin tips would hold the vise nut in place?
 

Shiftless

Well-known member
Joined
Mar 9, 2014
Messages
14,580
Location
East Bay SFO
You did your grandpa proud tinkerer . Nice work :beer:
He’s probably smiling down on your resto and looking forward to seeing his great grand daughter using his old pal.

Sidebar:
I noticed that on your 804 the front of the nose looks to be flat. On mine, it’s conical.
Does anybody else with an 804 have a variation? Are most flat? Are most conical? Is this too minor a variation for even GJ dwellers to consider? :)
 

Attachments

  • 9106EDFB-1B91-40A2-A383-289E5DE69E42.jpg
    9106EDFB-1B91-40A2-A383-289E5DE69E42.jpg
    68.1 KB · Views: 25
  • 7F0F3E8D-D07A-476B-94BE-1FB3E77C7BEE.jpg
    7F0F3E8D-D07A-476B-94BE-1FB3E77C7BEE.jpg
    108.3 KB · Views: 22
  • 152278F4-A880-4A95-95E8-CEF6895CDD35.jpg
    152278F4-A880-4A95-95E8-CEF6895CDD35.jpg
    93.7 KB · Views: 22
Last edited:
To avoid these ads, REGISTER NOW!
Top Bottom