To avoid these ads, REGISTER NOW!

Above 1200 Sq/FT My 34x60 budget build

Wokspaces above 1200 squarefeet.

DJF3

Well-known member
Joined
Feb 15, 2020
Messages
186
Location
British Columbia, Canada
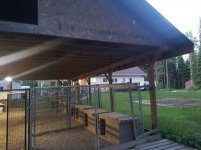
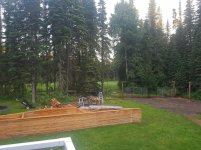
So this project started last winter. In my head at least. My good friend and neighbor allows me use of his shop when needed. Quads, dirt bikes, tractors, snowmobiles, vehicles, etc, I've had all kinds of things in his garage. My kids too. While my house is adequate, there is no shop, and worse yet no concrete to work from. I have a crushed limestone drive, and I'm finally tired of working without. I have a 2 bay carport, and I built a 4 bay pole barn. One bay is enclosed, but still everything is gravel. I also built a 34x40 roof on a post and beam structure. At the time, we were boarding dogs on the side and this structure worked very well for housing the kennel. I recently took a new job that's on a 14 day rotation. The dog kennel gave us a little mad money every year. My new role gets me a lot more mad money! Plus being away for 14 days at a time made it difficult to run a kennel.

So, I decided I wanted a shop. The first thought was to enclosed the carport and pour concrete. This meant changing a roofline, redesigning a basement entrance, maybe adding a bay. That got too complicated real quick. Then the thought was to enclosed the old kennel and pour concrete. But I only had about 9 ft ceiling. The decision was made very quickly to take it down and start over. Reusing the trusses and roofing would save some money too. On paper, 34x40 was too small, so I went to 34 x 50. Here's the best part. My wife asks me if 50 is big enough? Maybe you should go to 60, she says. God, I love that woman!

The decision was made. 34x60. My other neighbor recently built a 40x50x 14. He has one large 12 ft high door. Both his travel trailer and boat do not fit! Very quickly I made the choice to go 16 ft high and not limit myself. I will be putting in a lift one one side as well, so I wanted room for that. I change tires on at least 3 vehicles twice a year. No more floor jacks and working on my hands and knees for me!

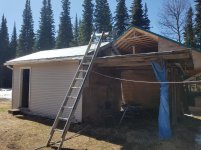
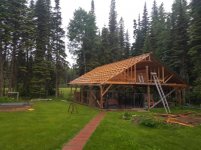
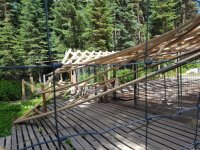
On the the decontruction. The fun begins. I'm on my 2 weeks off and I have a goal in my head of where I want to be when I go back to work. The first order of business was to move a 12X16 shed that was in the way. Tear down a leanto, jack up the shed, and got it moved out of the way. The base was a little rotten, so that will have to be addressed before it gets moved further. I cannot believe the amount of stuff that came out of that little shed! Next, the tin comes off . Not bad. Couple days work. Next, most of the strapping, but not all. The trusses are attic trusses, so then the plywood comes off the floors and walls. Then I start pulling the nails in the hurricane clips holding the trusses to the beam. The plan is to rent a telehandler to get them down. That's how I put them up 6 years ago. So, everything was mostly free and clear. Rent the telehandler and proceed to take down 5 trusses, one at a time.

This is when the fun stopped. Between the frost coming out of the ground late this year, and the amount of rain we have had, the ground was a little soft, but I thought I was safe. Attempting to retrieve the 6th truss, the telehandler punched through the mud and got stuck. It was getting late in the evening so I called it a night. I went out the next morning to reassess the situation. That's when I noticed the trussed racked on me. I quickly retrieved a rope and come a long, and brought them back to vertical. i

had attempted to pull the telehandler out with my pick up, but that didn't work. I had to call a wrecker to pull it out. I attempted to make a corduroy "road", but that failed when the telehandler got stuck again attempting to get to the soft section. This time the pickup was able to pull it out. Phone the rental company to come and get the telehandler. A 4 hour project to take the trusses down was now into day 4!

Contemplating what to next, I was coiling up some extra rope when the trusses tipped over. Right there in front of me! I had failed to realize that they had racked again. I believe they walked on me, and got to the point of no return. Well, trusses were down! I only damaged one fortunately. Got them all stacked and cleaned up the site and returned to work for the next 14 days.
 

Attachments

  • 20200501_121605_resized.jpg
    20200501_121605_resized.jpg
    155.6 KB · Views: 598
  • 20200501_121753_resized.jpg
    20200501_121753_resized.jpg
    157.6 KB · Views: 551
  • 20200617_220154_resized.jpg
    20200617_220154_resized.jpg
    147.2 KB · Views: 534
  • 20200619_204502_resized.jpg
    20200619_204502_resized.jpg
    154.2 KB · Views: 582
  • 20200626_180322_resized.jpg
    20200626_180322_resized.jpg
    156.6 KB · Views: 554
  • 20200628_125740_resized.jpg
    20200628_125740_resized.jpg
    161.5 KB · Views: 561
  • 20200629_211042_resized.jpg
    20200629_211042_resized.jpg
    153.8 KB · Views: 496
To avoid these ads, REGISTER NOW!

cdestuck

Well-known member
Joined
Nov 13, 2013
Messages
1,462
Location
Altoona, Pa
You have a nice project on front of you. Tear down usually takes way too much time and work. Yuck. You planning to do a lot of the new construction and cement work yourself?
 

CraigStu

Well-known member
Joined
May 22, 2014
Messages
4,042
Location
Blacksburg, Va
Looks like a great project. My one thought, noticing your location is do you really want a 16ft ceiling for the entire structure? There will be a lot of heat up there and very little down where you are working. 12 is fine for a lift and regular vehicles so maybe just a 16 wide 16 tall area for an RV. You could wall it off or just hang a tarp as a wall to keep heat from leaking to the RV room.
 
OP
D

DJF3

Well-known member
Joined
Feb 15, 2020
Messages
186
Location
British Columbia, Canada
You have a nice project on front of you. Tear down usually takes way too much time and work. Yuck. You planning to do a lot of the new construction and cement work yourself?

Yes. That's why I'm calling it a budget build lol. During the original design phase I was asked if I was going ICF or traditional forms. I got one quote for ICF for $20,000! I decided very quickly that I can do traditional forms for much less. My labor is "free". If I did ICF on my own, it would still be 30% more, at least. That's if I didn't have any blowouts etc. There is about $5000 in concrete between the foundation and the walls. I will have the slab professionally done, after I do all the ground work.
 
OP
D

DJF3

Well-known member
Joined
Feb 15, 2020
Messages
186
Location
British Columbia, Canada
Looks like a great project. My one thought, noticing your location is do you really want a 16ft ceiling for the entire structure? There will be a lot of heat up there and very little down where you are working. 12 is fine for a lift and regular vehicles so maybe just a 16 wide 16 tall area for an RV. You could wall it off or just hang a tarp as a wall to keep heat from leaking to the RV room.

I'm going to do overhead radiant heat and a fully insulated slab. I've worked in several warehouses with both radiant and forced air. The radiant is actually quite efficient. It heats the objects, not the air. So the slab should stay warm. And any snow or ice will melt nicely off the snowmobiles and trailer. The building will be well insulated as well, and I'm not planning on keeping it super warm. Between 5 and 10 deg C.
 

karoc

Well-known member
Joined
Dec 19, 2017
Messages
2,015
Location
Hemphill Tx
Out of curiosity,about what was rental on telehandler? I was wondering how to handle trusses and get them in air.
 
OP
D

DJF3

Well-known member
Joined
Feb 15, 2020
Messages
186
Location
British Columbia, Canada
Out of curiosity,about what was rental on telehandler? I was wondering how to handle trusses and get them in air.

I can't remember the exact number, but around $300 per day. Plus $120 each way delivery. What started out to be a one day rental turned into about 3 and a half. Plus the tow bill to get it unstuck. Removal of 5 trusses cost me $1300. So much for a budget build! All my wife said is "What's the lesson learned?" I was considering hiring a crane truck, but remember that shed I moved? It was in the way of the crane truck lol.

I tried to sell the shed, but it's overheight and over width to move. Just need pilot cars and permits, but no one wants that hassle. So I think I'm going to move it to another part of the property and use it for a wood shed for the firepit.
 

karoc

Well-known member
Joined
Dec 19, 2017
Messages
2,015
Location
Hemphill Tx
Going to follow your adventure,your bldg is about the size I want to build and sounds like both on tight budget
 
OP
D

DJF3

Well-known member
Joined
Feb 15, 2020
Messages
186
Location
British Columbia, Canada
Today was a busy day doing some running around. Got my plans printed from pdf files for $9 at a local print shop. Shocked how cheap that was. My engineer spec'd several beams over the overhead doors, and long beams to support the mezz. He spec'd LSL beams. My truss builder says LVL are easier to get and virtually the same. He's going to talk to the engineer and see if it can be changed. The engineer also spec'd Simpson Strong Tie HDU11-SDS2.5 anchors. Not sure why such a big anchor. No one carries them, and they are over $100 per anchor. I need 20 of them! Tried to find a source for those. Got some insulation quotes. My old truss manufacturer has gone out of business due to covid. Early retirement. He sold me a lift of 2x6x20 MSR 2100. I brought that home today. 20 ft lumber on a 16ft trailer! It was very light on the tongue. Luckily it was only a half mile away.
 

Attachments

  • 20200715_140217.jpg
    20200715_140217.jpg
    154.2 KB · Views: 314
Last edited:
OP
D

DJF3

Well-known member
Joined
Feb 15, 2020
Messages
186
Location
British Columbia, Canada
Got my permit application submitted today! Now the waiting starts. Also prayin for some drier weather. It has rained so much this year. Already set me back a couple of weeks. I read matt i's post Toolcrib of the North and saw what he went through with footings and rain in the clay. I'm trying to avoud that at all costs! Started moving my 20 ft lumber off the trailer and closer to the build site. Man, that MSR is heavy! Finish that off in the morning, then start forms or the footings. I'm thinking of prebuilding them before I dig, as to limit my exposure to the weather.
 
OP
D

DJF3

Well-known member
Joined
Feb 15, 2020
Messages
186
Location
British Columbia, Canada
It's official! Permit was issued today! Unfortunately, it has rained a couple of times and the ground has remained saturated. I go back to work in 6 days, so not enough time to dig anyways. The weather is supposed to turn around soon. So far, I have on site my 2x6 lumber, the pressure treated sill plate, rebar, starter bars, chairs for the rebar, lumber for footings, half the trusses, half the metal roof. It's starting to come together!
 

67CarGuy

Well-known member
Joined
Feb 6, 2008
Messages
764
Location
Outside Boston, MA
In for the ride! This size seems about right for my current wants too, so I'm interested to see how you finish and fill it out.

Good luck!
 
OP
D

DJF3

Well-known member
Joined
Feb 15, 2020
Messages
186
Location
British Columbia, Canada
So....I'm learning lots as I go. I am not up on what's required for insulation etc. Went into a local wholesale shop and asked for a quote for fiberglass insulation. Told them 2x6 construction. They wanted to know what R value. I am not in the construction business, so I wasn't sure. I told him that, and the response was.."Well, you have to tell me what you want. We are a contractor based business, and the contractors tell us what they want to buy". So I made a somewhat uneducated guess, but I can't remember what R value I wanted. I got a price, but they don't stock that one. Hmm, maybe I guessed wrong.

So I went to a local retail store. I posed the same question....2X6 construction, what do I need? The answer was R22. Got a quote and went on my way. Got looking at my plans at home, and they call for R24 in the walls. So I went back to the retail store and asked for a quote for R24. Oh, it's the same price he tells me. Oh good....then he says it doesn't cover quite as much square footage. He had to go look it up. 50 sq ft coverage for R22, 35 sq ft for R24. The building code changed 2 years ago. It used to be R22, now it's R24. And it's going to cost me 30% more! So it's not the same price.

I am starting to get frustrated with the inadequate skills that some of these people in sales have. Why in the world was I quoted R22 when it's not even code?

I guess the moral of this rant is to educate yourself as much as possible, and don't rely on others if you can help it. Question everything!! My next task is to educate myself on ICF blocks. I have decided to go that route for my foundation walls. Hopefully breaking ground within a week!
 

67CarGuy

Well-known member
Joined
Feb 6, 2008
Messages
764
Location
Outside Boston, MA
In my limited experience most salespeople don't know the current code(s), they know what sells and what gets asked for. You definitely need to be your own best advocate when it comes to materials and quality, especially in this case where you're doing much/all of the work.

You're not trying to build a net-zero energy garage, but you also don't want a windy, leaking shack. So you're absolutely right, you've got to educate yourself. If R24 is required for the walls, I'm guessing you need at least R36 for the roof/attic. I encourage you to look at building an unvented roof assembly - with the right materials, you can use a scissor truss or similar and increase your ceiling height while still keeping the roofline insulated.

I know my dad didn't think to insulate his slab when he built a new 3-bay garage... he didn't see a point at the time. The fact that you're here, asking questions and sharing your progress, is a great sign that you at least know that you (along with the resst of us! :bounce:) don't know everything! :)
 

Bolson32

Well-known member
Joined
Dec 6, 2016
Messages
541
Location
Lake Elmo, MN
I can't imagine r2 being that much difference. Does shop really need to be up to energy code? I can't imagine something that's not a living space having to be up to energy code.
 
OP
D

DJF3

Well-known member
Joined
Feb 15, 2020
Messages
186
Location
British Columbia, Canada
In my limited experience most salespeople don't know the current code(s), they know what sells and what gets asked for. You definitely need to be your own best advocate when it comes to materials and quality, especially in this case where you're doing much/all of the work.

You're not trying to build a net-zero energy garage, but you also don't want a windy, leaking shack. So you're absolutely right, you've got to educate yourself. If R24 is required for the walls, I'm guessing you need at least R36 for the roof/attic. I encourage you to look at building an unvented roof assembly - with the right materials, you can use a scissor truss or similar and increase your ceiling height while still keeping the roofline insulated.

I know my dad didn't think to insulate his slab when he built a new 3-bay garage... he didn't see a point at the time. The fact that you're here, asking questions and sharing your progress, is a great sign that you at least know that you (along with the resst of us! :bounce:) don't know everything! :)

Thanks 67CarGuy! I definitely don't know everything! I'm not sure yet what code is, but the architect spec'd R60 blown in for the roof. I'm pretty sure they are following code. I have to figure out how to do this. I'm using attic trusses, with a metal roof on a 7/12 pitch. I'm sure it's possible since they spec'd it.

I can't imagine r2 being that much difference. Does shop really need to be up to energy code? I can't imagine something that's not a living space having to be up to energy code.

I'm not sure how they would know, but I may not pass my final inspection if it's under code. I have to do some research, but I'm now actually considering going over code. Possibly R36.
 
To avoid these ads, REGISTER NOW!

karoc

Well-known member
Joined
Dec 19, 2017
Messages
2,015
Location
Hemphill Tx
Is there ever a day that we can get by without learning from our mistakes? I haven't had one yet,but dang 1300 that's gotta hurt.
 

CraigStu

Well-known member
Joined
May 22, 2014
Messages
4,042
Location
Blacksburg, Va
I thought this is a garage. There is a code requirement for insulation? Way too many garages w/ no heat and no insulation for me to understand that.
 
  • Like
Reactions: JGT
OP
D

DJF3

Well-known member
Joined
Feb 15, 2020
Messages
186
Location
British Columbia, Canada
Welcome to Canada I guess. My thought is that if you are going to insulate, it must be to the building code. If your not heating or insulating, then that part of the code doesn't apply. You must still follow the code for concrete, structure, etc. If no permit is pulled, then you can do as you wish, but you risk either a stop work order or a demo after the fact it the AHJ deems it to be unsafe.
 

Bolson32

Well-known member
Joined
Dec 6, 2016
Messages
541
Location
Lake Elmo, MN
Welcome to Canada I guess. My thought is that if you are going to insulate, it must be to the building code. If your not heating or insulating, then that part of the code doesn't apply. You must still follow the code for concrete, structure, etc. If no permit is pulled, then you can do as you wish, but you risk either a stop work order or a demo after the fact it the AHJ deems it to be unsafe.

That could be the case, I'm currently in my build and told them the permit was just for a shell. I will eventually insulate it but I'm not going to pull a permit for that.
 
OP
D

DJF3

Well-known member
Joined
Feb 15, 2020
Messages
186
Location
British Columbia, Canada
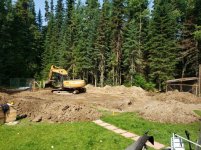
Broke ground today!!! Stuck at work until tomorrow night however. Wednesday morning bright and early I will start making forms for the footings. Finally getting somewhere. I hope to have the foundation walls up within two weeks. Then it's lots of fill!
 

Attachments

  • Resized_20200810_114503.jpeg
    Resized_20200810_114503.jpeg
    64.1 KB · Views: 254
  • Resized_20200810_111618.jpg
    Resized_20200810_111618.jpg
    150 KB · Views: 245

karoc

Well-known member
Joined
Dec 19, 2017
Messages
2,015
Location
Hemphill Tx
I see nothing but woods,that has got to be nice not seeing your neighbors. Looks like good ole country life and one heck of the beginning of a nice shop.Keep pics coming
 
OP
D

DJF3

Well-known member
Joined
Feb 15, 2020
Messages
186
Location
British Columbia, Canada
So ...Wednesday morning I started to build the forms. Continued into Thursday. Friday it rained ALL day! I think the forms were almost floating! Saturday I pumped water. Sunday and Monday were drying out days. I spent those days breaking apart the shed that no one could move, and kept feeding the burn pit. Still a little bit left, but it's now dry enough to work on the footings. Got them squared and mostly straight. Yesterday was spent building a 2 ft x 8 ft garbage bin. Not sure why it took all freaking day, but sometimes that's how things go. Today I got the horizontal rebar in, and about a third of the starter bars. Hand tying rebar is back breaking! Hopefully I can finish it tomorrow. My thought is to level the forms last, after I'm done messing with them. Then the inspection, and we pour concrete!! I'll post some more pictures later.
 
OP
D

DJF3

Well-known member
Joined
Feb 15, 2020
Messages
186
Location
British Columbia, Canada
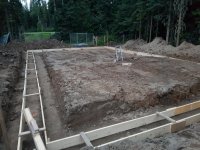
Well, things did not progress as I wanted. I tied in some of the vertical uprights, and designed a way to keep them upright as the concrete was poured. Took most of the day drilling 2x4's so the rebar would fit through. Then fastening the 2x4's to the forms and getting my spacing correct. Then I realized that they would be in the way for finishing the concrete, and all the screw heads would probably be filled and next to impossible to remove. So, I went backwards and removed everything and decided I will wet set all the starter bars. Sigh.

Here are some before and after pics of what I was dealing with. Wet and muddy!

Now I am back at work for two weeks. The horizontal bars are tied in. I hung them with wire from the cross supports. The forms are squared, straight, and leveled. When I get back home I will double check everything, call for an inspection, and pour the footings.
 

Attachments

  • 20200813_205043.jpg
    20200813_205043.jpg
    156.7 KB · Views: 235
  • 20200815_064801.jpg
    20200815_064801.jpg
    149.3 KB · Views: 216
  • 20200815_064830.jpg
    20200815_064830.jpg
    148.4 KB · Views: 215
OP
D

DJF3

Well-known member
Joined
Feb 15, 2020
Messages
186
Location
British Columbia, Canada
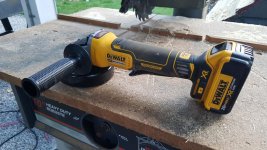
On another note, I got to welcome home a new member of the Dewalt family! I've heard mixed reviews about battery life on these, so I purchased 2 more 5 amp hour batteries to to with the angle grinder. I've got so many 20V Dewalt tools I could make a commercial!

I also purchased all my ICF and underslab insulation, so that is ready when I need it. I thought I would have it at the house rather than find out they were sold out and had to wait a week. Hopefully the footings get done week 1, and the walls get poured week 2 of me being home.
 

Attachments

  • 20200817_195539_resized.jpg
    20200817_195539_resized.jpg
    155.9 KB · Views: 173
  • 20200824_143425.jpg
    20200824_143425.jpg
    162.3 KB · Views: 201
OP
D

DJF3

Well-known member
Joined
Feb 15, 2020
Messages
186
Location
British Columbia, Canada
Time for an update. First day home from my 14 day rotation I spent pumping water from my forms. Called the building inspector and scheduled a footing inspection for the next day. I also called for concrete and they could deliver Friday at 3pm. The inspector arrived first thing Thursday morning and passed the forms. Took one measurement to make sure they were wide enough I guess. He was there for about 2 minutes! I also constructed the boxes for the footings that the sonotubes will sit on. This is to support the post for the mezzanine. Friday afternoon the concrete arrived and the footings poured. We wet set the vertical rebar as they finished the pour. Then Saturday morning I stripped the forms and my son and I started building the ICF wall.
 

Attachments

  • 20200911_161703_resized_1.jpg
    20200911_161703_resized_1.jpg
    153.2 KB · Views: 219
  • 20200911_151101_resized_1.jpg
    20200911_151101_resized_1.jpg
    156.4 KB · Views: 227
  • 20200911_132022_resized_1.jpg
    20200911_132022_resized_1.jpg
    155.6 KB · Views: 237
OP
D

DJF3

Well-known member
Joined
Feb 15, 2020
Messages
186
Location
British Columbia, Canada
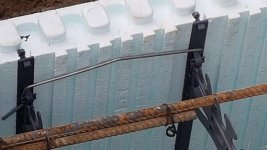
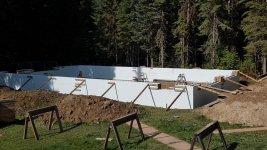
So we start building the first course. I had watched several youtube videos, and had a pretty good idea of what I was doing. You start at each corner of a long wall and build to the center. Then you measure and cut one piece to fit in the middle, if needed. Every joint has clips to hold them together. Every corner has a joint on each side, and the manufacturer recommends clips top and bottom at the corners. You can see the clips in one of the pictures. Towards the end of the first course, I run out of clips.

The wholesaler I purchased the forms from is closed on Saturday. So I phone a local retail outlet who deals with different brand of ICF. I ask to speak to someone who is knowledgeable in the forms, and I get Todd. I explained my situation of needing more clips. My webs are 8" apart. The competitors webs are also 8" apart. They stock the clips. Perfect, I won't be stuck all weekend not being able to build. I take one of my clips to the store, 20 mins away. I tell the clerk that I'm looking for the clips for the ICF. Blank stare. I told him I just talked to Todd about them. Oh, you'll have to wait for Todd to come back. Ok, when is Todd back? He went home for the weekend, he'll be back Monday. SMH. So the store has the product I want, but I can't buy it because no one knows where it is or how to sell it! I get a manager involved and after 15 or 20 mins we finally find a box marked horizontal clips! I brought a piece of my ICF with me to see if the clips would work, and they do! So I finally purchase the box of 250 clips and head home. I was only supplied 48 clips to start with, I figured I needed approximately 150 total. I never did ask why I was short. I think the professionals do it differently, and that's what the wholesaler is used to.
 

Attachments

  • 20200912_183114_resized_1.jpg
    20200912_183114_resized_1.jpg
    153.5 KB · Views: 237
  • 20200913_124749_resized_1.jpg
    20200913_124749_resized_1.jpg
    99 KB · Views: 231
OP
D

DJF3

Well-known member
Joined
Feb 15, 2020
Messages
186
Location
British Columbia, Canada
First course finished, and on to the second. As I get towards the end, I realize that between cutting forms to fit and one damaged form (my own doing), I'm two and a bit forms short. It's now Sunday, so I'll have to wait until Monday morning to purchase more forms. Monday morning I get three more forms and finish the second course. After the second course it's recommended that the forms get spray foamed to the footings. So I ask the wholesaler how much spray foam do I need? He has no idea. Again, I don't know how people are in a sales position and don't know their product! Twice in two days. And multiple times during this build I've run into this. It doesn't help that I don't know what I'm doing, but someone should! Anyway, I purchase 6 cans of spray foam to to approximately 380 ft.

I return home and proceed to straighten and square the forms. Then secure the forms to the footings with the spray foam. I used 5 and a half cans, so I guessed pretty good. There is a learning curve for sure. I maybe could have used one less, but it turned out well. On a side note, don't get that stuff on your hands or fingers. I tried fixing one spot with my thumb, thinking I could manipulate it somewhat. I couldn't unlock my phone with my thumbprint for 4 days!
 

Attachments

  • 20200913_124651_resized_1.jpg
    20200913_124651_resized_1.jpg
    154.5 KB · Views: 223
OP
D

DJF3

Well-known member
Joined
Feb 15, 2020
Messages
186
Location
British Columbia, Canada
When things came to a halt on Sunday, due to a shortage of forms, I checked with my local Home Depot for 2X12x12 pressure treated lumber. They had been out of stock for weeks, and my wife wanted me to finish her raised garden beds. The old beds were a single 2x12, not treated. They have rotted out and needs replaced. Well, they had the lumber in stock finally, so I went down and picked up the rest of what was need for 3 more beds. I had previously done two beds. In total, we have 5 beds, each one 4ft x 20ft. I'm pretty sure a project of this size requires a new tool, right?
 

Attachments

  • 20200915_173554_resized_1.jpg
    20200915_173554_resized_1.jpg
    172.5 KB · Views: 212
  • 20200917_134730_resized_1.jpg
    20200917_134730_resized_1.jpg
    150.3 KB · Views: 208
  • 20200915_173453_resized_1.jpg
    20200915_173453_resized_1.jpg
    155.4 KB · Views: 213
OP
D

DJF3

Well-known member
Joined
Feb 15, 2020
Messages
186
Location
British Columbia, Canada
With more forms purchased Monday morning, it’s on the the third course! I'm gaining speed now because I know what I'm doing (sort of). Get near the end, and this time I'm two forms short. The top course has a taper top to it, so it goes from 8" to 10". Not sure why they do this, but this is what was supplied to me. Again, not knowing, so I went with it. It's builders preference whether to taper to the inside or outside. I chose the inside as my 2x6 sill plate will sit on the outside. Probably makes no difference. If I were to do it again, I would chose straight forms all the way up. Slightly less concrete. So, back I go again to the wholesaler for the last two forms, and I'm finally done! Get everything straight, braced, reinforced, door bucks cut, concrete stops installed and I'm ready for vertical rebar.

I need about 160 pcs of vertical rebar, at 53" each. That 20V cordless angle grinder earned its keep! I built a jig out of 2x4's to feed rebar into, with a stop at the end and a gap at 53". I cut rebar and my son fed the jig. About 5 batteries and one cutting disc later, we were done. Pretty impressed with the grinder, and the 5 amp hour batteries.

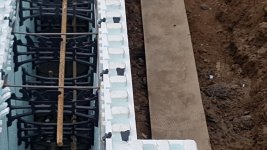
As you build the courses, horizontal rebar gets laid into slots built into the forms. There is no tying in except on the joints. At least I tied the joints. I'm not sure if you have to however. The first and second course are offset from each other, then the third course is the same as the first. Then the vertical is dropped in and "woven" between the horizontal. Again, no tying of the verticals. I even convinced the wife to help set the verticals!
 

Attachments

  • 20200915_182315_resized_1.jpg
    20200915_182315_resized_1.jpg
    147.6 KB · Views: 270
  • 20200915_173338_resized_1.jpg
    20200915_173338_resized_1.jpg
    153.2 KB · Views: 239
  • 20200913_124716_resized_1.jpg
    20200913_124716_resized_1.jpg
    147.9 KB · Views: 215
  • 20200915_173528_resized_1.jpg
    20200915_173528_resized_1.jpg
    152.6 KB · Views: 228
OP
D

DJF3

Well-known member
Joined
Feb 15, 2020
Messages
186
Location
British Columbia, Canada
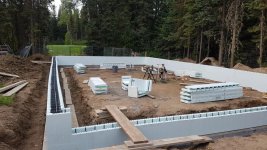
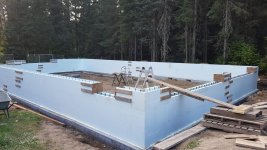
Rebar is in, inspector booked for Wednesday, concrete booked for Friday at noon! Inspector passed the foundation, and cleared me for backfill at the same time. Normally there is another inspection after damp proofing, but because both sides of the wall are backfilled there is no need for it. The damp proofing was returned for credit, so that saved me about $1000 and a bunch of time.

The concrete guys mentioned that it’s difficult to work on the higher forms without some sort of scaffolding. My forms are 18” high, so my wall ended up at 54” on top of a 10” footer. I’m actually now 6” higher than planned, so I have gained 6” inside my shop. When the footings were dug, we assumed 16” forms, giving me a 48” wall. Anyway, I got a bunch of large blocks of firewood that I haven’t split yet and screwed the old 2x10’s from the footing forms to them. Redneck scaffolding. They were pretty happy with it! Now it's back to work for an 18 day stint. While I'm gone, my son will remove all the 2x4's from the forms, and I will get backfilled. Looking at about 30 dump truck loads of pit run! At least I won't have water problems lol.
 

Attachments

  • 20200918_091859_resized_1.jpg
    20200918_091859_resized_1.jpg
    151.5 KB · Views: 221
  • 20200916_121039_resized_1.jpg
    20200916_121039_resized_1.jpg
    158 KB · Views: 216
  • 20200918_123110_resized.jpg
    20200918_123110_resized.jpg
    161.1 KB · Views: 239
OP
D

DJF3

Well-known member
Joined
Feb 15, 2020
Messages
186
Location
British Columbia, Canada
Got my back fill in yesterday. Dump trucks coming and going every 45 minutes. I don't know yet how many loads it took. I'm at work for 10 more days, but then it looks like I'll have 6 weeks straight to work on the slab and the walls. Hopefully get some help along the way and get trusses up too!
 

Attachments

  • IMG_2361.jpg
    IMG_2361.jpg
    104.4 KB · Views: 263
To avoid these ads, REGISTER NOW!
Top Bottom