To avoid these ads, REGISTER NOW!

Small block wall and concrete step project

Jayman17

Well-known member
Joined
Feb 6, 2017
Messages
3,820
Location
Seattle, Wa
Hi all, I thought I would start a thread to show a recently completed project.
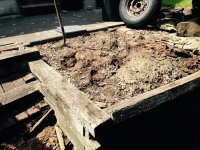
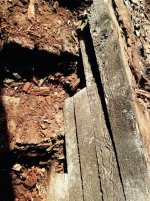
I've been in my house around 33 years and I had to replace a landscape timber retaining wall and steps I put in shortly after I moved in. This is outside my basement door at the back of my house. The garage used to be in my basement but had been sealed off before I moved in. I use this area for a woodshop.
I built a one car garage and carport under the same roofline shortly after I moved in, this is located closer to the alley. The block wall and stair project is situated between the short concrete walls that lined the old driveway. Hope I explained that well enough. Here are some before photos. You can see the stairs were rotten and broken apart.
 

Attachments

  • FullSizeRender 20.jpg
    FullSizeRender 20.jpg
    139 KB · Views: 101
  • FullSizeRender 16.jpg
    FullSizeRender 16.jpg
    157.1 KB · Views: 89
  • FullSizeRender 26.jpg
    FullSizeRender 26.jpg
    150.1 KB · Views: 88
  • FullSizeRender 6.jpg
    FullSizeRender 6.jpg
    157.4 KB · Views: 89
To avoid these ads, REGISTER NOW!
OP
J

Jayman17

Well-known member
Joined
Feb 6, 2017
Messages
3,820
Location
Seattle, Wa
The plan was to take out all the rotten landscape timbers and replace the retaining wall wth concrete block and pour new concrete stairs. Rot proof right?
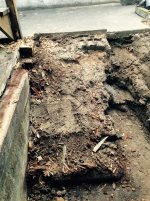
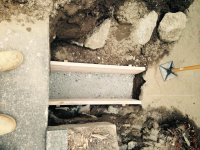
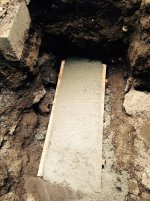
They will last my lifetime. First thing was to demo all the rotten wood and excavate enough to have space to work. This turned out to be more work than I was thinking because I forgot that I buried a lot of concrete rubble years ago when I did it the first time. Let's not forget the fact that I'm not in my mid 20's anymore either lol. Here are some excavation photos.

Jay
 

Attachments

  • FullSizeRender 28.jpg
    FullSizeRender 28.jpg
    149.7 KB · Views: 61
  • FullSizeRender 12.jpg
    FullSizeRender 12.jpg
    162 KB · Views: 60
  • FullSizeRender 14.jpg
    FullSizeRender 14.jpg
    159.9 KB · Views: 62
OP
J

Jayman17

Well-known member
Joined
Feb 6, 2017
Messages
3,820
Location
Seattle, Wa
The concrete on the ground is the actual old driveway and after I was done digging I realized the driveway didn't go back far enough to support the new block wall. It had been broken up at some point, but I don't remember if I did it. This forced me to pour a short footing to support some of the wall. In hindsight I discovered it should have been twice as wide as the block. I think it was around 12" wide but should have been 16". Oh well, it will be fine, it's a short wall and pinned between the stairs and all that dirt on the other side. I did put vertical rebar in the footing but didn't get a pic of it.

Jay
 

Attachments

  • FullSizeRender 24.jpg
    FullSizeRender 24.jpg
    148.2 KB · Views: 79
  • FullSizeRender 10.jpg
    FullSizeRender 10.jpg
    155.5 KB · Views: 68
  • FullSizeRender 15.jpg
    FullSizeRender 15.jpg
    149.1 KB · Views: 67
OP
J

Jayman17

Well-known member
Joined
Feb 6, 2017
Messages
3,820
Location
Seattle, Wa
Next up was actually laying the block wall. Let me tell you, watching someone who knows how to lay block walls makes you think that you can lay block walls. This couldn't be farther from the truth :bounce: I had trouble with a couple areas, like finding the right consistency for the mortar. Watching video of guys flicking it onto the block and having it stay there looked easy. Not so much in real life :confused:. I also couldn't figure out a way to use a string line with nowhere to drive a stake (all surrounded by concrete). I managed to get it placed. It's a good thing it's a short wall in length and height.

Jay
 

Attachments

  • FullSizeRender 4.jpg
    FullSizeRender 4.jpg
    154 KB · Views: 68
  • FullSizeRender 7.jpg
    FullSizeRender 7.jpg
    148.4 KB · Views: 64
  • FullSizeRender 17.jpg
    FullSizeRender 17.jpg
    156.9 KB · Views: 62
  • FullSizeRender 22.jpg
    FullSizeRender 22.jpg
    148 KB · Views: 64
OP
J

Jayman17

Well-known member
Joined
Feb 6, 2017
Messages
3,820
Location
Seattle, Wa
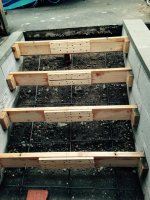
Next up was to layout and form the stairs. I wasn't sure how to do this when the surrounding area is all concrete. After a little research I thought I would fasten the riser form to a block of 2x4 and then fasten that to the concrete wall with a Tapcon. I also cut each form in half with the hopes that it would be easier to remove that way. I then re-joined the halves with 1x4 spliced across the joint.
This made a really stout form and I was feeling good the stair forms would work.
I probably should have mentioned this is pretty much my first attempt at a concrete wall and poured concrete stairs, in case you couldn't tell. :lol:

Jay
 

Attachments

  • FullSizeRender 9.jpg
    FullSizeRender 9.jpg
    153 KB · Views: 70
  • FullSizeRender 30.jpg
    FullSizeRender 30.jpg
    147.8 KB · Views: 79
  • FullSizeRender 18.jpg
    FullSizeRender 18.jpg
    147.4 KB · Views: 70
Last edited:
OP
J

Jayman17

Well-known member
Joined
Feb 6, 2017
Messages
3,820
Location
Seattle, Wa
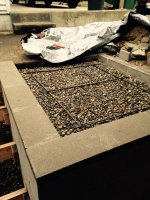
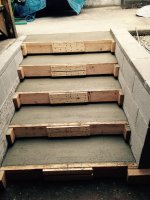
Finally the day I was feeling the most nervous about, actually pouring the stairs. I then made my best decision of the whole project which was to rent a mixer instead of mixing in a tub. Sooo much easier. Never having done much concrete work before I was worried about the concrete setting up too soon etc. if I mixed it manually. The mixer worked great, I used 29 bags on the stairs and the next day about 10 bags for the area contained within the retaining wall. All in all, I am very pleased how it turned out, so much cleaner looking and it won't rot. After suffering with those rotten stairs for a couple years it is a joy to use the new ones. Puts a smile on my face when I use them. :)
 

Attachments

  • FullSizeRender 31.jpg
    FullSizeRender 31.jpg
    85.3 KB · Views: 95
  • FullSizeRender 33.jpg
    FullSizeRender 33.jpg
    117.2 KB · Views: 103
  • FullSizeRender 8.jpg
    FullSizeRender 8.jpg
    111.2 KB · Views: 92
  • FullSizeRender 27.jpg
    FullSizeRender 27.jpg
    118.8 KB · Views: 99
  • FullSizeRender 32.jpg
    FullSizeRender 32.jpg
    89.2 KB · Views: 83

matt_i

Well-known member
Joined
Mar 14, 2008
Messages
10,752
Location
SE Michigan
Great job! What did you do with finishing? Steel trowel or just a whisk broom or did you just mag trowel it?

Im guessing you finished 1 stair then poured the next, etc.

Nice work and I think you will be very pleased with a project you don't have to work on any more :D
 
OP
J

Jayman17

Well-known member
Joined
Feb 6, 2017
Messages
3,820
Location
Seattle, Wa
Great job! What did you do with finishing? Steel trowel or just a whisk broom or did you just mag trowel it?

Im guessing you finished 1 stair then poured the next, etc.

Nice work and I think you will be very pleased with a project you don't have to work on any more :D

Matt, thanks! I put a radius edge on the stairs with a broom finish for traction. Yes I'm glad to be done with this project. I've read your thread and have to say great job on your place, no details ignored for sure. :thumbup:


I am sure you will get all this figured out, give yourself a little time.

Nadogail, thanks for checking in :beer:

Jay
 

txvwnut

Well-known member
Joined
Jan 1, 2015
Messages
7,662
Location
Bedford, Texas
Isn't bag mixing and pouring stairs fun? I did a set for my front porch a few years ago. One side was against the house the other open so I made a negative form to sit against the house and regular form for the open end. Figuring out the forms took me a day to get it where I liked it.
 
To avoid these ads, REGISTER NOW!

atch

Well-known member
Joined
Apr 4, 2006
Messages
843
Location
Columbia, Missouri
Very nice work.

Now that the forms are off if you want to dress up the vertical part of the stairs (rise) you can mix Portland cement and water into a slurry and trowel it on. The result makes the stairs look absolutely perfect.

This isn't a very good description, but I'm sure that some of the experienced concrete guys/gals on here can fill in my blanks and tell you explicitly how to do this.
 
OP
J

Jayman17

Well-known member
Joined
Feb 6, 2017
Messages
3,820
Location
Seattle, Wa
Nice job Jay!

Thank you nitroracer!

Isn't bag mixing and pouring stairs fun? I did a set for my front porch a few years ago. One side was against the house the other open so I made a negative form to sit against the house and regular form for the open end. Figuring out the forms took me a day to get it where I liked it.
Txvwnut, thanks for stopping by. Glad your project turned out well, stairs definitely use a little brain power to figure out. The mixing was less stressful than it would have been doing it manally in a tub, oh and a lot less work. :eyecrazy:

Very nice work.

Now that the forms are off if you want to dress up the vertical part of the stairs (rise) you can mix Portland cement and water into a slurry and trowel it on. The result makes the stairs look absolutely perfect.

This isn't a very good description, but I'm sure that some of the experienced concrete guys/gals on here can fill in my blanks and tell you explicitly how to do this.

Atch thanks, I was wondering about that because there are some areas of dry pockets. Nothing too bad but I would love a nice smooth finish. I will research this, thanks...

Jay
 

atch

Well-known member
Joined
Apr 4, 2006
Messages
843
Location
Columbia, Missouri
...Now that the forms are off if you want to dress up the vertical part of the stairs (rise) you can mix Portland cement and water into a slurry and trowel it on. The result makes the stairs look absolutely perfect.

This isn't a very good description, but I'm sure that some of the experienced concrete guys/gals on here can fill in my blanks and tell you explicitly how to do this...

====================

Atch thanks, I was wondering about that because there are some areas of dry pockets. Nothing too bad but I would love a nice smooth finish. I will research this, thanks...

Jay

====================

Jay,

I wish I could elaborate on how this is done, but I can't. I spent 40 years in the construction industry, but unfortunately I was never a tradesman. I pushed paper; but I've seen it done and seen the results. I think you'll be very happy with it if you find out how from someone who knows how and then giterdun.
 
OP
J

Jayman17

Well-known member
Joined
Feb 6, 2017
Messages
3,820
Location
Seattle, Wa
Hey Jay,

Absolutely awesome! Looking at the pics, I'd guess you've been doing that for a living...

Hey, if you're not busy in a couple of weeks...


...lol

...D

Fourby, haha yeah right, if I did that for a living I would have starved. Thanks for checking out my project and your generous comments. I see you have been busy back in Wyoming lately.

Jay
 
To avoid these ads, REGISTER NOW!
Top Bottom