Re: From losing everything to being cash-poor and shop-rich in "only" five years!
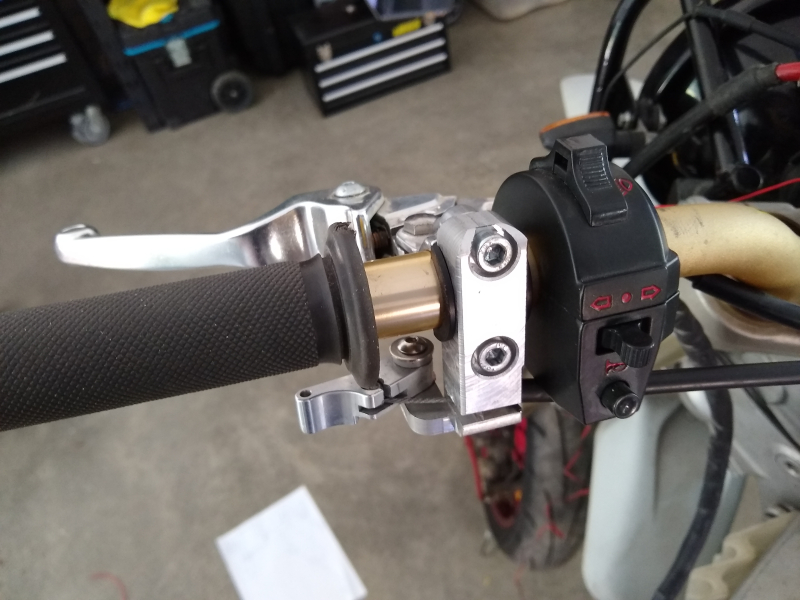
The start of a two-week flurry of to-dos involved draining my dirt bike's cooling system and pulling the radiators to ship them out for straightening. Mounting radiator braces requires that the radiators be out-of-the-box straight, and these were anything but:

They look a lot worse in person and with the plastics still bolted on and bending every which way. In the end, I decided it would be a lot faster, more guaranteed to fit up right, and barely more expensive to just order brand new OEM radiators, so I have those now and am just waiting on the braces to arrive so I can get this bike ready for another central Washington ride in a little over a week's time.
The next unexpected and potentially expensive quagmire involved trying to start up my lawnmower to tame the jungle and nothing happening. I have a Ryobi electric ride-on mower that I like quite a lot, but it's been a little finicky lately with bouts of not wanting to turn on. So...

Digging deeper and deeper with the multimeter, I just couldn't find anything wrong, so I carried on and slid out the battery tray. Stupidly. Without first setting the parking brake. That tray full of battery has to weigh 200 pounds, and once it reached a certain tipping point, the mower shot forward, and my scrawny self certainly wasn't going to stop the tray from sliding all the way out and slamming down to my poor slab (not a single crack). Kind of a slick design, though, with the whole battery pack just sliding out on a tray after removing two bolts:

After a couple of hours of not being able to find any kind of problem, I hooked everything back up on the floor, and the thing suddenly had life. Must have been a loose connection that I "fixed" by unplugging it and plugging it back in again, which is almost a worst case scenario, as it all but guarantees that this will happen again and I still won't know exactly where to look.
With the lawn mowed, it was time to start painting the shop, so that's what I did the following morning. And by "morning" I mean about noon, as I may or may not have gotten sucked down a 3D printing rabbit hole and ordered a printer prior to that... Unfortunately, noon is a little bit late to start on the south wall, so this is how far I got before pathetically throwing in the towel:

It was so hot that day that, in the direct sunlight--which was everywhere by then, any little paint drop that hit the wall would instatly dry, leaving a bump. I got tired of chasing drips and hung it up for the day.
Which turned into multiple days, as the 3D printer arrived impressively quickly, and I couldn't wait to set it up in the shop and play with it! Unfortunately, even in the best of times there's not much of a clear flat surface in the shop on which to set a printer, and currently the shop is buried under multiple projects, so all of the bed leveling and test prints had to happen with the printer on the floor.
Immediately following the bed leveling print (didn't even wait through the whole thing, just verified the first couple of layers were pretty even), I moved on to the Manticore (some kind of griffinlike thing) model that my son insisted on printing:

Pretty stringy mess...

...and not much better after finishing and (tediously) removing all of the supports that would come off. That's its horribly underprinted tail laying next to it. One of the legs also broke off. So much to learn with this thing.
First, though, to finish painting the shop. Which didn't happen. But I at least got out early enough one day to finish the back wall:

Which looked nice with the east wall that I had previously painted:

It was at about this point that I was handed down the shipping container directive, which led to a couple of days of thought and research into plans for making all of my **** fit into the shop without robbing it of what makes it so great compared to the old shop: room to work. I decided that every tool in the shop that needs to be up off the floor better be up off the floor on some kind of table or bench with built-in storage. So a heavy cabinet with drawers and shelves would be an ideal place to keep a printer. Sadly, I couldn't find anything anywhere in the ideal size that had any kind of storage beneath, so I decided to burn a precious day making something myself.
Design goals: Lots of--preferably vibration damping--mass to stabilize the printer, very sturdy, room for storage, fast and relatively inexpensive to build.
What I came up with cost less than $100 all-in thanks to surplus screws and materials I had laying around (7" Headlok screws, for instance, are pretty expensive, but Joey had a whole bucket left over from his garage beam project). It also weighs about 400 pounds and could probably survive an impact from a bowling ball being dropped from space. And it took between six and eight hours from start to finish to complete.
Started with a trip to the lumber yard:

(A lot of that stuff is for a future stand for the lathe, so we'll get to that down the line.) After cutting the 4x4 lumber to length, it was simply a matter of pre-drilling using a template made from an end cut and screwing together with the big Headlok screws:

With my wavy floor, the ability to level the table isn't optional. I used 3/4" grade 8 bolts, nuts, and fender washers as leveling legs:

Speed clamps, as they tend to be, were indispensable when it came to screwing in the last screws to square everything up:

Next step was flipping the table upright, dragging a tarp beneath, and using the feet to level it to as perfect as possible:

Next was forming up for the tabletop. The side forms were spaced out from the table legs 1" using a double layer of 1/2" OSB brad-nailed in, then 3/4" OSB forms were screwed into that using the rotary laser to ensure that the tabletop would be perfectly level when finished:

The top would be poured in place, so the lower forms needed to be inset into the frame and braced with 2x4 ribs that were notched for the frame:

And it's at this point that I went for a swim with my phone, so no pictures of the concrete prep and pour. I stapled down a sheet of plastic to protect the frame from the wet concrete, drilled four 1/2" holes in the support beams and pressed in finger-length pieces of #4 rebar to locate the tabletop to the frame, tied a 4x3 grid of #3 rebar and lifted it about 3/4" up off the bottom (found that broken off sections of a staple gun's reload strips worked great as rebar chairs).
The pour went interestingly. Since it was only going to be four bags of countertop mix, I figured I could get away with just mixing half-bags at a time in a 5-gallon bucket with a mixing paddle on the joist drill. Worked great until a bag and a half in, at which time every battery I own decided to be completely drained at the same time (certainly wasn't my fault...). Sent my daughter scrambling to bring me the wheelbarrow and switched to mixing all the rest at once with a shovel, getting wet mix into the form before the initial few bucketloads could fully harden.
Which is about then I remembered, "Uh oh. Totally forgot to brush any release agent on those forms..."
After some ham-fisted finishing (I'm not concrete pro), I left the table to cure overnight.
And here it is:


In spite of my fears, the forms unexpectedly fell off on their own after I took the screws out, so no worry there. There are a few voids in the bottom of the slab as a result of being busy frantically mixing in the wheelbarrow instead of working the first few dumps into the nooks and crannies, but I'm going to call it "character." I had originally planned on giving it a light diamond grind, but I actually like the imperfect look of my shoddy finishing work, so I'm leaving it. I did move the table outside and hit the edges and corners lightly with the diamond wheel, but that's it. I also added the angular gussets to the frame from a leftover 4x4 to take out a little wobble it had before. It's completely rock solid now.
Long days at work the next couple, then I hope to find time to rearrange the shop and clear a path to push the table to its new home and get the printer on top. Eventually, there's a shop with two more walls and a lot of trim that still need paint. It never ends.
Anyway, there's 700+ pictures.


")

