To avoid these ads, REGISTER NOW!

VISE REPAIR 101 all vise repairs, lubricants, sources for parts and the tricks to fix

txlonghorn1989

Well-known member
Joined
Feb 27, 2017
Messages
2,786

Get, Thanks for sharing the link. Very good info. I'm not a metalworker and between the wear and tear of all my years and a right wrist (I'm right handed) that's been needing to be fused for a couple of years I just don't think I have the fine motor skills in my hands to be able to do this. I wonder did KMScott ever sell these pins to folks?
 
To avoid these ads, REGISTER NOW!

Shiftless

Well-known member
Joined
Mar 9, 2014
Messages
14,599
Location
East Bay SFO
Tinkerer2:
Curious that mine has the conical nose. I wonder if this was a really early production run before Columbian realized that a flat nose was faster, easier, and less expensive to produce?

BTW, like yours, mine has no provision for pipe jaws, unlike the ad.

va.:
Did any of yours have pipe jaws?


.
 
Last edited:

va.grouseman

Well-known member
Joined
Mar 26, 2011
Messages
4,965
Location
Southern-Central VA.
Tinkerer2:
Curious that mine has the conical nose. I wonder if this was a really early production run before Columbian realized that a flat nose was faster, easier, and less expensive to produce?

BTW, like yours, mine has no provision for pipe jaws, unlike the ad.

va.:
Did any of yours have pipe jaws?
--------------------------------------------------------------------------------------------------------


No, none of them.---Would like to get ahold of one of those.
 

Shiftless

Well-known member
Joined
Mar 9, 2014
Messages
14,599
Location
East Bay SFO
Would anyone happen to know the part number of a freeze plug that would fit a Wilton C2? Brass or steel?

The last time I put a freeze plug into a bullet vise, I just took the dynamic down to the parts store and matched it up. The counter man or woman should be grateful for a different challenge to break up the monotony of his job.

But you’re right that it would be way easier to just get the part number and order one mailed to your house.
Have you put your caliper in there to find the exact OD the freeze plug would have to be in order to fit? There must be a chart online with the specs for various freeze plugs. You might have to file away a few thousandths to get the right fit.
 
Last edited:

Mr. Wonderful

Well-known member
Joined
Jan 15, 2018
Messages
1,781
Location
Pacific Northwest
Shift,

I don't have my hands on the vise yet. I am refurbishing a C2 for a friend and I just gave it the once over so he can start ordering parts.

If anyone has a recommendation for type of steel to use on a new handle I could use it. On my beat up 4500 I used thread on balls because I dont have a lathe. With a 3/4 rod I had to use 1-7/8" balls to match the threads. I don't want to go that big again if I don't have to. If i could buy some of the type that you peen over I would try that. Does anyone know a place to get those??
 

txlonghorn1989

Well-known member
Joined
Feb 27, 2017
Messages
2,786
I've cleaned up a Reed 104-1/2 I picked up last year. It appears to have a manufacture date of 11/29 on it. I removed the spindle and main screw from the dynamic jaw. Is there supposed to be a washer sitting between these two parts? You can see some considerable wear on the inside of the spindle where it meets the dynamic jaw. Just want to put it back together like it would have come from Reed back in '29. Thanks!
 

Attachments

  • IMG_0906.jpg
    IMG_0906.jpg
    112.4 KB · Views: 23
  • IMG_0907.jpg
    IMG_0907.jpg
    91.6 KB · Views: 27

Mr. Wonderful

Well-known member
Joined
Jan 15, 2018
Messages
1,781
Location
Pacific Northwest
I was also going to recommend 1144 like Kevin. However, it's quite strong stuff, and if push comes to shove, it will likely not act as a fuse were something to break or bend. If you're the only user, that's probably not a concern.

Clapped,

Thanks, I appreciate the input. This one unfortunately is not mine, it's going to a friend who wanted his first serious vise. It's actually surprised me I've had two friends that aren't into vises come to me wanting help in finding an heirloom to pass down. Both of them stepped up when the time came and spent decent money and traveled significant distance.

I've had others that can't fathom spending more than the going rate at Home Depot on something that is "old and needs work". Or they think they should be able to find Wilton or Reed for a good price in a week or two.
 

Shiftless

Well-known member
Joined
Mar 9, 2014
Messages
14,599
Location
East Bay SFO
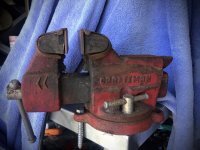
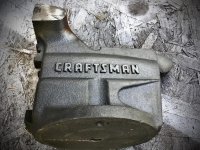
Some regulars have already seen the results of hot simple green soaks for stripping paint. But if some of the newer guys haven’t, here is one I pulled out of the soup this afternoon.
This is a Craftsman 391.5180
It was cast in Japan (BF foundry mark)
As you can see by looking at the second photo, the workmanship is first class. I couldn’t find a single void anywhere.

It would be interesting to do this treatment to a Harbor Freight vise and look for voids that were filled at the factory. I bet you’d find a few.
 

Attachments

  • 6F5E1950-0C2B-4360-8AFD-B3DBC8565C88.jpeg
    6F5E1950-0C2B-4360-8AFD-B3DBC8565C88.jpeg
    95 KB · Views: 37
  • DC16FD1A-CB5D-4E98-8F19-C2F25938AD6B.jpg
    DC16FD1A-CB5D-4E98-8F19-C2F25938AD6B.jpg
    152.8 KB · Views: 42
Last edited:

larry4406

Well-known member
Joined
Jan 27, 2006
Messages
19,603
Location
Northern Virginia
Some regulars have already seen the results of hot simple green soaks for stripping paint. But if some of the newer guys haven’t, here is one I pulled out of the soup this afternoon.
This is a Craftsman 391.5180
It was cast in Japan (BF foundry mark)
As you can see by looking at the second photo, the workmanship is first class. I couldn’t find a single void anywhere.

It would be interesting to do this treatment to a Harbor Freight vise and look for voids that were filled at the factory. I bet you’d find a few.

The results of the hot simple green soak are impressive! Did you use a dedicated crock pot?
 

Shiftless

Well-known member
Joined
Mar 9, 2014
Messages
14,599
Location
East Bay SFO
The results of the hot simple green soak are impressive! Did you use a dedicated crock pot?

Yes.
I got mine free at the local recycling center but you can also find them at just about any thrift store for $5-10

Or maybe the one in your kitchen is looking a little beat up and you can buy a new one for the kitchen and put the old one in the garage.
 

Attachments

  • 8D001B7B-7D6C-4E74-A511-873F9171E8F5.jpg
    8D001B7B-7D6C-4E74-A511-873F9171E8F5.jpg
    123.4 KB · Views: 38
  • 1C6B0ED4-5499-4B69-9662-08779A667011.jpg
    1C6B0ED4-5499-4B69-9662-08779A667011.jpg
    101.5 KB · Views: 38
  • DD71C624-6253-4ACC-91ED-0642ACDAB22B.jpg
    DD71C624-6253-4ACC-91ED-0642ACDAB22B.jpg
    131.8 KB · Views: 36

larry4406

Well-known member
Joined
Jan 27, 2006
Messages
19,603
Location
Northern Virginia
Yes.
I got mine free at the local recycling center but you can also find them at just about any thrift store for $5-10

Or maybe the one in your kitchen is looking a little beat up and you can buy a new one for the kitchen and put the old one in the garage.

How long did that have to stew in the pot?
 

Shiftless

Well-known member
Joined
Mar 9, 2014
Messages
14,599
Location
East Bay SFO
How long did that have to stew in the pot?

Depends
Some paint falls off quickly (1-2 hours) while others takes all day. Just check the stew & pull the piece up once in a while to see how things are progressing.

If a guy lacks patience, this is not a good paint stripping technique. For me, I’m always doing something else anyway so I just plop it into the crock pot and go off to do whatever. I don’t run mine at night when sleeping. But if it’s hot at 10 PM for example, I’ll just pull the plug and let it sit gradually cooling off until morning. That’s plenty of time for just about any paint to let go. Then the part is cool and I can take it outside to pressure wash.
You can reuse the Simple Green many times. I keep my used SG in a labeled 2.5 gallon plastic jug. You might want to filter it going back into the jug to remove some of the paint sludge. I have a stainless steel filter funnel for that purpose.
 
Last edited:
To avoid these ads, REGISTER NOW!

larry4406

Well-known member
Joined
Jan 27, 2006
Messages
19,603
Location
Northern Virginia
Depends
Some paint falls off quickly (1-2 hours) while others takes all day. Just check the stew & pull the piece up once in a while to see how things are progressing.

If a guy lacks patience, this is not a good paint stripping technique. For me, I’m always doing something else anyway so I just plop it into the crock pot and go off to do whatever. I don’t run mine at night when sleeping. But if it’s hot at 10 PM for example, I’ll just pull the plug and let it sit gradually cooling off until morning. That’s plenty of time for just about any paint to let go. Then the part is cool and I can take it outside to pressure wash.
You can reuse the Simple Green many times. I keep my used SG in a labeled 2.5 gallon plastic jug. You might want to filter it going back into the jug to remove some of the paint sludge. I have a stainless steel filter funnel for that purpose.

Speed seems no worse than electrolysis and easy premade gizmo.
 

toys4dlr

Member
Joined
Mar 1, 2020
Messages
11
Location
Phoenix, AZ
Does the soak in simple green leave any residue on the surface? Will fresh paint adhere well? How about flash rust? Keep that away too? Got to go find another old rusting vise to try the simple green method. Lol

Sent from my SM-N960U using Tapatalk
 

Shiftless

Well-known member
Joined
Mar 9, 2014
Messages
14,599
Location
East Bay SFO
Does the soak in simple green leave any residue on the surface? Will fresh paint adhere well? How about flash rust? Keep that away too? Got to go find another old rusting vise to try the simple green method. Lol

Sent from my SM-N960U using Tapatalk

SG doesn’t remove rust. But it’s great for removing old grease, dirt, and paint.
You want Evaporust to remove rust.

As I said, you have to rinse off the residue. I used to use a brass brush under running water. I now use a cheap low power electric pressure washer. It’s important to dry parts immediately. I use an old towel and a heat gun.
 
Last edited:

CentenIJ

Well-known member
Joined
May 11, 2020
Messages
241
Hi all, I got this Wilton 1765 I am restoring and I just found a crack on it. Any advice on what to do? It doesn’t go very deep, maybe 1/4 of an inch.
 

Attachments

  • IMG_2775.jpg
    IMG_2775.jpg
    151.3 KB · Views: 66

JonSayre

Member
Joined
Jun 26, 2020
Messages
8
Location
Tacoma Washington
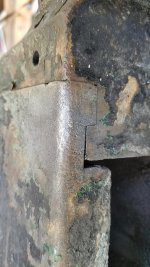
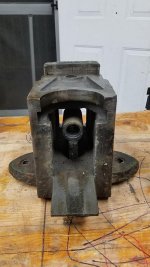
I picked up this Prentiss No. 5 fixed base 6 inch wide swivel jaw vise as a fixer project. I was able to free up the swivel jaw pin, and was also carefully able to remove and clean up the swivel jaw. I notice 2 small cracks, one on each side of the flange that captures the swivel jaw.

My questions are...
-Is this a common occurence?
-Should I leave it alone and not worry too much about them?
-Or should I grind each crack out a bit and tig weld them solid again?

The vise is operating just fine the way it is, but I plan to tune it up a bit over the next couple months making it operate even better.
 

Attachments

  • 20200726_113015.jpg
    20200726_113015.jpg
    152.9 KB · Views: 74
  • 20200726_113031.jpg
    20200726_113031.jpg
    147.7 KB · Views: 73
  • 20200726_111940.jpg
    20200726_111940.jpg
    92.2 KB · Views: 77
  • 20200726_112002.jpg
    20200726_112002.jpg
    109.6 KB · Views: 71

Shiftless

Well-known member
Joined
Mar 9, 2014
Messages
14,599
Location
East Bay SFO
Smitty, having dozens of those is the guy to say how common those cracks are. My advice would be to leave them alone and not use that vise for super heavy duty work. The swivel jaw models aren’t suitable for the heaviest of work anyway.
 

JonSayre

Member
Joined
Jun 26, 2020
Messages
8
Location
Tacoma Washington
Well I could not leave well enough alone! If it ain't broke, fix it til it is, right???

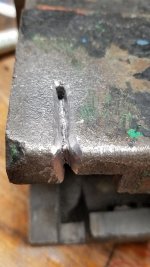
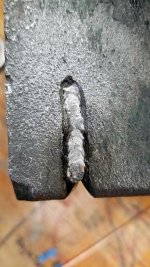
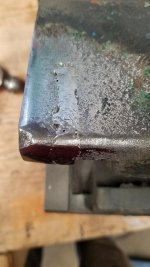
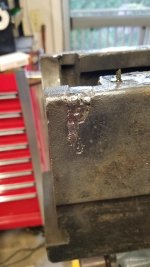
I decided to tig weld the cracks that formed in the shoulders of the swivel jaw race. Both sides were cracked and I want this vise to be a user until I come across a 6" inch Athol or Starrett.

Using a 10x loupe I chased down the tail of the crack and drilled a termination hole. I did a quick wire brushing of the immediate area surrounding the crack, to prevent any old paint from fuming while welding. Then I hogged out a deep v shaped valley to make weld passes in with a tapered tungsten carbide dremel bit. I followed that up with some hand filing to create even consistent valley shoulders to keep the heat zone as consistent as possible.

I live in Washington State and there happens to be a company near me that specializes in selling various soldering, brazing and welding fillers specifically designed for repairing cast iron items. Mike at Muggy Weld suggested I use their "77 cast iron weld" filler rod 3/32" diameter after I determined that the vise was likely made of a form of gray cast iron. The filler rod is designed for stick welding so in order to use it for tig welding the outer coating needs to be removed by soaking in water then scraping clean while still submerged. After scraping I cleaned the filler rod a bit more with fine sandpaper then wiped it clean with rubbing alcohol.


Welding cast iron is tricky no matter what, so I expected impurities and porosity and planned to ebb and flow with the additional complications as they came along. My goal was strength before beauty.

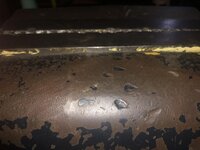
Short 1/2" long weld passes and substantial peening of the weld immediately after each pass is critical to prevent the weld from cracking while cooling. So I made sure to have my ball peen hammer and a nail punch ready, ( the punch is to reach into the valley where the ball peen hammer wouldnt quite fit during the root pass) I warmed up the immediate weld zone with a map/oxy torch on low heat for only a minute or two just to warm things up, there is no need to heat the entire part with this filler.

For starters, I'm a hack welder at best and the welding process was tricky for me as expected. I ended up running at 90 amps for the deep root weld and then backed off to 80 amps for the final 2 passes. Straight Argon gas. Getting each side of the cast iron valley to accept the filler was tricky, but with a bit of throttle control and weaving it worked really well. After the valley was filled I carefully filled the best I could, the cosmetic low spots caused by porosity in the cast iron using about 70-75 amps throttled on the foot. Again peening after every 1/2" pass.

Immediately after all welding was done I peened the entire weld lightly for another minute or so while it was still hot.


Once cooled, I ground the welds down to meet the cast surfaces. I still need to touch up the inner shoulders of the round race, which will be easy with my hand held milling machine(hand files) :eyecrazy: For now I decided to not weld the inside of the race as I think it may actually do more damage than good.

Next up for this old chomper is to tune the swivel jaw to "swivel" a touch more freely and then shim the lower slide race to remove some of the jiggle.
 

JonSayre

Member
Joined
Jun 26, 2020
Messages
8
Location
Tacoma Washington
Here are a few pics of the first side.
 

Attachments

  • 20200731_212407.jpg
    20200731_212407.jpg
    87.2 KB · Views: 68
  • 20200731_231538.jpg
    20200731_231538.jpg
    86.5 KB · Views: 72
  • 20200801_071135.jpg
    20200801_071135.jpg
    127.6 KB · Views: 75

JonSayre

Member
Joined
Jun 26, 2020
Messages
8
Location
Tacoma Washington
Here is the other side, the valley, the preheat, the raw peened weld, and the final ground surface. Again, I still need to file the inner race smooth and then give this handle a good crank!
 

Attachments

  • 20200801_182201.jpg
    20200801_182201.jpg
    57.4 KB · Views: 86
  • 20200801_184239.jpg
    20200801_184239.jpg
    84.4 KB · Views: 87
  • 20200801_194344.jpg
    20200801_194344.jpg
    73.4 KB · Views: 86
  • 20200801_195737.jpg
    20200801_195737.jpg
    66.8 KB · Views: 86

rockwelljt

New member
Joined
Aug 12, 2020
Messages
1
Location
WA
Hello
First time on the forum so forgive me if I pose a question and this is not the correct venue. I have a Wilton 645 and need a spindle nut , part number 2907810 (obsolete). Is there any places I could possibly buy this part? thanks, Rockwelljt
 

ALTEREGO

Well-known member
Joined
May 15, 2018
Messages
420
Location
@HOME
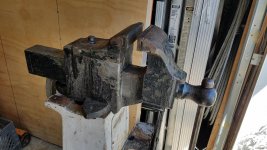
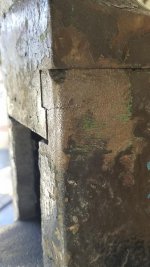
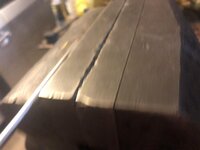
Any idea what happened here? At first I thought it was the replacement jaws that were off but that’s not the case.

The dynamic jaw is shorter/slimmer than the stationary jaw. The fixed jaw is flush with the replaceable jaw, both replaceable jaws are even (or pretty close) when fully closed but there is a gap in the back of the dynamic jaw and the replaceable jaw (see pictures)

Bad design?

Poor quality control (just a bad unit)?

Donor jaw?

Modified (ground/milled) jaw?

It is a Yost, made in USA. So far I think it will work for what I need but... what the heck?!

905a7dfe3e0896d99372e3ff35edb093.jpg

d5fab227194cfd62349751919ffbccef.jpgf72bd13e6ae73fd357f0d6daf555636e.jpg
dd1ca852a0280ebc5a74158f067a5275.jpg
 

Attachments

  • dd1ca852a0280ebc5a74158f067a5275.jpg
    dd1ca852a0280ebc5a74158f067a5275.jpg
    95.5 KB · Views: 1
  • f72bd13e6ae73fd357f0d6daf555636e.jpg
    f72bd13e6ae73fd357f0d6daf555636e.jpg
    153 KB · Views: 1
  • d5fab227194cfd62349751919ffbccef.jpg
    d5fab227194cfd62349751919ffbccef.jpg
    81.5 KB · Views: 0
  • 905a7dfe3e0896d99372e3ff35edb093.jpg
    905a7dfe3e0896d99372e3ff35edb093.jpg
    114.1 KB · Views: 0

ALTEREGO

Well-known member
Joined
May 15, 2018
Messages
420
Location
@HOME
Any sign it was ground? Maybe the PO needed the clearance for a repeated job?


Outlaw,

Strangely there are no signs of it being ground as far as I can tell.

All,

I’ve seen a few threads here of people shimming and grinding their vise to ensure it is 100% flush and I guess that would be ideal and even necessary when working with very thin material or doing a project that requires such accuracy.

I don’t usually need such level of accuracy, do you foresee any issues with the current state of the vise?

b40aa2169f6a60de1501bd57a1e2f657.jpg
 

Attachments

  • b40aa2169f6a60de1501bd57a1e2f657.jpg
    b40aa2169f6a60de1501bd57a1e2f657.jpg
    120.6 KB · Views: 2
Last edited:

RTM

Well-known member
Joined
May 13, 2019
Messages
13,259
Location
SF Bay Area
Not any expert, but if it were mine, I’d look at it, say “ crud how did I miss that”, and bolt it down anyway. I’m not doing anything that critical. The top of the jaws match, it would do what I need.
 
To avoid these ads, REGISTER NOW!
Top Bottom