To avoid these ads, REGISTER NOW!

Street Stock Rebuild

jones988

Well-known member
Joined
Dec 11, 2019
Messages
125
Location
Indiana
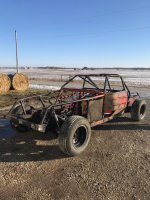
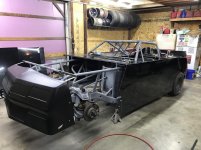
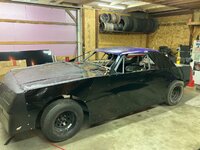
This last winter I decided my dirt street stock car needed a little rebuild. She still had the original heavy steel body that was all torn up, some welds throughout the car needed some attention, and she was due for a serious diet.

I had originally planned to get her done before racing season was here, but many other projects kept popping up and we just had our first child this summer, which slowed me down even more. As much as I want to get to race this year, it's kind of nice to move at a slower pace and be able to take my time so I can do things the correct way.

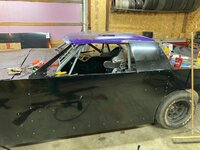
I had never attempted any type of sheet metal work before this project so I knew it was going to be a big learning curve. Other than reading a few articles online and stealing some pictures from Facebook, I have just been winging it and I am happy with the results so far.

I also cut the front bumper off to redo to shed some weight as well as cut off the original rear frame of the car from the axle back to redo that bumper and get rid of some weight. I figured I can't afford a high horsepower motor like everyone else so the next best thing was to lose as much weight as I could. Considering I have what is referred to as a "big body car", most street stocks have between a 108" to 112" wheelbase and mine is 116".

I haven't been the best about taking pictures throughout the process, but I do have a few to share. First picture is what the car looked like last year and the last is as she sat last night.
 

Attachments

  • IMG_0710.jpg
    IMG_0710.jpg
    144.2 KB · Views: 231
  • IMG_1418.jpg
    IMG_1418.jpg
    147.9 KB · Views: 216
  • IMG_1491.jpg
    IMG_1491.jpg
    97.5 KB · Views: 208
  • IMG_1800.jpg
    IMG_1800.jpg
    157.4 KB · Views: 205
  • IMG_1894.jpg
    IMG_1894.jpg
    150 KB · Views: 206
  • IMG_1893.jpg
    IMG_1893.jpg
    82.5 KB · Views: 201
  • IMG_1892.jpg
    IMG_1892.jpg
    150.9 KB · Views: 232
To avoid these ads, REGISTER NOW!

vpd66

Well-known member
Joined
Mar 1, 2010
Messages
712
Location
Central Wisconsin
If your car is on a 73-77 Chevelle frame like the purple body then it is 112" wheel base. If it is a 73-77 Monte Carlo frame then it is 116" wheel base. The larger wheel base cars are a little more forgiving on handling then the narrow 108" wheel base metric chassis. Your on the right track. If you can get the weight of the larger cars down then the larger wheel base cars actual handle better then the metric chassis.
 
OP
J

jones988

Well-known member
Joined
Dec 11, 2019
Messages
125
Location
Indiana
If your car is on a 73-77 Chevelle frame like the purple body then it is 112" wheel base. If it is a 73-77 Monte Carlo frame then it is 116" wheel base. The larger wheel base cars are a little more forgiving on handling then the narrow 108" wheel base metric chassis. Your on the right track. If you can get the weight of the larger cars down then the larger wheel base cars actual handle better then the metric chassis.

My goal is to shed 200-300 pounds between chopping and redoing the front and rear bumpers and ditching the heavy factory body for the aluminum one.
 

Bopbop

Well-known member
Joined
May 25, 2016
Messages
180
Location
Savannah,Ga
Brings back memories. I put a lot of time going in circles on a dirt track. Built a lot of cars for myself and others. Your work is looking good. The 116 inch wheel base Chevelle was a good starting point. You can make them light and they will perform great. As vpd66 said they are more forgiving than the narrow 108 wheel base cars.
We would build these cars lighter than a Camaro or Nova and out run them all the time.
 
OP
J

jones988

Well-known member
Joined
Dec 11, 2019
Messages
125
Location
Indiana
Brings back memories. I put a lot of time going in circles on a dirt track. Built a lot of cars for myself and others. Your work is looking good. The 116 inch wheel base Chevelle was a good starting point. You can make them light and they will perform great. As vpd66 said they are more forgiving than the narrow 108 wheel base cars.
We would build these cars lighter than a Camaro or Nova and out run them all the time.

I am also going to try and switch to a direct driver powerglide. Hopefully reduce torque loss from a normal powerglide. I have one but I'm not exactly sure on how to make it work. Hoping I can also figure that one out when I get to that point.
 

vpd66

Well-known member
Joined
Mar 1, 2010
Messages
712
Location
Central Wisconsin
I am also going to try and switch to a direct driver powerglide. Hopefully reduce torque loss from a normal powerglide. I have one but I'm not exactly sure on how to make it work. Hoping I can also figure that one out when I get to that point.

I've built plenty of direct drive powerglides. If your rules allow them then it is a must. The best way is to buy a manual valve body that is already modified for direct drive. I get mine from Coan engineering. They have great products and they are very knowledgable. I tend to stay away from anything from TCI.
https://www.coanracing.com/mwdownloads/download/link/id/4/
 
OP
J

jones988

Well-known member
Joined
Dec 11, 2019
Messages
125
Location
Indiana
I've built plenty of direct drive powerglides. If your rules allow them then it is a must. The best way is to buy a manual valve body that is already modified for direct drive. I get mine from Coan engineering. They have great products and they are very knowledgable. I tend to stay away from anything from TCI.
https://www.coanracing.com/mwdownloads/download/link/id/4/

Coan is actually only an hour straight west of me. A buddy of mine uses them for his drag car. From what I understand, the direct drive I have now is good to go (got it from the guy I bought my car from a few years ago).

I guess my main questions are exactly how it mates to my motor. I assume I still need a flex plate for my starter and maybe for the correct spacing? I have a Wilwood clutch setup I got from another drag racing friend who switched to an auto. Should I be concerned with having a certain master cylinder bore size? My direct drive came with a slave cylinder, not sure on the size though. Sorry if these are dumb questions, I am used to autos.
 

txvwnut

Well-known member
Joined
Jan 1, 2015
Messages
7,649
Location
Bedford, Texas
Its been a while since I've seen that setup but if I remember correctly there is a shaft that bolts to crank that takes place of the converter, you do keep the flex plate as you'll need it to be able to start the engine. I wanna say you also have to put a hydraulic "clutch pedal" in as well to simulate having the converter for gear engagment.
 
OP
J

jones988

Well-known member
Joined
Dec 11, 2019
Messages
125
Location
Indiana
Its been a while since I've seen that setup but if I remember correctly there is a shaft that bolts to crank that takes place of the converter, you do keep the flex plate as you'll need it to be able to start the engine. I wanna say you also have to put a hydraulic "clutch pedal" in as well to simulate having the converter for gear engagment.

I do have that shaft that bolts to the crank and a clutch pedal that will go to a slave cylinder that will "engage" the transmission starting and stopping. I just wasn't sure about the bore sizes for the slave cylinder and the clutch pedal. Not sure if those matter with a direct drive not actually having a "clutch".
 

vpd66

Well-known member
Joined
Mar 1, 2010
Messages
712
Location
Central Wisconsin
Coan is actually only an hour straight west of me. A buddy of mine uses them for his drag car. From what I understand, the direct drive I have now is good to go (got it from the guy I bought my car from a few years ago).

I guess my main questions are exactly how it mates to my motor. I assume I still need a flex plate for my starter and maybe for the correct spacing? I have a Wilwood clutch setup I got from another drag racing friend who switched to an auto. Should I be concerned with having a certain master cylinder bore size? My direct drive came with a slave cylinder, not sure on the size though. Sorry if these are dumb questions, I am used to autos.

You buy a coupler that bolts to the flex plate then there is a pump drive that is splined that goes into the coupler. The out end drive the front pump just like the torque converter.
https://www.jegs.com/images/photos/500/564/564-10775.jpg

The guys I know that run these direct drive Powerglides just use a simple cable to a homemade aluminum pedal to operate the line pressure. The valve bodies I recommend control the line pressure with the detent lever that comes out of the trans in the center of the shifter shaft. It takes very little pressure to operate it and there really isn't any need for a hydraulic setup. They mount the pedal way over to the left so its not in the way when your racing. You could also use a bicycle or motorcycle brake lever and mount it on your shifter.
 
OP
J

jones988

Well-known member
Joined
Dec 11, 2019
Messages
125
Location
Indiana
You buy a coupler that bolts to the flex plate then there is a pump drive that is splined that goes into the coupler. The out end drive the front pump just like the torque converter.
https://www.jegs.com/images/photos/500/564/564-10775.jpg

The guys I know that run these direct drive Powerglides just use a simple cable to a homemade aluminum pedal to operate the line pressure. The valve bodies I recommend control the line pressure with the detent lever that comes out of the trans in the center of the shifter shaft. It takes very little pressure to operate it and there really isn't any need for a hydraulic setup. They mount the pedal way over to the left so its not in the way when your racing. You could also use a bicycle or motorcycle brake lever and mount it on your shifter.

I believe I currently have everything needed for a hydraulic "clutch" setup (hydraulic clutch setup and slave cylinder to mount on ******). But I do like the idea of a motorcycle type lever. I also have a twin stick shifter I might be able to make work.
 

vpd66

Well-known member
Joined
Mar 1, 2010
Messages
712
Location
Central Wisconsin
I believe I currently have everything needed for a hydraulic "clutch" setup (hydraulic clutch setup and slave cylinder to mount on ******). But I do like the idea of a motorcycle type lever. I also have a twin stick shifter I might be able to make work.

Just doesn't make sense to use a hydraulic pedal/slave setup.More things to do wrong and more weight. No one around here uses a hydraulic setup and I've personal built 3 transmissions that are using direct drive, 2 use cables and pedal and 1 is a rod with a pedal. Simple and cheap!
 
OP
J

jones988

Well-known member
Joined
Dec 11, 2019
Messages
125
Location
Indiana
Just doesn't make sense to use a hydraulic pedal/slave setup.More things to do wrong and more weight. No one around here uses a hydraulic setup and I've personal built 3 transmissions that are using direct drive, 2 use cables and pedal and 1 is a rod with a pedal. Simple and cheap!

I definitely agree with you! I will keep you in mind if I have any questions when I actually get around to the ******.
 

Spareparts

Well-known member
Joined
Mar 12, 2010
Messages
2,045
Location
Lansing Ks.
when I used the PG we drilled the pump and just used a ball valve connected to the hoses, just closed the valve and away we went, mounted it just above the shifter. Now tht was in early 2000-2005, things change. I personally like 3 speed Saginaw trans, but we modify them, eliminate 1st gear on main shaft and cut it off the cluster, narrow 2nd on the main shaft and the cluster by about 1/2 also cut the input shaft and counter shaft by 1/2 of it's width, doing this we lost about 7 lbs of weight and freed the trans up to the point that we had to adjust the idle speed back down about 300 rpm's. The main problem with the lightened trans is you don't drive it on the trailer, either winch or push it on, and #2 you take off easy, get moving and shift to 3rd. no donuts or hard take off when you get spun, You have to learn to control your temper, it's hard. almost forgot take all the brass out, syncros and the like, don't need them.
 

Spareparts

Well-known member
Joined
Mar 12, 2010
Messages
2,045
Location
Lansing Ks.
One more thing, a good friend explained to me when 2 gears mesh together it becomes a oil pump and it takes horse power to turn it, that is why we cut the gears down on 2nd and the input shaft, once in 3rd all the other gears are just along for the ride. If you want to do a little research look up Lane Maching Works,,,, Direct drive Transmission. KC Mo.
 

TS3g

Well-known member
Joined
Oct 30, 2012
Messages
137
Location
Kansas
when I used the PG we drilled the pump and just used a ball valve connected to the hoses, just closed the valve and away we went, mounted it just above the shifter.

That's the way my Dad used to do it back in the day in his modified. Nowadays we run a Brinn, so no more fussing with broken cases and whatnot.

Speaking of which, it's crazy what some of these lower divisions are spending on transmissions. $1000 for a 3 speed with cermaic bearings, $1500 for Mitchell 2 speeds, and then you have to buy a clutch to go in front of it. I don't understand why tracks/sanctioning bodies don't allow aftermarket transmissions all around. I paid $800 for a used Brinn 10 years ago and its still going strong today.

Nice job on the rebuild jones! Any plans to add some nerf bars so the doors don't get caved in again?
 
Last edited:
OP
J

jones988

Well-known member
Joined
Dec 11, 2019
Messages
125
Location
Indiana
That's the way my Dad used to do it back in the day in his modified. Nowadays we run a Brinn, so no more fussing with broken cases and whatnot.

Speaking of which, it's crazy what some of these lower divisions are spending on transmissions. $1000 for a 3 speed with cermaic bearings, $1500 for Mitchell 2 speeds, and then you have to buy a clutch to go in front of it. I don't understand why tracks/sanctioning bodies don't allow aftermarket transmissions all around. I paid $800 for a used Brinn 10 years ago and its still going strong today.

Nice job on the rebuild jones! Any plans to add some nerf bars so the doors don't get caved in again?

There is more bracing down the door on the passenger side, but I'm sure I'll regret not having as much on the driver door. People in my area don't run nerf bars on the outside of the doors, I had never seen that before until one day on Facebook. I am not sure why as it seems like a good idea.

I would actually like to try and sell this chassis and upgrade to something a little better. After crawling around this car for the past few months, I see more and more things on it I am not a fan of (the front end is a little tweaked from a crash before I got it, overall structure of the car as half of the welds are not good at all, it's due for a serious suspension overhaul as everything is stock from the 70s.)

I have joked that putting a body on this thing was like putting lipstick on a pig, might sell it now as she is all nice and pretty before I tear it up on track.
 

Bopbop

Well-known member
Joined
May 25, 2016
Messages
180
Location
Savannah,Ga
I was sponsored by a transmission shop for a couple of seasons and we ran the powerglide with a flex plate and direct coupler. As Spareparts said we drilled and tapped the trans and ran a ball valve. It worked really good. However there was a learning curve for the driving.
I will never forget the night that a plug in the case where the module was originally installed blew out. just as it happened the main transformer to the track blew and the place went totally dark and there was the car going down the front straight in flames.
 

vpd66

Well-known member
Joined
Mar 1, 2010
Messages
712
Location
Central Wisconsin
Drilling and tapping the front pump is the original way of doing it. Modifiying the valve body and controlling the line pressure via the detent lever is much safer because you have no hydraulic plumbing outside of the transmission case.
 
To avoid these ads, REGISTER NOW!

vpd66

Well-known member
Joined
Mar 1, 2010
Messages
712
Location
Central Wisconsin
when I used the PG we drilled the pump and just used a ball valve connected to the hoses, just closed the valve and away we went, mounted it just above the shifter. Now tht was in early 2000-2005, things change. I personally like 3 speed Saginaw trans, but we modify them, eliminate 1st gear on main shaft and cut it off the cluster, narrow 2nd on the main shaft and the cluster by about 1/2 also cut the input shaft and counter shaft by 1/2 of it's width, doing this we lost about 7 lbs of weight and freed the trans up to the point that we had to adjust the idle speed back down about 300 rpm's. The main problem with the lightened trans is you don't drive it on the trailer, either winch or push it on, and #2 you take off easy, get moving and shift to 3rd. no donuts or hard take off when you get spun, You have to learn to control your temper, it's hard. almost forgot take all the brass out, syncros and the like, don't need them.

I'm interested in the modifying of 3 speed tranmissions. Have you seen the modification where the cluster gear "drops out" when shifted into 3rd gear (aka straight through). And the only thing that turns is the main shaft and its locked has one straight shaft? I believe they machine all the teeth of 3rd gear and first gear. You use 2nd too take off and it operates the cluster gear then when you shift to 3rd the cluster gear is not engaged and the mainshaft is direct straight through the trans.
 

vpd66

Well-known member
Joined
Mar 1, 2010
Messages
712
Location
Central Wisconsin

Here is a video of what I'm talking about. This is legal in IMCA and it seems like the majority of racers are going this route. I had one guy that runs a direct drive Powerglide ask me about them and I told him I'd do some research on it. I found a lot of talk about it and this video and that's about it.
 

Spareparts

Well-known member
Joined
Mar 12, 2010
Messages
2,045
Location
Lansing Ks.
The original direct drive trans were based on the Muncie 4 speed, the problem with the aluminum case muncie was the input shaft wolled out the case and broke the mounting ears off. that case was machined out and a 3&1/2" clutch was engineered to fit thus eliminating the clutch on the engine, very unique, they built 1,000s of them then IMCA decided to throw a wrench in their works by requiring a 5&1/2" clutch, so the boys got busy and changed it. Research Layne Machine Works, Bob and John Layne are some of the most creative and intelligent individuals you will ever talk to. When John was 15 yrs old he built Greg Weld,s sprint car, he was just getting started and it just went up hill from there. Thier was about a half dozen pages of the IMCA Modified Rules that were referred to as the Bobby Layne Rules, just to try to slow them down.
 

Bopbop

Well-known member
Joined
May 25, 2016
Messages
180
Location
Savannah,Ga
Drilling and tapping the front pump is the original way of doing it. Modifiying the valve body and controlling the line pressure via the detent lever is much safer because you have no hydraulic plumbing outside of the transmission case.

How times have changed. The modified valve body is much safer than the way we did it. We were doing this 35 years ago. I remember TCI, I think or some other company selling the trans set up like we ran. We would get our coupler from them.
 

vpd66

Well-known member
Joined
Mar 1, 2010
Messages
712
Location
Central Wisconsin
How times have changed. The modified valve body is much safer than the way we did it. We were doing this 35 years ago. I remember TCI, I think or some other company selling the trans set up like we ran. We would get our coupler from them.

Yes, I believe the modern ways of doing it came from a need to keep it stock appearing (aka cheating). It would be quite a challenge to hide a tapped front pump and all the plumbing. TCI also has an internal bleed valve body that has one of the valves drilled and a Holley carb jet installed. The theory is that when the engine is at idle the transmission line pressure is lower and when you put it in gear it doesn't have enough pressure to engage low. When you increase the engine speed then the line pressure goes up and the car start moving forward. This allow the car to get rolling then you shift to drive and your good to go. The problem is they are very touchy to get setup right. Engine idle speed, transmission line pressure, and trans condition all come into play. I know at least 2 guys that tried this method and never got more then 1/2 a season before the trans quite working.
 
OP
J

jones988

Well-known member
Joined
Dec 11, 2019
Messages
125
Location
Indiana
Alright I figured it was finally time for an update as I was able to get back to the track with it this last weekend for the first time since 2019. The car has come a long way and I made quite the different decision this year for my motor option. This will be a long update, so bear with me.

I was able to get the body finished, and it turned out a lot better than I was expecting considering I don't have a sheet metal stretcher/shrinker to make curves, so I was stuck with using straight lines and my metal brake. Since the last picture in my original post, I raised the front bumper up a few inches to make the fender and hood match better. I also made the front fenders removable with just a few bolts so you can easily work in the motor area instead of leaning over the fenders. From the beginning I had wanted to use the factory steel roof to try and break up the box look of the car instead of building my own. I did have to patch a few spots on the factory roof. It took me a few different designs to get the A and B pillars to look the way I wanted as the factory roof was quite a bit narrower than the body. Looking back I do wish I had made the car a few inches more narrow. I do plan to cut a whole in the hood and make a hood scoop for the air filter to stick out.

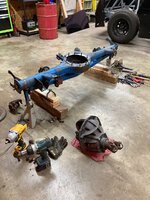
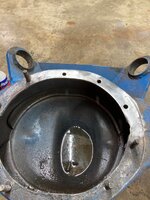
I also decided to pull my rear end out and address the leak it has always had, which actually caused me to grenade the rear gear back in 2019. This car has non floater Ford 9 inch and the center housing leaked pretty bad. The cause of the leak was a big crack on the lip of the housing where the third member bolted to the housing. (I will try to include a few pictures) The housing probably should have been replaced but I figured it was already junk, what would I hurt if I attempted to weld it up myself and see what happens. It turned out pretty good and so far I haven't had any leaks. I also decided to replace all of my brake lines throughout the car as they were a cluster and I was always chasing brake issues.

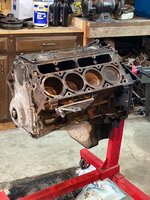
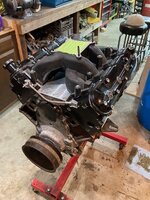
Around this time I was debating on what motor I was going to run. Now my car is considered a street stock/super street depending on what tracks rules you want to use in my area, so the motor rules are pretty open. In previous years I ran a small block Chevy, but I had always dreamed of running a carbureted LS for many reasons. Now running an LS motor in my class was going to push a few of the rules, but I know I'm not the only one stretching the rules in my class. I am also not exactly a front runner in my class, so I figured I could fly under the radar. I figured it was now or never and started piecing out my carbed LS build. You can buy a carb LS crate motor, but I don't have that money to blow on a motor. So I elected for a iron block 5.3 I bought off Facebook complete for $300.

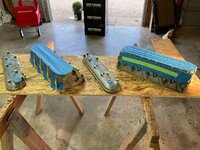
I pulled it apart and installed a new oil pump and pan in the bottom end. I also did a cam swap complete with new lifters, pushrods, and valve springs, as well as a trunnion bearing upgrade on the rocker arms. I decided to paint the heads so they didn't look "aluminum" to the untrained eye. I wanted to keep this on a somewhat simple budget as I wasn't 100% sure it was going to work the way I intended. I also had to get creative to get my direct drive powerglide to mate up to my LS as the crankshaft bolt patterns were different. I had to get an LS to sbc flywheel adapter and machine the center open to allow my direct driver coupler and shaft to bolt up to it. Originally I was planning on running the factory LS fan clutch and was going to make my own fan shroud but after sitting the motor in the car for the final time, I changed my mind and wound up running a single 16" electric fan, which worked great as I was going to have to run the alternator anyway. I wound up using a Holley carb LS intake and a MSD 6014 LS ignition box for my timing.

After a month of final assembly and making adjustments/tuning, the car was finally race ready. Before it hit the track, I wanted to scale it out and see how much weight I actually lost. Race ready without me it weighed 2730, so I was able to shed almost 300 pounds from what it weighed before. I wound up adding 220 pounds of weight to get my left side weight and rear weight numbers roughly where I wanted them as well as my 220 pounds. So total race ready weight right now is 3170, but I plan to play around with moving and removing weight to see how the car handles.

My first time back racing at the track since 2019 was this last weekend. I wasn't expecting a whole lot being a completely new car. Hot laps and my heat race went alright. Wound up rear ending a car in the feature due to a spin in front of us and knocked the radiator out of it and mangled my front bumper, which ended my night. I'm going to rebuild my front bumper with a different design and make it a little stronger, I also need to do some more tuning on my carburetor and make some brake adjustments. Overall I am still happy with the car as I completely rebuilt it myself from the ground up and I'm doing things a little different from most guys out there.

IMG_0458.jpgIMG_0369.jpgIMG_0393.jpgIMG_0334.jpgIMG_0901.PNGIMG_0312.jpgIMG_0239.jpgIMG_0703.jpgIMG_0641.jpg
 
OP
J

jones988

Well-known member
Joined
Dec 11, 2019
Messages
125
Location
Indiana
After taking a few weeks off to focus on some other projects around the house. I was able to rebuild the front bumper and make it stronger. I also added some more supports to the new radiator. I was able to use a harbor freight pipe bender to get the slight curve I needed for the bumper. I did learn that trying to notch tubes just using a grinder is difficult and takes some trial and error (I will include an "error" picture).
Also not pictured, I tore the carb apart to try different jets, and power valve. So hopefully I can see improvements there.

IMG_0951.jpgIMG_0925.jpg
 

LXCam

ALLIANCE MEMBER
Joined
Apr 23, 2013
Messages
19,180
Location
AZ
She's coming along nicely jones, best of luck getting finished up and getting back to the track.

Your comment about the trans shop sponsoring you brought back a memory. The one and only time I sponsored a circle track ride was for a buddy. My company name PROUDLY placed on the right front fender.

It didn't even make lap two before he kissed someone and ripped the entire fender off :lol:
 

Bodj Built

Well-known member
Joined
Feb 3, 2016
Messages
1,167
Location
Moorpark, CA
If I can give some tips on notching with an angle grinder...

For perpendicular tubes, like how you have it in the last picture, use a sharpie to draw a straight line down the tube (in green). Then, with a cutting disc, make two angled chops (in red). These are not 45 degree cuts. I used to make that mistake all the time. Make them much shallower, and don't meet the cuts at your center line. The shallower angle fits the tube much better, and not meeting at the center line makes for less grinding.

1. Make your cuts
1628104438029.png


2. Use flapper disk to blend the distal edges
1628104487928.png

3. If you need to notch deeper, use a flapper disk, but hold it horizontally, so the disk is cutting pretty flat against the tube and you're cutting with the flat part of the disk instead of the edge. You should have a cut edge that looks like the red line. Then blend it in (orange line) and open it a little wider towards the outside edges until the tube fits properly. I keep a scrap 4" section of tube handy so I can quickly check the fit.
1628104642578.png
 
OP
J

jones988

Well-known member
Joined
Dec 11, 2019
Messages
125
Location
Indiana
She's coming along nicely jones, best of luck getting finished up and getting back to the track.

Your comment about the trans shop sponsoring you brought back a memory. The one and only time I sponsored a circle track ride was for a buddy. My company name PROUDLY placed on the right front fender.

It didn't even make lap two before he kissed someone and ripped the entire fender off :lol:
That sounds about right! There isn't any place safe for a sticker on a street stock car!
 

Bigblue&Goldie

Well-known member
Joined
Mar 12, 2009
Messages
10,710
Location
AZ
Tube work is a pain in the *** when you don't do it with any kind of frequency. Bodj can do more tube work in a day than I could do in a week.
 
OP
J

jones988

Well-known member
Joined
Dec 11, 2019
Messages
125
Location
Indiana
If I can give some tips on notching with an angle grinder...

For perpendicular tubes, like how you have it in the last picture, use a sharpie to draw a straight line down the tube (in green). Then, with a cutting disc, make two angled chops (in red). These are not 45 degree cuts. I used to make that mistake all the time. Make them much shallower, and don't meet the cuts at your center line. The shallower angle fits the tube much better, and not meeting at the center line makes for less grinding.

1. Make your cuts
1628104438029.png


2. Use flapper disk to blend the distal edges
1628104487928.png

3. If you need to notch deeper, use a flapper disk, but hold it horizontally, so the disk is cutting pretty flat against the tube and you're cutting with the flat part of the disk instead of the edge. You should have a cut edge that looks like the red line. Then blend it in (orange line) and open it a little wider towards the outside edges until the tube fits properly. I keep a scrap 4" section of tube handy so I can quickly check the fit.
1628104642578.png
Thanks for the tips! I did find the shallower the cuts, the better. My first few were way too deep, like my last picture shows. My cuts were almost a 45 that did meet in the center. I will try what you showed in your first picture!
 
OP
J

jones988

Well-known member
Joined
Dec 11, 2019
Messages
125
Location
Indiana
Tube work is a pain in the *** when you don't do it with any kind of frequency. Bodj can do more tube work in a day than I could do in a week.
Yes, this was probably my biggest solo tube project I have done so far. I have helped with one roll cage install in the past, but it was all pre fab tubing. I was very surprised how time consuming it can be!
 
To avoid these ads, REGISTER NOW!
Top Bottom