

You are using an out of date browser. It may not display this or other websites correctly.
You should upgrade or use an alternative browser.
You should upgrade or use an alternative browser.
What's on your walls? Neat storage ideas!
- Thread starter scottybaccus
- Start date
atch
Well-known member
Did you 3-D print the pieces?
Dan in Pasadena
Well-known member
Did you 3-D print the pieces?
Hate to be the naysayer, but couldn't he have just cut up a piece of square tube? Must EVERYTHNING be high tech?
Did you 3-D print the pieces?
Hate to be the naysayer, but couldn't he have just cut up a piece of square tube? Must EVERYTHNING be high tech?
Haha! Made from steel with a drill, a chop saw and a grinder.
Dan in Pasadena
Well-known member
Haha! Made from steel with a drill, a chop saw and a grinder.
A man after my own heart. And they STILL look professionally made. Good old hand tools and a little bit of pride in the making.

kaymccampbell
Well-known member
Hate to be the naysayer, but couldn't he have just cut up a piece of square tube? Must EVERYTHNING be high tech?
Square tube is pretty high tech. You ever see it made?
Square tube is pretty high tech. You ever see it made?
It doesn't start square

kaymccampbell
Well-known member
It doesn't start square
Or, tubular.
admranger
Well-known member
They just wrap the steel around the airspace, don't they? 
Dan in Pasadena
Well-known member
They just wrap the steel around the airspace, don't they?
Yeah, but it has to be square airspace!
Muggzy
Well-known member
Hey Debreifer, that's a pretty slick idea for a lot of different tools. It's a great way to put long tools on a wall when you don't have any headroom like my shed!
Sent from my Pixel XL using Tapatalk
LS6 Tommy
Well-known member
Did you 3-D print the pieces?
Hate to be the naysayer, but couldn't he have just cut up a piece of square tube? Must EVERYTHNING be high tech?
Haha! Made from steel with a drill, a chop saw and a grinder.
A man after my own heart. And they STILL look professionally made. Good old hand tools and a little bit of pride in the making.
That's really nice! My fab skills aren't that good. I'd probably try to make it by cutting pieces out of some Unistrut.
Tommy
Notgrownup
Well-known member


FTWingRiders
Well-known member
I like it.. I need to do this to get them off my bench..
Dan in Pasadena
Well-known member
I had these welding banners folded on the shelf so I decided to store them on the walls using wood screws and fender washers.
 You don't own a stapler?
A bunch of 2x2 and ripped down 2x4 makes for some easy and cheap clamp and extension cord storage(1/2" conduit set into the wood for the extension cords). And an old garden hose hanger makes quick work for an air hose. Total cost was a few bucks worth of 3" construction screws and a 10' long piece of conduit. The wood was scraps left over from a variety of projects over the years.


Sent from my SM-G950U using Tapatalk
Sent from my SM-G950U using Tapatalk
Attachments


fartymarty
Well-known member
I hope nobody minds that I've expanded this thread to include the ceiling as a 5th wall....
Expanding on my earlier post where I reinforced my wooden overhead rack with steel strut. The offset ends of the back to back strut were sort of silently calling me to add a cross piece to the ends and I decided that would be a good place to mount a movable fan for when I work on that side of the garage.


I mounted a scrap piece of steel to two rollers inside the strut and a plastic fan to a piece of wood then ran a bolt through the wood to the scrap steel so the fan could be turned 360 degrees to where I'm working.
I also put a piece of electrical conduit up and some zip tied rolling shower curtain holders on it to manage the fan cord as it moves along the strut. If I had the fan aimed too much in line with the strut it would then self propel it's way along the strut so I had to put some cheap HF magnets at the ends of the strut to hold it in place.


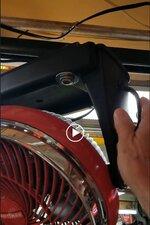
Expanding on my earlier post where I reinforced my wooden overhead rack with steel strut. The offset ends of the back to back strut were sort of silently calling me to add a cross piece to the ends and I decided that would be a good place to mount a movable fan for when I work on that side of the garage.
I mounted a scrap piece of steel to two rollers inside the strut and a plastic fan to a piece of wood then ran a bolt through the wood to the scrap steel so the fan could be turned 360 degrees to where I'm working.
I also put a piece of electrical conduit up and some zip tied rolling shower curtain holders on it to manage the fan cord as it moves along the strut. If I had the fan aimed too much in line with the strut it would then self propel it's way along the strut so I had to put some cheap HF magnets at the ends of the strut to hold it in place.
CarKid1989
Member
Can you elaborate on the roller setup for the fan? i cant picture it.
sweet setup and it gave me ideas for mounting the fan I have waiting to be installed
sweet setup and it gave me ideas for mounting the fan I have waiting to be installed
fartymarty
Well-known member
Can you elaborate on the roller setup for the fan? i cant picture it.
sweet setup and it gave me ideas for mounting the fan I have waiting to be installed
I used the green Superstrut from Home Depot and a couple of these rollers:
(click pic to link)
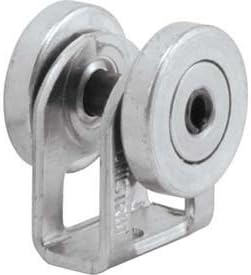
The Unistrut and Superstrut are close enough in size that the Unistrut rollers worked in the Superstrut. The rollers will not clear any mounting hardware in the strut, so they must either be inserted before the strut goes up or special strut hangers must be used that hold the strut without internal interference.
Let us know how it goes CarKid'.
travisn1
Well-known member
Can you elaborate on the roller setup for the fan? i cant picture it.
sweet setup and it gave me ideas for mounting the fan I have waiting to be installed
search for unistrut trolley
fartymarty
Well-known member
PCMusicGuy
Well-known member
I used the green Superstrut from Home Depot and a couple of these rollers:
(click pic to link)
The Unistrut and Superstrut are close enough in size that the Unistrut rollers worked in the Superstrut. The rollers will not clear any mounting hardware in the strut, so they must either be inserted before the strut goes up or special strut hangers must be used that hold the strut without internal interference.
Let us know how it goes CarKid'.
I used trolleys in my unistrut attached to the wall and had a bit of clearance issue with the screws. I solved it with a countersink bit which allowed the screws to recess a bit so the trolleys cleared it easily. Might work for you.
fartymarty
Well-known member
I used trolleys in my unistrut attached to the wall and had a bit of clearance issue with the screws. I solved it with a countersink bit which allowed the screws to recess a bit so the trolleys cleared it easily. Might work for you.
By "screws" you mean hex head lag bolts going into the wall framing...correct? ...or flathead screws doing the same? Regardless I'd be interested in knowing more about your install and purpose. Is your strut mounted through the side wall through holes you drilled so that the trolley runs along the bottom?...or?..well some photos would be appreciated. Thanks.
Dan in Pasadena
Well-known member
A lot of cool ideas for wall mounted tools and equipment here. However, cool ideas too often morph into covering all available wall space, trying to hang everything on them which ends in a mess of disorganization. Just because a neat idea to store pneumatic tools or wrenches on the wall looks great doesn't mean it will look good to mount everything you own on your walls. I'll get flack for this opinion, I'm sure. Some of the shop photos shown here really look like an attempt to organize turned into pure chaos.
Glen
Glen
^^^Agree entirely^^^
In my new-to-me Glendora garage I am trying to split the difference. I truly admire the garages that are surgical suite clean and devoid of all visible tools. I just don't want one like that and could never truly keep it up if I had it.
On the other hand, I also like seeing guys that have a metric ton of exotic, special-purpose tools and "stuff" but I want a very clean, admirable garage with SOME tools visible. Just what looks nice.
Yeah, I know some guys will be critical of that. I don't do any heavy wrenching anymore. Never did fabrication - I don't have the skills. I do oil changes, brake jobs and minor homeowner projects. No need for many of the tools it has taken me a lifetime to acquire. So selling off everything big and just organizing/building for looks. Engine hoist, concrete mixer, etc - GONE. And more going soon.

javyLSU
Well-known member
^I like that, very efficient use of space.
JasonMcElroy
Well-known member
As a long time reader here, I've seen some amazing shop organization ideas covering the gamut from throw **** on the floor and see what floats to the top at one end to build a custom fabricated container for each tool bit.
I fall in the middle, as I assume most of you do.
In the past I've constructed large shared workshops (around 3000sf) with machining and engine building tools for my friends and I. It's a lot of work.
I've since gone back to basics and am just doing my own work out of a two-car garage. Organization is necessary just due to shortage of space.
Organizing is hard.
Since moving into this house three years ago, I've created some main areas of the shop.
I made the benches and wall organizers with plywood and stick lumber. I soaked everything in used motor oil to seal and protect when done. Yes, my shop stank to high heaven for a week afterward. But, I've used this approach in the past with good results. In other shops I've made metal-capped bench tops but didn't go to the trouble here.
Jason
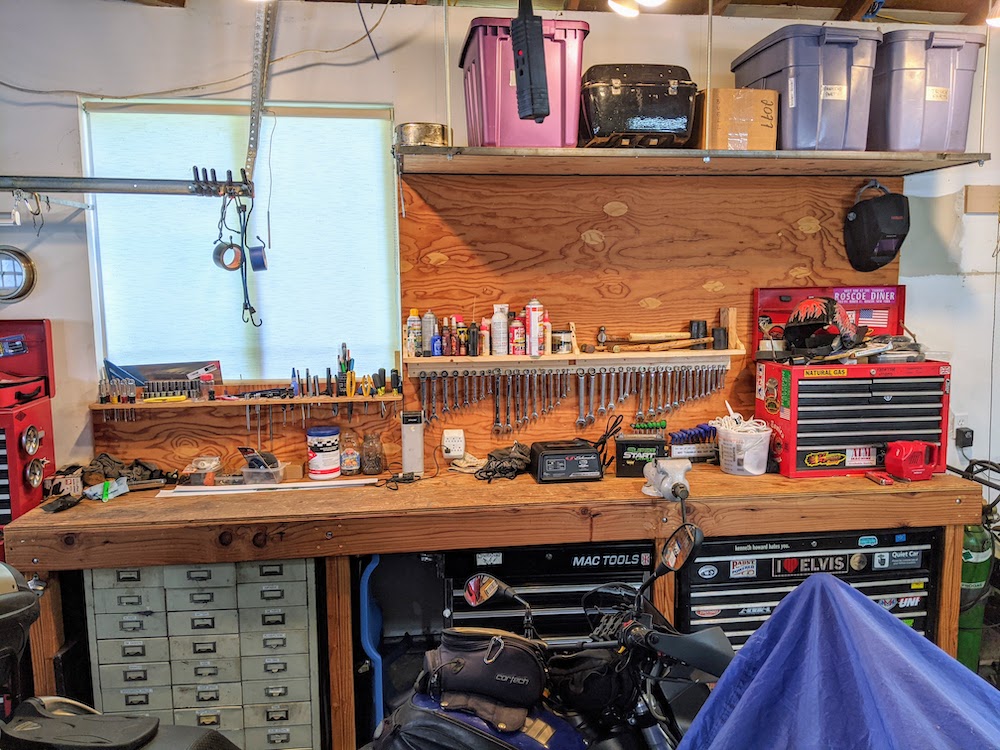
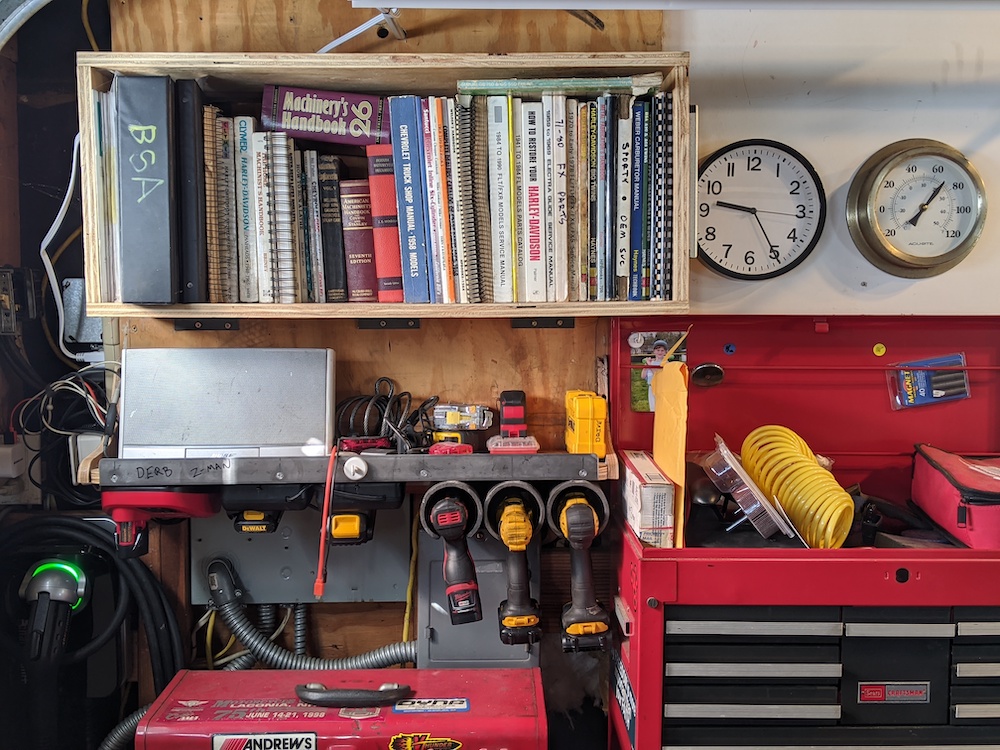
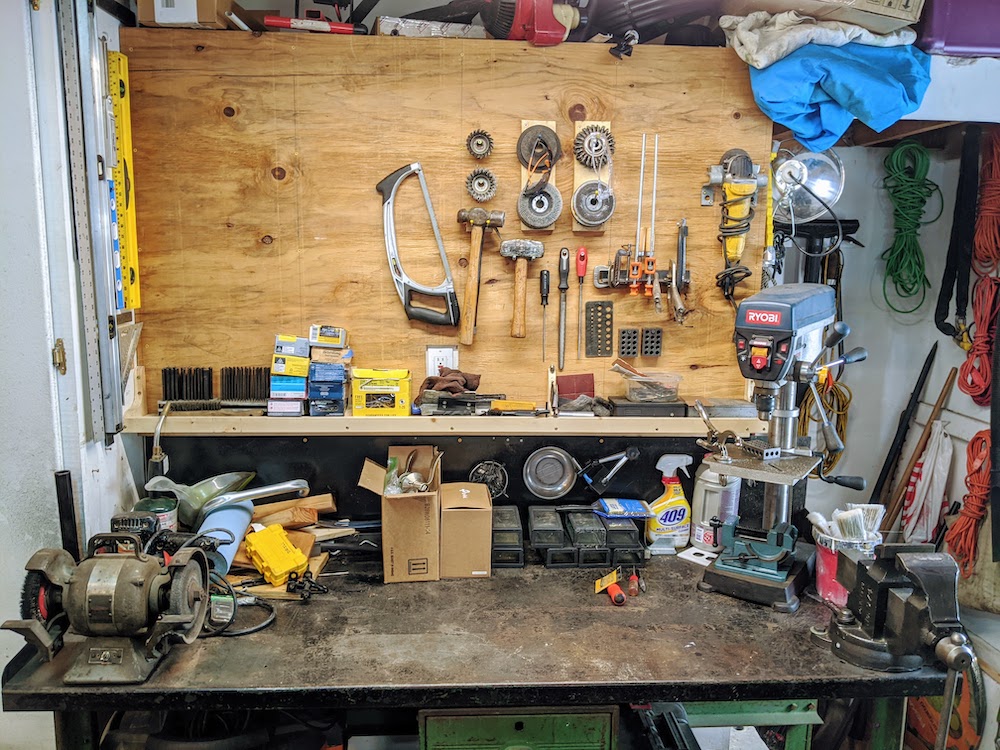
I fall in the middle, as I assume most of you do.
In the past I've constructed large shared workshops (around 3000sf) with machining and engine building tools for my friends and I. It's a lot of work.
I've since gone back to basics and am just doing my own work out of a two-car garage. Organization is necessary just due to shortage of space.
Organizing is hard.
Since moving into this house three years ago, I've created some main areas of the shop.
- Stairwell for cords and outdoor tools
- Long wall with high bench for hand tools and frequently used chemicals and other non-tools
- Opposite wall for lathe and motorcycle storage (I have four in this garage)
- Back wall for metal work with vise, grinder, some stock, cutting/filing tools, etc
- Near garage door for library, clock, stereo, tool charging
- Center floor near bench for bike lift. Can be moved out for larger projects
- Back alley for wood work. I hate getting sawdust in my shop.
- Small loft above bench for motorcycle and antique truck parts (one bin per vehicle)
I made the benches and wall organizers with plywood and stick lumber. I soaked everything in used motor oil to seal and protect when done. Yes, my shop stank to high heaven for a week afterward. But, I've used this approach in the past with good results. In other shops I've made metal-capped bench tops but didn't go to the trouble here.
Jason
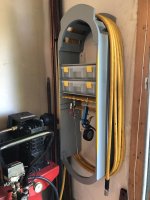
A quick little organizer for my air compressor tools, fittings and hose all in one.
works great and made things a lot cleaner...
That's really nice, did you make that? I'd like to copy it but it would be anything but quick. And probably not as pretty.
That's really nice, did you make that? I'd like to copy it but it would be anything but quick. And probably not as pretty.
Yes I did, it's a bit of plywood, mdf for the round bits, some odd bits of lumber for the hose supports up top and plywood for the sides and the tool hangers. it's all spec'd to fit around those two bins, one bin for 3/8th fittings and the other for 1/2" fittings. Happy to send you some layouts for it, you would of course need to adjust for whatever bins you put in if any.
-Clint
added another view of it.
Attachments

348guy
Well-known member
Excellent design and execution. [emoji106]A quick little organizer for my air compressor tools, fittings and hose all in one.
works great and made things a lot cleaner...
Sent from my XT1635-01 using The Garage Journal mobile app
DGersic
Well-known member
This is a great thread of ideas. But what I would like to see is what do you guys have in the corners? Especially the space right next to the garage doors. Always seems to be a catch all.
Thanks
There’s not much room between the garage door and the wall here. I made a storage / drain rack for tubing. These are used for draining the oil from the cars (Fumoto), snow blower, etc. and always need somewhere to drip.
Sent from my iPad using The Garage Journal mobile app
Attachments

DGersic
Well-known member
Leaf blower shelf.

The base is left over 3/4” plywood, front edges wrapped with 1x2 firing strip. Laid down some carpet runner with contact cement over the plywood.
Summer, bike goes here under it. Winter, the snow blower goes here instead.
Dead space underneath is storing a couple air hoses and extension cords.
Sent from my iPad using The Garage Journal mobile app
The base is left over 3/4” plywood, front edges wrapped with 1x2 firing strip. Laid down some carpet runner with contact cement over the plywood.
Summer, bike goes here under it. Winter, the snow blower goes here instead.
Dead space underneath is storing a couple air hoses and extension cords.
Sent from my iPad using The Garage Journal mobile app
acer66
Well-known member
There’s not much room between the garage door and the wall here. I made a storage / drain rack for tubing. These are used for draining the oil from the cars (Fumoto), snow blower, etc. and always need somewhere to drip.
Sent from my iPad using The Garage Journal mobile app

That oil collecting setup underneath is very cool.
Attachments

Yes I did, it's a bit of plywood, mdf for the round bits, some odd bits of lumber for the hose supports up top and plywood for the sides and the tool hangers. it's all spec'd to fit around those two bins, one bin for 3/8th fittings and the other for 1/2" fittings. Happy to send you some layouts for it, you would of course need to adjust for whatever bins you put in if any.
-Clint
added another view of it.
Hey thanks! pm sent
mv213
Well-known member
Yes I did, it's a bit of plywood, mdf for the round bits, some odd bits of lumber for the hose supports up top and plywood for the sides and the tool hangers. it's all spec'd to fit around those two bins, one bin for 3/8th fittings and the other for 1/2" fittings. Happy to send you some layouts for it, you would of course need to adjust for whatever bins you put in if any.
-Clint
added another view of it.
Wow, nice work! From the first picture, it looked so perfect I assumed it was molded plastic. Really great idea.
bad_idea
Well-known member
Yes I did, it's a bit of plywood, mdf for the round bits, some odd bits of lumber for the hose supports up top and plywood for the sides and the tool hangers. it's all spec'd to fit around those two bins, one bin for 3/8th fittings and the other for 1/2" fittings. Happy to send you some layouts for it, you would of course need to adjust for whatever bins you put in if any.
-Clint
added another view of it.
Awesome execution, I assumed it was a mass produced high end piece.
I recommend you put a door on it for two reasons. First, I like everything hidden behind doors for a more minimal look. Second, those air fittings are begging for dust to settle in them. I do a lot of grinding in my shop and the grinding dust settles on EVERYTHING!
Storage for some of my cordless tools etc made from pallet. I’m Santa at many locations in my hometown so the Santa picture is the one that was at the entrance of our local Lowe’s so families would know when to bring their children to see and get pictures with Santa.

Awesome execution, I assumed it was a mass produced high end piece.
I recommend you put a door on it for two reasons. First, I like everything hidden behind doors for a more minimal look. Second, those air fittings are begging for dust to settle in them. I do a lot of grinding in my shop and the grinding dust settles on EVERYTHING!
A very good idea, I may do that in future. for now it's an easy thing to hit it with a blower and it's right next to the garage door. I do mostly wood working so the dust is easily blown away and the tools etc are heavy enough the blower doesn't even disturb them.
Though on thinking of what you mean now, IN THEM... lol good point indeed!
Last edited: