To avoid these ads, REGISTER NOW!

ZMotorsports Shop Projects 2.0

OutlawDrifter

Well-known member
Joined
Jan 20, 2015
Messages
3,899
Location
KS
Yes, that price definitely sounds reasonable.

I generally get quoted the OLD price when I call in and they have to order it, then when it arrives, I get the NEW price (since they haven't had it in stock since 2004) and have to take a few moments to let the shock wear off :eyecrazy:
 
To avoid these ads, REGISTER NOW!
OP
Z

zmotorsports

ALLIANCE MEMBER
Joined
Oct 20, 2009
Messages
21,477
Location
Northern Utah
Yes, that price definitely sounds reasonable.

I generally get quoted the OLD price when I call in and they have to order it, then when it arrives, I get the NEW price (since they haven't had it in stock since 2004) and have to take a few moments to let the shock wear off :eyecrazy:

Yeah, I'm good with the price either way but I just hope he is looking up the correct part and has the correct part #, otherwise I've wasted a day I could be getting the correct one coming.

Sitting here thinking about it I know it hasn't given me any grief in all these years but we have check valve issues on our compressors at work quite regularly so if they have two I may pick up a spare. You know the old saying "two is one and one is none". Well I found out last night that I had none.:sad:
 

larry_g

Well-known member
Joined
Apr 28, 2007
Messages
16,896
Location
oregon
Airing down the tires?

In your trip descriptions you tell of airing down the tires two different times. I understand the first air down to go from pavement to off road. Why the second airdown higher up the mountain? Was it because of altitude making the tire harder or because the trail conditions were changing?

lg
no neat sig line
 
OP
Z

zmotorsports

ALLIANCE MEMBER
Joined
Oct 20, 2009
Messages
21,477
Location
Northern Utah
Airing down the tires?

In your trip descriptions you tell of airing down the tires two different times. I understand the first air down to go from pavement to off road. Why the second airdown higher up the mountain? Was it because of altitude making the tire harder or because the trail conditions were changing?

lg
no neat sig line

Sorry, I should have been more clear. We are airing down each day as we usually run only 1-2 trails a day. We air back up at the end of the trail, head back to camp and then drive to the next trail the next morning which requires airing back down, then rinse and repeat.

Thanks.
 
Last edited:

Jagmandave

Well-known member
Joined
Nov 6, 2011
Messages
6,305
Location
Overland Park, Ks.
Wow, shows how far out of it I am!

Those are pretty good sized tires on your Jeeps, how long does it take to air them back up again? I assume you use one of those little plug in compressors?
 
OP
Z

zmotorsports

ALLIANCE MEMBER
Joined
Oct 20, 2009
Messages
21,477
Location
Northern Utah
Wow, shows how far out of it I am!

Those are pretty good sized tires on your Jeeps, how long does it take to air them back up again? I assume you use one of those little plug in compressors?

I have a set of deflators preset to air down to 14 PSI for running easy to moderate trails like last week in Ouray, CO and air them back up to 30 PSI. At that 30 PSI warm it is actually closer to 28 PSI cold which is where I usually run them on a daily basis. On more difficult trails where there is sand or I need the traction for obstacles I have another set of deflators preset to 12 PSI and air back up to the same 30 PSI. The last day of the rally or gathering or just prior to leaving from home I air my 37" tires up to about 36 PSI for flat-towing behind the coach. It provides a bit less rolling resistance yet due to not being powered doesn't affect the tire wear.

I have used multiple iterations of small air compressors in my Jeeps over the years for airing up tires after the trail but in January 2019 I switched over to CO2 when I went from the 35" tires to the 37" tires so it is actually quite quick. It used to take me about 4-1/2 minutes per tire to air up my 35" tires but with the CO2 tank I can air up each 37" tire in about 50 seconds. It takes me longer to remove the cover from my CO2 tank, attach my hose and put them back away than it does to actually air up the tires.:lol:
 
OP
Z

zmotorsports

ALLIANCE MEMBER
Joined
Oct 20, 2009
Messages
21,477
Location
Northern Utah
Wow, C02.....great way to do it.....

Yes. SO far I really like it for the year and a half I've been using it. I can get about 4 complete air ups of all four tires per 10 pound tank and I have two 10 lb tanks on board. I simply refill them at a local brewery when I return home.
 

rattle_snake

Well-known member
Joined
Jun 25, 2015
Messages
5,240
Location
Chandler, AZ
I scored a C02 inflator system from a friend. I think it is a 10# tank, so guessing it will do 10, 40" tires fills or so. Can use C02 tank on kegs or welder too.
 
OP
Z

zmotorsports

ALLIANCE MEMBER
Joined
Oct 20, 2009
Messages
21,477
Location
Northern Utah
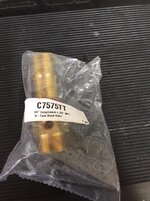
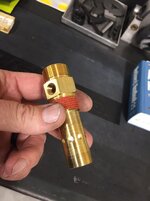
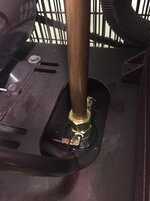
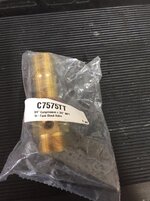
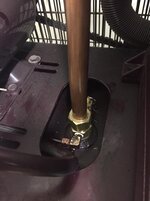
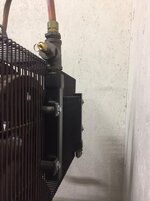
Picked up a new check valve for my Quincy QT-5 compressor today and installed it tonight after work. She’s all back up and running again. It ***** having the compressor down if even for one night.

New check valve.
fed9564ce6968fc45bcf6d1fac4aefb8.jpg

25df58eebb649d15310e6bb4776adb77.jpg

763b1acafd1ded759f45527526f377d2.jpg

fe81d8cb8da7ceefbbdd2f722f3a2ff5.jpg

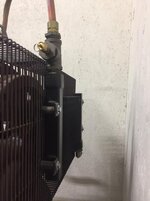
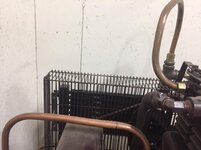
I’m not sure if I’ve shown this before but this is my old transmission cooler from of our Gillig chassis under our 1991 Beaver coach. It developed a leak so I replaced it and then figured I would try and repair it and after repairing it, I repurposed it as an aftercooler for my two-stage compressor.
1f7607a851ecea03026114942b89ef89.jpg

I mounted it to the back side of the belt guard then ran new copper tubing.
bb1d5ed8bffa532a21538d42097ce615.jpg

Thanks for looking.
 

Attachments

  • fed9564ce6968fc45bcf6d1fac4aefb8.jpg
    fed9564ce6968fc45bcf6d1fac4aefb8.jpg
    106.7 KB · Views: 0
  • 25df58eebb649d15310e6bb4776adb77.jpg
    25df58eebb649d15310e6bb4776adb77.jpg
    63.4 KB · Views: 0
  • 763b1acafd1ded759f45527526f377d2.jpg
    763b1acafd1ded759f45527526f377d2.jpg
    70 KB · Views: 0
  • fe81d8cb8da7ceefbbdd2f722f3a2ff5.jpg
    fe81d8cb8da7ceefbbdd2f722f3a2ff5.jpg
    78.8 KB · Views: 0
  • 1f7607a851ecea03026114942b89ef89.jpg
    1f7607a851ecea03026114942b89ef89.jpg
    78.6 KB · Views: 0
  • bb1d5ed8bffa532a21538d42097ce615.jpg
    bb1d5ed8bffa532a21538d42097ce615.jpg
    81.8 KB · Views: 0
Last edited:

rattle_snake

Well-known member
Joined
Jun 25, 2015
Messages
5,240
Location
Chandler, AZ
...It ***** having the compressor down if even for one night.

yes, mine has been down for 2 weeks now. I have a smaller backup compressor plumbed into the drain of one drops for now. Can't seem to prioritize extraction and inspection of the pump in miserable summer weather. That and someone built a shed around it. It did make it 22 years without issue, so can't complain to much.
Toying with idea of aftercooler I have a few spare coolers to choose from. But it has done fine all this time without, too many projects...
 
OP
Z

zmotorsports

ALLIANCE MEMBER
Joined
Oct 20, 2009
Messages
21,477
Location
Northern Utah
yes, mine has been down for 2 weeks now. I have a smaller backup compressor plumbed into the drain of one drops for now. Can't seem to prioritize extraction and inspection of the pump in miserable summer weather. That and someone built a shed around it. It did make it 22 years without issue, so can't complain to much.
Toying with idea of aftercooler I have a few spare coolers to choose from. But it has done fine all this time without, too many projects...

I agree about the projects Justin. I was ******* and moaning to my wife on Tuesday night that it seems like every time I get a paying job in the shop lately something goes to **** and makes me wonder if it's really worth it.

Rather than some sympathy or understanding all she said was "quit taking on side jobs". :dunno: Huh, that's not what I thought the response would be.
 

OutlawDrifter

Well-known member
Joined
Jan 20, 2015
Messages
3,899
Location
KS
I agree about the projects Justin. I was ******* and moaning to my wife on Tuesday night that it seems like every time I get a paying job in the shop lately something goes to **** and makes me wonder if it's really worth it.

Rather than some sympathy or understanding all she said was "quit taking on side jobs". :dunno: Huh, that's not what I thought the response would be.

Wisdom of a good wife. Honest. :rocker:
 

customh

Well-known member
Joined
Feb 18, 2013
Messages
562
Location
East Bethel, MN
Just did one of those check valves on the portable Husky at work. Our main air compressors are all rotary screws. 15hp up to 250.
 
OP
Z

zmotorsports

ALLIANCE MEMBER
Joined
Oct 20, 2009
Messages
21,477
Location
Northern Utah
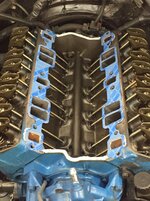
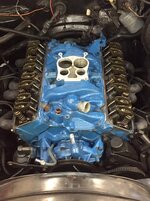
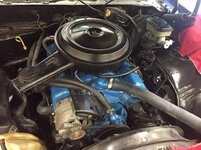
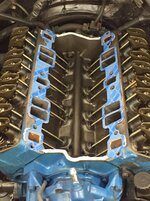
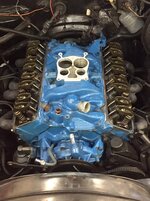
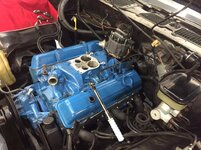
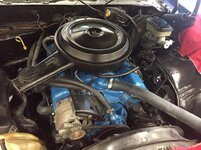
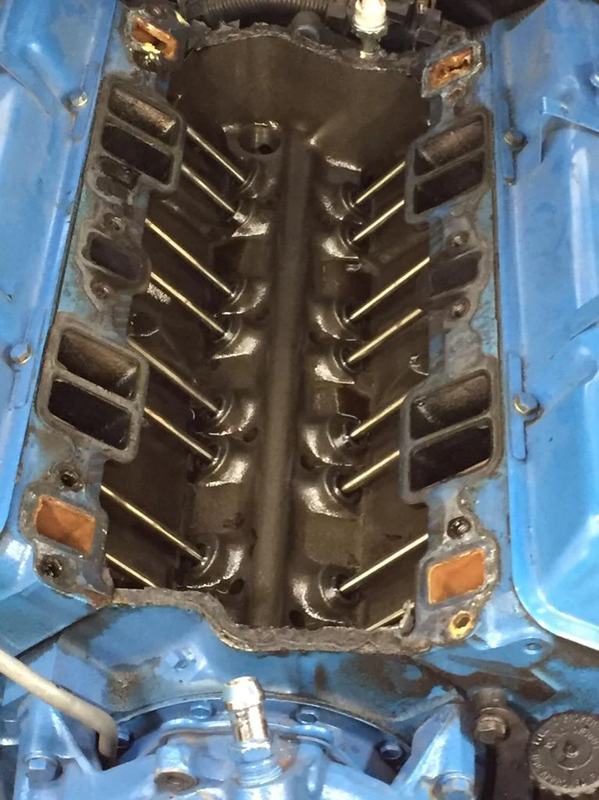
Finished up the Camaro tonight.

Gasket adhesive sprayed on gasket and stuck to the head. I smear a very thin layer around the water ports on the head before gasket placement then about a 1/4” bead at the front and rear of the lifter valley.
180ceed6efb19381b2122062f1fefcfc.jpg

Manifold installed and torqued in place.
fdac3c1eb464c7f2c4a19b819cb7a47e.jpg

Finishing up torquing the valve covers in place.
6cb67238c4e120b3a5513dadbaad4a17.jpg

Completed.
28781547bbff0f99b50244094ddef7c6.jpg

Thanks for looking.
 

Attachments

  • 180ceed6efb19381b2122062f1fefcfc.jpg
    180ceed6efb19381b2122062f1fefcfc.jpg
    129 KB · Views: 0
  • fdac3c1eb464c7f2c4a19b819cb7a47e.jpg
    fdac3c1eb464c7f2c4a19b819cb7a47e.jpg
    117.4 KB · Views: 0
  • 6cb67238c4e120b3a5513dadbaad4a17.jpg
    6cb67238c4e120b3a5513dadbaad4a17.jpg
    125.1 KB · Views: 0
  • 28781547bbff0f99b50244094ddef7c6.jpg
    28781547bbff0f99b50244094ddef7c6.jpg
    114.4 KB · Views: 0
Last edited:
To avoid these ads, REGISTER NOW!

C_F

ALLIANCE MEMBER
Joined
Jan 21, 2005
Messages
9,675
Location
Utah...SNOW BLOWS!
I've been absent for a while, gotta catch up! :eek:
I love the old Mr Gasket valve cover "load spreader" helpers pictured there.
MR-G.png


They were originally designed for the small block Chebby, & sold in 4-packs, with 1/4" bolt holes in them. I reamed out a few sets of those to 5/16" & used them of a few Ford FE engines with good results. The ones on your engine are pre-88 or so, I bet. The later ones were thicker & had sort of a "woop" (a kink) at each end to help stay straight. The steel was so crappy (Chinese) that they still bent under too much torque. I still have an old 390 with steel valve covers using those helpers. They work great! With minimal torque, that is. :)
 
OP
Z

zmotorsports

ALLIANCE MEMBER
Joined
Oct 20, 2009
Messages
21,477
Location
Northern Utah
I've been absent for a while, gotta catch up! :eek:
I love the old Mr Gasket valve cover "load spreader" helpers pictured there.


They were originally designed for the small block Chebby, & sold in 4-packs, with 1/4" bolt holes in them. I reamed out a few sets of those to 5/16" & used them of a few Ford FE engines with good results. The ones on your engine are pre-88 or so, I bet. The later ones were thicker & had sort of a "woop" (a kink) at each end to help stay straight. The steel was so crappy (Chinese) that they still bent under too much torque. I still have an old 390 with steel valve covers using those helpers. They work great! With minimal torque, that is. :)

Yeah, I had to straighten a couple of the load spreaders as they had been overtorqued, which is probably why there were leaks.:lol:
 

Bigblue&Goldie

Well-known member
Joined
Mar 12, 2009
Messages
10,733
Location
AZ
Mike, I tried searching, but came up empty handed.....

Did you ever do a write up on your VFD installation on your lathe? I saw in your old thread you briefly mentioned it, but the pics were dead. I've been reading how some people have the VFD stand alone and others use the machine's limit switches to control the VFD. Just curious how/why you did yours the way you did?
 
OP
Z

zmotorsports

ALLIANCE MEMBER
Joined
Oct 20, 2009
Messages
21,477
Location
Northern Utah
Mike, I tried searching, but came up empty handed.....

Did you ever do a write up on your VFD installation on your lathe? I saw in your old thread you briefly mentioned it, but the pics were dead. I've been reading how some people have the VFD stand alone and others use the machine's limit switches to control the VFD. Just curious how/why you did yours the way you did?

Ryan, I did have some pictures from 2014 when I installed it but you are right, they are gone now.

I didn't really do a write up as I just followed the direction in the literature. I did tweak my controls on my lathe a bit and put a potentiometer on the lathe control panel so I didn't have to keep opening and closing the enclosure to adjust the frequency.

As for why I did the it the way I did, it was simple and quick. I know there are a few guys that turned their VFD into a major project but I just wanted to get my lathe up and running as I had been without a lathe for a few months and was behind on some things. I'm not bashing anyone who spent a lot of time setting theirs up because there are some bad *** VFD setups but I just didn't have the time. Mine has worked great and I really haven't had to do anything to it since the installation.
 

BORING HOP YARD

Well-known member
Joined
Jan 13, 2007
Messages
1,105
Location
Boring Oregon
Mike, if I could chime in about why I used machine switches to give the VFD inputs.
In my case I was installing a VFD on a old Cincinnati toolmaster knee mill. The mill has a forked toolbar holder that locks out the main shaft so you can change cutters out. The toolbar also prevents the clockwise / counterclockwise switch from rotating so the mill main shaft will not rotate while the toolbar is engaged preventing tearing up the mill. Once you unlock the shaft by pulling out the toolbar about an inch, you can then switch the mill CW or CCW.
I'm using the stock Cincinnati rotary switch to tell the VFD to run the motor CW or CCW. Its been a few years but if I remember correctly, the switch inputs to the VHD, when the mill switch is turned to CW, it grounds the wire going back to a VFD terminal, the VFD is programed to run the motor CW when that terminal senses ground. Its the same for CCW when another terminal in the VFD senses ground it runs the motor CCW. This was a far easier method of preventing the mill from being turned on when the tool bar is locked.
I have already had this feature prevent me from crashing the mill more than once.
Hope this helps.
 

Bigblue&Goldie

Well-known member
Joined
Mar 12, 2009
Messages
10,733
Location
AZ
As for why I did the it the way I did, it was simple and quick. I know there are a few guys that turned their VFD into a major project but I just wanted to get my lathe up and running as I had been without a lathe for a few months and was behind on some things. I'm not bashing anyone who spent a lot of time setting theirs up because there are some bad *** VFD setups but I just didn't have the time. Mine has worked great and I really haven't had to do anything to it since the installation.

Isn't that the truth! MKSJ seems to be the guy when it comes to VFD installations on these machines, but they are definitely far more complex than I need or want to tackle. I started to add up the cost of the Hitachi VFD, the NEMA enclosure, brake caps, etc., and it was going to exceed the cost of a rotary phase converter that I could just "plug in". MKSJ's basic installation looks to be more what I'm going for, but without the jog switch or coolant pump (won't likely ever use). I will likely do the potentiometer as that's an easy addition that takes advantage of the VFD. Honestly, if it wasn't for his work, and generosity sharing it, I'd have to go with a phase converter.

I was hoping installation on the lathe would be like the one on my mill, as that one stretched my mental capacity bad enough......
 
OP
Z

zmotorsports

ALLIANCE MEMBER
Joined
Oct 20, 2009
Messages
21,477
Location
Northern Utah
Mike, if I could chime in about why I used machine switches to give the VFD inputs.
In my case I was installing a VFD on a old Cincinnati toolmaster knee mill. The mill has a forked toolbar holder that locks out the main shaft so you can change cutters out. The toolbar also prevents the clockwise / counterclockwise switch from rotating so the mill main shaft will not rotate while the toolbar is engaged preventing tearing up the mill. Once you unlock the shaft by pulling out the toolbar about an inch, you can then switch the mill CW or CCW.
I'm using the stock Cincinnati rotary switch to tell the VFD to run the motor CW or CCW. Its been a few years but if I remember correctly, the switch inputs to the VHD, when the mill switch is turned to CW, it grounds the wire going back to a VFD terminal, the VFD is programed to run the motor CW when that terminal senses ground. Its the same for CCW when another terminal in the VFD senses ground it runs the motor CCW. This was a far easier method of preventing the mill from being turned on when the tool bar is locked.
I have already had this feature prevent me from crashing the mill more than once.
Hope this helps.

I have my lathe setup similarly, without the locking of the mainshaft. My rotary switch that is controlled by the lathe controls provide the inputs to the VFD. I then have a potentiometer that provides and auxiliary input to the VFD to control the frequency remotely rather than using the controls directly on the VFD in the NEMA enclosure.

Thanks.
 
OP
Z

zmotorsports

ALLIANCE MEMBER
Joined
Oct 20, 2009
Messages
21,477
Location
Northern Utah
Isn't that the truth! MKSJ seems to be the guy when it comes to VFD installations on these machines, but they are definitely far more complex than I need or want to tackle. I started to add up the cost of the Hitachi VFD, the NEMA enclosure, brake caps, etc., and it was going to exceed the cost of a rotary phase converter that I could just "plug in". MKSJ's basic installation looks to be more what I'm going for, but without the jog switch or coolant pump (won't likely ever use). I will likely do the potentiometer as that's an easy addition that takes advantage of the VFD. Honestly, if it wasn't for his work, and generosity sharing it, I'd have to go with a phase converter.

I was hoping installation on the lathe would be like the one on my mill, as that one stretched my mental capacity bad enough......

You're right Ryan, Mark's (MKSJ) controls are phenomenal setups but like you are far more than I need or want to take the time to build. I like the standard features of the VFD and didn't want the noise or space of a RPC. The VFD was a simple and quick solution to having a 3 phase lathe.
 

TLCObsession

Well-known member
Joined
Aug 30, 2011
Messages
328
Location
Bellingham, WA
Finished up the Camaro tonight.

Gasket adhesive sprayed on gasket and stuck to the head. I smear a very thin layer around the water ports on the head before gasket placement then about a 1/4” bead at the front and rear of the lifter valley.
180ceed6efb19381b2122062f1fefcfc.jpg


Thanks for looking.

What did you add at the water ports and valley? Gasket adhesive, RTV or something else?
 
OP
Z

zmotorsports

ALLIANCE MEMBER
Joined
Oct 20, 2009
Messages
21,477
Location
Northern Utah
What did you add at the water ports and valley? Gasket adhesive, RTV or something else?

A very thin coat of GM ES (Engine Sealant). I prefer the GM ES to most every other sealant and use it almost exclusively. On the head side of the intake gaskets I sprayed some contact adhesive, mainly to hold the gaskets in place so I could set the manifold in place without them moving.
 

Bob Heine

ALLIANCE MEMBER
Joined
Oct 24, 2009
Messages
10,709
Location
Boca Raton, Florida
Mike, I don't know if it's a good or bad idea but I made four short headless studs with a hacksawed slot in them. They hold the gasket in place and let me line up the manifold without seeing both sides at the same time. Once I have a couple of the manifold bolts snugged lightly I unscrew the alignment studs. Took the approach after I ruined a set of intake gaskets.
 

WoodsTruck

Well-known member
Joined
Jan 12, 2013
Messages
1,028
Mike would probably take it one step further and machine a Torx head in the alignment studs.
 

lilscorpion

Well-known member
Joined
Mar 15, 2010
Messages
3,600
Location
Colorado
Mike, I don't know if it's a good or bad idea but I made four short headless studs with a hacksawed slot in them. They hold the gasket in place and let me line up the manifold without seeing both sides at the same time. Once I have a couple of the manifold bolts snugged lightly I unscrew the alignment studs. Took the approach after I ruined a set of intake gaskets.


That’s a neat idea.
 
OP
Z

zmotorsports

ALLIANCE MEMBER
Joined
Oct 20, 2009
Messages
21,477
Location
Northern Utah
I was hoping for a nice relaxing weekend but evidently the universe had different plans for me.

I had a long as hell week last week with corporate people in town to rollout our new maintenance CMMS system.

Friday after work I was able to unwind while mowing my lawns and after dinner the wife and I were relaxing and looking forward to having our morning coffee sitting on the deck.

Well that changed quickly when the magic smoke decided to escape from our dishwasher. This was what I thought was a decent quality appliance and was only 3+ years old when we bought our new home and was the only appliance we didn’t replace when we purchased the home.

I don’t think the previous owners took care of anything and for those that followed along on my shop build and saw what I dealt with on the home, I think you can concur.

When we bought the house I performed a thorough cleaning of the dishwasher but yet I’ve still had to dig into this dishwasher on two separate occasions due to debris getting caught in the screen and once bending the impeller blades.

After performing some preliminary tests and unable to find a wiring schematic I determined it would probably be best to replace it rather than waste any more time.

Saturday morning the wife and I went and purchased a new dishwasher and my son came over to help me lift it out if the truck and install it. It was nice to be able to spend some time with my son but I wasn’t thrilled about having to spend money and replace an appliance that was only 7 years old. It’s so disappointing when researching for quality anything anymore because I’m not sure it exists.

After replacing the dishwasher I went out to the shop to begin what I had originally planned for the day which was to rack the Jeep to perform a routine service and give it a thorough once over.
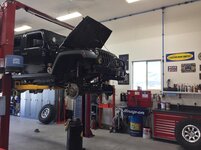
5463a02a148ebe31d2152d422c0083e6.jpg

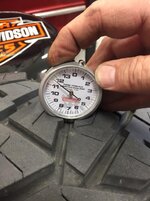
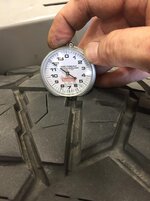
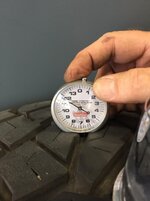
I measured the tread depth again and these tires have really been wearing well. I have been so pleased with these Nitto Ridge Grapplers from day one. I now have 24k driven miles on these tires plus another roughly 8k of flat-towed miles and they still have between 11/32” and 12/32” of tread depth.
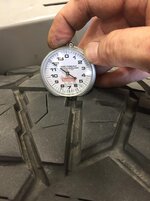
277a7a1da0119d572c07a7e52267f9df.jpg

1cd300d3e6f0fc182904c7ad5740ef54.jpg

4e4fffa137d557cb374b8d19dd03c241.jpg

0c04cec985bac7eed77f61bf603b7380.jpg

All in all very happy with the entire setup. The new powertrain now has 24k miles on it and has performed beautifully.

I did discover my front brake pads are needing to be replaced then I can wrap it up and put it back down on all fours.
 

Attachments

  • 5463a02a148ebe31d2152d422c0083e6.jpg
    5463a02a148ebe31d2152d422c0083e6.jpg
    85.7 KB · Views: 0
  • 277a7a1da0119d572c07a7e52267f9df.jpg
    277a7a1da0119d572c07a7e52267f9df.jpg
    77.8 KB · Views: 0
  • 1cd300d3e6f0fc182904c7ad5740ef54.jpg
    1cd300d3e6f0fc182904c7ad5740ef54.jpg
    81 KB · Views: 0
  • 4e4fffa137d557cb374b8d19dd03c241.jpg
    4e4fffa137d557cb374b8d19dd03c241.jpg
    73.1 KB · Views: 0
  • 0c04cec985bac7eed77f61bf603b7380.jpg
    0c04cec985bac7eed77f61bf603b7380.jpg
    66.9 KB · Views: 1
Last edited:
OP
Z

zmotorsports

ALLIANCE MEMBER
Joined
Oct 20, 2009
Messages
21,477
Location
Northern Utah
Hey Mike, what make and model of dishwasher did you end up purchasing?

Whirlpool 24" with the stainless steel tub. Can't remember the exact model # off the top of my head. It got some decent scores in consumer reports. We found the next higher model of Kitchenaid from what we had but that we both liked but they didn't have it in stock and was on backorder without a known ETA.
 

shortykorte

Well-known member
Joined
Sep 1, 2014
Messages
8,039
Location
Tallahassee, Fl
Well just think, if you still had your favorite yard ornament, you could have flipped it on it’s side and used it as a wash tub. Lol.


Sent from my iPhone using Garage Journal
 
OP
Z

zmotorsports

ALLIANCE MEMBER
Joined
Oct 20, 2009
Messages
21,477
Location
Northern Utah
While I was performing the service on the Jeep on Saturday I discovered my front brakes were wearing and the passenger side had worn very heavy on the inside pad. I ordered a new set and they were due to arrive this afternoon. When I arrived home they still hadn’t been delivered yet so I went through and checked fluids on the coach.

Once the front pads arrived I commenced disassembling them and quickly found out why the passenger side wore so unevenly. The upper pin was frozen in the mounting bracket.

With a little heat and working it back and forth I was able to remove the pin, clean the pin and the bore in preparation for reassembly.
a6122307aa2542398d2c5c200cfc4779.jpg

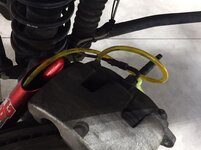
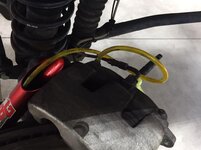
When compressing the pistons in the calipers it is a good idea to open the bleeder as you are compressing the pistons to allow contaminated fluid to be expelled from the caliper. This prevents pushing a high volume of brake fluid back to the reservoir or any contaminants into the ABS module. Even though I flush and replace my fluid regularly I still practice this method as the fluid in the caliper is the usually the most apt to be compromised due to heat.
1f602921e249aa97d501873936ca5d24.jpg

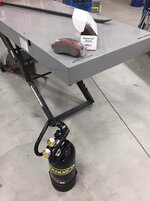
New brake pads ready to install and my freshly refilled CO2 tank that I stopped and had filled on the way home today.
029c1bc81bb815eea281fd178f29e0ce.jpg

Ready for a road test.
d2729707788635c73c01b621c7d45f3c.jpg
 

Attachments

  • 029c1bc81bb815eea281fd178f29e0ce.jpg
    029c1bc81bb815eea281fd178f29e0ce.jpg
    69.5 KB · Views: 0
  • 1f602921e249aa97d501873936ca5d24.jpg
    1f602921e249aa97d501873936ca5d24.jpg
    67.7 KB · Views: 0
  • a6122307aa2542398d2c5c200cfc4779.jpg
    a6122307aa2542398d2c5c200cfc4779.jpg
    71.4 KB · Views: 0
  • d2729707788635c73c01b621c7d45f3c.jpg
    d2729707788635c73c01b621c7d45f3c.jpg
    72.9 KB · Views: 0

jbmatth

Well-known member
Joined
Jun 3, 2013
Messages
5,692
Location
Northern Ok.
Good tip on bleeding the fluid off of the caliper when compressing the piston. I hadn't heard that before and it could have saved me some messes in the past doing my first pad change on a used vehicle that had been overfilled. Jeep still looks great.

JB
 
OP
Z

zmotorsports

ALLIANCE MEMBER
Joined
Oct 20, 2009
Messages
21,477
Location
Northern Utah
Good tip on bleeding the fluid off of the caliper when compressing the piston. I hadn't heard that before and it could have saved me some messes in the past doing my first pad change on a used vehicle that had been overfilled. Jeep still looks great.

JB

Thank you JB. Glad the little tip was helpful. I've been doing it that way for many years and I try to pass it along because I hear of a lot of stories of ABS modules having issues after a brake job which I think are related. Plus I don't think many people realize that brake fluid should be replaced/flushed routinely.
 
To avoid these ads, REGISTER NOW!
Top Bottom