To avoid these ads, REGISTER NOW!

VISE REPAIR 101 all vise repairs, lubricants, sources for parts and the tricks to fix

Shiftless

Well-known member
Joined
Mar 9, 2014
Messages
14,589
Location
East Bay SFO
If you can’t get complete submersion, here is a trick.

Put the part into a heavy plastic bag like a zip lock, Seal completely, fill the bag with Evaporust, then immerse the bag in a bucket of water. Keep the opening above water level if possible. Warm water speeds the chemical reaction of Evaporust eating the rust.
 
To avoid these ads, REGISTER NOW!

tjpavlov

Well-known member
Joined
May 18, 2012
Messages
1,280
Location
Providence, RI
If you can’t get complete submersion, here is a trick.

Put the part into a heavy plastic bag like a zip lock, Seal completely, fill the bag with Evaporust, then immerse the bag in a bucket of water. Keep the opening above water level if possible. Warm water speeds the chemical reaction of Evaporust eating the rust.

That's a great idea. Can't believe I didn't think of using a ziplock. If things don't turn out great in the morning I will give that a try.

Thanks!
 

larry4406

Well-known member
Joined
Jan 27, 2006
Messages
19,565
Location
Northern Virginia
If you can’t get complete submersion, here is a trick.

Put the part into a heavy plastic bag like a zip lock, Seal completely, fill the bag with Evaporust, then immerse the bag in a bucket of water. Keep the opening above water level if possible. Warm water speeds the chemical reaction of Evaporust eating the rust.

Very clever!
 

Shiftless

Well-known member
Joined
Mar 9, 2014
Messages
14,589
Location
East Bay SFO
That's a great idea. Can't believe I didn't think of using a ziplock. If things don't turn out great in the morning I will give that a try.

Thanks!

Very clever!

Thanks guys, but it wasn’t me who first suggested that trick. If one of the other contributors to this thread can remember who first posted that idea, let’s give him credit here.
 

Outlawmws

Well-known member
Joined
Aug 9, 2011
Messages
39,324
Location
The Badlands
But also, credit to Shift for keeping it alive!

My only caution is to take measures to ensure you don't poke a hole in the bag, - double bagging might be a good idea, or padding the part or water container so a sharp corner is less likely to punch a hole.
 

tjpavlov

Well-known member
Joined
May 18, 2012
Messages
1,280
Location
Providence, RI
Just to update all of you who have been helping and following along.

I got my vise all taken apart and cleaned up. I wound up soaking it in how soapy water for about a half hour to help loosen up the grime and the grease. I rinsed it with a hose and then used Grez-off to degrease it. From there it went into a soak in Evaporust for about a day. It was amazing to see how different the Evaporust looked at the end--basically from yellow to brown. I took it out, rinsed and wire wheeled it. Man, wire wheeling is very satisfying, particularly on the handle. I think a grinder restoration is going to by my next project.

I wound up priming and painting it on Saturday. Just waiting another day before I put it all back together. I'll post up some finished pictures when it's all done.

Thanks again to all who helped walk me through this process!
 

AreBeeBee

Well-known member
Joined
Sep 17, 2020
Messages
415
Location
Wisconsin
Hello all, I'm a new member with a question about finishing a vise as bare metal. The vise is a 5-inch Craftsman 506-51810, made by Columbian (in 1960? to 1975?). I got it at a Mid-West Tool Collectors meet a couple weekends ago.

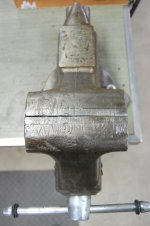
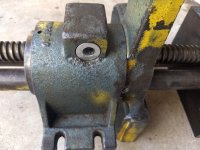
The four images below show the vise as bought, its two sides cleaned of paint, and the state of the jaws.

Yep, hacksaw cuts on them plus a small, less than 1 mm, out-of-parallel error in seating the right side of the fixed jaw insert. (Clogged and damaged slots on the screws promise lots of fun loosening them.) So far neither the cut marks nor the insert misalignment are a problem for me in use.

I'll probably tackle loosening the inserts and seating them properly as the next project with this vise, but there's no hurry as it works well enough as is. The vise is not going to see action beyond basic home handyman projects.

However after I stripped off the gray paint then the Craftsman red below it, I got to liking the bare metal finish. My original plan was to strip it down then repaint in dark blue with the make, model number, and chevrons picked out in silver. I may still do that.

For now however I'm leaving it bare. But to protect it from rust, I've painted the casting parts with a coat of shellac (Zinnser's bulls-eye clear shellac).

So my question, after all this preamble, is why isn't shellac used more often in cases like this? It's easy to apply and dries fast. It can also be removed with denatured alcohol.

Numerous restorers in this thread and others at GJ have spoken of wiped-on BLO in one or more coats and waiting perhaps a day between coats for it to harden. With the shellac, one coat covers it and dries in about 30 minutes or less, depending on conditions. (It darkens the metal a little, but so does BLO it seems.)

Is there a reason NOT to use shellac as a bare metal finish? I'm hoping to hear from people who know a whole lot more than I about this —
 

Attachments

  • Craftsman as bought.jpg
    Craftsman as bought.jpg
    95.3 KB · Views: 60
  • Craftsman left.jpg
    Craftsman left.jpg
    93.3 KB · Views: 59
  • Craftsman right.jpg
    Craftsman right.jpg
    79.2 KB · Views: 65
  • Craftsman top.jpg
    Craftsman top.jpg
    64.7 KB · Views: 59

RTM

Well-known member
Joined
May 13, 2019
Messages
13,251
Location
SF Bay Area
as a woodworker, (and MWTCA member), I would think that shellac might tend to flake a bit more than BLO, which would just wear. Shellac has good adhesion properties, but I also think it’s bit more fragile overall.

¢¢
 

AreBeeBee

Well-known member
Joined
Sep 17, 2020
Messages
415
Location
Wisconsin
Thanks, RTM. I've used Zinnser's shellac on various tool handles, wood and metal, but don't have a long baseline of experience to see how well it holds up.

I guess the vise will be another item in the test!

Thanks again —
 

Outlawmws

Well-known member
Joined
Aug 9, 2011
Messages
39,324
Location
The Badlands
I agree Shellac is more brittle than BLO. BLO is like "Natures Polyurethane" . Mind you I like Shellac on wood - I use it a lot, but some places I need Poly's durability...

For metal I'd go with BLO.
 

RTM

Well-known member
Joined
May 13, 2019
Messages
13,251
Location
SF Bay Area
My usual choice for wooden tool handles is a 1/3 mix each of BLO, turpentine and beeswax. It will feel much better in the hand over time. Shellac is very versatile, a great sealer, intermediate coat, top coat, but tool handles would not be the top of the list.
 

doubletroubledan

Active member
Joined
Sep 30, 2018
Messages
34
Location
home
Anybody use Shima ?
I tried it and will let everyone else that has , tell you if it works .

https://www.amazon.com/dp/B07WLD38SN/?tag=atomicindus08-20

Multi-Purpose Rust Remover, Uscharm Anti-Rust Lubricant Multipurpose Rust & Iron Stain Remover Rust Removal Iron Stain Removal Toilet Stain Remover
Brand: Uscharm_Household Cleaners


🍀🍀🍀WORKS FAST – Instantly remove rust and rust stains! No more waiting around for things to work!
🍀🍀🍀PREVENTS OXIDATION & CORROSION – This leaves a thin, waxy film that clings to metal for months that coats and protects metal surfaces from oxidation! Restore shine & prevent rust from developing again.
🍀🍀🍀REQUIRES NO SPECIAL EQUIPMENT – No need to wear gloves, or masks or any protective gears! It is absolutely safe to use around kids and pets!
🍀🍀🍀EASY TO USE – Just spray and wipe! No elbow greasing of any kind involved!
🍀🍀🍀SAFE – Friendly, non-corrosive, no fumes! It is safe to use on almost everything; safe on paints, any metal surfaces, plastics, and vinyl. It is also non-conductive and will not cause short circuits, so it’s safe to use even on electronics!
 

htw

Well-known member
Joined
Mar 1, 2018
Messages
66
WILTON UNIVERSAL TURRET VISE REPAIR INFO

Since the locking mechanism repair information for this vise is essential not available on the internet, I would like to put down as much information as possible to help others.

Background: I Picked up this vise a couple month ago, please see post here.
https://www.garagejournal.com/forum/showpost.php?p=8607244&postcount=80274
It misses the original locking mechanism. I spent a lot of time searching the internet, as well as asking a few GJ members who may still own the same vise; however, could not find any pictures for the locking mechanism.

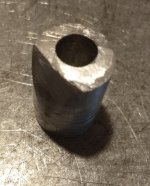
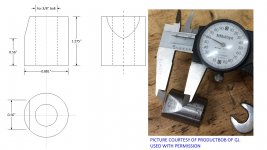
A couple weeks ago when browsing the forum I happened to see a 2019 post by Productbob that he also owned the same vise. I took a chance and sent him the message, and he was very helpful and replied immediately to confirm that he still owns the vise and later sent the detailed measurement of the internal mechanism. It was a simple cylinder with a chamfer. Please see the last picture for the dimension and the actual part. Highly appreciate Productbob’s help.

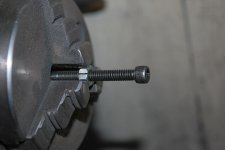
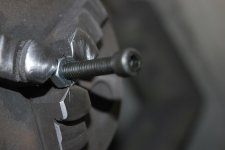
I already bought a 7/8” alumina rod, and finally got the time to make the part. It turned out not as easy as I thought it would be. Since I did not have a real drill press (only a small one to mount Dremel which could not drill a large hole), it was difficult to drill a perfectly vertical hole. I used the small Dremel drill press to drill a small hole and enlarged it step by step to 25/64” (3/8” is too tight for a 3/8” bolt). With some further filing and fitting I finally could get it to work, but from the picture you can see the hole is not centered and vertical.

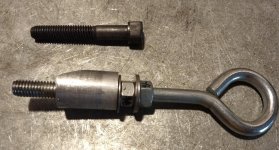
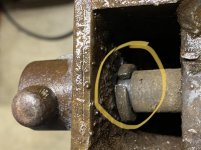
I used a 6" long 3/8 (16 TPI) eye bolt from Home Depot, and used 2 nuts and washers to adjust the space. I also bought a 2-1/2" long 3/8 socket cap bolt trying to make it look more authentic but found it's not as convenient as the eye bolt. With eye bolt I can just use the hand to tighten and if needed use a screwdriver in the eye to tighten further.

I think because of the soft alumina even if I get the bolt really tight I can still rotate the jaw if I try hard. Not sure if the original steel part can get it locked down really tight. But I'm very happy overall, and may consider making a steel part in the future.

When I was at it I also bought ¼ (20 TPI) ½” socket cap screws to replace the original Philips screws for jaws, they looked better and easier to tighten.
 

Attachments

  • IMG_20200926_172824920.jpg
    IMG_20200926_172824920.jpg
    96.9 KB · Views: 39
  • 004.jpg
    004.jpg
    149.1 KB · Views: 36
  • IMG_20200926_172838228.jpg
    IMG_20200926_172838228.jpg
    150.8 KB · Views: 32
  • 003.jpg
    003.jpg
    155.4 KB · Views: 31
  • 002.jpg
    002.jpg
    111.9 KB · Views: 28
  • 001.jpg
    001.jpg
    90.2 KB · Views: 28
  • Presentation1.jpg
    Presentation1.jpg
    136.7 KB · Views: 37
Last edited:

Fretters

Well-known member
Joined
Jan 25, 2014
Messages
4,217
Location
South Yorkshire, England
Shellac, I believe, is prone to flake? With the likes of linseed oil or wax/beeswax, the only maintenance they require is an occasional reapplication when they wear.
 
To avoid these ads, REGISTER NOW!

AreBeeBee

Well-known member
Joined
Sep 17, 2020
Messages
415
Location
Wisconsin
I've been using shellac (Zinsser's) for several years now for wood and metal tool handles and not seen any erosion or loss of the shellac. I'll keep an eye on the vise and see how well the shellac holds up. If it starts to flake or wear, I'll remove it and consider whether to use paint, as I had originally planned, or BLO.

In putting BLO on the eyes of hammers to keep them from drying out, I've noted that any BLO that gets on the metal head tends to remain pretty stubbornly. So that may be the eventual outcome.
 

AreBeeBee

Well-known member
Joined
Sep 17, 2020
Messages
415
Location
Wisconsin
Painting over it also works with shellac, at least Zinsser's, according to the label which says it works as a sealer. Anyway, I'm probably months to a year away from deciding which course to take.
 

jaycobie

Member
Joined
Mar 19, 2020
Messages
19
Location
Iceland
Does anyone know about a site that sells vise jaw screws with a 30-35° countersink?
I need 4x 1/4-20 screws, 3/8" long for an Oswego 23 bench vise.

I would rather I could just get ready-made screws than have to grind down larger headed screws to fit.

If no-one has them, I'm kinda surprised some enterprising guy or gal didn't custom-order some 5/16-18 and 1/4-20 screws with that taper head to sell, seeing as how lots of bench vises seem to have exactly that type of screw.
 

RTM

Well-known member
Joined
May 13, 2019
Messages
13,251
Location
SF Bay Area
It is pretty fast to grind them down, chuck them up in a drill, run them against a grinder wheel. I used allen heads.
 

Tinkerer2

Well-known member
Joined
Jun 19, 2020
Messages
345
Location
Central Florida
Does anyone know about a site that sells vise jaw screws with a 30-35° countersink?
I need 4x 1/4-20 screws, 3/8" long for an Oswego 23 bench vise.

I would rather I could just get ready-made screws than have to grind down larger headed screws to fit.

If no-one has them, I'm kinda surprised some enterprising guy or gal didn't custom-order some 5/16-18 and 1/4-20 screws with that taper head to sell, seeing as how lots of bench vises seem to have exactly that type of screw.

I put mine in a drill press and used a file. Didn't take long.
 

KMScott

Well-known member
Joined
Feb 14, 2012
Messages
4,643
Location
Daufuskie Island, South Carolina
Does anyone know about a site that sells vise jaw screws with a 30-35° countersink?
I need 4x 1/4-20 screws, 3/8" long for an Oswego 23 bench vise.

I would rather I could just get ready-made screws than have to grind down larger headed screws to fit.

If no-one has them, I'm kinda surprised some enterprising guy or gal didn't custom-order some 5/16-18 and 1/4-20 screws with that taper head to sell, seeing as how lots of bench vises seem to have exactly that type of screw.

Well no one makes them, if you have old vises then sometimes you have to make some vise parts your self. Not hard to do just have to do it. I cut a nut so it squeezes over the threads either in a drill chuck or lathe. I use my woodworking lathe.
 

Attachments

  • 30 Degree Screws (3).jpg
    30 Degree Screws (3).jpg
    133.3 KB · Views: 51
  • 30 Degree Screws (7).jpg
    30 Degree Screws (7).jpg
    51.8 KB · Views: 48
  • 30 Degree Screws (8).jpg
    30 Degree Screws (8).jpg
    92.7 KB · Views: 46
  • 30 Degree Screws (5).jpg
    30 Degree Screws (5).jpg
    91.4 KB · Views: 49

cheeky

Member
Joined
Mar 12, 2020
Messages
13
Location
Portland, OR
Finished
I used the collar stop on the screw. I put the smaller tapered side against the dynamic head and put just a drop of blue loctite on the set screw. That 1/16" or so space that I left when I marked the spot to create a divot for the set screw was perfect. Handle turns perfectly and there isn't any noticeable slop.

Great tip @Tinkerer2.

Any suggestions on getting the retaining ring/collar for the lead screw (near the handle -- see attached pic) off and back on other than just brute force and wrangling? I didn't see it on your group of photos so maybe it was already gone when you got it?
 

Attachments

  • IMG_6880.jpg
    IMG_6880.jpg
    104.9 KB · Views: 40

Tinkerer2

Well-known member
Joined
Jun 19, 2020
Messages
345
Location
Central Florida
I spun it around and put the open part 180 degrees from the where you are looking. I then took a dremel and carefully removed part of the clip. Shaved it off. Making it thinner in that spot made it a lot easier to spread it apart. I knew I'd never be able to get it back on so destroying it was ok. BTW, the collar stop worked perfectly.

What vise is this on?
 

AreBeeBee

Well-known member
Joined
Sep 17, 2020
Messages
415
Location
Wisconsin
Cheeky —

I had a similar collar on the Craftsman 5-inch (#506-51810) that I needed to remove to get the lead screw out. I finally pried it apart enough with an old screwdriver and got the gap (like that shown in your photo) wide enough to let the screw slide out for cleaning.

For putting it back, I was planning on slipping the screw in and somehow forcing the collar back together enough to keep the screw and dynamic jaw moving together.

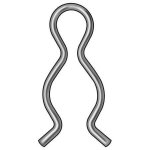
Then on a trip to Ace hardware — one of the canonical three trips necessary for any project — I found an 1/8" hairpin retainer, half-an-inch in diameter, like that shown below. I bought two of them because the collar's raceway(?) was 1/4" wide. I had to trim about 1/8" off the two legs of the hairpin to get it to fit into the U-channel. (Yours may or may not need this.) The two pins, well greased, now hold the screw and jaw together perfectly.

(I put the collar aside, just in case. But I'll probably toss it one of these days. I don't really trust a piece of metal that has been forced open and closed perhaps several times, as mine was.)

Besides being easier to install than the collar (to say the least), the hairpins can be easily removed (and re-inserted) with needlenose pliers, should you ever wish to remove the lead screw again.
 

Attachments

  • Z_z05xfo5oy.JPG
    Z_z05xfo5oy.JPG
    18.3 KB · Views: 35

cheeky

Member
Joined
Mar 12, 2020
Messages
13
Location
Portland, OR
I spun it around and put the open part 180 degrees from the where you are looking. I then took a dremel and carefully removed part of the clip. Shaved it off. Making it thinner in that spot made it a lot easier to spread it apart. I knew I'd never be able to get it back on so destroying it was ok. BTW, the collar stop worked perfectly.

What vise is this on?

Thanks, it's a shame it can't be reused, but I guess there are more modern reusable retaining rings that are now available.

To your question, it's the same vise as yours - Columbian 804.
 

cheeky

Member
Joined
Mar 12, 2020
Messages
13
Location
Portland, OR
Cheeky —

I had a similar collar on the Craftsman 5-inch (#506-51810) that I needed to remove to get the lead screw out. I finally pried it apart enough with an old screwdriver and got the gap (like that shown in your photo) wide enough to let the screw slide out for cleaning.

For putting it back, I was planning on slipping the screw in and somehow forcing the collar back together enough to keep the screw and dynamic jaw moving together.

Then on a trip to Ace hardware — one of the canonical three trips necessary for any project — I found an 1/8" hairpin retainer, half-an-inch in diameter, like that shown below. I bought two of them because the collar's raceway(?) was 1/4" wide. I had to trim about 1/8" off the two legs of the hairpin to get it to fit into the U-channel. (Yours may or may not need this.) The two pins, well greased, now hold the screw and jaw together perfectly.

(I put the collar aside, just in case. But I'll probably toss it one of these days. I don't really trust a piece of metal that has been forced open and closed perhaps several times, as mine was.)

Besides being easier to install than the collar (to say the least), the hairpins can be easily removed (and re-inserted) with needlenose pliers, should you ever wish to remove the lead screw again.

Ah, I was thinking typical external retaining ring or an e-clip, but your suggestion might be easier. There will be some friction/tension, but probably not enough to feel, right?
 

AreBeeBee

Well-known member
Joined
Sep 17, 2020
Messages
415
Location
Wisconsin
E-clips by design are pretty thin, and it looked in your image that the slot or raceway for the collar looked as wide as mine. Which doesn't surprise me, now that you mention your vise is a Columbian. Columbian made the Craftsman vises that have the 506-##### prefix....

As I said, grease 'em, and if one of both work loose, they are easily removeable with needlenose pliers.

Good luck!
 

AreBeeBee

Well-known member
Joined
Sep 17, 2020
Messages
415
Location
Wisconsin
Meant to add —

Yes, no friction that a single finger on the tommy-bar can't overcome. Nor have I seen any signs of them working loose.

Given the complcated planning I was doing to tighten up that collar — wedges, and skinny Vise-Grips or something, maybe a mallet? — the ease with which these pups snapped into place in the lead screw's raceway was almost laughable.
 

cheeky

Member
Joined
Mar 12, 2020
Messages
13
Location
Portland, OR
Cheeky —

Then on a trip to Ace hardware — one of the canonical three trips necessary for any project — I found an 1/8" hairpin retainer, half-an-inch in diameter, like that shown below. I bought two of them because the collar's raceway(?) was 1/4" wide. I had to trim about 1/8" off the two legs of the hairpin to get it to fit into the U-channel. (Yours may or may not need this.) The two pins, well greased, now hold the screw and jaw together perfectly.

I couldn't find it at my local Ace HW, but found it on the Home Depot site. Btw, they call it an external hitch pin. in case anyone else is searching.
 

AreBeeBee

Well-known member
Joined
Sep 17, 2020
Messages
415
Location
Wisconsin
Glad you found it. I use two of them because that neatly fills that channel where the collar went.

I expected the piece of hardware would be found under different names in different sources, which is why I posted a photo of what to look for.

Just keep in mind that if the cover channel for the lead screw is narrow, you may have to clip off a bit of the pins' legs so they can get onto the lead screw.

Edit: And in the McMaster-Carr catalogue: https://www.mcmaster.com/hairpins/hairpin-clips/
 
Last edited:

Roberts210

Well-known member
Joined
Dec 21, 2015
Messages
3,177
Location
Missouri
I found this Wilton 3" machinist's vise today at the local junkyard for $5. But dern it, it's missing the horse-shoe shaped piece on the front that screws to the front of the dynamic. I know somebody here knows where I can get one.

171133042.jpg
 
To avoid these ads, REGISTER NOW!
Top Bottom