To avoid these ads, REGISTER NOW!

Switch/Switch Plate alignment - any pro tips?

Coloshaver

Well-known member
Joined
Apr 4, 2011
Messages
911
Location
Northern Colorado
I've been working on an older house with challenging wiring. It has all Decora style switches many with dimmers and many are 3-way. There are 3 and 4 gang boxes.

After pulling a switches out to trace the wiring getting everything back together is a real PITA. The boxes are stuffed full of wires requiring a lot of pushing to get the wire to the back of the boxes. Then getting the switches back in requires a lot of pressure. I try to tighten the switches down, but the cover plate rarely aligns properly. It turns into several cycles of align and try the cover plate - nope one of the switches shifted when I tightened it so take the cover plate off and try again.

There has to be an easier way!?!? How to you pros do it?

Thanks in advance.
 
To avoid these ads, REGISTER NOW!

Zmann

Well-known member
Joined
Feb 24, 2019
Messages
302
Location
Arizona
a full box is a pain to get the bigger wifi and dimmers from being cocked

but for alignment in the plate i usually center the switch screws in the center of the elongated device holes since the box itself has the proper spacing

and like mentioned don't crank them down then you can still move them.

Commercial switch banks can have a crazy amount in one plate
 

zeke67

Well-known member
Joined
Jun 11, 2010
Messages
272
Location
Houston
I fold all the neutrals horizontally into the back of the box, followed by the grounds. Not sure how old the house is, but the Carlon blue switch boxes and some of the fiber boxes are shaped deeper across the back of the center to accommodate the neutrals horizontally. This gets wires deep in the box and out of the way so you don't have to crank down the switches. Fold in the hots behind the switches. For mounting the switches, I try to center all the device screws and get them nearly tight. Then I match up the cover and using a flat tired screw driver as a pusher, I push the tie bar on the switches left or right until I get all the stitches aligned. Then give the screws a little snug and install the cover.

Uneven drywall is not your friend, so I have a few of those plastic spacers to get all the tie bars in roughly the same plane.
 

nadogail

Well-known member
Joined
Jan 23, 2009
Messages
32,008
Location
Coronado, CA
That is why I carry a hammer with either a wooden or plastic handle to try shoving everything back into the box.
 
To avoid these ads, REGISTER NOW!

MikeinNorthWales

Well-known member
Joined
Nov 27, 2015
Messages
316
Location
SE Pennsylvania
I just thought of this, and it's really going to sound silly, but if you have many to do...

Grab a 3 gang cover and drill holes over the device screws. Get the devices close, place the cover over the devices, and tighten the screws through the holes. Kinda like using a template. It should work for 2 devices as well.

Sent from my SM-G965U using Tapatalk
 

WP9

Well-known member
Joined
Nov 26, 2014
Messages
81
Place all switches so they are to either the left-most or right -most position then tighten down.
 
OP
C

Coloshaver

Well-known member
Joined
Apr 4, 2011
Messages
911
Location
Northern Colorado
i have run into this problem as well. To the OP are you still using the old boxes and original wiring?

Yes. The house has plaster & lathe walls. I'm not masochistic enough to try to replace them :eek:

I just thought of this, and it's really going to sound silly, but if you have many to do...

Grab a 3 gang cover and drill holes over the device screws. Get the devices close, place the cover over the devices, and tighten the screws through the holes. Kinda like using a template. It should work for 2 devices as well.

Sent from my SM-G965U using Tapatalk

I was thinking along these lines but doing it in heavier material than the flimsy plastic switch plates. If I come up with anything, I'll post it.

Thanks for the ideas.
 

checkthisout

Well-known member
Joined
Sep 5, 2008
Messages
5,232
Are you talking about switch depth?

If so get those shims and then lay a straight edge across the faceplate and set all the switches to the depth you want using the shims.

The shims allow you to tighten the switches up against the boxes (as you should be doing) and then they won't shift side to side as you fiddle with the others.

Then install your cover plate over the firmly fastened devices.

The other "trick" is to rip the wall box out and replace it with a remodel box. Remodel boxes sit flush with the drywall everytime. You can then tighten the switches without having to use shims to achieve the desired depth.

Also, that lets you install the largest box possible giving you more room to tuck wires back into the box as needed.
 

75gmck25

Well-known member
Joined
Jul 21, 2014
Messages
1,328
Location
Alexandria, VA
The old metal boxes are too small for easy wiring, and a PIA to remove in plaster walls. They have metal bracket that goes out to one side and nails to the face of the 2x4, and if its a multi-gang box they may have a narrow bracket/arm that goes out the other direction to the next stud.

To get them out you have to use a multi-tool to cut the bracket on either side, and try to not destroy too much plaster in the process. Plaster does not take well to vibration, so it does not always go well. Then you have to release the metal covered cable and push it up and out of the retainer so that you can actually pull the box out. If the cable is still connected it is so inflexible that you can't get the box out.

I've also cut a few ceiling boxes out from the attic side, and even with that access its hard to keep the plaster intact. The metal supports they used for ceiling fixtures are narrow, but about 3/16" thick, so it takes quite a bit to carefully cut them where they are nailed to the floor joists.

Bruce
 

yatg

Well-known member
Joined
Aug 16, 2019
Messages
2,829
Location
Southern Oregon
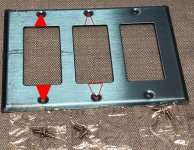
Somewhere I saw a template that let you align the switches. It looked like a multi gang switch plate, but had extra holes for accessing the switch mounting screws. You could probably make one by taking a 3 gang metal plate and notching it.
 

Attachments

  • 3gang-notched.jpg
    3gang-notched.jpg
    166.7 KB · Views: 14
To avoid these ads, REGISTER NOW!
Top Bottom