To avoid these ads, REGISTER NOW!

Above 1200 Sq/FT The ASYLUM - Happy 40th Birthday to Me! (Est. 2005)

Wokspaces above 1200 squarefeet.
OP
S

shopnut

Well-known member
Joined
Feb 22, 2006
Messages
4,237
Location
Florida
Re: The ASYLUM - Turning a Crazy Vision into a Lakefront Gearhead Getaway: Year 6

I've been working on autoCAD 2019 lately and dont really care for the layout. It's not nearly as user friendly as draft site was.

Sent from my SM-A102U using The Garage Journal mobile app
All I want at this point is to do some quick edits on my old AutoCAD 2D building layout drawing, which is a .DWG file. The last software I opened it with was AutoCAD 2012, which did what I needed it to. It seems I'm out of luck if I don't want to spend any money.
 
To avoid these ads, REGISTER NOW!
OP
S

shopnut

Well-known member
Joined
Feb 22, 2006
Messages
4,237
Location
Florida
Re: The ASYLUM - Turning a Crazy Vision into a Lakefront Gearhead Getaway: Year 6

Mark, with the tight space between lift and south wall, I have two thoughts. First, can lift be in middle bay? The other is only using wall for hanging stuff that doesn’t protrude more than 6”. A French cleat wall might work there.

Started on AutoCad 2.5 and really liked it. I’ve been dabbling in Fusion 360 and it’s a great, powerful 3D program but with a learning curve. I also use SketchUp.


Sent from my iPhone using Garage Journal
Actually, I bought the caster kit for the lift, and I had always planned to try the lift in different positions to see what worked best. I still have yet to move it from its initial resting spot. LOL Perhaps its time to try it somewhere else. I always thought the north side bay would be a good place for it, but height is somewhat limited and teh overhead door is only 8 feet leading to it.

French cleats are a good idea for giving me flexibility to move stuff around as needs change. Its becoming obvious to me that all the bulk items are not going to fit on that wall (like ladders. sawhorses, and such), so I might need to get creative with storage ideas to hide them when not in use.

I downloaded Fusion 360 and it seems to be functioning. However, I guess its not designed to deal with the old .DWG drawings because it doesn't recognize my files and won't let me select them to open. Maybe I'm doing something wrong, I don't know.
 

Bob Heine

ALLIANCE MEMBER
Joined
Oct 24, 2009
Messages
10,707
Location
Boca Raton, Florida
Mark, like you I try to hide my messes. I have a wall like that and made some 30"x30" boxes with 1"x8" shelving. That size shelf holds a gallon can nicely.
attachment.php


It also means most of my stuff isn't stacked more than two items deep. To make them one item deep I made some exhaust pipe racks...
attachment.php


...and bought some quart spray bottle racks.
attachment.php


Back in the 1990s, when I built those shallow cabinets, Home Depot sold Mills Pride door packs with two 15"x30" doors for less than $10 so I turned my exposed mess...
attachment.php


...into a hidden mess.
attachment.php


Although Home Depot no longer sells Mills Pride products, Ikea sells a plain white 15"x30" door for $7. With a pair of cheap European hinges they would be a reasonable solution. Of course you would need about 23-inches of space between the lift legs and the wall to allow full opening. Here's a link to the Ikea doors: https://www.ikea.com/us/en/p/haeggeby-door-white-50267172/
 

Attachments

  • 8-inch Cabinet.jpg
    8-inch Cabinet.jpg
    69.5 KB · Views: 276
  • Spray Can Rack 4.jpg
    Spray Can Rack 4.jpg
    76.1 KB · Views: 280
  • Spray Bottle Rack 2.jpg
    Spray Bottle Rack 2.jpg
    94.9 KB · Views: 275
  • Cabinets Open.jpg
    Cabinets Open.jpg
    108.7 KB · Views: 280
  • Cabinets Closed.jpg
    Cabinets Closed.jpg
    75.5 KB · Views: 275
OP
S

shopnut

Well-known member
Joined
Feb 22, 2006
Messages
4,237
Location
Florida
Mark, like you I try to hide my messes. I have a wall like that and made some 30"x30" boxes with 1"x8" shelving. That size shelf holds a gallon can nicely.
What a transformation those cabinet doors made. Wow! And I really like your idea of not having things stacked in front of other things. Once a door is opened, I think everything should be visible and accessible.

Thanks for the Ikea alternative. I've certainly been known to stop in there once in a while. I especially liked their tambour roll-up door kits back in the day, but they stopped selling them before I was ready to buy some. That happens all too often, unfortunately.

Thanks for stopping in and sharing your story. And Vette's in the pictures too... BONUS!
 
OP
S

shopnut

Well-known member
Joined
Feb 22, 2006
Messages
4,237
Location
Florida
THE SAILBOAT’S BOTTOM PAINT IS COMPLETELY FINISHED NOW…

We had some rain-free days lately and I had the time, so I finished painting the sailboat hull under the bunk boards. The project spanned two days because I needed to jack up one side, put three coats on, let it dry, and then set it back down before nightfall. I left the plastic in there that had been covering the bunk carpet in case the paint was not completely dry. The instructions say you can put it back in the water just 6 hours after applying it.

attachment.php


attachment.php


attachment.php


attachment.php


attachment.php
 

Attachments

  • 4356-Hunter-H240-Sailboat-107 (Bottom Paint).jpg
    4356-Hunter-H240-Sailboat-107 (Bottom Paint).jpg
    151.8 KB · Views: 244
  • 4355-Hunter-H240-Sailboat-106 (Bottom Paint).jpg
    4355-Hunter-H240-Sailboat-106 (Bottom Paint).jpg
    150.5 KB · Views: 244
  • 4354-Hunter-H240-Sailboat-105 (Bottom Paint).jpg
    4354-Hunter-H240-Sailboat-105 (Bottom Paint).jpg
    159.5 KB · Views: 248
  • 4353-Hunter-H240-Sailboat-103 (Bottom Paint).jpg
    4353-Hunter-H240-Sailboat-103 (Bottom Paint).jpg
    148.8 KB · Views: 245
  • 4352-Hunter-H240-Sailboat-102 (Bottom Paint).jpg
    4352-Hunter-H240-Sailboat-102 (Bottom Paint).jpg
    149.7 KB · Views: 240
Last edited:
OP
S

shopnut

Well-known member
Joined
Feb 22, 2006
Messages
4,237
Location
Florida
“THIS IS MY BENDPAK” – MAKING THIS LIFT MINE (Part 10 of ?)…

A POOR MAN’S SLIDING/ROLLING BRIDGE JACK (Continued)


I partially built the second powered lift jack, but still have the tail support to add. But it was far enough along to test for synchronization. In order to power the motor, I created a T-harness to control them off the same switched supply. Not long after spending time building it, I realized I could have simply added add another pigtail coming from the junction box, which would have been a LOT easier. Oh well.

Here is the dual set-up.

attachment.php


These are with the jacks fully lowered. I laid a 24” level on the jack pads to indicate if they were rising equally.

attachment.php


attachment.php


This is with the jacks raised nearly to the top.

attachment.php


attachment.php


It appears the right side is running just a bit faster. Overall, this might equate to 1/16 to 1/8” difference between left and right. For a single lift, I think I can live with this, but the difference will accumulate with each raise and lower cycle. Initially, I can manually synch them between lift cycles, but long term, I feel it’s best to run a chain between the two jacks to keep them rising equally.

Here’s a video to give you an idea.

Link to Jack Synchronization Video

(Oops, my picture link below to the video doesn't seem to be working)

attachment.php
 

Attachments

  • 4362-BendPak-Jack-101 (video link).JPG
    4362-BendPak-Jack-101 (video link).JPG
    76.7 KB · Views: 254
  • 4361-BendPak-Jack-103.jpg
    4361-BendPak-Jack-103.jpg
    107.9 KB · Views: 249
  • 4360-BendPak-Jack-102.jpg
    4360-BendPak-Jack-102.jpg
    148.6 KB · Views: 246
  • 4359--BendPak-Jack-099.jpg
    4359--BendPak-Jack-099.jpg
    99.7 KB · Views: 244
  • 4358--BendPak-Jack-100.jpg
    4358--BendPak-Jack-100.jpg
    146.7 KB · Views: 243
  • 4357--BendPak-Jack-098.jpg
    4357--BendPak-Jack-098.jpg
    147.6 KB · Views: 242
Last edited:

shortykorte

Well-known member
Joined
Sep 1, 2014
Messages
8,039
Location
Tallahassee, Fl
Re: The ASYLUM - Turning a Crazy Vision into a Lakefront Gearhead Getaway: Year 6

IMG_2076.JPG
If you had strapped the wood push V, I think the GJFCASS would have signed off. Lol.

May I suggest putting the jacks under load also to see if there’s any difference


Sent from my iPhone using Garage Journal
 
OP
S

shopnut

Well-known member
Joined
Feb 22, 2006
Messages
4,237
Location
Florida
racer-john - Thanks. Lots to do yet , like attach the cross tube, build chain guards, and mount the whole contraption on the BendPak jack plate, but the whole theory is looking feasible at this point.

harley_jim - Hoping so! Thanks. All testing is positive so far.

shortykorte - Wow, yeah, it would have been so much safer strapping the V to keep it from sliding around. At least I had some bolts in place to keep the V from sliding off the jack pads in one direction. And I straps between the trailer and motorcycle jack frame. I was 2/3rds covered anyway. LOL. On this uphill side, it was a pretty severe angle compared to the other, and things COULD have gone dreadfully bad with that overlooked 1/3rd.

attachment.php


You have a good mind for safety… which sort of makes me wonder about all the blood that shows up in your thread. LOL
 

Attachments

  • 4363-Hunter-H240-Sailboat-105 (Bottom Paint) (Zoomed).JPG
    4363-Hunter-H240-Sailboat-105 (Bottom Paint) (Zoomed).JPG
    52.1 KB · Views: 236
OP
S

shopnut

Well-known member
Joined
Feb 22, 2006
Messages
4,237
Location
Florida
THE LAST FRONTIER, THE ASYLUM SOUTH WALL… (Part 2 of 50)

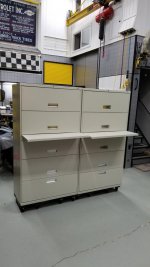
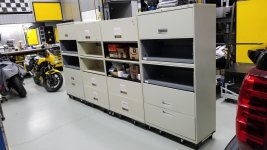
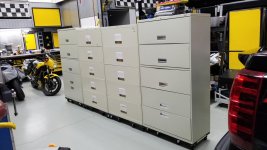
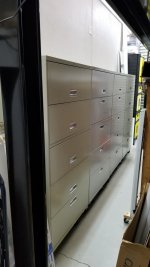
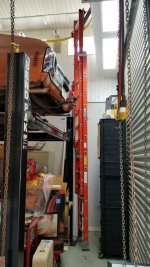
5-DRAWER LATERAL CABINETS


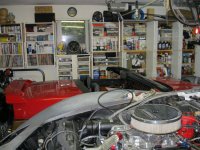
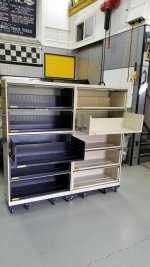
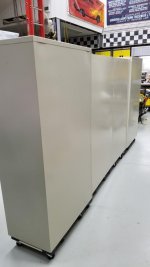
With most company files going digital, I can’t imagine there is much of a market for new lateral file cabinets anymore. And you are seeing many businesses dumping their old cabinets for a song to open up space in their offices. These lateral style file cabinets have proven extremely versatile at storing things at my city garage, so I decided they will be integrated into the Asylum as well. Besides the number of drawers, the biggest difference in the configurations are the drawer/door styles. Some have drawers that simply pull out and others have flip doors in front of the drawers that can be left open or closed.

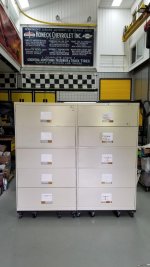
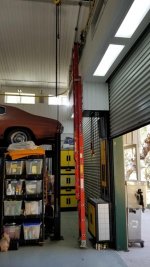
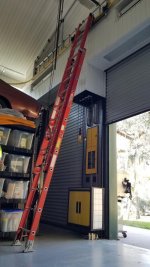
In my quest for suitable lateral file cabinets, I found this interesting old cabinet. Literature proves it is the first “flip-door” style cabinet of its kind. It’s made by Supreme and they call it a Conserv-a-File. It was budget priced at $25 so I bought it. It’s doubtful I will ever find any matching cabinets out there, but it was just to cool to pass up.

attachment.php


attachment.php


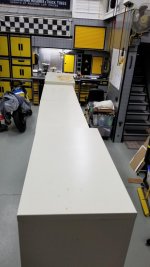
I really like the wide aluminum lid pulls because it comes in handy in tight quarters when you are standing to the side of the cabinet while trying to access a drawer.

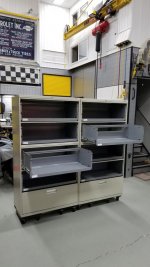
As I said, it has flip doors and once the door is flipped up, the drawer can be pulled out. All the contemporary manufacturers offer cabinets in this style, but they are the minority of cabinets being sold. Still, they are handy in the shop because you can open up the doors and use it like a bookcase if you want. If you need access to what’s at the back of the shelf, just slide the drawer out partially or fully.

attachment.php


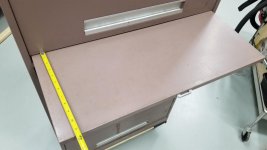
It has a nice little pull out shelf too.

attachment.php


All of these tall cabinets have some type of method to allow only one drawer to be pulled out at a time to avoid a tip over situation. Most modern day cabinets have elaborate latching systems to accomplish it. Not this one. If you look closely, you will see a string with just enough slack in it to allow one drawer to fully extend. I thought it was so simple, it was brilliant. However, I can also see a string breaking and causing a big lawsuit. LOL Unlike the newer style of latching systems, this one will let you pull out two drawers, for instance, halfway.

attachment.php


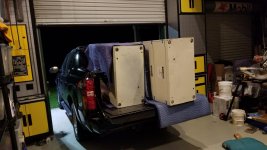
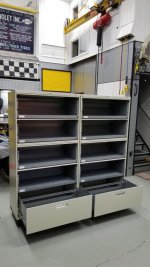
Another very interesting feature is the type of drawer slides. Forget about any drawer slide you have ever seen before. This one has rollers position vertically at the back of the drawer. A steel cable is mounted at the back frame of the cabinet and runs forward over the top roller. The cable then runs down around the back of the bottom roller before mounting low on the cabinet frame. In this picture, you can see the cable routing diagonally between the two rollers. Believe it or not, those drawers fully extended are just as sturdy as any of the other cabinets I have with conventional slides. Removing a drawer is a pain, however, because you have to unhook those cables.

attachment.php


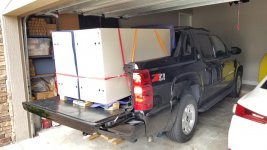
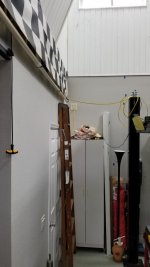
I happened to notice that its color matched the freebee 5-drawer cabinet I found a few months ago. I doubt I will put this tall cabinet into active duty in the Asylum, but it may end up in my retro office back at the city house with my old tanker desks. Time will tell.

attachment.php
 

Attachments

  • 4370-Supreme Conserv-a-File-5-drawer Lateral-04.jpg
    4370-Supreme Conserv-a-File-5-drawer Lateral-04.jpg
    64.4 KB · Views: 249
  • 4369-Supreme Conserv-a-File-5-drawer Lateral-20.jpg
    4369-Supreme Conserv-a-File-5-drawer Lateral-20.jpg
    27.9 KB · Views: 249
  • 4368-Supreme Conserv-a-File-5-drawer Lateral-16.jpg
    4368-Supreme Conserv-a-File-5-drawer Lateral-16.jpg
    54.2 KB · Views: 249
  • 4367-Supreme Conserv-a-File-5-drawer Lateral-09.jpg
    4367-Supreme Conserv-a-File-5-drawer Lateral-09.jpg
    78.7 KB · Views: 252
  • 4366-Supreme Conserv-a-File-5-drawer Lateral-24.jpg
    4366-Supreme Conserv-a-File-5-drawer Lateral-24.jpg
    66.1 KB · Views: 249
  • 4365-Supreme Conserv-a-File-5-drawer Lateral-14.jpg
    4365-Supreme Conserv-a-File-5-drawer Lateral-14.jpg
    68.6 KB · Views: 249
  • 4364-Supreme Conserv-a-File-5-drawer Lateral-03.jpg
    4364-Supreme Conserv-a-File-5-drawer Lateral-03.jpg
    56.7 KB · Views: 257
Last edited:

TwoBytes

Well-known member
Joined
Mar 14, 2014
Messages
790
Location
Canberra, 'Stralia
Re: The ASYLUM - Turning a Crazy Vision into a Lakefront Gearhead Getaway: Year 6

I downloaded Fusion 360 and it seems to be functioning. However, I guess its not designed to deal with the old .DWG drawings because it doesn't recognize my files and won't let me select them to open. Maybe I'm doing something wrong, I don't know.

I haven't imported 2D .DWG files into Fusion 360 myself, but this page indicates that it can be done...
https://knowledge.autodesk.com/supp.../How-to-import-DWG-files-into-Fusion-360.html

"Both 2D and 3D DWG files are uploaded to Fusion 360 through the Data Panel. It is then translated via the Cloud Translation Process and will allow them to be opened and edited in Fusion 360."

I hadn't used AutoCAD since college, but managed to replicate my house in 3D in Fusion 360 in a surprisingly short amount of time...

I had a perfect mental picture of what I want to build, but no matter how much I scribbled on scraps of paper, and stood in the backyard waving my arms around and pointing, my wife couldn't understand what I was talking about.

That gave me a good excuse to get back into 3D CAD to help visualise my ideas. So I've been having lots of fun with AutoDesk Fusion 360 (thanks to dozerbuilder01 for the recommendation).

Here's a current photo of the place for reference...
View media item 62492
And here's the 3D model I've built in Fusion 360, showing the proposed pergola addition hanging off the back there...
View media item 62493
I've also discovered that Fusion 360 will let me share the model online, so you can twirl it around and have a proper look. Here's the link if you're interested...

http://a360.co/2b0uQWV

The first person walkthrough view, and "explode model" options are particularly impressive...
 
OP
S

shopnut

Well-known member
Joined
Feb 22, 2006
Messages
4,237
Location
Florida
Re: The ASYLUM - Turning a Crazy Vision into a Lakefront Gearhead Getaway: Year 6

I haven't imported 2D .DWG files into Fusion 360 myself, but this page indicates that it can be done...
https://knowledge.autodesk.com/supp.../How-to-import-DWG-files-into-Fusion-360.html

"Both 2D and 3D DWG files are uploaded to Fusion 360 through the Data Panel. It is then translated via the Cloud Translation Process and will allow them to be opened and edited in Fusion 360."

I hadn't used AutoCAD since college, but managed to replicate my house in 3D in Fusion 360 in a surprisingly short amount of time...
That is great news and maybe there is hope for Fusion yet. I will give it a try later.

Awesome job on the house model... it looks exactly like the real thing! And with a quick hit of the mirror image button, the attached neighbor can get their model too (well, it looks like a mirror-image duplex anyway).

Thanks for popping in a giving the AutoCAD tip, I need all the help I can get. Maybe, it will be enjoyable enough to final turn the Asylum layout into a 3D model.
 
OP
S

shopnut

Well-known member
Joined
Feb 22, 2006
Messages
4,237
Location
Florida
THE LAST FRONTIER, THE ASYLUM SOUTH WALL… (Part 3 of 50)

MORE CABINETS (Allsteel 4-flip doors).


Craigslist and FB Marketplace are good sources for inexpensive cabinets. The flip door cabinets don’t pop up as often as the regular style, so you need to be ready to pounce when some show up. It seems al lot of them are/were used in medical and dental offices for patient files.

This is the first matching pair I found, made by AllSteel I believe. Two of these fit nicely in the back of the Avalanche. It takes two people to lift each up in there, but I’m getting good at unloading them by myself.

attachment.php


They are in pretty good shape. I would rather have black to save the time of painting the frame, but the beige on the drawers should cover easier and with less coats of the yellow. (I did mention I am going to A-Sy-Li-Fy these cabinets someday, right?)

attachment.php


All doors flip up on these cabinets.

attachment.php


And each drawer can pull out, one at a time of course, for my safety.

attachment.php


As I watch for more cabinets, I found a temporary spot for them underneath the front of the lift. I actually liked the fit of them there, but they can't stay there because I don’t intend to move them every time I want to bring the lift down.

attachment.php
 

Attachments

  • 4371-Cabinet-Allsteel-5-Drawer-Lateral-Flip-Doors-01.jpg
    4371-Cabinet-Allsteel-5-Drawer-Lateral-Flip-Doors-01.jpg
    132.5 KB · Views: 213
  • 4372-Cabinet-Allsteel-5-Drawer-Lateral-Flip-Doors-03.jpg
    4372-Cabinet-Allsteel-5-Drawer-Lateral-Flip-Doors-03.jpg
    72.3 KB · Views: 215
  • 4373-Cabinet-Allsteel-5-Drawer-Lateral-Flip-Doors-05.jpg
    4373-Cabinet-Allsteel-5-Drawer-Lateral-Flip-Doors-05.jpg
    78.4 KB · Views: 209
  • 4374-Cabinet-Allsteel-5-Drawer-Lateral-Flip-Doors-06.jpg
    4374-Cabinet-Allsteel-5-Drawer-Lateral-Flip-Doors-06.jpg
    75.4 KB · Views: 211
  • 4375-Cabinet-Allsteel-5-Drawer-Lateral-Flip-Doors-07.jpg
    4375-Cabinet-Allsteel-5-Drawer-Lateral-Flip-Doors-07.jpg
    66 KB · Views: 209
Last edited:

TwoBytes

Well-known member
Joined
Mar 14, 2014
Messages
790
Location
Canberra, 'Stralia
Re: The ASYLUM - Turning a Crazy Vision into a Lakefront Gearhead Getaway: Year 6

That is great news and maybe there is hope for Fusion yet. I will give it a try later.

Awesome job on the house model... it looks exactly like the real thing! And with a quick hit of the mirror image button, the attached neighbor can get their model too (well, it looks like a mirror-image duplex anyway).

Thanks for popping in a giving the AutoCAD tip, I need all the help I can get. Maybe, it will be enjoyable enough to final turn the Asylum layout into a 3D model.

No worries at all, and thanks, yeah, it's a mirror image duplex, I should try out the mirror image button on the whole model. The fence line and yard are different, but that wouldn't be hard to tweak manually.
 

shortykorte

Well-known member
Joined
Sep 1, 2014
Messages
8,039
Location
Tallahassee, Fl
Re: The ASYLUM - Turning a Crazy Vision into a Lakefront Gearhead Getaway: Year 6

While cabs where in the back of the truck, good time to mount casters.


Sent from my iPhone using Garage Journal
 
OP
S

shopnut

Well-known member
Joined
Feb 22, 2006
Messages
4,237
Location
Florida
Re: The ASYLUM - Turning a Crazy Vision into a Lakefront Gearhead Getaway: Year 6

While cabs where in the back of the truck, good time to mount casters.


Sent from my iPhone using Garage Journal
I wish it were that easy.

Unloading the cabinets by myself is a precarious procedure at best... I get each one to the balance point on the edge of the tailgate and pull them just a bit more while letting them slide down easy from there to the ground. Its a pretty tease moment because I want the two corners hitting the ground at the same time or risk denting one (these cabinets are pretty heavy. And its using every ounce of muscle I have to keep it from crashing down hard. Wheels (or anything that would skate on the floor) at this point would just let the cabinet keeping sliding away from the truck until the entire cabinet dropped to the floor on its side (at a rapid rate, I might add).

Once I have one side edge touching the floor with the cabinet still leaning at about a 45 degree angle against the tailgate, I pivot it upright onto the far moving dolly, but rocking over a 4x4 at the center of the cabinet like a seesaw. Why a 4x4 in the middle? Well it makes getting that second moving dolly under the cabinet closest to the truck much easier.

I suppose I could have used the overhead crane or engine hoist for the job, but I've unloaded four of these in the city garage where I don't have those aids and I've gotten good it. So I stuck with it.
 

bugnut

ALLIANCE MEMBER
Joined
Jul 14, 2012
Messages
3,945
Location
Central Ohio
Shopnut, unload on a couple 2x4 ramps after the wheels are installed. Throw a moving pad like the ones you are using under the bottom of the 2x4 on the garage floor, the boards won't move and the wheels won't roll. Love those cabinets!
 
OP
S

shopnut

Well-known member
Joined
Feb 22, 2006
Messages
4,237
Location
Florida
Re: The ASYLUM - Turning a Crazy Vision into a Lakefront Gearhead Getaway: Year 6

Those are some nice cabinets

Sent from my SM-A102U using The Garage Journal mobile app
These were from a law office and in great shape. Only bad thing was they were in the basement of previous owner, with a 90 degree flight of stairs to go up before getting them to my truck. What a nightmare, but at least he pitched in 100% to get them out of there. I even asked him about stairs when I initially called about them. He said there were just 2 or 3 steps outside the building, and there was, once we were up out of the basement. LOL. Oh well, all's well that ends well.
 
Last edited:
To avoid these ads, REGISTER NOW!
OP
S

shopnut

Well-known member
Joined
Feb 22, 2006
Messages
4,237
Location
Florida
Shopnut, unload on a couple 2x4 ramps after the wheels are installed. Throw a moving pad like the ones you are using under the bottom of the 2x4 on the garage floor, the boards won't move and the wheels won't roll. Love those cabinets!
I think I understand what you are saying. Just slide it down the ramps until it contacts the floor, and then stand it up on the mat? I can see the weight of the cabinet on the ramps keeping the mat from sliding on the floor, but I can't imagine the wheels not wanting to roll (even on the mat) as soon as I start standing it up. I'll give it some more thought and it will likely come to me.

I bought some more cabinets and will show them to y'all shortly.
 
OP
S

shopnut

Well-known member
Joined
Feb 22, 2006
Messages
4,237
Location
Florida
THE LAST FRONTIER, THE ASYLUM SOUTH WALL… (Part 4 of 50)

MORE CABINETS (HON 4-Flip Doors).


The next pair I found were made by HON. Again the Avalanche earned its keep.

attachment.php


They are also in very decent shape and only a couple small dents will need to be hammered out.

attachment.php


They differ slightly in the fact that the bottom drawers are conventional, with just the upper 4 being the flip lid style.

attachment.php


attachment.php


They have the pull out writing desk too like the Conserv-a-File does.

attachment.php
 

Attachments

  • 4380-Cabinet - HON 5-Drawer Lateral Flip Door-09.jpg
    4380-Cabinet - HON 5-Drawer Lateral Flip Door-09.jpg
    64.8 KB · Views: 381
  • 4379-Cabinet - HON 5-Drawer Lateral Flip Door-07.jpg
    4379-Cabinet - HON 5-Drawer Lateral Flip Door-07.jpg
    73.1 KB · Views: 373
  • 4378-Cabinet - HON 5-Drawer Lateral Flip Door-06.jpg
    4378-Cabinet - HON 5-Drawer Lateral Flip Door-06.jpg
    75.1 KB · Views: 377
  • 4376-Cabinet - HON 5-Drawer Lateral Flip Door-01.jpg
    4376-Cabinet - HON 5-Drawer Lateral Flip Door-01.jpg
    146.7 KB · Views: 385
  • 4377-Cabinet - HON 5-Drawer Lateral Flip Door-08.jpg
    4377-Cabinet - HON 5-Drawer Lateral Flip Door-08.jpg
    64.1 KB · Views: 373
Last edited:
OP
S

shopnut

Well-known member
Joined
Feb 22, 2006
Messages
4,237
Location
Florida
THE LAST FRONTIER, THE ASYLUM SOUTH WALL… (Part 5 of 50)

CABINET COMPARISON.

So you think a cabinet is a cabinet, right? I figured the AllSteel and HON cabinets would look fine next to each other with all four in a row. Not really. Here is a comparison. The major difference is overall dimensions, but there are plenty of subtle differences too.

attachment.php


This is how I had planned to arrange them.

attachment.php


attachment.php


attachment.php


attachment.php


My OCD just won’t let me do it. Luckily, two of the cabinets at the city garage are HON’s and nicely match the taller two here at the Asylum (different door arrangements, however).

attachment.php


.

So I guess the Avalanche isn’t done hauling cabinets just yet. LOL
.
 

Attachments

  • 4386-Cabinet - HON 5-Drawer Lateral-01.jpg
    4386-Cabinet - HON 5-Drawer Lateral-01.jpg
    57.2 KB · Views: 343
  • 4385-South-Wall-05 (Cabinet comparison).jpg
    4385-South-Wall-05 (Cabinet comparison).jpg
    136.2 KB · Views: 345
  • 4384-South-Wall-04 (Cabinet comparison).jpg
    4384-South-Wall-04 (Cabinet comparison).jpg
    45.2 KB · Views: 342
  • 4383-South-Wall-03 (Cabinet comparison).jpg
    4383-South-Wall-03 (Cabinet comparison).jpg
    65.9 KB · Views: 16
  • 4382-South-Wall-02 (Cabinet comparison).jpg
    4382-South-Wall-02 (Cabinet comparison).jpg
    134 KB · Views: 348
  • 4381-South-Wall-01 (Cabinet comparison).jpg
    4381-South-Wall-01 (Cabinet comparison).jpg
    63.3 KB · Views: 344
Last edited:
OP
S

shopnut

Well-known member
Joined
Feb 22, 2006
Messages
4,237
Location
Florida
THE LAST FRONTIER, THE ASYLUM SOUTH WALL… (Part 6 of 50)

THE CABINET FLIP-FLOP.

With one trip to the Asylum, I hauled the two HON cabinets from the city garage and then hauled the two AllSteel cabinets back to city garage. I’m sure my neighbors thought I was just hauling the same cabinets out and back into the city garage. LOL But that’s okay, they already think I’m crazy.

Here are all four of the HON cabinets lined up approximately where their final resting place will be. Final leveling and alignment will happen later.

attachment.php


My OCD is settled down a bit now that all cabinet sizes are the same brand, size, and have matching interior colors. LOL

attachment.php


They all have the same matching pull out writing shelves too, not that I’m ever going to use them. Well, never say never. I guess it could come in handy to lay something 12’ long on.

attachment.php


My OCD still wouldn’t let me sleep until I flipped drawers and doors around to get the cabinets as closely configured as possible.

attachment.php


Note now that only the middle row of drawers are different… the two on the outside have flip doors while the middle two have conventional drawers. This, I can live with. At least until I see a fantastic deal on another HON cabinet to scavenge drawers from. LOL

attachment.php


So you might be starting to see the overall plan for this wall at this point. The tall bulk item storage will be where the yellow and black stacked cabinets are at the far end. Tote bins will reside above the lateral file cabinets.
 

Attachments

  • 4391-South-Wall-031.jpg
    4391-South-Wall-031.jpg
    55.3 KB · Views: 325
  • 4390-South-Wall-030.jpg
    4390-South-Wall-030.jpg
    55.3 KB · Views: 324
  • 4389-South-Wall-029.jpg
    4389-South-Wall-029.jpg
    51 KB · Views: 322
  • 4388-South-Wall-028.jpg
    4388-South-Wall-028.jpg
    55.8 KB · Views: 327
  • 4387-South-Wall-027.jpg
    4387-South-Wall-027.jpg
    54.5 KB · Views: 330
Last edited:

shortykorte

Well-known member
Joined
Sep 1, 2014
Messages
8,039
Location
Tallahassee, Fl
Re: The ASYLUM - Turning a Crazy Vision into a Lakefront Gearhead Getaway: Year 6

Looking good and for cabs, those look like the right ones for that spot. We had a bunch of these at work and never realized they have the pull out table. That could come in handy while working under the lift.


Sent from my iPhone using Garage Journal
 

Grizz1963

Well-known member
Joined
Jan 7, 2010
Messages
12,028
Location
Rochester, KENT. UK
Love your evolution in the shop.


If you look in my thread in a bit, you will see some of the cabinets I picked up yesterday and today.

Also got a couple of office chairs for Sally and myself as she did not have one and mine has worn through from 10 years use.
 
OP
S

shopnut

Well-known member
Joined
Feb 22, 2006
Messages
4,237
Location
Florida
Re: The ASYLUM - Turning a Crazy Vision into a Lakefront Gearhead Getaway: Year 6

Looking good and for cabs, those look like the right ones for that spot. We had a bunch of these at work and never realized they have the pull out table. That could come in handy while working under the lift.


Sent from my iPhone using Garage Journal
Thanks. Yeah, they seem to fit there nicely. Actually, many do not have the pull out table, but just a cross support there. I think you are right... somewhere to set that starter before I mount it in the car, somewhere to set my tablet will my PDF manual displayed, or maybe somewhere just to set a cold beverage.
 
OP
S

shopnut

Well-known member
Joined
Feb 22, 2006
Messages
4,237
Location
Florida
Love your evolution in the shop.


If you look in my thread in a bit, you will see some of the cabinets I picked up yesterday and today.

Also got a couple of office chairs for Sally and myself as she did not have one and mine has worn through from 10 years use.
Thanks for the kind words and thanks for the heads up on your own additions... I will check it out.
 
OP
S

shopnut

Well-known member
Joined
Feb 22, 2006
Messages
4,237
Location
Florida
THE LAST FRONTIER, THE ASYLUM SOUTH WALL… (Part 7 of 50)

A QUICK SKETCH OF WHAT I’M PLANNING.

I wasn’t going to bother drawing up a plan for this project, but ended up doing it anyway. Being able to stare at it on paper sometimes flushes out many of the smaller details.

The four lateral file cabinets will be the centerpiece of the wall. They will be flanked by shallow sliding door cabinets where the car lift columns are located. Above the lateral cabinets will be 2 tiers of tote bins behind sliding doors. A third tier will be located behind checkered flag swing-up doors like the rest of the shop. Above that will be a sloped tin “roof” to finish it off when looking down on it from the office bay window above.

attachment.php


Here are some notes to help explain which doors are sliding and which are hinged.

attachment.php


Something that will add time to the design AND construction of all this is my goal of been able to remove everything from the wall in a short period of time (one hour?) in 3 different spots along this wall for the manlft. This means lateral cabinets must roll away, sliding doors get slid to one side, tote bins are taken down and set elsewhere, horizontal shelf planks for totes get lifted out, and checkered flip doors and “roof” panels hinge flat against the wall. No challenge at all. LOL Okay, maybe it will take two hours before the manlift is rising to the windows/lights at the ceiling.

An alternative to all this is pulling the caster set out for the BendPak lift and moving it 4 feet further from the wall, but that would make it a pretty long reach out to the side of the lift, and that just seems like it will be unsafe.

I have this 8’ step ladder and a 21’ Little Giant ladder that will reside in the tall cabinet adjacent to the laundry room. There’s a possibly I may relocate this tall cabinet to the other end of the south wall so it is close to the overhead door, offering quick access for outdoor chores needing a ladder. I’m still on pondering that.

attachment.php


I also probed the wall for structural elements. Shelving supports for all the tote bins will be cantilevered, so hitting studs is essential. Nails mark center of stud and they make it easy to hook a tape measure on during the planning process.

attachment.php


attachment.php


In anticipation of this south wall project, I juggled everything around inside the shop to make room where I will be working. Normally I would try to keep the bikes as far away from the action as possible, but after some thought, it made sense to park them under the lift where one, two or all three can quickly/easily be rolled rearward out the door for the day to open up a bunch of room. Plus I can ride one anytime I want too, and it is prime bike riding weather here in Florida!

attachment.php


attachment.php
 

Attachments

  • 4398-South-Wall-042.jpg
    4398-South-Wall-042.jpg
    85.5 KB · Views: 276
  • 4397-South-Wall-041.jpg
    4397-South-Wall-041.jpg
    87.7 KB · Views: 276
  • 4396-South-Wall-047.jpg
    4396-South-Wall-047.jpg
    144 KB · Views: 275
  • 4395-South-Wall-046.jpg
    4395-South-Wall-046.jpg
    148.8 KB · Views: 274
  • 4394-South-Wall-043.jpg
    4394-South-Wall-043.jpg
    57.4 KB · Views: 275
  • 4393-South-Wall-049 (Design and Notes).jpg
    4393-South-Wall-049 (Design and Notes).jpg
    81.9 KB · Views: 900
  • 4392-South-Wall-048 (Design).jpg
    4392-South-Wall-048 (Design).jpg
    73.8 KB · Views: 419
Last edited:

cbacres

Well-known member
Joined
May 28, 2010
Messages
5,998
Location
SW Florida
They look great Mark.


Funny timing.
dc3199feee5c42b205c3707f42c69e8a.jpg
I had been searching off and on for a while now for a pair for the garage (wife’s territory)

Found some week of Thanksgiving, went up to Sarasota (1hr20mins one way) to get them, told the wife let’s go and we’ll get dinner at the Amish diner.

Well, we got the dinner!

Guy had them in a storage unit, couldn’t find his keys.
So no cabs.

He said he’d bring them to me later that week, we said OK, not completely believing it would happen. Two days later there he was.

Anyway, the wife puts them in place, but some drawers only opened 2/3, one not at all.
So a hour or so after pulling the drawers, removing some of the slides, I was able to get the offending mechanisms out.
The mechanisms now reside in the circular file.

She’s filled them up, but the work great.


Sent from my iPhone using Garage Journal
 

Attachments

  • dc3199feee5c42b205c3707f42c69e8a.jpg
    dc3199feee5c42b205c3707f42c69e8a.jpg
    187 KB · Views: 1

shortykorte

Well-known member
Joined
Sep 1, 2014
Messages
8,039
Location
Tallahassee, Fl
Re: The ASYLUM - Turning a Crazy Vision into a Lakefront Gearhead Getaway: Year 6

Will the cabs get Asylum-nized?
Can you hang from trolley track to reach windows?


Sent from my iPhone using Garage Journal
 
OP
S

shopnut

Well-known member
Joined
Feb 22, 2006
Messages
4,237
Location
Florida
They look great Mark.


Funny timing.

I had been searching off and on for a while now for a pair for the garage (wife’s territory)

Found some week of Thanksgiving, went up to Sarasota (1hr20mins one way) to get them, told the wife let’s go and we’ll get dinner at the Amish diner.

Well, we got the dinner!

Guy had them in a storage unit, couldn’t find his keys.
So no cabs.

He said he’d bring them to me later that week, we said OK, not completely believing it would happen. Two days later there he was.

Anyway, the wife puts them in place, but some drawers only opened 2/3, one not at all.
So a hour or so after pulling the drawers, removing some of the slides, I was able to get the offending mechanisms out.
The mechanisms now reside in the circular file.

She’s filled them up, but the work great.


Sent from my iPhone using Garage Journal
Thanks! Yours too.

I'll have to look for the Amish diner next time we are in Sarasota. I'm glad the guy came through for you after all. But those situations are disappointing when the sellers aren't quite prepared to sell when you're ready to buy.

They cabinets are just great overall bulk storage and I'm sure your wife will love them. I had some sticky drawers as well on some of the cabinets I bought and I made it a rule early on to just lube every drawer slide whether it needed it or not when a new one came into the shop. I even lubed the cabs I already had. Now they are all good to go for many years, hopefully.
 
OP
S

shopnut

Well-known member
Joined
Feb 22, 2006
Messages
4,237
Location
Florida
Re: The ASYLUM - Turning a Crazy Vision into a Lakefront Gearhead Getaway: Year 6

Will the cabs get Asylum-nized?
Can you hang from trolley track to reach windows?


Sent from my iPhone using Garage Journal
Of course... black frames, yellow drawers. The good thing about theses HON cabinets is that the front doors and conventional drawer faces unbolt without removing the whole drawer. So I can take them off as time allows (without emptying drawer) and paint them yellow.

I don't think its a question of CAN I hang from the trolley track, its if I would want to! LOL. Come to think of it, it would be sort of fun whizzing around the loop while enjoying the view out the clear story windows. It might not pass the safety committees approval, however.
 
Last edited:
OP
S

shopnut

Well-known member
Joined
Feb 22, 2006
Messages
4,237
Location
Florida
LIBRARY LADDER ALONG SOUTH WALL…

Ever since I built the Library Ladder, I wondered if it would navigate the corner over to the south wall with the BendPak lift column and cabinets in the way. Well, with the new cabinets in place, I finally had an opportunity to try it. Short's question about getting to the windows was a good reminder as well.

First, here is a shot showing the ladder can be used as a backup way to access the front loft, if the manlift in inoperable.

attachment.php


This picture shows how the ladder hangs freely from the trolley above. I currently use a tie strap to hold the lower ladder section off the ground. Notice the feet dangling.

U
attachment.php


So it’s the moment of truth… starting to pull the ladder through the corner with several obstacles in the way. I ended up needing to move the stack of black/yellow cabinets to gain enough room and will need to keep this in mind moving forward with the wall layout.

attachment.php


On one hand, it would help to move the car lift forward so the ladder clears the top of the lift column better.

attachment.php


attachment.php


But on the other hand, there is currently just enough room to swing the ladder out away from the wall between the lateral cabinets and lift column. So things sort of need to stay where they are. I will test this some more before settling on the final placement of everything.

attachment.php


This picture shows the rough position of the ladder if being used to climb up the the ceiling. I didn’t bother to lower the bottom ladder section to the floor for this demo, but everything seems doable. The ladder is a little steeper than I would prefer, but functional just the same.

attachment.php
 

Attachments

  • 4405-Library-Ladder-414 (South Wall Access).jpg
    4405-Library-Ladder-414 (South Wall Access).jpg
    59.5 KB · Views: 220
  • 4404-Library-Ladder-413 (South Wall Access).jpg
    4404-Library-Ladder-413 (South Wall Access).jpg
    65.3 KB · Views: 220
  • 4403-Library-Ladder-410 (South Wall Access).jpg
    4403-Library-Ladder-410 (South Wall Access).jpg
    70.3 KB · Views: 219
  • 4402-Library-Ladder-409 (South Wall Access).jpg
    4402-Library-Ladder-409 (South Wall Access).jpg
    81.9 KB · Views: 215
  • 4401-Library-Ladder-408 (South Wall Access).jpg
    4401-Library-Ladder-408 (South Wall Access).jpg
    98.8 KB · Views: 222
  • 4400-Library-Ladder-407.jpg
    4400-Library-Ladder-407.jpg
    84.6 KB · Views: 296
  • 4399-Library-Ladder-406 (Front Loft Access).jpg
    4399-Library-Ladder-406 (Front Loft Access).jpg
    81.6 KB · Views: 294
Last edited:

Bob Heine

ALLIANCE MEMBER
Joined
Oct 24, 2009
Messages
10,707
Location
Boca Raton, Florida
Mark, in your last photo it looks like the ladder is so close to the lift only a very thin person could use it. Maybe a circus acrobat could climb the back (wall) side and then swing around to the open side above the lift. I'm not a circus person so I'm just speculating.
 
OP
S

shopnut

Well-known member
Joined
Feb 22, 2006
Messages
4,237
Location
Florida
Mark, in your last photo it looks like the ladder is so close to the lift only a very thin person could use it. Maybe a circus acrobat could climb the back (wall) side and then swing around to the open side above the lift. I'm not a circus person so I'm just speculating.
You are exactly right Bob, it looks like it is going to be a tight squeeze for even a slim guy like me. Rather than hiring an acrobat (however entertaining that might be), a backup plan might be to set a step ladder next to it and climb up on that until after the lift runways and then hop over to the extension ladder. Whatever I do, I can set whatever I'm carrying up, whether it is a broom to knock down cobwebs or a bulb to replace in a fixture, on the lift runway until I am in the clear on the ascent.

The ladder is just an alternative to clearing a path for the manlift for those quick/small jobs.

Oh, and if anyone has a good recommendation for a good circus acrobat, please chime in... I always like having options!!! LOL
 

shortykorte

Well-known member
Joined
Sep 1, 2014
Messages
8,039
Location
Tallahassee, Fl
I was thinking more of a Batman thing. Take one of those motors and a battery pack, add a cable and grappling hook.
IMG_2162.JPG


Sent from my iPhone using Garage Journal
 
To avoid these ads, REGISTER NOW!
Top Bottom