To avoid these ads, REGISTER NOW!

The VISES of Garage Journal

sch

Member
Joined
Dec 31, 2018
Messages
18
Location
Durham, NC
SCH -
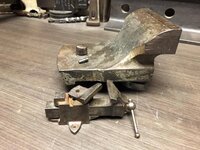
B E W A R E ! Breaking loose the swivel jaw on my Amer. Scale 6" vise cost me a broken left arm (end of the radius). The big chain wrench I was using to turn the jaw back-n-forth slipped off and I did a FOOSH (Fell On Out Stretched Hand).

But, you're prob'ly smarter'n me, so my warning is not needed.
:)

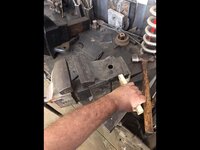
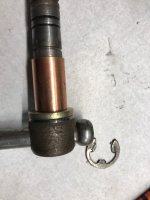
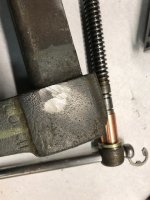
BTW: After I had wrenched it back-n-forth a bunch of times to no avail, I then knocked out the cross-pin that holds the jaw in the body (it goes cross-wide through the body and fits in a rounded groove in the 2" dia. pin the jaw swivels on to retain the jaw).

Then I put a 5/8" bolt w/coupling nut on it INSIDE the body and used it as a jack to push the jaw up and out. Worked like a charm! (even with a broken arm that, at that point, I though was still just a 'very bad sprain')
: - )

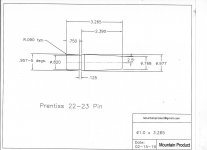
'Course, the Prentiss may have a different jaw mounting scheme, I'm no Prentiss Master.
YMMV


Thank you for taking a hit that others may learn from, Charles!

I was thinking "I hope I don't break this jaw" without a thought to my own self.

I don't *think* the Prentiss has a similar pin, but I'll be looking closely to try to confirm this.

Do you have pics of the American Scale swiveler? I don't think I've seen such.
 
To avoid these ads, REGISTER NOW!

sch

Member
Joined
Dec 31, 2018
Messages
18
Location
Durham, NC
While I'm working on that Prentiss 22, I'll take a moment to show my vise mounting system, in case it may be interesting to some.

When I started acquiring and fixing up more vises than are strictly necessary for my little garage shop to function, I knew I wanted to keep them poised and ready for use, not laying on a shelf or cabinet, unbolted, nothing more than an appealing sculpture and reminder of a different era. I want them to be tools, however infrequently used they may be.

So I made a mounting system that can shuttle from a display shelf to the functional vise stand with relatively minimal effort.

Easier to just show pictures than describe in detail, so that's what I'll do. But this little system works well for me. One note on this: the vises stay bolted to their mounting plates, and the mounting plate swaps from the stand to the display shelf.

Now, I have never once been working on some project in the garage and thought, "now this job was meant for the Rock Island 190" and swapped it in.

But knowing I could do this is somehow very satisfying.
 

Attachments

  • IMG_20191103_202739727.jpg
    IMG_20191103_202739727.jpg
    121.5 KB · Views: 133
  • IMG_20191103_203313143 (1).jpg
    IMG_20191103_203313143 (1).jpg
    147.3 KB · Views: 124
  • IMG_20191103_203322287.jpg
    IMG_20191103_203322287.jpg
    126.6 KB · Views: 118
  • IMG_20191103_202817266.jpg
    IMG_20191103_202817266.jpg
    148.9 KB · Views: 114

Outlawmws

Well-known member
Joined
Aug 9, 2011
Messages
39,257
Location
The Badlands
I like the concept a lot. The key will be how much load the shelf can take without tearing loose from the wall. Vises are generally heavy, and that is a lot of cantilevered weight on the shelf and the locking 2X4 at the back.
 

GForceJunky

Well-known member
Joined
Apr 18, 2011
Messages
562
Cool idea! Really like it, but like Outlaw said, you'd definitely want to make sure that locking 2x4 is WELL secured. Also, I feel like you'd want more than 1.5" of locking depth....I think a 4x4 would be more appropriate in case it gets nudged/bumped. Wouldn't take much to make one come crashing down if the 2x4 is the only thing holding it in place.

Alternatively, maybe just bolt (or clamp, but that's much less clean looking) them down on the storage rack as well as haven the 2x4? Even one bolt would be a big difference. Could also setup some Destacos or similar and then clamp down the stored vises once in place:

destaco-quick-clamp-225-u-lever-horizontal-when-clamped-143741-en-G.jpg
 

Smitty

Well-known member
Joined
Sep 4, 2018
Messages
2,409
Location
USA
Sch...I’ve freed up numerous Prentiss swivel jaws and here’s a few tips that might help. First off I’ll never hit the jaw towers. I always use blocks of wood and tap at the back. I’ll give it a good ten hits and then I’ll do the same from the other side. I’ll keep alternating until I can get some movement. If I can get the jaw to move 1/16 I know I’m going to win the battle. The most important thing is not to damage the jaw itself, slow and steady wins the race. Good luck, here’s a pic of a 22 like yours.4db6cf0acf30c49a264881d14f5211f9.jpg


Sent from my iPad using The Garage Journal mobile app
 

Attachments

  • 4db6cf0acf30c49a264881d14f5211f9.jpg
    4db6cf0acf30c49a264881d14f5211f9.jpg
    74.3 KB · Views: 11
Last edited:

Private Lugnutz

Well-known member
Joined
Mar 30, 2012
Messages
30,589
Location
The Authentic Jersey Shore
Sch,

Last year I had a stuck swivel jaw pin in a tiny Parker. I tried everything that everyone tries. Immersed it in successive bouts of Kroil, heat, tapping, etc. For months. I thought about making a little machinists jack, to force it up from the inside, but I wasn't too keen on removing the nut. What finally worked for me were wedges. I started with the thickest feeler gauge blade I could manage to tap into the opening. I tapped a few in all around. Then reapplied the Kroil-heat-tap. I pulled those and went up a few sizes in feeler blades, tapping those in a few places both sides. I kept doing that, increasing the separation between the swivel jaw and the body, a few almost visually imperceptible feeler gauge blade thicknesses at a time, until the minute pressure on the swivel jaw lifting popped the pin.

As someone else warned, make sure there's no retaining pin!
 

sch

Member
Joined
Dec 31, 2018
Messages
18
Location
Durham, NC
Cool idea! Really like it, but like Outlaw said, you'd definitely want to make sure that locking 2x4 is WELL secured. Also, I feel like you'd want more than 1.5" of locking depth....I think a 4x4 would be more appropriate in case it gets nudged/bumped. Wouldn't take much to make one come crashing down if the 2x4 is the only thing holding it in place.

Alternatively, maybe just bolt (or clamp, but that's much less clean looking) them down on the storage rack as well as haven the 2x4? Even one bolt would be a big difference. Could also setup some Destacos or similar and then clamp down the stored vises once in place:

destaco-quick-clamp-225-u-lever-horizontal-when-clamped-143741-en-G.jpg


I'm confident in the setup for my purposes, but I'd never discourage an even beefier version. The four shelf brackets combined are rated for more than my entire vise collection weighs, and the 2x4 is fastened with big GRK structural screws. The max load I put on one shelf is typically less than 300 lbs, and each mounting plate sits without moving easily. It's been up and working without a hint of sag or unplanned movement for about a year. I wouldn't put it in a high traffic area, or where a car could hit it, but the only moving object near the setup is me, and I'll break before a vise will be dislodged. Thank you!
 

sch

Member
Joined
Dec 31, 2018
Messages
18
Location
Durham, NC
Sch...I’ve freed up numerous Prentiss swivel jaws and here’s a few tips that might help. First off I’ll never hit the jaw towers. I always use blocks of wood and tap at the back. I’ll give it a good ten hits and then I’ll do the same from the other side. I’ll keep alternating until I can get some movement. If I can get the jaw to move 1/16 I know I’m going to win the battle. The most important thing is not to damage the jaw itself, slow and steady wins the race. Good luck, here’s a pic of a 22 like yours.4db6cf0acf30c49a264881d14f5211f9.jpg


Sent from my iPad using The Garage Journal mobile app


Thanks to all replying on the art and craft of swivel jaw removal.

I was hoping to hear from you, Smitty, the Prentiss legend. All responses are appreciated.

I'm very much taking this to heart: slow and steady. It's already moved 0.25" in one direction, so that's encouraging. I'm going to avoid striking the jaw tower.

Do these Prentiss vises have a pin holding in the swivel jaw? I don't see one, and a video I saw on a similar vise did not appear to have one. But it would be bad thing to miss. My vise is probably the earliest design: cast-in jaw face, small "Prentiss 22" lettering on top of the body with no lettering on the side, and the spring driven plunge-pin thing to lock the body into the swivel base.
 

Attachments

  • 4db6cf0acf30c49a264881d14f5211f9.jpg
    4db6cf0acf30c49a264881d14f5211f9.jpg
    68.4 KB · Views: 5

Vise

Well-known member
Joined
Apr 16, 2019
Messages
575
Location
NE
Thanks to all replying on the art and craft of swivel jaw removal.

I was hoping to hear from you, Smitty, the Prentiss legend. All responses are appreciated.

I'm very much taking this to heart: slow and steady. It's already moved 0.25" in one direction, so that's encouraging. I'm going to avoid striking the jaw tower.

Do these Prentiss vises have a pin holding in the swivel jaw? I don't see one, and a video I saw on a similar vise did not appear to have one. But it would be bad thing to miss. My vise is probably the earliest design: cast-in jaw face, small "Prentiss 22" lettering on top of the body with no lettering on the side, and the spring driven plunge-pin thing to lock the body into the swivel base.


There is a guy on FB who could make you a pin for that 22. Look up Hobby Garage.

I agree with Smitty on the approach, hitting at the back of the jaw. I use a lot of kroil oil and hard wood drifts for striking, but pretty quickly escalate to brass drifts. Heat also helps, but I don’t like to go overboard with that. One other tip is to alternate hitting sides. If you got it 1/4” in one direction, trying hitting it from the other side. Good luck!


Sent from my iPad using Tapatalk
 

Smitty

Well-known member
Joined
Sep 4, 2018
Messages
2,409
Location
USA

Attachments

  • 67afcb0ffb27ca5410142c890d661d2b.jpg
    67afcb0ffb27ca5410142c890d661d2b.jpg
    119.2 KB · Views: 7
  • 6f015d52cf41ea122667df16e3f32646.jpg
    6f015d52cf41ea122667df16e3f32646.jpg
    141.4 KB · Views: 7
  • 796821d0f54952c2671c7e2cfc9c1aad.jpg
    796821d0f54952c2671c7e2cfc9c1aad.jpg
    42.1 KB · Views: 9

ncgun99

Well-known member
Joined
Oct 21, 2016
Messages
139
Location
Eastern North Carolina
Recently started a re-fresh on a Prentiss 22. The swivel jaw has moved maybe 4mm. That's about 1mm per 20 hammer blows, I estimate.


Sharing this for general interest, but also, if anyone has undertaken this process and has a cautionary tale, I'm listening.


Concur with Smitty. I also uses a block of wood with the static part of the vise in another vise. I had a scrap 2x2 laying around which worked perfectly. 2.5 lbs sledge a little at a time. I went through 3 or 4 pieces of wood but that’s what worked for me.
Additionally, mine had pitting once I got it apart. A lot of filing and patience to get the jaw moving properly. IMG_3929.jpgView attachment 1
IMG_3736.jpgIMG_3738.jpgIMG_3741.jpgIMG_3746.jpgIMG_3752.jpg


Sent from my iPhone using Garage Journal
 

wrenchguy

Well-known member
Joined
Sep 22, 2011
Messages
4,698
Location
NW Indiana
I'm getting ready to redo this 22, should i assume the roll pins (left side only) are holding the rear from rotating? I don't see 'em holes in your guys pics. I got the taper out but the jaw is stuck tight.


hitthewall79

Well-known member
Joined
Feb 2, 2018
Messages
196
Re organized the shelf. 3 big ones are a rock island 56 (7 inch swivel jaw) reed 208 and a Columbian 108. Also picked up this bad boy, emmert 10a71395423c03a5c7918a18df7ada36eae.jpg4e01db60e44b5d4460e727e74fde3a71.jpg

Sent from my SM-G770F using Tapatalk
 

Attachments

  • 4e01db60e44b5d4460e727e74fde3a71.jpg
    4e01db60e44b5d4460e727e74fde3a71.jpg
    579.6 KB · Views: 3
  • 71395423c03a5c7918a18df7ada36eae.jpg
    71395423c03a5c7918a18df7ada36eae.jpg
    622.6 KB · Views: 3

hitthewall79

Well-known member
Joined
Feb 2, 2018
Messages
196
Surely some righteous iron there Hitthewall.---Didn't happen to get the swivel jaws with the big Emmert, did you?
Did I get them? No I didn't...

Am I going to 3d print replicas and then cast them in copper? I sure am

Sent from my SM-G770F using Tapatalk
 

Smitty

Well-known member
Joined
Sep 4, 2018
Messages
2,409
Location
USA
I'm getting ready to redo this 22, should i assume the roll pins (left side only) are holding the rear from rotating? I don't see 'em holes in your guys pics. I got the taper out but the jaw is stuck tight.


Wrench guy
The holes in the side of the swivel jaw were handling holes used during the machining process. All of my swivel jaw Prentiss vises have them. Most are filled with lead from the factory. Post some pics when you finish the 22, I’d like to see them. BTW, I just got a W&B number 17 engineers wrench that’s in beautiful condition. Now all I need is a 3 1/8” nut.a6c5ececa9638e5d7c2a8ac29fb08453.jpgf627edc0fdc0984e70fbfce458219f37.jpg


Sent from my iPad using The Garage Journal mobile app
 

Attachments

  • f627edc0fdc0984e70fbfce458219f37.jpg
    f627edc0fdc0984e70fbfce458219f37.jpg
    102.1 KB · Views: 3
  • a6c5ececa9638e5d7c2a8ac29fb08453.jpg
    a6c5ececa9638e5d7c2a8ac29fb08453.jpg
    116 KB · Views: 2

wrenchguy

Well-known member
Joined
Sep 22, 2011
Messages
4,698
Location
NW Indiana
That's a nice 1! Thanks 4 the info, but the front hole has a roll pin in it, you can see it. Should i figure it wasn't drilled deeper and pin installed to clinch? I think i'll try to drill the pin out.

Maybe you can determine with your rear off and see if location will clinch anything if drilled and pinned? thank u again.
 
To avoid these ads, REGISTER NOW!

va.grouseman

Well-known member
Joined
Mar 26, 2011
Messages
4,965
Location
Southern-Central VA.
Right about the holes in the swivel jaws, Smitty.---That question came up for discussion about 11 years ago and still pops up again from time to time.---I'll bet since the first time it was asked, we've seen 300 Prentiss swivel jaws with those holes in the side.---Kind of bothered me the first time I saw them.---They were drilled in an otherwise mint Prentiss and I wondered, who would do a thing like that.
 

Outlawmws

Well-known member
Joined
Aug 9, 2011
Messages
39,257
Location
The Badlands
WG I doubt the hole even lines up to bite into the vise base. Someone probably just wanted to fill the hole?

The jaw is removed by getting it to turn far enough to disengage the flange.


67afcb0ffb27ca5410142c890d661d2b.jpg
 

Smitty

Well-known member
Joined
Sep 4, 2018
Messages
2,409
Location
USA
VA, I thought the same thing when I first noticed it and thought who could drill holes in a vise like that? After a while I figured that they were part of the manufacturing process much like the handling holes on an anvil.
 

ClintNZ

Well-known member
Joined
Sep 6, 2012
Messages
107
Location
Rotorua, New Zealand
Modern English iron for some old English iron.

DSC_9952-L.jpg


The jaws on the trusty Record No5 I inherited from my dad were getting a bit worn, they were supposedly available from Record as they still make the No5 in China, but I had never found them actually for sale anywhere. While hunting down new jaws for my recently acquired Record No75 I found Vice Works UK who manufacture parts for these old beauties & as they set me up for the 75 parts I thought I'd give the workhorse 5 a Christmas present too:

DSC_9954-L.jpg


The original jaws weren't too bad, but it will be nice to have sharp corners again for holding small parts. Good for another few decades anyway.

Cheers
Clint
 

tool_scrounge

Well-known member
Joined
Jul 20, 2010
Messages
4,193
Location
Southern California
. While hunting down new jaws for my recently acquired Record No75 I found Vice Works UK who manufacture parts for these old beauties & as they set me up for the 75 parts I thought I'd give the workhorse 5 a Christmas present too

Cheers
Clint

Clint - Viceworks looks like a nice source for Woden and Record vice parts. Too bad no Paramo parts. I'll have to keep them in mind when I clean up my 186/3. Thanks!
 

GForceJunky

Well-known member
Joined
Apr 18, 2011
Messages
562
I'm confident in the setup for my purposes, but I'd never discourage an even beefier version. The four shelf brackets combined are rated for more than my entire vise collection weighs, and the 2x4 is fastened with big GRK structural screws. The max load I put on one shelf is typically less than 300 lbs, and each mounting plate sits without moving easily. It's been up and working without a hint of sag or unplanned movement for about a year. I wouldn't put it in a high traffic area, or where a car could hit it, but the only moving object near the setup is me, and I'll break before a vise will be dislodged. Thank you!

It looked well thought out but of course I'm never one to keep my mouth shut if I see something that could be even more overkill :lol_hitti

It's definitely a clever solution to a problem many of us have and I like that you can have any of the vises ready to use in a moments notice. Really helps with the multitude of different base patterns in existence!
 

engineer2

Well-known member
Joined
Dec 13, 2009
Messages
11,803
Location
Chicago burbs
I was using my new-to-me Wilton 643-1/2 and I noticed a crack between the moving jaw and the slide. The crack opens up as you tighten the jaw. What's the best fix for this?

I don't know of a local welder who does cast iron, but I haven't looked. I suppose I could drill and tap for a bolt.
 

Attachments

  • wiltoncrack.jpg
    wiltoncrack.jpg
    37 KB · Views: 66

Shiftless

Well-known member
Joined
Mar 9, 2014
Messages
14,551
Location
East Bay SFO
I was using my new-to-me Wilton 643-1/2 and I noticed a crack between the moving jaw and the slide. The crack opens up as you tighten the jaw. What's the best fix for this?

I don't know of a local welder who does cast iron, but I haven't looked. I suppose I could drill and tap for a bolt.

Unless you can find another one with a good slide and a damaged body for a swap, I’d say that vise is done. It’s a common problem with that design. I had one that I bought on eBay long ago. It had been freshly painted and the price was really low.
I sold it at a slight loss to a local who thought he could either repair it or just use it for very light duty.

You could also make that vise into a nice pair of bookends like this from Mark in Indiana.
 

Attachments

  • 1DBA22C2-0EC0-43D2-80BC-D86608235BD4.jpeg
    1DBA22C2-0EC0-43D2-80BC-D86608235BD4.jpeg
    95.4 KB · Views: 66

engineer2

Well-known member
Joined
Dec 13, 2009
Messages
11,803
Location
Chicago burbs
I’d say that vise is done.
Sounds like good advice (pun intended). Now I know why it was free. I'll switch back to my good old Craftsman vise until something better turns up on the local market.

Has any vise expert posted a list of desirable models and what to avoid? I know to avoid the no-name Chinese ones. Restored Wilton Bullets go for around $500-$600 in our area, a bit out of my price range. I don't mind restoring a vise.
 

ClintNZ

Well-known member
Joined
Sep 6, 2012
Messages
107
Location
Rotorua, New Zealand
Clint - Viceworks looks like a nice source for Woden and Record vice parts. Too bad no Paramo parts. I'll have to keep them in mind when I clean up my 186/3. Thanks!

I'd definitely ask them about Paramo parts, they have the drawings & equipment to make up lots of British vice parts that aren't listed on the website - like the pipe jaw insert for my 75. Plus, some Record parts also fit Paramo eg the No.6 jaw inserts.

Cheers
Clint
 

KMScott

Well-known member
Joined
Feb 14, 2012
Messages
4,642
Location
Daufuskie Island, South Carolina
I missed aiding in the posts on the 22 and 23 swivel pins for the Prentiss's. I was working with the guy Vise was talking about and want to share the drawing for the pin. The difference I noticed between the 21 to 18 pin is the angle went from 3 deg/side to 2-1/2 deg/side. Smitty your drawing is close and should work fine, this drawing is more for machinists.
 

Attachments

  • Prentiss 22-23 Pin.jpg
    Prentiss 22-23 Pin.jpg
    77.3 KB · Views: 72

engineer2

Well-known member
Joined
Dec 13, 2009
Messages
11,803
Location
Chicago burbs
So I decided to do a quick repair. Put the jaw in my press to put it back where it was, and pinned it with ramset nails. Also did some improvements to take slop out. It is on light-duty until I find a replacement.
 

Attachments

  • IMG_3493.JPG
    IMG_3493.JPG
    73.3 KB · Views: 76
  • IMG_3496.JPG
    IMG_3496.JPG
    96.8 KB · Views: 73
  • IMG_3495.JPG
    IMG_3495.JPG
    107.4 KB · Views: 72
  • IMG_3494.JPG
    IMG_3494.JPG
    92.9 KB · Views: 74

Smitty

Well-known member
Joined
Sep 4, 2018
Messages
2,409
Location
USA
KMS, the top of the pin should be tapered to match the bottom so once it’s pulled you can flip it over and put it in the hole. All of the Prentiss pins were designed this way, it helps to keep them from getting lost.
 

Shiftless

Well-known member
Joined
Mar 9, 2014
Messages
14,551
Location
East Bay SFO
KMS, the top of the pin should be tapered to match the bottom so once it’s pulled you can flip it over and put it in the hole. All of the Prentiss pins were designed this way, it helps to keep them from getting lost.

Brilliant deduction!
So simple, so obvious...why didn’t I think of that??
 

KMScott

Well-known member
Joined
Feb 14, 2012
Messages
4,642
Location
Daufuskie Island, South Carolina
KMS, the top of the pin should be tapered to match the bottom so once it’s pulled you can flip it over and put it in the hole. All of the Prentiss pins were designed this way, it helps to keep them from getting lost.

Yes I know. it is hard to see with all the numbers. The drawing has the angle in question. .957 - 5deg.
 
To avoid these ads, REGISTER NOW!
Top Bottom