To avoid these ads, REGISTER NOW!

Sandblast Cabinet air venting.

islandkent

Well-known member
Joined
Jan 29, 2009
Messages
281
Location
PEI,Canada
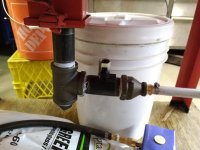
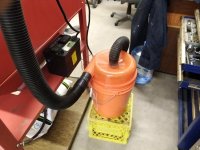
Your right RJ. You must maintain negative pressure in the cabinet. People put so much effort into that caulking regime. I used 3M two way tape from Napa to replace the supplied tape. It's so much nicer, cleaner, easier to use than caulk. If you keep the neg press in order you don't have to worry much about leakage.
I can't imagine running one of these cabinets with out the vacuum and the extra lights. I had one of those little bench top cabinets and I learnt a lot from that experiment. lol
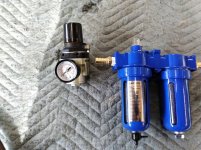
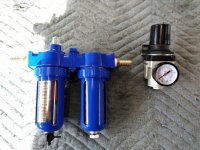
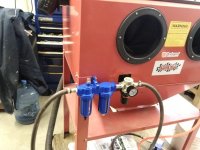
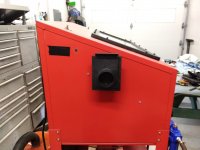
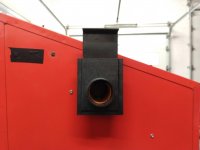
If you can tell from one of my pictures that I control the amount of air entering the cabinet with the small supplied cap. Except I installed it backwards so to speak. So I can adjust the flow. It came in handy as my gloves began to deteriorate. I just closed off the vent the more my gloves would crack keeping the pressure at the right amount. Yes I just replaced my gloves.
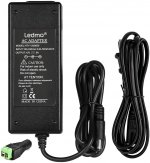
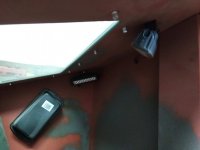
I thought of using those little LED light strips but they didn't look to robust. So I opted for the off road LED lights. I mounted three to my cabinet. Two in the upper corners and one right between the gloves. Really bright in there. Because when your blasting shadows are your enemy. I just daisy chained them to the original light switch. But I did have to buy a adapter off of Amazon to make them light properly. I used a old adapter off of a calculator or game from the 80's and it lit them but not as bright as they should have been. A battery did the trick but was a bit of a pain in the ***. So I opted with the adapter.
I know a lot of guys are running these cabinets as is but since the internet you can learn a lot from other peoples endeavors to make these cabinets run like those bigger more expensive ones for one quarter of the price.
Just thought I would add this to this thread.
Trooper I hope you get your pot of gold at the end of the rainbow when you get you valve and gun/pedal hooked up. Lets us know how it goes. I usually never reply on here and I am a lurker in general, but I have been where you are now and I thought I could help.
Good luck!
 
To avoid these ads, REGISTER NOW!

zippyslug31

Well-known member
Joined
Jul 11, 2017
Messages
207
Location
Central Oregon
Kent - I've been following Trooper's thread since I'm also mod'ing a HF cabinet... thanks for providing some additional pics since they've given me some ideas for more mods. The inside of your door looks awesome. I forgot about throwing some tape to cover those indentations in the molded plastic door, but your addition of the "eve" and "gutter" at the bottom are good additions. Also using that plastic circle as a metering valve on your inlet side... brilliant! I was wondering what I was going to do with mine, now I know.
I also have mine mounted on a castered base and I agree it's pretty awesome. It makes it so nice to roll around and reposition while I've been doing my mods.
The only thing left on my project is lighting (I went with weather-proof LED strips) and my vacuum system (I'm making a universal vacuum cart for use with this, and anywhere else), but can't wait to give mine a try.
 
OP
T

trooper1954

Well-known member
Joined
Nov 4, 2016
Messages
197
Location
Salmon Arm, BC, Canada
Everyone....especially Kent,
Thanks so much for all the input and advice. I was a bit daunted when I first asked the questions, as I've no experience with these cabinets at all. All the advice and help has made this project so much easier, and today I will install the metering valve and the new gun, as well as a dedicated 1/2" air line to the cabinet with a regulator. I'm just wondering if the use of the 20-30 crushed glass may have contributed to my previous flow problem, so will be emptying that out and trying 30-60 next. I too have the lights currently running off a 12v battery, but would be interested as to what sort of adapter you got Kent...I'm assuming a converter from 110 to 12V?
Once the mods are in pace, I'll take photos, and keep you guys up to speed on how this turns out:):)
Thank you!!!!!
 

islandkent

Well-known member
Joined
Jan 29, 2009
Messages
281
Location
PEI,Canada
No problem Zippy. My pleasure. My long weekend off and I caught up on a lot of the forums I frequent.
I forgot to add about my intake cap. I use a spring and a washer on the in side to keep the tension on the little cap to prevent dropping shut. I have to remember to keep rotating it clockwise to keep it from getting loose. Hence the spring.
And on the gutter situation that white strip is merely several layers of duct tape to use as a lip to try and keep down the material from getting on the door sill. Some still gets through no matter how hard I hit the door before opening it. Hence the catch gutter. And yes I have to tuck it in when I start to shut the door.
And I have also added a separate blow gun to blow of the parts and the everything else in there before I open the door. You can see it one of my pictures.
Except for the gutter idea all of these mods I found all over the net.
Right now as I'm writing this I'm on page four of RJ's sticky threads. Great great information in there. Thanks RJ!
 

zippyslug31

Well-known member
Joined
Jul 11, 2017
Messages
207
Location
Central Oregon
converter from 110 to 12V?

Trooper, take a look at 12V DC (I assume you need DC) adapter. Easy, peasy. Just make sure you get enough to deliver enough amps. You can also step up and use a computer power supply, if you really need the amps. I have two of these in my shop running a large grid of 12v LED strip lights. Works perfectly.
 
OP
T

trooper1954

Well-known member
Joined
Nov 4, 2016
Messages
197
Location
Salmon Arm, BC, Canada
One final question for Kent.....what media are you using, and with your system how long roughly would it take you to clean up a rusty horseshoe?
The whole project of mine is geared to clean and re-use 3-400 rusty horseshoes for re-purposing....hence the odd question!
Thanks
 

zippyslug31

Well-known member
Joined
Jul 11, 2017
Messages
207
Location
Central Oregon
I use a spring and a washer on the in side to keep the tension on the little cap to prevent dropping shut. I have to remember to keep rotating it clockwise to keep it from getting loose. Hence the spring.

Of course! I was wondering how I was going to make it stay in a given orientation. Thanks. And, for the thing getting loose, maybe try a nylock nut?

I have also added a separate blow gun to blow of the parts and the everything else in there before I open the door. You can see it one of my pictures.
Yep, I stuck one of those in my cab, too. But yesterday I realized I was being a bit thick when I noticed that the T-fitting inside my cabinet that splits to my sand gun and to my blow-off air gun both are supplied to my foot peddle. I'll leave it to the reader as to why this was dumb. :wtf:
I'll have to remove my T, and run a dedicated line for my blow-off gun at a later time. :lol:
 

islandkent

Well-known member
Joined
Jan 29, 2009
Messages
281
Location
PEI,Canada
Here you go Trooper off of Amazon.ca. I just spliced the end of the original adapter to the switch to the new one. Presto! Nice and bright. I'm sensitive with us being up here in Canada. Meaning things are so hard to get up here compared to are American cousins. Did I mention I'm restoring my 70 Charger. lol
Here's the link
https://www.amazon.ca/dp/B06Y64QLBM/?tag=atomicindus04-20

I tried a nylon lock nut Zippy but it just keep getting loose??? So I went with a compression spring. Not thick at all Zippy. You just invented the micro blaster!!

Ok I thought I might add. I got about a year out of the LED light that took the most abuse. About 60-70 hours. The other two are working fine. The light still worked but only 2 out of 6 of the LED were lit. I just replaced it with one. Bought a complete set (3 +the one I replaced) while they were on sale. The vast majority of my blasting is done now. So I think I'm good on the durability of those cheap PA lights.
 

Attachments

  • Adaptor.jpg
    Adaptor.jpg
    95.6 KB · Views: 49
Last edited:

islandkent

Well-known member
Joined
Jan 29, 2009
Messages
281
Location
PEI,Canada
Trooper I just finished reading your question about the horseshoes. Missed it in the mix. Sorry.
Well I guess it would depend on a few variables. How rusty? How clean? But I think the crushed glass would be my first choice or aluminum oxide. That copper slag is pretty aggressive. And maybe a reblast with something less aggressive if surface finish is important. I would think no more than 5 minutes would do it. Have you ever heard of Evapo-rust? PA sell it. I've bought a few 3 gallon jugs there but seem to like the glass beads better for paint prep.
Not much of a answer Trooper sorry.

Side note... just thumbed through all of that sticky thread of RJ. Lots of useful info there and lots of links. Could have spent the rest of the day there but have to get ready to go to work.
 

OccupantRJ

Well-known member
Joined
May 15, 2009
Messages
11,076
Location
Eastern North Carolina
No problem Zippy. My pleasure. My long weekend off and I caught up on a lot of the forums I frequent.
I forgot to add about my intake cap. I use a spring and a washer on the in side to keep the tension on the little cap to prevent dropping shut. I have to remember to keep rotating it clockwise to keep it from getting loose. Hence the spring.
And on the gutter situation that white strip is merely several layers of duct tape to use as a lip to try and keep down the material from getting on the door sill. Some still gets through no matter how hard I hit the door before opening it. Hence the catch gutter. And yes I have to tuck it in when I start to shut the door.
And I have also added a separate blow gun to blow of the parts and the everything else in there before I open the door. You can see it one of my pictures.
Except for the gutter idea all of these mods I found all over the net.
Right now as I'm writing this I'm on page four of RJ's sticky threads. Great great information in there. Thanks RJ!

Your head will be spinning and bursting with ideas by the time you read all that!
 

islandkent

Well-known member
Joined
Jan 29, 2009
Messages
281
Location
PEI,Canada
Yes Lots of useful information in there. I sort of gravitated to the smaller cabinets information. I was thinking I might print off the abrasive guide and put a couple of copies out in the shop. Nice goto chart. Lot of industrial blasting info in there also. The Big Boy stuff!
Well done! Great resource all together!
 

Awag

Well-known member
Joined
Aug 27, 2019
Messages
51
Location
SE NE
I have a HF blast cabinet like these that I need to mod. But my dad has an old HF blast cabinet that came with the exhaust hose attachment on the back and the inlet on the left from the factory. So at one time they were doing it correctly. I like his cabinet better than the new ones. His has a 6" flat top on the to set stuff. Unlike ours that come to a point. The next time I'm over there I need to remember to take pics of it.
 

Jeff Ivers

Well-known member
Joined
Apr 9, 2010
Messages
2,557
Location
Oklahoma
I have this blast cabinet I picked up off a CL ad about 7 or 8 years ago for about $100. Based on the appearance, I always assumed I had a HF unit.
blast cabinet 4 r.jpg
I have previously upgraded the lighting, but after reading many threads on the ways to improve these cabinets, I decided some upgrades might be in order. When I started taking it apart, I discovered several things.
blast cabinet 5 r.jpg
blast cabinet 9 r.jpg
The baffled opening on the back that I had been using as air intake has a closed (at the top) baffle.
blast cabinet 10 r - left rear corn.jpg
The corners on the top of the cabinet are all welded and not bolted.
blast cabinet 12 r - rear hop.jpg
The corners on the hopper are welded and not bolted.
Does anyone know what I have? This was bought in Broken Arrow, OK.
 
OP
T

trooper1954

Well-known member
Joined
Nov 4, 2016
Messages
197
Location
Salmon Arm, BC, Canada
Hey Gang,
Just wanted to update you all on the prgress or lack thereof on this cabinet.
Unfortunately, the parcel I thought wa my foot pedal and new gun turned out to be a Dewalt jigsaw I had ordered almost 7 months ago!! So my anticipation on getting this running has been delayed, but as soon as I get the kit and it's installed I'll let you know the results.
In the meantime, I have changed the venting so that the vacuum outlet is now on the back, and installed a baffle inside the vent on the left side so this is now the air intake. Also found a blast gate on Lee Valley that I'm picking up tomorrow.
Keep safe all.
 
OP
T

trooper1954

Well-known member
Joined
Nov 4, 2016
Messages
197
Location
Salmon Arm, BC, Canada
Quick update...or lack thereof. Gun and foot pedal kit due middle of the month!! Anyone would think it's coming from C...a!!!!! :dunno:
I have everything ready, but thought I'd ask if anyone has found any advantage to having a 1/2" airline direct from the compressor to the foot valve? Would the increase in volume be any advantage? I currently have 3/8ths hose.
Just curious?Thanks
 
To avoid these ads, REGISTER NOW!

islandkent

Well-known member
Joined
Jan 29, 2009
Messages
281
Location
PEI,Canada
I did that. The hole shebang. Regulator, hose, fittings. Even drilled out the inside of all my fittings. Bought 1/2" ID Flexzilla 8' hose to run direct from Air compressor tank. Changed all my fittings at the tank to 1/2 ID right down to the air filter/dryer. Did it make a difference? Well it didn't hurt. When I need air for the heavier media it it moves it right along. I even drilled out as much as I could at the gun. I'm going to let you in on a secret The hose is 1/2 but they are all necked down. And the most I got was 3/8 ID. Hence drilling out the fittings as much as I dare. I have had so much failure on my bench top model I wasn't taking any chances on this one. That being said try what you have first before stepping up to 1'2 (3/8 ID) I see no advantage to me for going any bigger. My next trial is going to be me making my own gun out of pipe fitting and trying to bore out the inside for better flow. To be continued...lol
Here's a shot at the compressor. The hose going up is standard 3/8 hose. The main shut off for all the air is hidden on the other side.
 

Attachments

  • air tank.jpg
    air tank.jpg
    108.8 KB · Views: 67
Last edited:
OP
T

trooper1954

Well-known member
Joined
Nov 4, 2016
Messages
197
Location
Salmon Arm, BC, Canada
Thanks Kent,
Was going to try the setup 'as is" with the 3/8ths but was just curious. Happy to advise gun and foot pedal arrived yesterday...will be installing today and will then take some photos of the upgrades I did...I'm now into the cabinet for as much as they cost to buy new, so I'm hoping it works out well after all the upgrades.
 
OP
T

trooper1954

Well-known member
Joined
Nov 4, 2016
Messages
197
Location
Salmon Arm, BC, Canada
Just wanted to ask people's opinion...have attached photos of a regulator and an air filter and dryer...which would you put inline first from the compressor, or doesn't it matter?
Thanks
 

Attachments

  • IMG_20210214_123305.jpg
    IMG_20210214_123305.jpg
    157.2 KB · Views: 40
  • IMG_20210214_123249.jpg
    IMG_20210214_123249.jpg
    150.8 KB · Views: 45

islandkent

Well-known member
Joined
Jan 29, 2009
Messages
281
Location
PEI,Canada
Filter> dryer> regulator

Just think about it. Get the dirt particles out before entering the dryer and keeping your regulator moisture free. 10-4? plus your regulator should be last because the pressure will be different further down the line you go. That why painters have small regulators right on or built into their spray guns.
Oh yeah you could make a cheap easy air dryer so to speak if you were to take a 25'-50' air hose and let the air go through it first to cool down and take a bit of moisture out of it first. Some guys mount them in a zig zag pattern. Good write up in Hot Rod magazine a few years back. I found it some where on the net. Great ideas. I'll see if I can find a link and post it here later.

Oh I know$$$ I must have around $500 into mine right now with out the service I did a few weeks ago. These make a real nice media blasting cabinet with a little effort. Go and try and buy one that works as good as these with the mods. More than likely looking at over a grand Canadian.
 
Last edited:
OP
T

trooper1954

Well-known member
Joined
Nov 4, 2016
Messages
197
Location
Salmon Arm, BC, Canada
Re: Sandblast Cabinet air venting.....and the big REVEAL!!!

Hi Guys,
For those that have been following this and been extremely helpful in this project, here's the final result which I got up and running today. I have included photos of the upgrades I made....one thing left to do will be to get a 12v to 110v transformer so the LED lights are powered from an outlet rather than a battery.
First observations during today's maiden voyage....

1. Not able to get good blasting at anything less than 60 psi...with the air valve on the mixing valve maybe 20% open....perhaps wider open will see an improvement....will have to test.

2. Media flow still had a few dead spots....no media at all then suddenly lots.....I kept backflushing with hand over nozzle....didn't seem to change things.... media is dry.

3. Wonder if a slightly smaller nozzle would improve above? The new gun came with #6 which is the largest I've used. Or perhaps the added distance the media now has to travel verses the shorter distance when using the old syphon tube? I had to change the feed tube on the gun as the one that came with the kit would not reach the mixing valve, so its a little longer and now has to go uphill a little. Thoughts?

The performance of the blasting has improved by 60% I would say with the issues noted above aside.

Any suggestions for even better performance will be greatly appreciated....I have about 3-400 horseshoes to blast!!:lol_hitti

Thanks to everyone that contributed.
 

Attachments

  • DIY mixing valve.jpg
    DIY mixing valve.jpg
    128.5 KB · Views: 75
  • LED lights + air intake baffle.jpg
    LED lights + air intake baffle.jpg
    69.8 KB · Views: 68
  • Glass surround with new screws + rivet nuts.jpg
    Glass surround with new screws + rivet nuts.jpg
    124.3 KB · Views: 59
  • Filter,dryer and regulator setup.jpg
    Filter,dryer and regulator setup.jpg
    140.4 KB · Views: 68
  • Dust cyclone.jpg
    Dust cyclone.jpg
    143.4 KB · Views: 67
  • Air intake.jpg
    Air intake.jpg
    103.3 KB · Views: 63
  • Air intake open.jpg
    Air intake open.jpg
    66.5 KB · Views: 66

islandkent

Well-known member
Joined
Jan 29, 2009
Messages
281
Location
PEI,Canada
Looking good Trooper! Yes you have to tweek a bit to find your sweet spot with your components. Yes I have "surging" from time to time. I found i had best results with a 4mm nozzle. And I run my mixing open all the way open. Therefore I should have a larger adjusting valve. But like I said I'm liking the way it works. It wont take long for a #4 nozzle to go to a #6. Bigger the nozzle the more pressure. Make sense? Your amount of media is not running out to introduce the surge? Yeah like I said it will take a bit of tuning for sure.
Did you try a horseshoe yet? I can't t seem to see what type of media your using. I see it's 30-60 grit though. How did it do? Any pics of before and after horseshoe? How long to blast one? So many questions I know. I'm just curious to see how it working out for you.
So all and all your happy but room for improvement?
Just zoomed in your pictures. Crushed glass. Got it. Any of that copper grit/ slag?
 
Last edited:
OP
T

trooper1954

Well-known member
Joined
Nov 4, 2016
Messages
197
Location
Salmon Arm, BC, Canada
Hi Kent,
Here's the photos of before and after....this took me 3-4 minutes. I opened the air valve on the mixing valve to 1/2 and kept the psi @ 70...seemed to work a little better. Was unable to try a #4 nozzle as the ones I have only fit the old gun...probably Eastwood specific.
I have only tried crushed glass as that was the medium suggested to me for heavy rust. What are you using , and how do you rate it?
Also, I'm wondering if, as the manual suggests "7.1 CFM @ 90 PSI minimum requirement,
10.25 CFM @ 115 PSI is recommended.".....whether that was the recommended pressure if you were hooking this up to a syphon system? The reason I ask is the hose that came with the new gun certainly was not long enough to reach to a mixing valve. I haven't tried beyond 70 psi yet but will experiment.
Cheers.
 

Attachments

  • 20 seconds on wire wheel.jpg
    20 seconds on wire wheel.jpg
    113.7 KB · Views: 43
  • After approx. 3mins.jpg
    After approx. 3mins.jpg
    100.4 KB · Views: 43
  • Before.jpg
    Before.jpg
    87.3 KB · Views: 44
OP
T

trooper1954

Well-known member
Joined
Nov 4, 2016
Messages
197
Location
Salmon Arm, BC, Canada
Hmmm....just contacted Eastwood about getting a set of different sized nozzles.....guess what?.....they only sell 6mm, and I also spotted that the gun I installed isn't designed to use media less than 60 grit!! I'm using crushed glass that's 30-60 grit, so am wondering if I went to a finer medium I'd have my socks knocked off with the performance??:lol:
 

islandkent

Well-known member
Joined
Jan 29, 2009
Messages
281
Location
PEI,Canada
That's not to bad 3-4 minutes. Middle picture is with the crushed glass right? Is the last picture wire brush polish? Seems right shiny. You might be able to get a finer results by a second blasting with different media. But it turned out nice don't you THINK? Are you looking for better results? Like I said maybe two stage blasting.
Those pictures I showed before of the car parts are all done with glass beads. I'm only dealing with paint removal no rust on those parts. I rate it a 10 out of 10 when it come to paint removal on steel. I like the glass beads better than the walnut.
Now this past weekend I did a Mopar intake with the copper slag and did a nice job I thought. Yes I would use crushed glass on those shoes with the rust. Maybe use a courser grit if you think it's taking to long but will have a courser finish. It did turn out nice that's for sure.
Here's that copper slag on cast.
 

Attachments

  • Center1.jpg
    Center1.jpg
    138.5 KB · Views: 52
  • intake.jpg
    intake.jpg
    137.1 KB · Views: 54
Last edited:

islandkent

Well-known member
Joined
Jan 29, 2009
Messages
281
Location
PEI,Canada
I think that is pretty much a generic gun. You should be able to get nozzles off of Amazon I think. I checked those out before and also checked out the consumables. So I think they are out there. Somebody may be able to help with a definite answer. So your happy with your mods?
 
OP
T

trooper1954

Well-known member
Joined
Nov 4, 2016
Messages
197
Location
Salmon Arm, BC, Canada
Yes...very happy:beer:
Will be happier once I've found replacement nozzles....amazon.ca don't have any, so I'm going to try Princess Auto and KMS.
I wanted to thank you for your input and help...it's been quite a journey but well worth it....now I just have to start 'blasting" those 5 garbage cans full of shoes!!!
The idea is to make things with the horseshoes....and the great part about it is they are all genuine used shoes, so the marks left on them after buffing up adds to the character. Repurposing them all :)
Will keep you up to date on any and all progress as we go forward.
Cheers
 

Jswain

Well-known member
Joined
Apr 26, 2013
Messages
2,460
Location
Calgary, AB
The best way to setup your gun is with it hooked to a vacuum gauge hooked into the suction tube, then adjust your jet back until you reach max vacuum. It looks as if you have your jet all the way in which will limit vacuum and allow the gun to clog more.

I believe the clemco manual says something like 4 threads showing and I'm pretty sure that's how I set mine up and it's worked good enough I didn't go the vacuum gauge route. Back yours out so there's 4 threads showing between the lock ring and the fitting for the hose barb and try it again!

For adjusting your metering valve set your desired air pressure and start with the metering valve fully opened. Close off the metering valve slowly until the gun begins to slug and then open it a touch until the gun stops slugging. You should only have to adjust again if you change air pressure/media etc.

You can find the nozzles on Amazon as said I would stick with the 6mm and perhaps get a boron nozzle then you're good for a long time.

https://www.amazon.ca/dp/B07X38VPLX/?tag=atomicindus04-20

Link to the Amazon boron nozzles, 6mm is currently unavailable but easy enough to find once you have the measurements(35mm*20mm). I wouldn't change the size yet as it is supposed to be sized according to the jet(2x larger) but I believe once you pull the jet back you will be thrilled

https://www.clemco-international.com/sites/default/files/manuals/BNP-suction-Rev1_2015-engl-p_1.pdf

Link to their blast cabinets running the same style gun, 3.5-4 threads is what they recommend

https://clemcoindustries.com/produc...t-cabinet-accessories/bnp-suction-blast-guns/

A good illustration of why that distance will make it better and if you click on the technical data sheet you can find part numbers for replacement nozzles etc.
 
Last edited:

islandkent

Well-known member
Joined
Jan 29, 2009
Messages
281
Location
PEI,Canada
There you go Trooper! I'll leave it to Jswain. He knows what he's talking about when it come to these guns.
Great tip on the vacuum gauge! Going to give those links a read. I think I might pick up a larger "jet" for mine and give it a try. Mine is open fully and alway did wonder if it was to small. I might try drilling/boring it out to a greater ID. But I think my local Home Hardware has the same "jet" /valve that Trooper has. Heading into town later and going to pick one up.
Thanks Jswain

Just took a look at the Clemco literature. Some great info there for sure. Great diagrams/troubleshooting guide!
 
Last edited:

Jswain

Well-known member
Joined
Apr 26, 2013
Messages
2,460
Location
Calgary, AB
Curious what you are using for a metering valve Kent? I use the same valve as trooper and it is always around 20-40% closed. I picked it up at Canadian Tire in the air fitting section.

Depending on which gun you have /pressure you're running/ jet & nozzle size will change what % open the metering valve is as I believe the more vacuum you are pulling the less you will have to open the valve to prevent surging
 
Last edited:

islandkent

Well-known member
Joined
Jan 29, 2009
Messages
281
Location
PEI,Canada
Yes I got my parts for the valve itself right from crappy. But my valve for adjusting the air volume I had kicking around here. I believe the ID is probably less than 1/4". You must of seen this type before. Do you know how big the ID is on yours and trooper valve is??

Here is a better picture of just the valve...
 

Attachments

  • 13.JPG
    13.JPG
    43.5 KB · Views: 54
Last edited:

islandkent

Well-known member
Joined
Jan 29, 2009
Messages
281
Location
PEI,Canada
The gun I'm using is not the one that came with the PA cabinet. I'm using the one that came with the Canadian Tire bench top model/version(my first blast cabinet). I even bought the one from Campbell Hausfeld because the reviews were so good on those. Not in my case anyway. The one from CT works great. That's why I'm in no rush to change up. Like I said I have the foot valve for that triggerless type gun and if I decide to to change I will make my own gun with 45 degree T type pipe fittings and bore out the center for max media flow and make a adjusting valve like on those type of guns you have. I will also make the nozzle holder so I can use those nozzles from Princess. No good if I can't find the consumables. Right? Those guns from CT and PA take the same nozzles. Easy to find. And I have some replacement nozzles for the CH gun from PA also. Took the gun right to the store to test fit.
 
To avoid these ads, REGISTER NOW!
Top Bottom