old_smokey
Well-known member
Hi everyone,
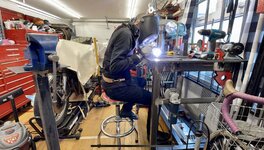
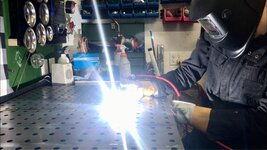
I just finished building a welding fabrication table. This is the first thing I've TIG welded, so the welds aren’t good, but I’m learning fast and having fun.
I recently bought a Primeweld 225x and after running a few practice beads and watching a ton of YouTube I decided to build a proper table.
I wanted to share the process and results mainly because of how I handled the 1/2" steel top plate.
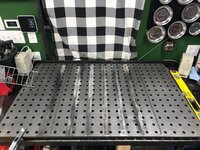
I got a really good deal on a 1/2" thick, 30" by 46" plate with 5/8" holes laser cut on a 2" grid. The problem was the plate was warped like a potato chip when I received it… This was a side deal through a friend and his work supplier, with no option to return/exchange.

The plate was warped 1/2" across its length and 1/4" across the width. I couldn't find anyone locally that could press it flat, and I didn't want to pull it flat with clamps and weld in place. My research ended up bringing me to the idea of flame straightening.
I don't have a good oxy setup (torch and regulators need to be replaced and I’m trying to stay on a budget here) so I started wondering if the same process would hold true using just the heat of a TIG torch. Figured why not give it a try.
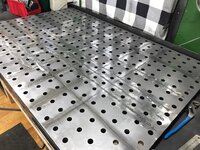
I put the steel top on my work bench, crown up, and marked out all the high points with a scribe. Then I ran autogenous welds just hot enough to form a puddle. I'd run a “bead", then watch as the crown rose and the bend got worse from expansion, then cool and pull the plate a bit flatter. Pretty amazing to watch actually.

In the end it took me about 14 “passes” of varying size and location. The plate ended up flat to within 1/32 of an inch, and that gap is only at the rear corner, which I corrected with steel shims when I bolted the top to the frame.


Before and after a few passes:


A couple things I learned and wish I did better:
- Since I'm new to TIG welding, I obviously had poor technique on the autogenous/straightening welds. My travel speed was much to fast, resulting in some inconsistent, lumpy results. If I had slowed down I would have had little to no clean up afterward. Instead I needed to spot grind a few areas that prevented the plate from resting flat on its base.
- I was also a bit nervous of how this would go, so I ran a lot of low amperage passes. I think if I had cranked the amps up I could have done 4-5 passes instead of numerous low amperage passes. I guess I was worried about the plate pulling too far and having to do the same thing on the opposite face. Not really a bad thing, but something I learned.
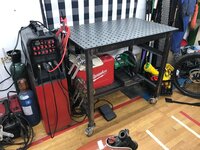
All in all this process took maybe two hours and I now have a nice flat top.
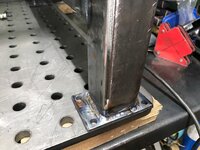
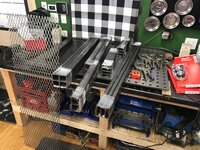
I built the base out of 2" square and 3x1" rectangular 0.125” tubing. The top is bolted down using 14 M8 set screws spread throughout the base so I can shim as/if needed.
Only thing left to do is get a hammertone powder coat job for the legs.
Thanks, hope that was interesting for someone.
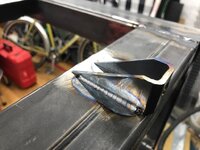
Here's a few of the in-process pics, and a couple weld examples. The flare-bevel's were the hardest for me. If I could weld in a horizontal position I would have pretty good results. But trying something more advanced like vertical up and such is something I should have waited till I was more practiced.


Sent from my iPhone using Tapatalk
I just finished building a welding fabrication table. This is the first thing I've TIG welded, so the welds aren’t good, but I’m learning fast and having fun.
I recently bought a Primeweld 225x and after running a few practice beads and watching a ton of YouTube I decided to build a proper table.
I wanted to share the process and results mainly because of how I handled the 1/2" steel top plate.
I got a really good deal on a 1/2" thick, 30" by 46" plate with 5/8" holes laser cut on a 2" grid. The problem was the plate was warped like a potato chip when I received it… This was a side deal through a friend and his work supplier, with no option to return/exchange.
The plate was warped 1/2" across its length and 1/4" across the width. I couldn't find anyone locally that could press it flat, and I didn't want to pull it flat with clamps and weld in place. My research ended up bringing me to the idea of flame straightening.
I don't have a good oxy setup (torch and regulators need to be replaced and I’m trying to stay on a budget here) so I started wondering if the same process would hold true using just the heat of a TIG torch. Figured why not give it a try.
I put the steel top on my work bench, crown up, and marked out all the high points with a scribe. Then I ran autogenous welds just hot enough to form a puddle. I'd run a “bead", then watch as the crown rose and the bend got worse from expansion, then cool and pull the plate a bit flatter. Pretty amazing to watch actually.
In the end it took me about 14 “passes” of varying size and location. The plate ended up flat to within 1/32 of an inch, and that gap is only at the rear corner, which I corrected with steel shims when I bolted the top to the frame.
Before and after a few passes:
A couple things I learned and wish I did better:
- Since I'm new to TIG welding, I obviously had poor technique on the autogenous/straightening welds. My travel speed was much to fast, resulting in some inconsistent, lumpy results. If I had slowed down I would have had little to no clean up afterward. Instead I needed to spot grind a few areas that prevented the plate from resting flat on its base.
- I was also a bit nervous of how this would go, so I ran a lot of low amperage passes. I think if I had cranked the amps up I could have done 4-5 passes instead of numerous low amperage passes. I guess I was worried about the plate pulling too far and having to do the same thing on the opposite face. Not really a bad thing, but something I learned.
All in all this process took maybe two hours and I now have a nice flat top.
I built the base out of 2" square and 3x1" rectangular 0.125” tubing. The top is bolted down using 14 M8 set screws spread throughout the base so I can shim as/if needed.
Only thing left to do is get a hammertone powder coat job for the legs.
Thanks, hope that was interesting for someone.
Here's a few of the in-process pics, and a couple weld examples. The flare-bevel's were the hardest for me. If I could weld in a horizontal position I would have pretty good results. But trying something more advanced like vertical up and such is something I should have waited till I was more practiced.
Sent from my iPhone using Tapatalk
Attachments
-
 96cdc0db7a23b9bfc7859eac82787381.jpg75.5 KB · Views: 52
 -
 9dd68e0456801aecfd6cee92e170190f.jpg140.3 KB · Views: 43
 -
 1d387b885d5e6733f139935d02fcdb93.jpg127.7 KB · Views: 35
 -
 270b85d93188cff26e1b65975b724ff6.jpg85.2 KB · Views: 29
 -
 e16676fa04202d971c61438c3893a428.jpg165.3 KB · Views: 26
 -
 b6bd812dfde2d456e4dfefd55fe11002.jpg102.2 KB · Views: 21
 -
 68096a868cadeb40396fc0417e031292.jpg102.5 KB · Views: 19
 -
 c66ccee60f4865e1ad0b823d69494e33.jpg146.8 KB · Views: 16
 -
 e1b3f1c6de7128c0810e506ec3e67cb9.jpg125.2 KB · Views: 15
 -
 a6816dcd6832294916a40347f1aded2b.jpg131.4 KB · Views: 16
 -
 a146bf4f1a1e3fb8ee1b25d22f62d358.jpg133.7 KB · Views: 13
 -
 c769df5e72a02ac294301642fd71e842.jpg48.6 KB · Views: 14
 -
 ae2ab90ba6a2690445144e3cc76cb4ca.jpg58 KB · Views: 17
 -
 dda97e8671eb00f94de7b526bc31fe0c.jpg79.3 KB · Views: 19
 -
 5a583b8ad2cbad0fd40e3f4048cb4ec9.jpg167.2 KB · Views: 20
Last edited: