To avoid these ads, REGISTER NOW!

Above 1200 Sq/FT The ASYLUM - Happy 40th Birthday to Me! (Est. 2005)

Wokspaces above 1200 squarefeet.
OP
S

shopnut

Well-known member
Joined
Feb 22, 2006
Messages
4,237
Location
Florida
THE LAST FRONTIER, THE ASYLUM SOUTH WALL… (Part 40 of 50)

LATERAL CABINETS.


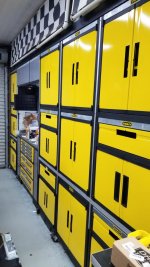
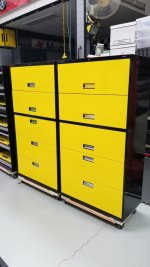
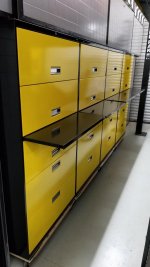
Its was time to put the other lateral cabinets back together. Here are the first two and you can tell the different drawer configurations on these two. I must say, I like the arrange with the three consistent drawers on the bottom better.

attachment.php


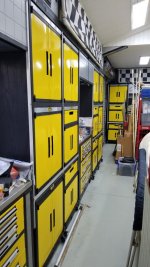
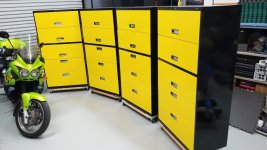
It didn’t take long to have all 4 done.

attachment.php


At this point, there was nothing stopping me from wheeling them into their final home.

attachment.php


attachment.php


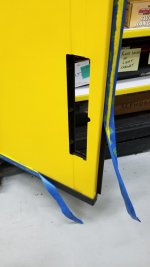
The top two rows are the flip-lid style with pull-out drawers.

attachment.php


One final picture with all writing shelves pulled out.

attachment.php
 

Attachments

  • 4720-South-Wall-320 (Lateral Cabinets).jpg
    4720-South-Wall-320 (Lateral Cabinets).jpg
    57.2 KB · Views: 249
  • 4721-South-Wall-324 (Lateral Cabinets).jpg
    4721-South-Wall-324 (Lateral Cabinets).jpg
    127.6 KB · Views: 248
  • 4722-South-Wall-325 (Lateral Cabinets).jpg
    4722-South-Wall-325 (Lateral Cabinets).jpg
    133.3 KB · Views: 248
  • 4723-South-Wall-326 (Lateral Cabinets).jpg
    4723-South-Wall-326 (Lateral Cabinets).jpg
    62.5 KB · Views: 249
  • 4724-South-Wall-328 (Lateral Cabinets).jpg
    4724-South-Wall-328 (Lateral Cabinets).jpg
    63 KB · Views: 254
  • 4725-South-Wall-329 (Lateral Cabinets).jpg
    4725-South-Wall-329 (Lateral Cabinets).jpg
    58 KB · Views: 252
Last edited:
To avoid these ads, REGISTER NOW!

ODIS

Well-known member
Joined
Apr 30, 2012
Messages
2,110
Location
Pacific Northwest
The cabinets look wonderful!

Asked about the winds only because thought you might have frequent heavy winds at your location. Here, our prevailing winds are out of the west coming off the ocean and not at all unusual to have gale force winds. Any door facing this direction during a wind event, once opened, will allow all kinds of debris to go flying all over the interior and certainly with the large garage doors, they can rattle like crazy.

Thanks again for all the effort you put into the Asylum!
 

drivesitfar

Well-known member
Joined
Oct 23, 2013
Messages
36,009
Location
Pacific Northwest
I can't imagine all the items you've had sitting around while you've been painting all your cabinets, but you've done an amazing job and taking your time so you shouldn't have to paint again for a very long time.

just curious do you have a plan on what items go where and are you itemizing everything on an Excel program or will you maybe use green/blue painter's tape with a sharpie telling you what's in each drawer until you know where everything is?

WELL DONE!!
 
OP
S

shopnut

Well-known member
Joined
Feb 22, 2006
Messages
4,237
Location
Florida
ODIS - Thanks for more detail. Yeah, those big doors sure can make a racket when there is a variable breeze pressing on them. Doesn’t take much wind either.

I know the doors are rated for “hurricane winds” with their windlocks built into the jambs. Docs say 120mph wind rating. The rest of the building may be gone, but the doors should survive!! LOL I have my doors open nearly always when working in the shop, but if the back door isn’t opened, I don’t have much problem with debris flying around. But there certainly have been occasions when I needed to close all the doors because things were getting out of hand.

With the large porch overhang in front, I seldom need to close them during any rain event, even our summer afternoon thunderstorms and its cool seeing the water drops whizzing by almost horizontal out in front of the shop while its relatively peaceful inside. I like having the doors open at these times because it helps to cool the place down.

drivesitfar - Thanks. There are bins and bins of stuff just waiting to move in… shop supplies and bike parts mainly. I will consult my spreadsheet to make sure I don’t forget to gather up anything that is intended to live there in the future. Some magnetic labels will probably be used to keep me from hunting too long for something. But you are right, temporary labels of post-it notes or tape will suffice until I get it all sorted

harley jim - Thank you sir. We are here to help push each other along. I’m looking forward to seeing the cart of yours finished up and cruising around first!

T-handle - Thanks. The entire shop has been a labor of love, that’s for sure. It’s certainly taken much longer to finish it, but I’ve enjoyed nearly every minute of it.

casmurbax - Thanks. For your friend… I haven’t gotten to that detail yet, but each cabinet will have a kick panel attached to it hiding the dolly below. Its secondary purpose will be to keep dropped items from rolling under there, thus keeping me from cussing.

attachment.php
 

casmurbax

Well-known member
Joined
Sep 25, 2012
Messages
2,758
Location
Wilton, NY
Oh I think you did mention that before, putting a skirt on them. That makes sense to keep things from rolling under them.
 
OP
S

shopnut

Well-known member
Joined
Feb 22, 2006
Messages
4,237
Location
Florida
REPAINTING THE STANLEY CABINETS… (Part 5 of 6)

I moved a little further along on this side project. The new paint turned out nice and I’m very glad I did it.

To get the second set of drying doors out of the way, those also got hung back on their respective cabinets.

attachment.php


Another few minutes presented itself so I pulled the tape off of everything.

attachment.php


With the tape off, I could finally close all the doors, step back and take a good look at the two walls of cabinets.

attachment.php


attachment.php


I decided to NOT pop the pull handles back in until the paint had another week to dry. So this project STILL isn't done.

attachment.php
 

Attachments

  • 4730-Stanley-Cabinet-Repaint-29.jpg
    4730-Stanley-Cabinet-Repaint-29.jpg
    113.5 KB · Views: 209
  • 4729-Stanley-Cabinet-Repaint-30.jpg
    4729-Stanley-Cabinet-Repaint-30.jpg
    85.4 KB · Views: 209
  • 4728-Stanley-Cabinet-Repaint-28.jpg
    4728-Stanley-Cabinet-Repaint-28.jpg
    88.7 KB · Views: 212
  • 4727-Stanley-Cabinet-Repaint-27.jpg
    4727-Stanley-Cabinet-Repaint-27.jpg
    42.2 KB · Views: 213
  • 4726-Stanley-Cabinet-Repaint-26.jpg
    4726-Stanley-Cabinet-Repaint-26.jpg
    90.3 KB · Views: 212
Last edited:

drivesitfar

Well-known member
Joined
Oct 23, 2013
Messages
36,009
Location
Pacific Northwest
I bet you are a happy guy. just curious since the Asylum isn't at your home are you able to drive over after work and still get home for dinner or are you omitting sleep to get this project done?

I bet you have something under the Stanley cabinets to keep stuff from rolling under them sort of like the base plate you are going to put on the big cabinets? i just couldn't see them and either could my FRIEND so he's asking. :bounce:


looks AWESOME!!
 
OP
S

shopnut

Well-known member
Joined
Feb 22, 2006
Messages
4,237
Location
Florida
I bet you are a happy guy. just curious since the Asylum isn't at your home are you able to drive over after work and still get home for dinner or are you omitting sleep to get this project done?

I bet you have something under the Stanley cabinets to keep stuff from rolling under them sort of like the base plate you are going to put on the big cabinets? I just couldn't see them and either could my FRIEND so he's asking. :bounce:


looks AWESOME!!
The Asylum is within a 30 minute drive, so its certainly possible to run out there after work and tinker a bit. But what I prefer to do is run out there in blocks of a day or two when time allows. Its just me and that shop and the work, I mean play, sessions are pretty intense and focused. I get a ton done in a 24 hour period. Then during the week, I post the updates on the GJ when time allows to sort through pictures and write up the story behind them. So what I am posting here typically really isn't "real time", but at least a day or two or four behind.

I went a different route with the Stanley cabinets. Since there was was a bunch of wasted space between the casters, I made little roll-out trays to store a bunch of my heavier items (raw stock, brackets, etc). If I had more room under the new lateral cabinets, I would be doing the same thing because it is a great way to use that otherwise wasted space.

attachment.php


attachment.php


attachment.php


Link to Reply #3038 where the story of the trays begins: Reply #3038
Link to Reply #3651 where I built some more of them: Reply #3651

When it is time to clean or retrieve something that has bounced under the Stanley cabinets, the lower cabinets pull out easy enough.

attachment.php
 
Last edited:

Trapps

ALLIANCE MEMBER
Joined
Feb 10, 2017
Messages
2,002
Location
The Detroit Zoo
You do know that pack-rats, hoarders and storage freaks (like me) thrive on your thread, right?

Combine that with the subtle details like handle pin-striping and inset contrast modifications, and you hit the detail weirdos and OCD crowds right in the frontal lobes too!

The evolution of your place is just fantastic, Mark! :bowdown:

:beer:
 
OP
S

shopnut

Well-known member
Joined
Feb 22, 2006
Messages
4,237
Location
Florida
You do know that pack-rats, hoarders and storage freaks (like me) thrive on your thread, right?

Combine that with the subtle details like handle pin-striping and inset contrast modifications, and you hit the detail weirdos and OCD crowds right in the frontal lobes too!

The evolution of your place is just fantastic, Mark! :bowdown:

:beer:
I struggle with throwing away anything with an ounce of usefulness still in it, so I've always considered myself a pack-rat. I don't think I've crossed over into the hoarder region... yet, but my wife may beg to differ. LOL

Being a pack-rat, but with a desire to find things quickly, forces my organized nature with a need to utilize every cubic inch of space. On top of that, I simply what things to look good and to be able to enjoy the workspace I'm in. I guess the ASYLUM is the result of all that rolled up into one. I think it reflects who I am pretty closely.

I'm happy to hear it attracts the people you mention, because I am certainly in those categories. You made me laugh, but mostly, you made me proud of what I created here. Thank you sir!
 
OP
S

shopnut

Well-known member
Joined
Feb 22, 2006
Messages
4,237
Location
Florida
THE LAST FRONTIER, THE ASYLUM SOUTH WALL… (Part 41 of 50)

POWER CORD REEL.


With most of the major tasks done on this wall, it was time to work on some of the details. I originally planned to have a number of different reels over here for power, air, 12V charging, and lighting, but I decided to integrate all but the power cord into the auto lift. Since those other things will be used for the car on the lift, I didn’t want a bunch of cords/hoses running from this wall over to the car… less to trip on. Instead, I plan to have one umbilical cord running overhead to the lift with everything I need.

So it boiled down to just one power cord reel to install… easy! I just needed some framework on the wall to mount the reel to and I made it extra long in case I changed my mind later on and wanted to add more later on. I used on the Appleton reels.

attachment.php


The cord is simply going to hang in the gap between up and lower doors.

attachment.php


This is what it looks with a little lead pulled out.

attachment.php


And when its retracted, its completely out of sight.

attachment.php


I stepped back a ways to get this picture and you can see the top of the door leading to the apartment.

attachment.php
 

Attachments

  • 4735-South-Wall-336 (Cord Reel).jpg
    4735-South-Wall-336 (Cord Reel).jpg
    117.4 KB · Views: 177
  • 4734-South-Wall-335 (Cord Reel).jpg
    4734-South-Wall-335 (Cord Reel).jpg
    48.9 KB · Views: 176
  • 4733-South-Wall-334 (Cord Reel).jpg
    4733-South-Wall-334 (Cord Reel).jpg
    40.8 KB · Views: 177
  • 4732-South-Wall-333 (Cord Reel).jpg
    4732-South-Wall-333 (Cord Reel).jpg
    53.5 KB · Views: 175
  • 4731-South-Wall-332 (Cord Reel).jpg
    4731-South-Wall-332 (Cord Reel).jpg
    110 KB · Views: 179
Last edited:

casmurbax

Well-known member
Joined
Sep 25, 2012
Messages
2,758
Location
Wilton, NY
I like how that came out. I know you were just waiting for my approval. Great use of space.

What is in those drawers under the Stanley cabinets on the far right?
 

drivesitfar

Well-known member
Joined
Oct 23, 2013
Messages
36,009
Location
Pacific Northwest
that looks like a very STOUT power cord AND it's YELLOW. imagine that.

looking good at the Asylum and hope you find a few treasures you forgot you owned while you are sorting, organizing and putting everything in it's place.

cheers!!
 
OP
S

shopnut

Well-known member
Joined
Feb 22, 2006
Messages
4,237
Location
Florida
I like how that came out. I know you were just waiting for my approval. Great use of space.

What is in those drawers under the Stanley cabinets on the far right?
Yeah, I've been sitting here idle just waiting for your approval before moving on! Thanks for finally giving the OK! LOL

That particular drawer has a number of different styles of surplus steel brackets and plates in it. And a few alternator support arms too (the arc-shaped ones with long slots for belt adjustment. Just various bits I picked up for free along the way and are slowly being used on some of the weird projects I build occasionally.
 
OP
S

shopnut

Well-known member
Joined
Feb 22, 2006
Messages
4,237
Location
Florida
that looks like a very STOUT power cord AND it's YELLOW. imagine that.

looking good at the Asylum and hope you find a few treasures you forgot you owned while you are sorting, organizing and putting everything in it's place.

cheers!!
I love those Appleton reels... such quality! And colors of that particular model looks good out in the open in this shop. I mounted one of them as a drop cord on the outer tip of my jib crane:

attachment.php


attachment.php


But the really STOUT ones I own are these orange Appleton models. They make the gray ones look like toys (which they aren't). Just look at the cable size comparison. Infinitely adjustable roller fairleads too. These will be replacing my existing Craftsman 'Professional" reels soon in 3 spots in the shop.

attachment.php
 
Last edited:
To avoid these ads, REGISTER NOW!
OP
S

shopnut

Well-known member
Joined
Feb 22, 2006
Messages
4,237
Location
Florida
THE LAST FRONTIER, THE ASYLUM SOUTH WALL… (Part 42 of 50)

OUTFITTING THE LEFT CABINET.


I have a number of things I wanted to store in the left side sliding door cabinet. The main items are 3 step ladders. I also wanted to hang all my lifting slings for easy retrieval and so I could see how long they were BEFORE grabbing one (they were neatly tucked in bags before, but this proved inefficient because I had to guess at a strap’s length and then put it back if it wasn’t what I wanted).

I built this strap rack to hang in the cabinet and provide plenty of hooks to hang everything. I had a surplus of those 6” screws (hundreds?) so it was nice using some more of them here.

attachment.php


To protect the nylon straps from the sharp screw threads, I added some spiral wrap. I would have just used some solid hose or pipe, but I didn’t think about until AFTER all 30 screws were driven in. It actually didn’t take long at all to add it after the fact.

attachment.php


Ready to go up!

attachment.php


I tucked it in as high as it would go. You can see the first lateral cabinet there in the lower right corner.

attachment.php


Straps in their new home. I had room for my engine leveler behind there too.

attachment.php


I accumulated a few lifting chains that needed a home as well and the screw pegs worked fine for hanging those too.

attachment.php


Here is an overall shot. I know I can pack a lot more stuff in there, so the story is not finished yet!

attachment.php
 

Attachments

  • 4742-South-Wall-356 (Left Side Cabinet).jpg
    4742-South-Wall-356 (Left Side Cabinet).jpg
    58.4 KB · Views: 356
  • 4741-South-Wall-353 (Left Side Cabinet).jpg
    4741-South-Wall-353 (Left Side Cabinet).jpg
    56 KB · Views: 352
  • 4740-South-Wall-351 (Left Side Cabinet).jpg
    4740-South-Wall-351 (Left Side Cabinet).jpg
    82.9 KB · Views: 348
  • 4739-South-Wall-348 (Left Side Cabinet).jpg
    4739-South-Wall-348 (Left Side Cabinet).jpg
    103.5 KB · Views: 359
  • 4738-South-Wall-347 (Left Side Cabinet).jpg
    4738-South-Wall-347 (Left Side Cabinet).jpg
    102.4 KB · Views: 351
  • 4737-South-Wall-346 (Left Side Cabinet).jpg
    4737-South-Wall-346 (Left Side Cabinet).jpg
    127.1 KB · Views: 351
  • 4736-South-Wall-345 (Left Side Cabinet).jpg
    4736-South-Wall-345 (Left Side Cabinet).jpg
    122.7 KB · Views: 359
Last edited:
OP
S

shopnut

Well-known member
Joined
Feb 22, 2006
Messages
4,237
Location
Florida
THE LAST FRONTIER, THE ASYLUM SOUTH WALL… (Part 43 of 50)

OUTFITTING THE LEFT CABINET.


I also needed a spot for all of my shackles, so I added another 2x6 on the wall so I could install more pegs.

attachment.php


This same 2x6 extended nearly down to the floor and I added hooks to hang 4 moving dollies and also the short step ladder. Sure, it looks messy in there, but that’s why I have doors!! LOL

attachment.php


The left half of this cabinet houses my other two ladders which get used often. The 3-step blue one allows me to reach any tote bin in the ASYLUM and weighs nothing to carry around, so that one is out and about all the time.

attachment.php
 

Attachments

  • 4743-South-Wall-360 (Left Side Cabinet).jpg
    4743-South-Wall-360 (Left Side Cabinet).jpg
    130.5 KB · Views: 344
  • 4744-South-Wall-358 (Left Side Cabinet).jpg
    4744-South-Wall-358 (Left Side Cabinet).jpg
    81.1 KB · Views: 347
  • 4745-South-Wall-3461(Left Side Cabinet).jpg
    4745-South-Wall-3461(Left Side Cabinet).jpg
    66 KB · Views: 343
Last edited:

drivesitfar

Well-known member
Joined
Oct 23, 2013
Messages
36,009
Location
Pacific Northwest
I am pretty sure you are past the TERRIBLE LOOKING STORAGE EVEN IF THE DOORS ARE OPEN. i'm not sure you even remember what a MESS LOOKS LIKE?

nicely done as usual and love the huge power cords and their cast iron housing!! :bowdown:
 

casmurbax

Well-known member
Joined
Sep 25, 2012
Messages
2,758
Location
Wilton, NY
Thanks for rolling with my wise *** comment.

I know there is a chevelle somewhere in that neatly organized garage. What are the plans with that?

That jib crane looks awesome.
 

shortykorte

Well-known member
Joined
Sep 1, 2014
Messages
8,039
Location
Tallahassee, Fl
Re: The ASYLUM - Turning a Crazy Vision into a Lakefront Gearhead Getaway: Year 6

That’s easy, the Chevelle will be part of the Close Encounter scene for the HO world that will live under it.

Mark, so many great ideas.


Sent from my iPhone using Garage Journal
 

casmurbax

Well-known member
Joined
Sep 25, 2012
Messages
2,758
Location
Wilton, NY
You know I pulled my HO set out when you all were talking about that a few weeks ago. I thought I had more metal cars but I was mistaken, most of the cars I have from the early 80's plastic ones.
 

Bob Heine

ALLIANCE MEMBER
Joined
Oct 24, 2009
Messages
10,705
Location
Boca Raton, Florida
You know I pulled my HO set out when you all were talking about that a few weeks ago. I thought I had more metal cars but I was mistaken, most of the cars I have from the early 80's plastic ones.
John, don't feel bad, my HO stuff is from the late '40s-early '50s. No plastic but lots of cardboard.
 

Bob Heine

ALLIANCE MEMBER
Joined
Oct 24, 2009
Messages
10,705
Location
Boca Raton, Florida
John, the freight cars were kits with the sides printed on cardboard with a metal top, ends and chassis. I watched my grandfather put them together when I was about 4. The original couplers were large flat rings and I remember replacing them with more realistic ones when I was 9. A lot of the track we had came as a carved wooden bed and brass rails that we had to pin in place. We had a wooden handled jig to hold the rails in place and drove the four tiny tiny nails on each tie. I might have to go in the attic to drag out what's left of the old layout.
 
OP
S

shopnut

Well-known member
Joined
Feb 22, 2006
Messages
4,237
Location
Florida
I am pretty sure you are past the TERRIBLE LOOKING STORAGE EVEN IF THE DOORS ARE OPEN. i'm not sure you even remember what a MESS LOOKS LIKE?

nicely done as usual and love the huge power cords and their cast iron housing!! :bowdown:
Oh, I know EXACTLY what messes are! Why? Because this is the current state of my workbench.

attachment.php


And here is what’s out in front of my workbench… A bunch of marine stuff, displaced items that will go in the south wall cabinets, and other things that need homes. Forget about rolling out the island workbench right now!

attachment.php


And here is what’s packed under the auto lift. I hope to sell several of these items shortly (not the manlift!).

attachment.php
 

Attachments

  • 4748-Mess-03.jpg
    4748-Mess-03.jpg
    149.4 KB · Views: 307
  • 4747-Mess-02.jpg
    4747-Mess-02.jpg
    96.4 KB · Views: 302
  • 4746-Mess-01.jpg
    4746-Mess-01.jpg
    153.8 KB · Views: 309
OP
S

shopnut

Well-known member
Joined
Feb 22, 2006
Messages
4,237
Location
Florida
Thanks for rolling with my wise *** comment.

I know there is a chevelle somewhere in that neatly organized garage. What are the plans with that?

That jib crane looks awesome.

I can roll with the best! LOL
The Chevelle was my first car and my intentions are for it to be my last, as well. My plan is to make it reliable, give it some go-fast goodies, some creature comforts, a new body, and then drive it daily once I retire in ten years.

That’s easy, the Chevelle will be part of the Close Encounter scene for the HO world that will live under it.

Mark, so many great ideas.


Sent from my iPhone using Garage Journal
You remember the diagram! It might become reality someday, but that's pretty far off.

You know I pulled my HO set out when you all were talking about that a few weeks ago. I thought I had more metal cars but I was mistaken, most of the cars I have from the early 80's plastic ones.
After we talked about it, I searched Ebay for some good deals on HO steam engines. I got outbid on all of them that looked interesting (and nearly free when I first bid!). It good to see a strong interest in the hobby yet.

John, don't feel bad, my HO stuff is from the late '40s-early '50s. No plastic but lots of cardboard.

Bob, that is kind of surprising from that era even.

John, the freight cars were kits with the sides printed on cardboard with a metal top, ends and chassis. I watched my grandfather put them together when I was about 4. The original couplers were large flat rings and I remember replacing them with more realistic ones when I was 9. A lot of the track we had came as a carved wooden bed and brass rails that we had to pin in place. We had a wooden handled jig to hold the rails in place and drove the four tiny tiny nails on each tie. I might have to go in the attic to drag out what's left of the old layout.
That sounds very interesting Bob... you actually built your own track! I remember buying a model railroading How-To book when I was kid and reading about how people laid their own track. I figured if I would do it, there would be train wrecks from derailing every 5 minutes or so. LOL
 

cbacres

Well-known member
Joined
May 28, 2010
Messages
5,998
Location
SW Florida
Re: The ASYLUM - Turning a Crazy Vision into a Lakefront Gearhead Getaway: Year 6

You call that messy?
You definitely win the organization ideas award though.

Great idea on the strap storage. I started something similar years ago in my trusses.
IMG_6815.jpg

My current strap hangout.
IMG_6816.jpg

I don’t have wall space to spare, I was vaguely tossing around in the head storage in the truss for straps.
I may steel a version of your set up there.
I’d love to do it so the lengths can easily been seen.

Looks great!


Sent from my iPhone using Garage Journal
 
OP
S

shopnut

Well-known member
Joined
Feb 22, 2006
Messages
4,237
Location
Florida
Re: The ASYLUM - Turning a Crazy Vision into a Lakefront Gearhead Getaway: Year 6

You call that messy?
You definitely win the organization ideas award though.

Great idea on the strap storage. I started something similar years ago in my trusses.
IMG_6815.jpg

My current strap hangout.
IMG_6816.jpg

I don’t have wall space to spare, I was vaguely tossing around in the head storage in the truss for straps.
I may steel a version of your set up there.
I’d love to do it so the lengths can easily been seen.

Looks great!


Sent from my iPhone using Garage Journal
You better get that I-beam up soon... looks like you have plenty of lift straps just begging to be used! And your back will thank you too. LOL
 
OP
S

shopnut

Well-known member
Joined
Feb 22, 2006
Messages
4,237
Location
Florida
THE LAST FRONTIER, THE ASYLUM SOUTH WALL… (Part 44 of 50)

WALL SCUFF PLATE FOR STEP LADDER.


There was one last thing I wanted to add to the left side cabinet and that’s a scuff plate to keep the ladder from chewing up the painted drywall as its pulled out and returned.

This first picture shows the position of the ladder as it ducks under the door track. I discussed earlier about the compromise of the door track being so low and this is my way of dealing with it.

attachment.php


The board simply mounts on the wall and allows me to not be so careful as I’m pulling the ladder out and tossing it back in the cabinet.

attachment.php


attachment.php


Also note that I had a triple tap adapter that gave me the perfect slack on the cord reel lead cord so the cord isn’t straining to make the 90 degree bend now.

attachment.php
 

Attachments

  • 4751-South-Wall-410 (Left Side Cabinet).jpg
    4751-South-Wall-410 (Left Side Cabinet).jpg
    58.7 KB · Views: 236
  • 4750-South-Wall-409 (Left Side Cabinet).jpg
    4750-South-Wall-409 (Left Side Cabinet).jpg
    51 KB · Views: 238
  • 4749-South-Wall-408 (Left Side Cabinet).jpg
    4749-South-Wall-408 (Left Side Cabinet).jpg
    60.8 KB · Views: 236
  • 4752-South-Wall-378 (Left Side Cabinet).jpg
    4752-South-Wall-378 (Left Side Cabinet).jpg
    90.9 KB · Views: 236
Last edited:
OP
S

shopnut

Well-known member
Joined
Feb 22, 2006
Messages
4,237
Location
Florida
THE LAST FRONTIER, THE ASYLUM SOUTH WALL… (Part 45 of 50)

FINISHING THE FRAMING ON RIGHT SIDE.


What you see in this first picture is the unfinished framing on the right (west) end to cap off the cabinet system. The upper portion built thus far was needed to support the upper door track at this end. But now it was time to finish it all the way down to the floor.

attachment.php


I built the little L-section that would go against the wall and on the floor. I used a scrap of that white PVC trim to act as a water barrier in case the ASYLUM ever floods. Note that I notched out the stud mounting to the wall because I intend to leave the base board in place on this wall.

attachment.php


And there it is in place. It just fastened to the stud that was buried in the wall behind it.

attachment.php


Then a little more framing to finish it off.

attachment.php


With door closed. I didn’t bother to skin it (and may never do it) because I have plans for the space adjacent to this.

attachment.php


FUTURE VERTICAL STORAGE CABINET.

I’m going to continue using that narrow vertical gap between the cabinet and big roll-up door track to store my 12’ stock. It’s a perfect place for it and the recess is bigger than it looks because it extends behind the door jamb.

attachment.php


I’m eventually going to add a door on this “cabinet” as narrow cutoffs of the aluminum tile board accumulate, so it may be a while before it’s finished. I also added the black trim to hide the steel door track.

attachment.php
 

Attachments

  • 4753-South-Wall-337 (Right Side Cabinet).jpg
    4753-South-Wall-337 (Right Side Cabinet).jpg
    74.5 KB · Views: 219
  • 4754-South-Wall-338 (Right Side Cabinet).jpg
    4754-South-Wall-338 (Right Side Cabinet).jpg
    67 KB · Views: 217
  • 4755-South-Wall-339 (Right Side Cabinet).jpg
    4755-South-Wall-339 (Right Side Cabinet).jpg
    76.1 KB · Views: 215
  • 4756-South-Wall-340 (Right Side Cabinet).jpg
    4756-South-Wall-340 (Right Side Cabinet).jpg
    73.7 KB · Views: 217
  • 4757-South-Wall-341 (Right Side Cabinet).jpg
    4757-South-Wall-341 (Right Side Cabinet).jpg
    67.4 KB · Views: 220
  • 4758-South-Wall-343 (Roll-up Door Trim).jpg
    4758-South-Wall-343 (Roll-up Door Trim).jpg
    82.3 KB · Views: 218
  • 4759-South-Wall-344 (Roll-up Door Trim).jpg
    4759-South-Wall-344 (Roll-up Door Trim).jpg
    63.1 KB · Views: 218
Last edited:

casmurbax

Well-known member
Joined
Sep 25, 2012
Messages
2,758
Location
Wilton, NY
Bob, building your own track, I never heard of that either, that is both interesting and crazy.

Nice job on hiding your ladders and installing the scuff pad.
 

drivesitfar

Well-known member
Joined
Oct 23, 2013
Messages
36,009
Location
Pacific Northwest
your continual improvements look great. I know you can probably leave that new area open next to the door, but with your OCD the first time a few leaves get inside it will drive you CRAZY.

so my thoughts is to paint a 1/4 inch hardy board (or plywood or similar thin product) white and put it up on the side of your 2 x 4's. that way you'll not only have an enclosed area to keep leaves, rain and dirt out you will also not stick any of your 8-12 foot items into that area and get them stuck or worse.

keep up the great work!!

(yep I do like the way you put a 3 inch extension on to your reel's cord with the 3 prong adapter)
 
OP
S

shopnut

Well-known member
Joined
Feb 22, 2006
Messages
4,237
Location
Florida
Bob, building your own track, I never heard of that either, that is both interesting and crazy.

Nice job on hiding your ladders and installing the scuff pad.
Thanks. I have a feeling I will be opening that one door often to get the little step ladder.
 
To avoid these ads, REGISTER NOW!
Top Bottom