
You are using an out of date browser. It may not display this or other websites correctly.
You should upgrade or use an alternative browser.
You should upgrade or use an alternative browser.
Above 1200 Sq/FT Restored 1930's Auto Shop
- Thread starter BB767
- Start date
Wokspaces above 1200 squarefeet.
Kevin54
MEMBER EMERITUS
SWMBF&O used to be just SWMBO and stood for "She Who Must Be Obeyed" I think somewhere along the line she created another demand, hence the "F". And I'm not even going there in this thread  FredR will have to fill that one in.
FredR will have to fill that one in.SWMBF&O used to be just SWMBO and stood for "She Who Must Be Obeyed" I think somewhere along the line she created another demand, hence the "F". And I'm not even going there in this thread
Aha, I see and no need FredR, got it..........
...............who comes up with this stuff anyway???

Perplexed Thomas
rrudd2
Well-known member
I thought F&O was FEARED and Obeyed. It is in my house....
I thought F&O was FEARED and Obeyed. It is in my house....
There ya go! Actually She Who Must Be Feared & Obeyed is not like the acronym implies. I only use it when I refer to her after I've done something dumb.

I thought F&O was FEARED and Obeyed. It is in my house....
Well da, of course. What else could it possibly have meant?

Thomas
Here are a few views of the barn lights with the mounting boxes installed.

When first viewed up close..........

...... they look a little clunky...........

.........but since it's just a barn.......

.........they have a certain utilitarian look about them that just blends in.

The color matches the powder coating on the door opening protector posts........
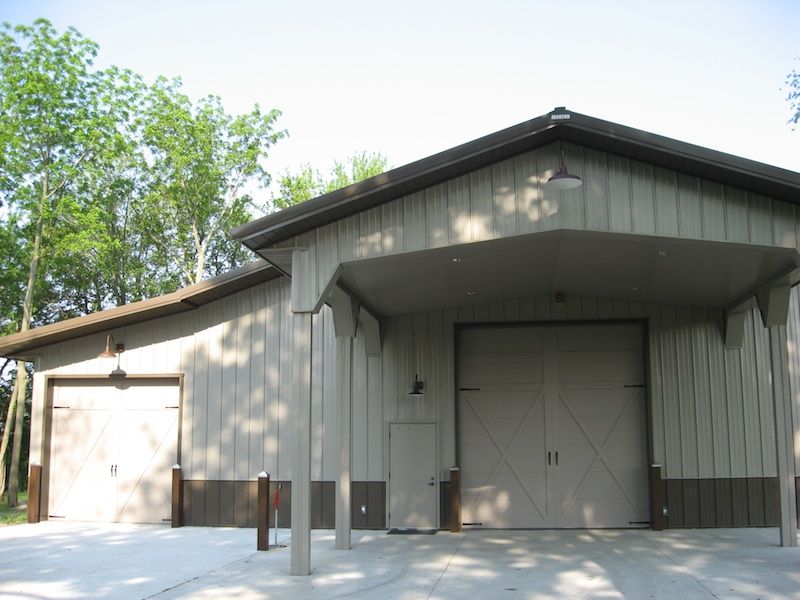
.....so they all tie in together.
Thomas
When first viewed up close..........
...... they look a little clunky...........
.........but since it's just a barn.......
.........they have a certain utilitarian look about them that just blends in.
The color matches the powder coating on the door opening protector posts........
.....so they all tie in together.
Thomas
mdbeck1
Well-known member
Originally Posted by Bigpigdave
Thomas, does the photo eye just allow for turning the light on when it gets dark or can it also be used as a motion sensor. I have been looking for a way to make some lights I have "motion sensing". Thanks and great job on the thread.
I did a Yahoo search for "Motion Detector" and came across this little guy. http://www.gadgetshack.com/flood-light-motion-light-adapter.html
I'm sure that someone makes a motion detector like your photo eye.
Thomas, does the photo eye just allow for turning the light on when it gets dark or can it also be used as a motion sensor. I have been looking for a way to make some lights I have "motion sensing". Thanks and great job on the thread.
Dave, the boxes that were constructed to just hold dusk/dawn photo cells and all the wiring. I don't know of any motion sensors available as stand alone items like these photo cells are. If they are available they could be installed in place of the photo eyes.

The boxes were made out of 1/8" steel, the large hole is for the Romex wire from the building to enter the back side of the box........

........the "eye" was placed on the side of the box when installed on the building........
....
Thomas
I did a Yahoo search for "Motion Detector" and came across this little guy. http://www.gadgetshack.com/flood-light-motion-light-adapter.html
I'm sure that someone makes a motion detector like your photo eye.
rlwhitetr3b
Well-known member
I think you will find that a motion detector that has a “screen” as small as a photo cell will not be very sensitive or be very expensive. The only ones I’ve seen are very similar to the ones at link in the post above.
Hello Thomas and Chris,
I stumbled across this thread about a month ago and read through the entire thing. I just registered with Garage Journal to finally comment. You have done a fantastic job with this project! I absolutely love seeing the history of this place and how you have preserved it! I have driven by this property many times in the last 6 years (I live in Savoy and have had internships that had me visiting farms in the area) and haven't payed much attention to it.
I even asked my Grandpa and Uncle if they remembered the shop. My Grandpa clearly remembers the shop, but doesn't think he ever had any work done there. Their family farm was in Collison, so there were other shops closer. My Grandpa does remember talking to other farmers (customers) who used the shop often (he was in cost accounting for the Farm Bureau).
Once again....Fantastic work and thank you so much for putting the work you have done in this thread!
-Nathan
I think you will find that a motion detector that has a “screen” as small as a photo cell will not be very sensitive or be very expensive. The only ones I’ve seen are very similar to the ones at link in the post above.
The motion detector in the link should adapt very well. Defiantly the easiest way is to find pre-made exterior electrical boxes and use those. As I said I just wasn't happy with any exterior boxes that I could find that I thought were heavy duty enough and would work those lights, so I made my own.
I have several lights around the old shop that are on motion detectors and they work like a champ. Mine illuminate normally at dusk at 20% and motion trigers them to 100% illumination.
Thanks mdbeck1 for that link.
Thomas
Hello Thomas and Chris,
I stumbled across this thread about a month ago and read through the entire thing. I just registered with Garage Journal to finally comment. You have done a fantastic job with this project! I absolutely love seeing the history of this place and how you have preserved it! I have driven by this property many times in the last 6 years (I live in Savoy and have had internships that had me visiting farms in the area) and haven't payed much attention to it.
I even asked my Grandpa and Uncle if they remembered the shop. My Grandpa clearly remembers the shop, but doesn't think he ever had any work done there. Their family farm was in Collison, so there were other shops closer. My Grandpa does remember talking to other farmers (customers) who used the shop often (he was in cost accounting for the Farm Bureau).
Once again....Fantastic work and thank you so much for putting the work you have done in this thread!
-Nathan
Hello Nathan and welcome to our world here. Not only this thread but Garage Journal as well. It's always nice to hear from people familiar with the shop now and especially from back in the day. Mr.Johnson has been gone from that shop for about 25 years now and many who had work done out there are getting fewer all the time as they age.
I originally thought I'd post a few pictures of what I had done to the building and be done. But the response to what has taken place out there has prompted this thread to become a series of posts on that little piece of property in its entirety. How it functioned starting some 70 years ago and the various stages it has gone through in the intervening years. What I'm now doing with it is just the latest phase of what has happened out there. Maybe a little history in the making as it were I suppose.
Anyway I'm glad you persevered to the latest post and found it interesting enough to share some memories and thoughts with us. I have more material from back in the day and present ongoing work that I will get posted as my time permits. You are most welcome here.
Thomas
Thomas,
Those barn lights. Words fail me.
It's not the lights, necessarily, it's your logical, clever, insightful approach to the situation at hand;
The way it's been manifest throughout the entire property.
(The shed that's slated for destruction - no reason you can't give it a quick coat of white paint. Amazing)
Fascinating, humbling, thought-provoking.
Thank you.
markviii
Well-known member
oberst:
The shed will be relocated to a farm just down the road, once we get it emptied. He's in no hurry and it's nice to know it will be used. Tom tries to "re-purpose" anything he can.
Chris
The shed will be relocated to a farm just down the road, once we get it emptied. He's in no hurry and it's nice to know it will be used. Tom tries to "re-purpose" anything he can.
Chris
toytech40
Well-known member
Tom and Chris,
Been a little while since I checked in on this post, had about 4 pages to catch up on. Try to stay on top of it to be ready for the upcoming quiz. haha Looks great all that you have done, the lights you put on the barn/shed look like the belong there due to the forward thought you put into the implementation of them and fit the lok perfectly.
Keep up the good work and keep us posted.
Thomas,
The shed that's slated for destruction - no reason you can't give it a quick coat of white paint.)
"the shed slated for destruction....." that seems so harsh don't you think?
"destruction"...I prefer the term "recycled". As Chris mentioned, 2 of the 4 buildings involved will be moved to a farm about a mile away. The buildings remaining (the tool shed and lean to) first of all are not structurally very sound, have no electrical power to them, aren't all that secure, have dirt floors and are in the wrong location since that's where the driveway is slated to go. Other than that I suppose some white paint wouldn't hurt, but.....Thanks oberst though, for your keen appreciation of the ongoing efforts out there.

Thomas
Tom and Chris,
Been a little while since I checked in on this post, had about 4 pages to catch up on. Try to stay on top of it to be ready for the upcoming quiz. haha Looks great all that you have done, the lights you put on the barn/shed look like the belong there due to the forward thought you put into the implementation of them and fit the lok perfectly.
Keep up the good work and keep us posted.
Thanks toytech40 for reminding everyone about the quiz at the end of the thread.
If the thread keeps growing however, it may have to expand to a full blown out test!  Glad you're staying on your toes and keeping up! There is more in the pipeline......
Thomas
51rider
Well-known member
SWMBO and stood for "She Who Must Be Obeyed" .
You must be doing it wrong it is SWTSMBO, "She Who ThinksShe Must Be Obeyed"
Must be something funny in the water on your side of the pond.....
You must be doing it wrong it is SWTSMBO, "She Who ThinksShe Must Be Obeyed"
Must be something funny in the water on your side of the pond.....
It is most definatly She-Who-Must-Be-Obeyed. I suggest reading She by H. Rider Haggard.
rlwhitetr3b
Well-known member
If the thread keeps growing however, it may have to expand to a full blown out test!
It could replace the SAT test! In this case it would be Shop - Activities - Test.
JB740i
Well-known member
Hi Thomas,
As a retirement house I would like to find an old building; a bank, fire house or, small factory? The big question is where? It would have to be in a town or city with enough amenities to satisfy a couple city dwellers, and be safe to walk at night.
Steve
Detroit? Except for the safety part. Get a big building and walk around the roof.
classic gary
Active member
Detroit? Except for the safety part. Get a big building and walk around the roof.
how about this ?
Attachments


First thing I need to do is repair the two holes someone drilled in the saddle many, many, many years ago!!!:sad:

That's NOT sad.
That's a "field" modification that was done for a good reason. Performed on a working tool by someone who knew what they wanted and knew how to get it. That little trick was performed so you could tie the load onto the jack.
They're your jacks so do as you feel.
For Elroy that mod would stand just as it is. You already have your primo, original. Make this one your working jack. At some point those tie down holes are going to be just what the "crew chief" ordered.
It could replace the SAT test! In this case it would be Shop - Activities - Test.
Now there is an excellent suggestion.
Since we all now need to read "She" by H.Ryder Haggard, I guess the test will now expand to include psychology, not my favorite subject in college I might add!
Thomas
markviii
Well-known member
She by H. Rider Haggard sure doesn't sound like psychology to me, although Freud saw a prototype in the main character, Ayesha. Seems ahead of its time. This is what ebook says:
She
Author: H. Rider Haggard
Published: 1886
Language: English
Wordcount: 111,776 / 298 pg
LoC Category: PR
Series: Ayesha
Downloads: 4,905
mnybks.net#: 3131
Origin: gutenberg.org
Genres: Adventure, Audiobook, Romance
The adventures of an expedition to an unexplored part of East Africa, where the group finds Ayesha, a beautiful and immortal sorceress who claims the expedition's leader is the reincarnation of her long-dead beloved. Ayesha had become ageless and perfectly beautiful more than 2 millennia earlier by immersing herself in a magic flame, and pressures the expedition leader to immerse himself as well.
I know Tom will just love to read it in his spare time! It's not copyrighted in the USA.
Chris
Last edited:
That's NOT sad.
That's a "field" modification that was done for a good reason. Performed on a working tool by someone who knew what they wanted and knew how to get it. That little trick was performed so you could tie the load onto the jack.
They're your jacks so do as you feel.
For Elroy that mod would stand just as it is. You already have your primo, original. Make this one your working jack. At some point those tie down holes are going to be just what the "crew chief" ordered.
I've seen a jack with holes drilled in the saddle in a similar fashion. Their purpose was to mount a home built frame which transformed it into a useful transmission jack.
I know Tom will just love to read it in his spare time! It's not copyrighted in the USA.
Chris
It's not copyrighted anywhere... It's copyright has long expired. But you should be careful Tom might start referring to you as SWMBO.
That's NOT sad.
That's a "field" modification that was done for a good reason. Performed on a working tool by someone who knew what they wanted and knew how to get it. That little trick was performed so you could tie the load onto the jack.
They're your jacks so do as you feel.
For Elroy that mod would stand just as it is. You already have your primo, original. Make this one your working jack. At some point those tie down holes are going to be just what the "crew chief" ordered.
Elroy is wise.
Elroy makes some sense.
I admire Elroy's thoroughness and high standards in his work.
I will give Elroy's suggestion some serious thought.
I suspect I will still repair the jack however.
I completely understand your point about modifying a tool to do work. That's what this is after all, a tool( but I find it an especially beautiful tool which may be coloring my decision
) However, I've been doing mechanical work for 40 some odd years and I always try to find alternatives whenever I'm faced with having to permanently alter a tool. I can almost always find a way around doing so. Not always, but usually. This could very well be considered "patina" and if so the modification will stand as is. I'm not home right now (Brazil....again) or I would post some "field modifications" done to the lift that I left "as is". Perhaps when I get home in a few days I can post those. I'm not opposed at all to this sort of thing. These will both be working jacks, as everything in my shop works.Elroy has my thanks for taking a moment to point out what I might have been blind to.
(I still find it sad that such a beautiful piece was.....made somewhat less beautiful
 . I mean just look at the pair of them, they are so very wonderful in my eyes
  )
) Thomas
She by H. Rider Haggard sure doesn't sound like psychology to me, although Freud saw a prototype in the main character, Ayesha. Seems ahead of its time. This is what ebook says:
She
Author: H. Rider Haggard
Published: 1886
Language: English
Wordcount: 111,776 / 298 pg
LoC Category: PR
Series: Ayesha
Downloads: 4,905
mnybks.net#: 3131
Origin: gutenberg.org
Genres: Adventure, Audiobook, Romance
The adventures of an expedition to an unexplored part of East Africa, where the group finds Ayesha, a beautiful and immortal sorceress who claims the expedition's leader is the reincarnation of her long-dead beloved. Ayesha had become ageless and perfectly beautiful more than 2 millennia earlier by immersing herself in a magic flame, and pressures the expedition leader to immerse himself as well.
Chris
I had no idea is was a novel! Ayesha sounds like you Chris, a beautiful sorceress.....ageless and perfectly beautiful

(ah...... nobody else is reading this, right Ayesha, I mean Chris??? It's just you and me here, right?
)Thomas
It's not copyrighted anywhere... It's copyright has long expired. But you should be careful Tom might start referring to you as SWMBO.
There you go, Chris aka Ayesha aka SWMBO
Ah guys, I think we're getting off topic.......again........sorry about that. This will not be on the test, promise.
Thomas
markviii
Well-known member
sweet, nonetheless!
hobbitss
Well-known member
Ahhh... What happened???
The page numbers have stopped changing....
Have I reached the end of the Internet???
Discovered this thread by accident... I had heard of and found or been sent links to The Garage Journal previously and visited it last Thursday to wander around and check out the place... While reading the front page blog posts I discovered the link to this Thread several pages into the blog... Old Garage restoration?? Cool, sounds a little like the work I've been doing to my little structure....
Wrong, this is so much more.... I must add, I have been reading all the posts from the beginning since last week and must make the following confession...
I'm Not Worthy...
First post here by the way and now that I have reached the end of the Internet I can go eat breakfast...
Then I need to do some work in my garage before rereading this entire thread and posting questions and comments...
Looks like I need to set up a Sig file on here....
And I read something about a tool forum.... Ahhh....
So many ways to spend my time....
Joe
Ahhh... What happened???
The page numbers have stopped changing....
Have I reached the end of the Internet???
Discovered this thread by accident... I had heard of and found or been sent links to The Garage Journal previously and visited it last Thursday to wander around and check out the place... While reading the front page blog posts I discovered the link to this Thread several pages into the blog... Old Garage restoration?? Cool, sounds a little like the work I've been doing to my little structure....
Wrong, this is so much more.... I must add, I have been reading all the posts from the beginning since last week and must make the following confession...
I'm Not Worthy...
First post here by the way and now that I have reached the end of the Internet I can go eat breakfast...
Then I need to do some work in my garage before rereading this entire thread and posting questions and comments...
Looks like I need to set up a Sig file on here....
And I read something about a tool forum.... Ahhh....
So many ways to spend my time....
Joe
Hello Joe, no you haven't reached the end of the internet. I'm on a forced intermission while I do my day job. Since you've read the thread you know from time to time there's a,ah......... pause in the postings but I'll pick it up once I get home. I must say your comments brought a smile to me while I'm down south, thank you for that.
You sound like you're going to really like this site. So many threads to read and so little time to do so! Welcome and check this thread from time to time for up dates. Questions and or comments are always encouraged. There are so many talented people here I've learned a great deal and I bet you will too.
Thomas
markviii
Well-known member
Joe,
It's better late than never! It's all good. You have entered the vortex! (from the Urban Disctionary - "any and everything in close proximity gets sucked in and can never come back out" - but in a good way!)
Chris
It's better late than never! It's all good. You have entered the vortex! (from the Urban Disctionary - "any and everything in close proximity gets sucked in and can never come back out" - but in a good way!)
Chris
hobbitss
Well-known member
When I taught at our local community college in another life years ago, I knew that if someone didn't understand there were bound to be many others with the same question. Thanks for asking the question. Hopefully these pictures will save the day for my poor explanation!!

How do you bolt the legs of the bench when you're going into the end grain of a 2 X 4? This is another bench I built 20 + years ago and in this case the end grain of the 2 X 4 is actually the stretcher on the base for the legs but it's the same construction detail. We're talking about the nut that appears to be inside the hole in the 2 X 4 here in the center of the picture.

Here the bolt is going through what would be the leg on my shop benches into the end grain of the 2 X 4. How do you secure the nut end of it?
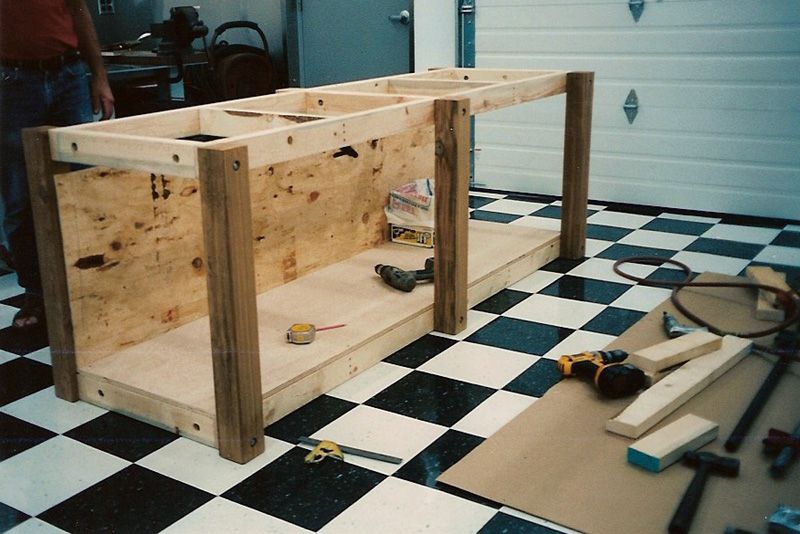
Look at the end of the bench and the short 2 X 4's ( one on top, another on the bottom )There are 2 holes in each of these short 2 X 4.


Drill a 1" hole in the side of the 2 X 4. Take a piece of electrical conduit which is just 1" diameter thin wall pipe. Cut it the width of the 2 X 4 so when you insert it in the hole you just drilled it won't stick out past the sides of the 2 X 4. Take that piece of conduit and cut it in haft to make a semi-circle. See how the conduit goes just past the top and bottom of the nut, it's now a haft circle. Drill a hole in the conduit so the leg bolt can be inserted through it and then tread the nut onto the bolt. Now when you tighten up the nut it doesn't crush the nut into the end grain of the 2 X 4 and maybe splitting the 2 X 4. By placing the piece of conduit into the hole, it acts as a washer the same profile as the hole in the 2 X 4 and spreads out the surface area of the nut. You can now make that nut much tighter without possibly splitting the 2 X 4.

This is the other side of the 2 X 4. Since I didn't enclose the base of this bench I didn't bore the 1" hole in the 2 X 4 all the way through like I did on the shop benches. That's because this side is exposed in front of the bench and I didn't want the hole or nut seen. Purely for aesthetics.

I just used electrical conduit because everybody always has a short piece of it floating around their shop and it's a cheap and easy detail to fabricate and gives good results. Cheap and easy, two endearing words when it comes to building something!
Hopefully all of this will help......... but if not drop me a PM and I'll go into greater detail. Thanks for keeping me on my toes!
Thomas
Thank you for the detail on this post... It helps fill in what we can't get from touching and looking at all angles of the frame... I saved the original post for future reference...
When I can get them, I usually end up using old solid core doors placed on recycled cabinets...
hobbitss
Well-known member
No, no internet connection. The shop is located out in the weeds. Besides if I had a computer out there.........

........what would I do with all of these?? A gazillion, bazillion of these got left. I put them all in sealed Rubbermaid plastic tubs in 2006 when they got cleared out and this is the first I've had even a few out. I have no clue as to what manuals are there. How do you keep your keyboard clean when your hands are a greasy??
Thomas
Wow, you've got piles of these Plastic tub full of treasures... Any day can be Christmas morning...

I'm wondering where all of the Old Hand Tools are....
Joe
hobbitss
Well-known member
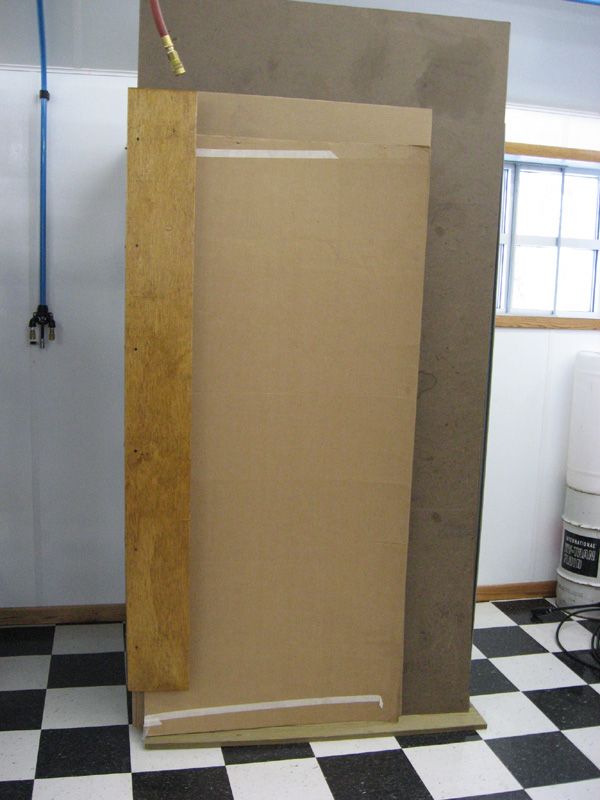
Since I have VCT tile floors I need to protect them or they will get damaged. Put a loaded jack stand or a loaded floor jack for that matter on the tile unprotected and it will leave an impression in the tile. I also need to protect the tile when welding as the welding " BB's " will burn the tile too. Do that very often and the floors will start to look pretty rough. As you've seen, I use 4' X 8' sheets of 1/4" Masonite for floor protection. They are fairly light weight and easy for one person to handle. It really does the job protecting the tile. The sheets are rather large and ungainly however. What do you do with them when you're not using them? I keep 5 sheets of Masonite on hand and this is my storage solution.

Look at the wood strip on the left side of the shelving unit. Note there are two shelving units back to back.

I stack the sheets on end.

Since the shelving units are back to back they measure on the end, 4' wide and 7' tall. This provides a surface to lean the sheets against. The wood bracket keeps them from flopping over.

The foot print on the shop floor taken up by the Masonite is just a few inches doing it this way. I also store my sheet cardboard in front of the Masonite. I didn't have the wood bracket extend all the way to the floor. If there is much moisture on the floor from moping, cleaning or anything, the bottom of the backet won't get damaged by keeping it up slightly.

Top view. The wood bracket is 3/4" plywood, mitered on both corners.

The bracket was bolted to the shelves with carriage head bolts seen on the left. When they were tightened they just crushed into the plywood. On the right are flat head sheet metal screws. These were screwed to 2 X 4's inside the corner.

Here's an view inside. You can see the plywood end grain on the left. 2 X 4's were used to back up the plywood in the corner and strengthen the corner joint also.

Another view. To aid the sheets sliding in, the 2 X 4's were cut on a 45 degree angle. Everything was glued prior to assembly and then the screws helped clamp it all together as the glue dried. The plywood was stained to match the shop trim and finished with polyurethane for durability.

It's easy to access the sheets from the side. They just slide in or out. The treated wood the sheets rest on, keeps the floor from getting scuffed as the sheets slide.
Here cardboard sheets are stacked in front of the Masonite. This system works out extremely well. Inexpensive to fabricate, somewhat elegant in it's tidy appearance. It's convenient and easy for one person to slide sheets in or out. Because it's so easy, I never find myself thinking it's too much of a hassle to get either cardboard or Masonite out. I'm sure something similar has been used many times before. This is just how I adapted it to fit my needs and my shop. I'm a happy camper!
There is still more on the way............
Thomas
Nice idea... I would have separated the 2 racks a few inches and placed the card board and masonite between them... I also notice you don't seem to have any floor plates under the rack uprights to protect your floor tiles... At work we have been using 4 inch square 1/4 inch steel plate under each leg or pair of legs if 2 racks are back to back like your... we also use a similarly sized piece of the scrap floor tile under the plate to prevent rust stains but your idea of powder painting is better...
Time to sleep, hopefully I will be able to return to the latest end of the internet tomorrow morning...
Joe
Wow, you've got piles of these Plastic tub full of treasures... Any day can be Christmas morning...
I'm wondering where all of the Old Hand Tools are....
Joe
Joe, you'll need to study better than this in hopes to pass the quiz/test at the end!
In an earlier post you'll find that one of the sons removed much material from the shop for his own personal use. Some was left but the bulk was taken by him. When I get home I'll post a picture of some of the material stacked on and around the lift that he pulled together to remove.Thomas
Nice idea... I would have separated the 2 racks a few inches and placed the card board and masonite between them... I also notice you don't seem to have any floor plates under the rack uprights to protect your floor tiles... At work we have been using 4 inch square 1/4 inch steel plate under each leg or pair of legs if 2 racks are back to back like your... we also use a similarly sized piece of the scrap floor tile under the plate to prevent rust stains but your idea of powder painting is better...
Time to sleep, hopefully I will be able to return to the latest end of the internet tomorrow morning...
Joe
Placing the shelves together, back to back gives them more structural rigidity than they would have as a stand alone unit. Also it allows wider items than the shelves can accommodate to "spill" over onto the shelf behind it.
I originally used some small 2"X2" tile pieces under all the shelf legs to protect the floor. To be honest I can't recall now why I removed them
, but I do remember removing them from the shelves. I still have several pieces of equipment in the shop with tile scraps under them to protect the floor in those areas.Yes, you should sleep as you always need to be well rested before you "dive in" here.
Thanks for the suggestions and comments.Thomas
hobbitss
Well-known member
Joe, you'll need to study better than this in hopes to pass the quiz/test at the end!
Thomas
I saw that image, 3 feet off the ground & loaded with goodies for the family to collect and take home... But I also remember buckets and boxes of rusty hand tools in some pictures!!!
With the shear volume of stuff there has to be tons of old hand tools and other treasures that were buried.... I'm hoping they didn't accidentally end up in the recycling pile...
Someone made a comment about soaking the rusty bits in molasses and I'm wondering what this does....
I thought Molasses was just for making Rum...
Inquiring minds and all that...
Joe