To avoid these ads, REGISTER NOW!

What did you do "IN" your garage today?

To avoid these ads, REGISTER NOW!

smackey05

Well-known member
Joined
Oct 21, 2009
Messages
792
Location
Massachusetts
Finished the sled and got ready to put it back in the trailer.... Then I bought some more parts... I ended up buying a RideLite which alerts riders in the opposite direction if I am the first, or only person in the group riding.

It'll make it back to the trailer one day!

EF0A1929.JPG
 

zmotorsports

ALLIANCE MEMBER
Joined
Oct 20, 2009
Messages
21,441
Location
Northern Utah
Drug the snow thrower over from the shed and started looking it over for winter

I need to get my snowblower ready. Time is a ticking and I've been so busy on side jobs I haven't taken the time to get my snowblower ready for the first storm. I know I need to build up my wear skids as they are showing heavy wear. I should probably just get it into the shop then it will be easier to work on when I get a few minutes here and there.
 

Kevkx125

Well-known member
Joined
Dec 26, 2013
Messages
3,394
Location
DOUGLASSVILLE, PA
I need to get my snowblower ready. Time is a ticking and I've been so busy on side jobs I haven't taken the time to get my snowblower ready for the first storm. I know I need to build up my wear skids as they are showing heavy wear. I should probably just get it into the shop then it will be easier to work on when I get a few minutes here and there.
I hear you, that's what I figured too as long as it was in the shop I would get to it.
 

Zebedeewesty

Well-known member
Joined
May 31, 2013
Messages
4,148
Location
Wales, UK
My 1970 Beetle failed it MOT today on a worn tie rod end.
Managed to break the end off my balljoint splitter (again :rolleyes:) and my pickle fork splitter is too big to do tie rods and this sucka is seized in good and proper. :mad:
I've given it a good soaking in plusgas penetrating oil so will try again tomorrow. Theres not quite enough space to get a couple of hammers i to give it a love tap either. Heat next if its still not shifting, though the other tie rod end is right close and i don't want to f**k the rubber up on that one.
Looking in my parts stash only produces ones for pre 68 models though too so i've had to buy one online which won't arrive until friday.
 

Kevkx125

Well-known member
Joined
Dec 26, 2013
Messages
3,394
Location
DOUGLASSVILLE, PA
Sanded and polished the headlites on the d/d, better but no where near "like new"

before after
 

Attachments

  • GEDC0857.JPG
    GEDC0857.JPG
    180.8 KB · Views: 73
  • GEDC0858.JPG
    GEDC0858.JPG
    200.3 KB · Views: 54
  • GEDC0859.JPG
    GEDC0859.JPG
    212.7 KB · Views: 47
  • GEDC0860.JPG
    GEDC0860.JPG
    180.9 KB · Views: 63

Forgottonia

Well-known member
Joined
Apr 20, 2021
Messages
808
Location
edge of Forgottonia
I'm building a small enclosure for my air compressor attached to the outside wall of my shop. I plan to put some sort of sound damping material on the walls. Damn that thing is loud.
 

Arne73

Well-known member
Joined
Mar 20, 2010
Messages
1,477
Did the seasonal swap on my tractor- mower deck off, snowblower on. Then rearranged the garage to put mowing equipment in the back, snow removal in front and still be able to get work done out there.
Did it.
 

kaymccampbell

Well-known member
Joined
Feb 27, 2015
Messages
29,600
Location
Upstate New York
Set aside my 4 finished treads to harden. Processed and glued up the next 3. Put them in clamps.
Thought I could do the last one, but it turns out that tread is going to require me to radically modify the template, and I can't do that until the glue hardens and I mark and rough cut the 3 treads I've got in clamps.
Stay tuned.
 

jshillin

Well-known member
Joined
Nov 9, 2008
Messages
5,620
Location
PA
Sanded and polished the headlites on the d/d, better but no where near "like new"

before after
You made good process, but you need to do more sanding. Sometimes you have to start as low as 400 and work up in increments. If they aren't bad, you can start at 600 or 800, then work your way up to 2500 or 3000 before polishing.
 

rayra

Well-known member
Joined
Dec 1, 2014
Messages
4,724
Location
Escaped from Los Angeles
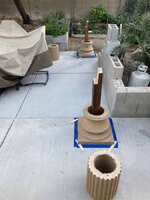
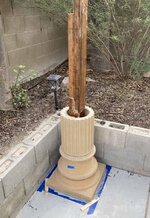
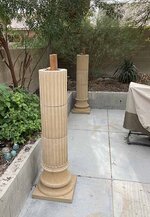
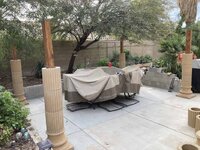
Just making fresh messes in my garage, as I have commenced the installation of all the pergola / pillar parts I've been working on (since July)
 

Attachments

  • random mess 211116.jpg
    random mess 211116.jpg
    88.1 KB · Views: 55
  • sparta pergola pillar install 02 bases installed.jpg
    sparta pergola pillar install 02 bases installed.jpg
    59.5 KB · Views: 53
  • sparta pergola pillar install 01 bases installed.jpg
    sparta pergola pillar install 01 bases installed.jpg
    56.4 KB · Views: 50
  • sparta pergola posts 10.jpg
    sparta pergola posts 10.jpg
    71.4 KB · Views: 50
  • sparta pergola posts 12 oiled.jpg
    sparta pergola posts 12 oiled.jpg
    71.7 KB · Views: 49
  • sparta columns 93 pillar post sections.jpg
    sparta columns 93 pillar post sections.jpg
    103.1 KB · Views: 51

Beelzeboss

Well-known member
Joined
Jul 31, 2020
Messages
555
Location
Sydney
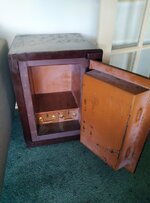
Attached some UHMWPE plastic slider plates to the underside of my old safe to allow it to slide on the carpet/floor without damage. The safe is roughly 450x400 and I was able to get 4 plates of 200x200x10. I drilled and tapped 4 x M5 holes per plate (unfortunately no pics, I was too excited to get it done) and fitted the sliders with countersunk M5 socket head screws.

51687697474_4e0e40dbd3_c.jpg

Likely not it's final resting place, but it's in the house.

51687919060_9943ccfc75_c.jpg

Now I just need to figure out how to finish the inside as a drinks cabinet. I'm thinking a glass bottom and/or back, maybe some LED's up top with the electronics in one of the money draws...
 
To avoid these ads, REGISTER NOW!

Dan in Pasadena

Well-known member
Joined
Feb 18, 2009
Messages
13,158
Location
Pasadena, CA
After MUCH procrastination I took apart a (used to be) nice bird feeder my mother and sisters bought me as a gift years ago. The sun beat the hell out of it. Forgot to take "Before" pics but at least I got some in process.

Sanded the two piece wood post and metal parts. Sprayed the metal a Rustoleum bronze and did the wood with a all-in-one stain & poly finish. The parts that hold the actual seed with be step 2. It's the same wood and copper plate. I think I'll polish up the copper and maybe shoot a little clear on it so it lasts awhile. Over the years it aged but did NOT develop the nice green patina.

tempImageF3QgtE.pngtempImagexGf8Nh.jpg
 

kaymccampbell

Well-known member
Joined
Feb 27, 2015
Messages
29,600
Location
Upstate New York
Traced and roughed out the next 3 treads. Made the old pattern into the top tread pattern. Got it cut, jointed, and glued up. This tread is not like the others. It's not 3 or 4 square boards glued up in a block and then cut out. The leading edge and the back edge boards both have two angles, and then there's a little triangle that fills in for half their length. Then there's a little tab on one end to fill in around the railing base, and catch some trim. This is one of those deals where it has to be made to finished angles in one go. There's no sneaking up on the finished dimensions with a planer and sander. Lotsa fun. Made the matching piece of big oak for the other half of the landing.
 

jshillin

Well-known member
Joined
Nov 9, 2008
Messages
5,620
Location
PA
Changed the oil in the wife's car for the 1st time. It's a '21 Kia Soul, I'm glad that they put access holes in the belly pan to allow access to the drain plug and oil filter as I hate removing the belly pans to change the oil like on my WRX. I cleaned up under the hood, added washer fluid and checked it over. I went ahead and vacuumed it out and dressed all of the interior plastic. I was going to wash it, but it's supposed to rain tomorrow. It was nice spending a little time in the garage.
 

Pompey

Well-known member
Joined
May 25, 2021
Messages
120
Yesterday a buddy took me to Harbor Freight and we picked up two 44 inch US General rolling tool cabinets and a 26 inch cabinet. We got them off the collapsing pallets and into the garage. Today was spent cleaning up all the packing materials and installing a replacement contactor for the external thermostat for my soon to arrive ( I hope) King 10kW garage heater.


Tomorrow I am going to cut 6 x 6 plywood spacers to go under the wheels of the 26 inch and 44 inch cabinet which are installed side by side. I am trying to level them and to get them both at the same height. My garage floor seems to have quite a slope and I will need a 1/2 inch spacer under the lhs wheels of the 26 inch cabinet, just to get it level. The 44 inch cabinets is sitting about 1/4 inch lower than the 26 inch cabinet , so that will need a 3/4 inch spacer under the rhs wheels and a 1 inch spacer underneath the lhs wheels.
 

ZRX61

Well-known member
Joined
Aug 15, 2006
Messages
28,716
Location
Solar Blight Valley, SoCal
Stepped over all the **** removed from the bathroom/closet/bedroom etc during the tear out to fix the water leak. Entire house is custom oak so it was necessary to save the bathroom vanity.. which is now blocking my Kawasaki in the garage when the Camaro is also in there.
Now I need to remove one side of the vanity (MDF) case & the middle support as they are water damaged. Will probably replace with 3/4 ply.
 

555

Well-known member
Joined
Nov 10, 2007
Messages
2,308
Location
Nomad-Arkansas & Georgia
I donated my Desert Storm/Shield uniforms & equipment to the Army AMEDD Museum at Fort Sam Houston. The staff was especially excited and grateful for the old version chocolate chip DCUs as they didn't have a single set in the inventory.
Went through some stuff for a possible donation to Motts Military Museum.KIMG1511.JPG

Under my old fire helmet is a full military map of Kuwait. It's made of several different map sheets put together. Probably not many out there in civilian hands that were actually used during Desert Storm.
 

rayra

Well-known member
Joined
Dec 1, 2014
Messages
4,724
Location
Escaped from Los Angeles
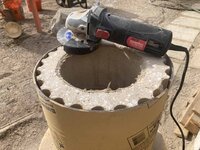
Did some concrete grinding, getting some more concrete pillar parts stacked. About to sharpen some pruning shears and get busy ahead of trash pickup day.
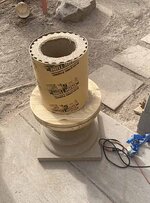
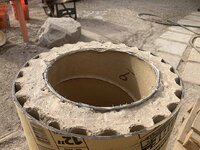
The pillar parts are cast in molds with open tops. A little uneveness of the casting platform, a little capillary action in the fluting of the mold and the open top surface is a bit uneven. So I wrap them in a section of sonotube which is used as an even height reference then set about grinding things. Every concrete piece has a flat square bottom and a rough 'top'. So one face has to be worked, the other used as-is. The way I am arranging / inverting the pieces, I only have to dress 2 joints out of 5, or 4 faces out of 12. Per column. Rest of the joints are flat bottom to flat bottom.

I could have taken greater time in setup and crafted some mold supports which let me cast the pieces in vertical halves, which would have made it easier to assemble the pieces around a full-height post or stanchion. But I was in a hurry to get casting. Project is taking too long as it is. I also was originally going to cast the pieces solid, but weight concerns became a thing, so was casting them hollow. The post solution came after.

ETA - got greedy and put a 3rd layer in place this afternoon. 5ht pic. Tomorrow the 4th layer of castings goes in place and then the last segment of the posts. Might have it all together by the end of the weekend.
 

Attachments

  • sparta pergola pillar install 03 pregrind.jpg
    sparta pergola pillar install 03 pregrind.jpg
    110.1 KB · Views: 38
  • sparta pergola pillar install 04 postgrind.jpg
    sparta pergola pillar install 04 postgrind.jpg
    94.4 KB · Views: 32
  • sparta pergola pillar install 05 grinding turntable.jpg
    sparta pergola pillar install 05 grinding turntable.jpg
    90.6 KB · Views: 35
  • sparta pergola pillar install 06 second layer.jpg
    sparta pergola pillar install 06 second layer.jpg
    77.3 KB · Views: 40
  • sparta pergola pillar install 08 3rd layer.jpg
    sparta pergola pillar install 08 3rd layer.jpg
    106.9 KB · Views: 39
Last edited:

Kevkx125

Well-known member
Joined
Dec 26, 2013
Messages
3,394
Location
DOUGLASSVILLE, PA
I started up the snow blower and toped off the tank with ethanol free gas, ready for the sow to fly hopefully not too much this season!!
 

Attachments

  • GEDC0863.JPG
    GEDC0863.JPG
    322.9 KB · Views: 45
  • Like
Reactions: 555

rshadd

Well-known member
Joined
Dec 29, 2009
Messages
1,598
Location
Doylestown, PA
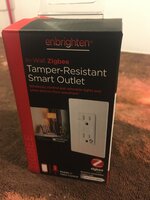
Installed a smart outlet in the shop. I'm using it mostly to build out my zigbee mesh network to increase the range for my zigbee contact sensors they I have for the garage doors and trash lids.

2021-11-03 010.JPG
 

Attachments

  • Enbrighten Zigbee Smart Outlet.JPG
    Enbrighten Zigbee Smart Outlet.JPG
    129.6 KB · Views: 19

rd65

Well-known member
Joined
Sep 29, 2017
Messages
2,819
Location
Granite Falls, WA
With another dry weekend coming it should be the last leaf clean up weekend. Got the broken starter cord replaced on the hand leaf blower, cleaned carbs on two chainsaws for some fallen tree clearing, and mixed up some more premix. I hadn't used the saws in over a year and neither would start last monday when I had a hemlock blow down through the fence. Fence in temporarily patched up to keep the hound in but the tree in blocking the path to my leaf dumping area. Going to be a busy weekend. Step daughter's baby shower is at the house sunday afternoon, apparently men are invited these days.
 

16again

Well-known member
Joined
Nov 25, 2010
Messages
1,946
Location
Boynton Beach, FL.
Did an oil change and tire rotation on my 2016 Toyota Camry. Then I found out my home has been sold and as of 12/10 I will be homeless. Not to mention scheduled surgery to rebuild my hand on the 30th of November! FML!!!!
I have a pre approval for new mortgage BUT it doesn't appear that stars will align to work it all out.
 

rayra

Well-known member
Joined
Dec 1, 2014
Messages
4,724
Location
Escaped from Los Angeles
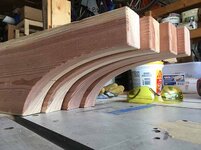
Getting workshop cleaned up and prepared to work the big beams for the pergola project. Havent' yet decided whether I'm using 4x8 or 4x10 beams. Last pillar pieces / capitals go in place Sunday afternoon. Then I'll put up a couple cardboard mockups. Beams will probably have an ogive cutout on the ends. Not sure of the overhang lengths yet. And for various reasons the beams will likely be two pieces with some joinery.
Couple pics of former ogives, as example. These were 2x6 redwood.

grillcounter191.jpg grillcounter196.jpg grillcounter203.jpg

Looking forward to recapitulating a similar design atop the new pergola. Today was the 4th tier of pillar castings and the last section of wood on the posts. Might do the 5th layer late today or early tomorrow. Have a friend slated to help Sunday afternoon to hoist the 120# tops / capitals into place (same as the pillar bases)


eta I went ahead and added teh 5th tier of column pieces late this afternoon.
 

Attachments

  • sparta pergola pillar install 09 4th layer.jpg
    sparta pergola pillar install 09 4th layer.jpg
    80.2 KB · Views: 23
  • sparta pergola pillar install 10 4th layer.jpg
    sparta pergola pillar install 10 4th layer.jpg
    92.5 KB · Views: 19
  • sparta pergola pillar install 11 last wood.jpg
    sparta pergola pillar install 11 last wood.jpg
    124.7 KB · Views: 19
  • sparta pergola pillar install 12 closeup.jpg
    sparta pergola pillar install 12 closeup.jpg
    81.8 KB · Views: 20
  • sparta pergola pillar install 13 5th tier.jpg
    sparta pergola pillar install 13 5th tier.jpg
    129.8 KB · Views: 14
Last edited:

PassnThru

Well-known member
Joined
Jan 5, 2010
Messages
6,512
Location
Bowling Green KY
Been getting to freezing here at night so decided it was time to move the pressure washer from the shed to the semi-heated detached garage. As I was surveying what I needed to move to make a place for it a thought hit me. I put a new pump on it 2 years ago - there's no shroud - the old one would no longer fit - nothing but a naked pump hung on by four bolts. So I went out to the shed, spent 5 minutes pulling the pump, and put it on a shelf in the garage.
Problem solved - space saved.
 
To avoid these ads, REGISTER NOW!
Top Bottom