To avoid these ads, REGISTER NOW!

Mini split over window - line routing?

Shovelhead

Well-known member
Joined
Dec 22, 2018
Messages
397
Location
DEEP EAST TEXAS
On to planning the next project. 12k mini split. Still kickin tires on what flavor to buy.

16w x 30d x 10h framed room inside of metal building.
This unit needs to be above a window. I could offset it if I have to, but afraid it would drive me nutts ever time I looked at it.

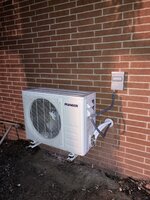
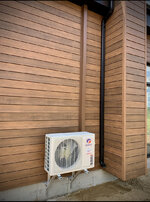
From most installs I've studied, the line set exits directly out the back or slightly to the side.
Out the back is not an option.

Other concern I have is most say not to run the lines inside a wall. I found an old thread from a fellow Texan with a similar install. He ran his inside the wall inside of conduit. Looked very neat. Just not sure of the troubles involved if I'd ever have to change it out or make any repairs.
The typical way of using a gutter/cover looking gizmo on the ouside of the building don't look real "nice" to me, but, mine would be on the back of the shop and I don't think the deer and wild hogs would mind much.

The thing that has me stuck in neutral is routing the line set. I have metal girts around the window frame and a wall girt at 5' off the floor.
Need some suggestions on how to deal with the line set without going thru any of the metal.

Thanks

Here's some photos of what I got. ----- 3x3 window. 43" to outside edges of metal frame.

IMG_2276.JPG

IMG_2277.JPGIMG_2278.JPG
 
To avoid these ads, REGISTER NOW!

Rudyjr

Well-known member
Joined
Dec 28, 2009
Messages
555
Location
Central Ohio
I just helped my neighbor install a Pioneer unit in his garage in November. So far we have been very impressed with the performance of the product in some really crazy temperature swings. Everybody that goes with the Mr. Cool units seems to do it because they make a big deal of their "precharged" lineset. All of the units we looked at came with a sufficient charge for the supplied unit. He wanted the ability to cut down the lineset to the size needed for a clean installation. We also installed the linset inside his wall to keep from running it down the outside on his brick.
 

Attachments

  • tSl%6UPyQB2GNDOEm6HiGg.jpg
    tSl%6UPyQB2GNDOEm6HiGg.jpg
    436.7 KB · Views: 37

Yankeefarmer

Well-known member
Joined
Jul 25, 2011
Messages
1,186
Location
Connecticut
It’s not at all clear why out the back is not an option. Is it because the “back” will be a visible wall seen by others than the deer and hogs? If you are locating the outside unit outside the wall on the right, then why not run the lineset inside behind a false duct chase (or left exposed if just a shop room) to that wall before exiting there?

If the outside unit will be outside that back wall, you won’t really know if exiting out the back is an option until you select the unit and know where the lines will exit relative to your framing.
 
OP
S

Shovelhead

Well-known member
Joined
Dec 22, 2018
Messages
397
Location
DEEP EAST TEXAS
It’s not at all clear why out the back is not an option. Is it because the “back” will be a visible wall seen by others than the deer and hogs? If you are locating the outside unit outside the wall on the right, then why not run the lineset inside behind a false duct chase (or left exposed if just a shop room) to that wall before exiting there?

Straight out the back and down the wall. Can't run that line set over the dang window.
Ain't nothing out back but deer and hogs, and woods.
Definitely need to exit the building to the right of the window opening(looking from the inside).

Don't get the false duct thing.
Did you look at the photos and see the metal framing?

Depending on width of unit, I'm thinking I need to go past the edge of the window, plus 3 1/2" to clear the metal framing.

It's 43" across between the framed window opening.

I ain't compooter smart enough to put them fancy pointing arrows on my pictures to show distances and the metal framing, but it's pretty clear to me.

Thanks
 

Yankeefarmer

Well-known member
Joined
Jul 25, 2011
Messages
1,186
Location
Connecticut
Here’s a picture of exit options for one manufacturer:
25291978-2FE1-484E-BF99-427D6E9C669D.jpeg
But you need to know what unit you are buying to know where the ”straight out the back” penetrations would land. Her’s the same units installation instructions showing where the holes would be. You‘ll need to do some math to figure out if they would miss your metal framing.
5FD4281A-BBCF-4F33-92B8-223A52D00E4D.jpeg
If they interfere with your steel framing- and I agree it’s likely tight- then just exit the side before making a 90 to penetrate the wall, like this:
95B61FAB-9457-48D8-B860-BA26355B2141.jpeg
 

Jackfre

Well-known member
Joined
Dec 26, 2010
Messages
4,411
Location
N CA
I installed the unit blowing on me in the kitchen in the wall. It took me a few days because I was so pissed off try8ing to get 5# of you know what in a 3# bag that I’d have to walk away for another day. I wouldn’t say it can’t be done, but Yankeefarmer makes a point. Why can’t you run it out the back as it isn’t a visibility thing. It is just so much easier. My problem was getting the line set in the wall WITH THE DRAIN LINE GRADED PROPERLY. It is that 5&3 thing again. In your climate, and I lived in Beaumont years ago in my fitter/welder days, and I seem to remember taht it is rather moist at times, like cut the air moist. If your drain line isn’t right you will turn that evap into a mold bed in a hurry. Look up “mini-split line set covers”. I think Diversatech are supplying them these days, as well as others. They trim out really well and greatly simplify the install.
 
OP
S

Shovelhead

Well-known member
Joined
Dec 22, 2018
Messages
397
Location
DEEP EAST TEXAS
Here’s a picture of exit options for one manufacturer:
25291978-2FE1-484E-BF99-427D6E9C669D.jpeg
But you need to know what unit you are buying to know where the ”straight out the back” penetrations would land. Her’s the same units installation instructions showing where the holes would be. You‘ll need to do some math to figure out if they would miss your metal framing.
5FD4281A-BBCF-4F33-92B8-223A52D00E4D.jpeg
If they interfere with your steel framing- and I agree it’s likely tight- then just exit the side before making a 90 to penetrate the wall, like this:
95B61FAB-9457-48D8-B860-BA26355B2141.jpeg

Appreciate your time and input Yank.
yeah the only way I see it working is to run the line set out to the side as you have marked on my picture.
Which means the line set will be on the surface of my wall for that distance then exit out and down. “I think”

Hey! You smart nuff to use yer crayolas on my picture! LOL
 
OP
S

Shovelhead

Well-known member
Joined
Dec 22, 2018
Messages
397
Location
DEEP EAST TEXAS
I installed the unit blowing on me in the kitchen in the wall. It took me a few days because I was so pissed off try8ing to get 5# of you know what in a 3# bag that I’d have to walk away for another day. I wouldn’t say it can’t be done, but Yankeefarmer makes a point. Why can’t you run it out the back as it isn’t a visibility thing. It is just so much easier. My problem was getting the line set in the wall WITH THE DRAIN LINE GRADED PROPERLY. It is that 5&3 thing again. In your climate, and I lived in Beaumont years ago in my fitter/welder days, and I seem to remember taht it is rather moist at times, like cut the air moist. If your drain line isn’t right you will turn that evap into a mold bed in a hurry. Look up “mini-split line set covers”. I think Diversatech are supplying them these days, as well as others. They trim out really well and greatly simplify the install.

Hahaha. Good story Jack.
I don’t know, when y’all say “out the back” , seems to me if I poked a hole above that window then the lines and gutter cover gizmo would have to run at an angle to avoid the window.

And yes sir about the humidity around here. It’s brutal.
 

tmshort

Well-known member
Joined
Dec 10, 2012
Messages
395
Location
Central IN
Could you go straight out the back then make a 90deg turn away from the window before going down to the outside unit?
That's what I would try and do, on the 3 pioneer units I've installed the straight out the back option seemed easiest, you get good access for connecting the linesets and less bending of the lines coming out of the inside unit.
 

yeldogt

Well-known member
Joined
Jan 2, 2012
Messages
18,184
How will the room be used ?

Center it over in the left space and you will be happy .. even the shorter right will work.

You don't want to play with the line set connected to the head -- carefully move it once while supporting the line on the head side. People play with the line too much --- moving it weakens the connection at the heat exchanger.

All of mine have the tubing in the wall.

I'm afraid trying over the window will have you making too tight a turn and playing with it too much .... They look better one a wall anyway
 

yeldogt

Well-known member
Joined
Jan 2, 2012
Messages
18,184
I just helped my neighbor install a Pioneer unit in his garage in November. So far we have been very impressed with the performance of the product in some really crazy temperature swings. Everybody that goes with the Mr. Cool units seems to do it because they make a big deal of their "precharged" lineset. All of the units we looked at came with a sufficient charge for the supplied unit. He wanted the ability to cut down the lineset to the size needed for a clean installation. We also installed the linset inside his wall to keep from running it down the outside on his brick.
The pre-charged line set is all about not having to pump them down --- no equipment needed. Actually -- most are not all the filled as the units have enough. The nice thing now is you can get different lengths .. and many installs have some ways around the length especially new construction. You can always move the outside unit to the left or right away from the head to gain some distance .....often on a garage the space is there on the outside
 
OP
S

Shovelhead

Well-known member
Joined
Dec 22, 2018
Messages
397
Location
DEEP EAST TEXAS
Could you go straight out the back then make a 90deg turn away from the window before going down to the outside unit?
That's what I would try and do, on the 3 pioneer units I've installed the straight out the back option seemed easiest, you get good access for connecting the linesets and less bending of the lines coming out of the inside unit.

I could but I don't believe they recommend kinking the line so much.?
That would be the line exiting the metal siding above the window, then bending a 90 to clear the window, then anotherr 90 down the siding to the outdoor unit. I think?
Thanks


How will the room be used ?

Center it over in the left space and you will be happy .. even the shorter right will work.

You don't want to play with the line set connected to the head -- carefully move it once while supporting the line on the head side. People play with the line too much --- moving it weakens the connection at the heat exchanger.

All of mine have the tubing in the wall.

I'm afraid trying over the window will have you making too tight a turn and playing with it too much .... They look better one a wall anyway

Room will be shop space for me to get out of the heat, most likely uses will be some woodworking, fishing, boat equipment maintenance/repair, even roll a motorcycle in there to work on.

I can't move it left of the window. Couple reasons. There will be a Generator outside between the window and the left wall.
Look on the floor to the left. There will be a framed out 4x5 piss box there. So I'm already off center of the room. I could move it to the right but seems it would be blowing down the right side wall.

I've looked online at the schematics for a Pioneer 12k unit and the measurements I see does not allow the line set to run parallel out the side more that about 5". They don't give the dimensions of the bracket, just the indoor unit footprint.
Think I'm fixing to call them right now and see what they say about the situation.

If I didn't care about being able to look out that window, it would already have a window unit A/C in it. Easy and done.
So I'm still stuck in neutral scratchin my head.
Thanks
 

Yankeefarmer

Well-known member
Joined
Jul 25, 2011
Messages
1,186
Location
Connecticut
Our master bedroom is about 12 x 20. The 12’ wall has a window like yours in the middle. The indoor unit is on that wall, to the left of the window, quite close to the adjacent wall. It works beautifully despite being located way off center. It could just as easily have been located to the right.

I understand the desire for aesthetics creates a wish for it to be centered. But I think most people with these units just stop noticing them very quickly. There’s other concerns in life.
 
To avoid these ads, REGISTER NOW!

tmshort

Well-known member
Joined
Dec 10, 2012
Messages
395
Location
Central IN
I could but I don't believe they recommend kinking the line so much.?
That would be the line exiting the metal siding above the window, then bending a 90 to clear the window, then anotherr 90 down the siding to the outdoor unit. I think?
Thanks
You have to be careful not to kink or dent the tubing, but a couple of 90 degree bends isn’t an issue. I used some tubing benders and was super careful doing the bending.

As someone mentioned above, it is more risky bending the tubing where it exits the inside unit.

One of mine does almost exactly what you mention above - comes straight out the back, 90 degree turn, then horizontal for 12’ or so and then another 90 down to the unit outside.
 
OP
S

Shovelhead

Well-known member
Joined
Dec 22, 2018
Messages
397
Location
DEEP EAST TEXAS
One of mine does almost exactly what you mention above - comes straight out the back, 90 degree turn, then horizontal for 12’ or so and then another 90 down to the unit outside.

Looking from the outside of your building the line set comes out the wall, bent 90 degrees and runs along the wall, then another 90 that turns down the wall?

So you have that gutter/cover gizmo running horizontal and then down the wall?

I'd like to see what that looks like.
Seems like a good way for it not to drain right. ?? Don't know.

Thanks
 

justinjoyal

Well-known member
Joined
Apr 30, 2015
Messages
888
Location
Quebec
Looking from the outside of your building the line set comes out the wall, bent 90 degrees and runs along the wall, then another 90 that turns down the wall?

So you have that gutter/cover gizmo running horizontal and then down the wall?

I'd like to see what that looks like.
Seems like a good way for it not to drain right. ?? Don't know.

Thanks
You slope the drain line within the cover space.

I would not use the cheap plastic gutter-style cover though… Have a color-matched aluminum cover made for your project, for example :
 

Attachments

  • E0FCCBEC-1FFA-40C3-ADE2-A19E44A1F334.jpeg
    E0FCCBEC-1FFA-40C3-ADE2-A19E44A1F334.jpeg
    520.9 KB · Views: 27
  • 1E9C0813-6E21-445E-B178-4F1EEBE24123.jpeg
    1E9C0813-6E21-445E-B178-4F1EEBE24123.jpeg
    970.7 KB · Views: 25
Last edited:

KJ in VT

Member
Joined
Feb 6, 2022
Messages
19
What am I missing? You either go laterally out the side of the unit then 90 through the wall and 90 again down the outside, or straight through the wall 90 to the side then 90 down. Either way, its two 90's. Not hard to argue that the later option will be easier with the two bends further apart offering more room for the bender and more run to correct any clocking errors in the bend directions.
 
OP
S

Shovelhead

Well-known member
Joined
Dec 22, 2018
Messages
397
Location
DEEP EAST TEXAS
You slope the drain line within the cover space.

I would not use the cheap plastic gutter-style cover though… Have a color-matched aluminum cover made for your project, for example :
Ok if I'm understanding right, the cover is oversized a good bit to allow for sloping the line within it?
The color matched aluminum cover. Is that something these A/C dealers sell or would I source that from like the Steel Supply house my shop material came from? Sounds pricey, but ain't it all.

Thanks

What am I missing? You either go laterally out the side of the unit then 90 through the wall and 90 again down the outside, or straight through the wall 90 to the side then 90 down. Either way, its two 90's. Not hard to argue that the later option will be easier with the two bends further apart offering more room for the bender and more run to correct any clocking errors in the bend directions.
Not sure yer missing anything, I'm the one missing. As I said I thought the less bends the better off you'd be. Be it 5 bends or 2.
If it will work fine and reamin reliable in the long run with a couple 90's then that's great. Don't know, never jacked with one of these and my reason for asking questions.

Thanks
 

tmshort

Well-known member
Joined
Dec 10, 2012
Messages
395
Location
Central IN
I will try and get pics later, but like yours mine is on the back of the shop against the woods, so I didn't spend a ton of time making it look pretty.

I used gutter downspout type material for the cover, and just sloped it over the 12' run to account for the drain line.

The 90 degree bend out the wall hole and down to the unit are a non-issue so long as you take care not to kink or dent the tubing.
 
OP
S

Shovelhead

Well-known member
Joined
Dec 22, 2018
Messages
397
Location
DEEP EAST TEXAS
I will try and get pics later, but like yours mine is on the back of the shop against the woods, so I didn't spend a ton of time making it look pretty.

I used gutter downspout type material for the cover, and just sloped it over the 12' run to account for the drain line.

The 90 degree bend out the wall hole and down to the unit are a non-issue so long as you take care not to kink or dent the tubing.
Thank you.
 
OP
S

Shovelhead

Well-known member
Joined
Dec 22, 2018
Messages
397
Location
DEEP EAST TEXAS
Check out my email reply from Pioneer mini splits.
I don't know a thing about these units but good grief this reply is baffling me.
Who are these yayhoos? Almost like they mixed me up with someone else. ?

Thank you for that information,

You would be looking at an 18000 BTU system and going off what Doug mentioned at the point yes it would be best to route your lines through the top into the attic / roof and then run them out towards the outdoor unit.


After-Sales Manager
Customer Relations
Parker Davis HVAC International, Inc.
800-675-7410
305-513-4488 x 4135
3250 NW 107th Avenue Doral, FL 33172
pdhvac.com
 

tmshort

Well-known member
Joined
Dec 10, 2012
Messages
395
Location
Central IN
IMG_6705.JPG


Like I said, I haven't tried to make it look nice yet ... in fact, haven't even connected the drain fully yet (I was running it into a bucket and watering the garden with it over the summer).
After the wall it makes another turn down to the unit. The other side is as yet completely unfinished. Like many of my projects...
 

justinjoyal

Well-known member
Joined
Apr 30, 2015
Messages
888
Location
Quebec
Ok if I'm understanding right, the cover is oversized a good bit to allow for sloping the line within it?
The color matched aluminum cover. Is that something these A/C dealers sell or would I source that from like the Steel Supply house my shop material came from? Sounds pricey, but ain't it all.

Thanks

Yes you oversize it a bit to allow for the slope.

A siding contractor makes them on order for me, usual size is 9ft long, 3in wide by 3in deep, ~25$.

When I know I’m gonna have to slope a drain line in there I have it made 4, 5 or 6in wide depending on how long the horizontal part is gonna be.

If yours is gonna be only like 2-3 ft you would be fine with 4in.
 
OP
S

Shovelhead

Well-known member
Joined
Dec 22, 2018
Messages
397
Location
DEEP EAST TEXAS
IMG_6705.JPG


Like I said, I haven't tried to make it look nice yet ... in fact, haven't even connected the drain fully yet (I was running it into a bucket and watering the garden with it over the summer).
After the wall it makes another turn down to the unit. The other side is as yet completely unfinished. Like many of my projects...

Thanks, pictures are better than words a lot of times.
That stone wall is cool!

And, I spot a tiller, pallet forks and a shredder.
And, a feller can always use a few pallets!

My kind of man. Appreciate it.
 
OP
S

Shovelhead

Well-known member
Joined
Dec 22, 2018
Messages
397
Location
DEEP EAST TEXAS
Yes you oversize it a bit to allow for the slope.

A siding contractor makes them on order for me, usual size is 9ft long, 3in wide by 3in deep, ~25$.

When I know I’m gonna have to slope a drain line in there I have it made 4, 5 or 6in wide depending on how long the horizontal part is gonna be.

If yours is gonna be only like 2-3 ft you would be fine with 4in.
Thanks Justin
 
To avoid these ads, REGISTER NOW!
Top Bottom