To avoid these ads, REGISTER NOW!

Bought a router. Need help with some joinery.

ive

Well-known member
Joined
Mar 8, 2011
Messages
1,533
Location
Canada
Hi everybody.

I am in the process of making a gate, purchased a Bosch MRC23EVSK 2.3 HP Electronic Modular Router System with a fixed base and a plunge base. .

I want to install a header using some joinery and would like to remove material from the wood post to have a 2x8 fit in flush.

I’ve never used a router, and would love some tips on what to do and what not to do.

Thank you very much.
 
To avoid these ads, REGISTER NOW!
OP
I

ive

Well-known member
Joined
Mar 8, 2011
Messages
1,533
Location
Canada
This is a picture. I’m using pressure treated boards, just put the posts up.
 

Attachments

  • 3C8E6EF3-9AEE-4E56-ACC6-0A96F731C9CC.jpeg
    3C8E6EF3-9AEE-4E56-ACC6-0A96F731C9CC.jpeg
    343.2 KB · Views: 87
OP
I

ive

Well-known member
Joined
Mar 8, 2011
Messages
1,533
Location
Canada
My first question is do I use a straight bit for the router?
 

PCustoms

Well-known member
Joined
Jul 23, 2011
Messages
23,684
Location
VT
My first question is do I use a straight bit for the router?
Yes.

Can you put the post horizontal, or are you working in the air?

You can use a top bearing bit and a guide on either side of your desired dado. Or, you can use a straight bit and offset your guide by the distance to the router base.

Either option will be easier in sawhorses and not on a ladder.

Honestly this could have been done with a skill saw and a chisel super fast.
 

PCustoms

Well-known member
Joined
Jul 23, 2011
Messages
23,684
Location
VT
Start at about 1 minute


I could probably find my tools and cut a post in less time then that video takes to watch. Mark the notch, set you blade depth and cut the 2 sides with a speed square.

From there go nuts cutting as much as you can. Whack it with a hammer to get the big chunks out, then a chisel to clean up.
 

PCustoms

Well-known member
Joined
Jul 23, 2011
Messages
23,684
Location
VT
Also, there's a good chance that 2x8 shrinks, a LOT if you used PT.

Size your notch tight.
 
  • Like
Reactions: ive

The Cobbler

Super Moderator
Staff member
Joined
Oct 24, 2013
Messages
26,237
Location
Niagara Region, Ontario, Canada
That's a lot of material to remove with a router ( in my opinion) and not necessarily the best tool ( in my opinion)
you would want to use a large diameter bit ( probably 3/4" min. ) and to do that depth of cut, probably at least 2 passes
if that was my project, a circular saw set to depth, multiple cuts 1/4 to 1/2 apart, knock off with a hammer, clean up with a sharp chisel , plane or whatever .
 

rayra

Well-known member
Joined
Dec 1, 2014
Messages
4,724
Location
Escaped from Los Angeles
PCcustoms has the right answer. You use the right tool for the job. You can use the router if you want to, but it's a lot more costly and dangerous, especially for a first-timer.
OP is thinking 'fine furniture' fitting but talking about something rougher.

Also seconding The Cobbler's remarks.

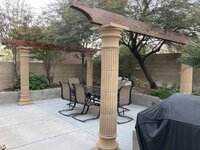
Pics are some pergola beams I made last year where I joined two shorter beams with a rabbet / half-lap joint, glued and screwed, to make some much longer odd-sized beams for my pergola project.
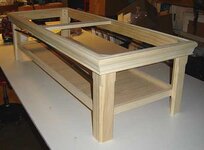
The last pics are a coffee table I built 13yrs ago. There are rabbets and there are rabbets and the OP's project is the former.
 

Attachments

  • sparta pergola beam 37 rabbets.jpg
    sparta pergola beam 37 rabbets.jpg
    111.5 KB · Views: 76
  • sparta pergola beam 38 rabbets.jpg
    sparta pergola beam 38 rabbets.jpg
    60.6 KB · Views: 47
  • sparta pergola beam 42 rabbets.jpg
    sparta pergola beam 42 rabbets.jpg
    93 KB · Views: 47
  • sparta pergola beam 65 installed.jpg
    sparta pergola beam 65 installed.jpg
    118.2 KB · Views: 46
  • coffeetable frametightfit-090125.jpg
    coffeetable frametightfit-090125.jpg
    15 KB · Views: 46
  • coffeetable fabricationdone3-090128.jpg
    coffeetable fabricationdone3-090128.jpg
    21 KB · Views: 43
  • coffeetable finished-090316.jpg
    coffeetable finished-090316.jpg
    23.5 KB · Views: 73
Last edited:

PCustoms

Well-known member
Joined
Jul 23, 2011
Messages
23,684
Location
VT
This is a picture. I’m using pressure treated boards, just put the posts up.
Looking back at this, I assume there will be no load on the "header".

I would put on on the inside/outside with the post in the middle, secure it with some liquid nails and some timber screws.

Make a nice scroll on the ends to pretty it up.
 
  • Like
Reactions: ive

rayra

Well-known member
Joined
Dec 1, 2014
Messages
4,724
Location
Escaped from Los Angeles
A spiral up cut bit is better as it pulls the chips out of the hole. But a straight bit works

I would use a chisel.
Technically correct. But the OP's routering should not be going into any sort of hole. He should be working in from the edge of the post so the router is supported on the uncut surface behind and his chips are flying clear. No concern about binding or burning, if he doesn't use any plunge work and works the router in an effective pattern. He can use simple (and inexpensive) straight bits. Because he is sure to burn some up on his first project.
 
To avoid these ads, REGISTER NOW!

Firebrick43

Well-known member
Joined
May 12, 2015
Messages
14,453
Location
West central Indiana
Technically correct. But the OP's routering should not be going into any sort of hole. He should be working in from the edge of the post so the router is supported on the uncut surface behind and his chips are flying clear. No concern about binding or burning, if he doesn't use any plunge work and works the router in an effective pattern. He can use simple (and inexpensive) straight bits. Because he is sure to burn some up on his first project.
He is surely going to mortice and tenon and draw bore it for a wooden pin isn't he?

Even if doing dado the upcut bits really help clear. I have many dado plug with chips on the first pass before switching to upcut bits.
 
Last edited:
  • Like
Reactions: ive

Jackfre

Well-known member
Joined
Dec 26, 2010
Messages
4,435
Location
N CA
Given that the posts are all ready upI would use two 2x8’s. In the 6x6 posts cut in the width of the 2x and do the other side as well. You can then screw or bolt from either side. You can do it with an up-cut spiral, but as a rookie…up in that position I don’t think I’d want to try it. You can’t mortise it anyway as the 2x8 would be to long as the posts are set.
 
  • Like
Reactions: ive
OP
I

ive

Well-known member
Joined
Mar 8, 2011
Messages
1,533
Location
Canada
Hi everyone.
I’m gonna go with working with the skillsaw. Thanks so much for the advice.

Yes.

Can you put the post horizontal, or are you working in the air?

You can use a top bearing bit and a guide on either side of your desired dado. Or, you can use a straight bit and offset your guide by the distance to the router base.

Either option will be easier in sawhorses and not on a ladder.

Honestly this could have been done with a skill saw and a chisel super fast.
Hi PC.

I’m going to do it with a skillsaw. Seems like a much smarter way to go. Thank you.
 
OP
I

ive

Well-known member
Joined
Mar 8, 2011
Messages
1,533
Location
Canada
Start at about 1 minute


I could probably find my tools and cut a post in less time then that video takes to watch. Mark the notch, set you blade depth and cut the 2 sides with a speed square.

From there go nuts cutting as much as you can. Whack it with a hammer to get the big chunks out, then a chisel to clean up.
Thank you for the video and advice. Much appreciated.
 
OP
I

ive

Well-known member
Joined
Mar 8, 2011
Messages
1,533
Location
Canada
I’ll second the saw and chisel technique. Thats a lot of material to remove on a vertical surface with a router. Even better would have been to do the notches before the post were installed. 👍
Hi. Yes. Completely right about doing this before the posts went up.
 
OP
I

ive

Well-known member
Joined
Mar 8, 2011
Messages
1,533
Location
Canada
I’ll second the saw and chisel technique. Thats a lot of material to remove on a vertical surface with a router. Even better would have been to do the notches before the post were installed. 👍
Hi. Yes. Completely right about doing this
That's a lot of material to remove with a router ( in my opinion) and not necessarily the best tool ( in my opinion)
you would want to use a large diameter bit ( probably 3/4" min. ) and to do that depth of cut, probably at least 2 passes
if that was my project, a circular saw set to depth, multiple cuts 1/4 to 1/2 apart, knock off with a hammer, clean up with a sharp chisel , plane or whatever .
thank you very much.
 
OP
I

ive

Well-known member
Joined
Mar 8, 2011
Messages
1,533
Location
Canada
PCcustoms has the right answer. You use the right tool for the job. You can use the router if you want to, but it's a lot more costly and dangerous, especially for a first-timer.
OP is thinking 'fine furniture' fitting but talking about something rougher.

Also seconding The Cobbler's remarks.

Pics are some pergola beams I made last year where I joined two shorter beams with a rabbet / half-lap joint, glued and screwed, to make some much longer odd-sized beams for my pergola project.
The last pics are a coffee table I built 13yrs ago. There are rabbets and there are rabbets and the OP's project is the former.
Looks great. Thank you for your advice.
 
OP
I

ive

Well-known member
Joined
Mar 8, 2011
Messages
1,533
Location
Canada
Looking back at this, I assume there will be no load on the "header".

I would put on on the inside/outside with the post in the middle, secure it with some liquid nails and some timber screws.

Make a nice scroll on the ends to pretty it up.
Hi. No weight on the header. Thanks for suggest you finish the ends.
 
OP
I

ive

Well-known member
Joined
Mar 8, 2011
Messages
1,533
Location
Canada
Technically correct. But the OP's routering should not be going into any sort of hole. He should be working in from the edge of the post so the router is supported on the uncut surface behind and his chips are flying clear. No concern about binding or burning, if he doesn't use any plunge work and works the router in an effective pattern. He can use simple (and inexpensive) straight bits. Because he is sure to burn some up on his first project.
Thank you for the vote of confidence. But it being my first time and up in the air I think the skill saw is the way to go.
 
OP
I

ive

Well-known member
Joined
Mar 8, 2011
Messages
1,533
Location
Canada
Given that the posts are all ready upI would use two 2x8’s. In the 6x6 posts cut in the width of the 2x and do the other side as well. You can then screw or bolt from either side. You can do it with an up-cut spiral, but as a rookie…up in that position I don’t think I’d want to try it. You can’t mortise it anyway as the 2x8 would be to long as the posts are set.
Thank you. I will heed your advice. Much appreciated.
 
OP
I

ive

Well-known member
Joined
Mar 8, 2011
Messages
1,533
Location
Canada
Thank you very much to everyone. I truly appreciate you all taking the time to guide me.

Thank you once again.
 
To avoid these ads, REGISTER NOW!
Top Bottom