To avoid these ads, REGISTER NOW!

How to attach new point to backhoe bucket?

aardquark

Well-known member
Joined
Aug 27, 2011
Messages
72
My backhoe has lost the point from one of its teeth, as shown below. The new point is supposed to be held on (I suppose) by peening the ears (where the hole appears) into depressions in the tooth. Easier said that done. The point is so wobbly that hammering it is ineffective. I really need some kind of heavy backstop to put on the opposite side. Anyone with some experience in this have any advise for me?20220609_161857.jpg
20220609_161931.jpg
 
To avoid these ads, REGISTER NOW!

Ed_Hazard

Well-known member
Joined
Oct 28, 2018
Messages
90
Location
Los Angeles
What type of backhoe? All the teeth I've seen on the excavators, BH, loader buckets have all ways been pinned in place, not peened. Cross pin through the tooth and the mounting stud. I have some rental equip show up with the teeth welded on.
 
OP
A

aardquark

Well-known member
Joined
Aug 27, 2011
Messages
72
This is a small backhoe attachment for a Case 1845C skid loader. I think it is a D100XR, but there is no plate so I'm not positive.
 
OP
A

aardquark

Well-known member
Joined
Aug 27, 2011
Messages
72
Yeah, they don't have roll pins either. I'm wondering if the problem is that the bucket has been used a lot with the missing point, and the shank is worn down so there is a sloppy fit. If the point had a nice tight fit then it would sit still while I got in there with a hammer and punch. But it is so sloppy that I can't really get any purchase on the point. It just flops around.
 

robert6715

Well-known member
Joined
Dec 29, 2015
Messages
111
Location
Alaska
All the pinned-in-place teeth I have dealt with are loose to some degree, even on new machines. The cross pins are not roll pins, they are a solid pin with a spring steel collar midway down the pin to lock into the tooth holder. I prefer Esco teeth with side locks instead of cross pins, a lot easier to replace & much tighter. Look over the tooth holder real well for a manufacturer, the bucket is generally not made by the Machine maker. Esco, PMC, Felco & many more all make buckets, tooth holders & teeth.

It almost looks like you are trying to put a tooth over an existing tooth. What your pic shows looks like no tooth holder I have ever seen & doesn't match your other existing teeth.

What is the part in your hand, it doesn't look anything like the other teeth on your bucket?
 

quickfarms

Well-known member
Joined
Feb 14, 2021
Messages
1,027
Location
Southern California
You pictures look like the shanks and teeth that are common on a Gannon and they are not a super tight fit and I usually tack weld then after peening them
 

kaymccampbell

Well-known member
Joined
Feb 27, 2015
Messages
29,619
Location
Upstate New York
I used to hate those crimp on teeth. In the day, those and the rubber pin, hated those too, were the only game in town for smaller stuff. You need a new shank for your tooth. It's shot. It was used without a tooth for a long time. Or you could just weld the new tooth to the existing stub shank and call it good. It's what I used to do after crimping them.
 

jack stand

Well-known member
Joined
Feb 29, 2012
Messages
3,354
Location
Lakes Region Maine
Just weld them on, a good heavy tack on each side will keep them on. They're basically little cultivator or box blade ripping shank "covers" that come on these hobby backhoe's and for the most part, do the job. The peening works fine for implement's that only work in a forward direction, not so much on a BH bucket.
 
To avoid these ads, REGISTER NOW!

oldwino

ALLIANCE MEMBER
Joined
Nov 16, 2009
Messages
1,917
Location
Sonoma County California (wine country)
It’s been a lot of years ago but the old Case backhoes used the crimp on style. A drift pin and a BFH worked 99% of the time. Because you’re pulling into the bucket you are continually pushing the tooth toward the bucket. Besides you end up filling the area between the shank and the tooth with mud, etc to help lock it in place
 
OP
A

aardquark

Well-known member
Joined
Aug 27, 2011
Messages
72
I think I'm onto something here (worn out shank). Here is what a new shank looks like, I may have to build up the old shank with weld to look a new one (or just weld on a new shank), then I would have a nice tight fit.
What is the part in your hand, it doesn't look anything like the other teeth on your bucket?
That's what I get nowadays. Looks similar to the other three points, but it's not exactly the same.

You need a new shank for your tooth. It's shot. It was used without a tooth for a long time. Or you could just weld the new tooth to the existing stub shank and call it good. It's what I used to do after crimping them.
Agreed. The new shanks like shown below are not expensive. $10.82 at Messicks. Since I would have to fire up the welder anyway, it is not worth messing around trying to build up the old shank.
 

Attachments

  • 7704801.jpg
    7704801.jpg
    21.3 KB · Views: 8

Sawlog

Well-known member
Joined
Aug 5, 2020
Messages
69
Location
Illinois
Yes, heat it up and dent in the new tooth over the small one. I have replaced those over the years on our old case trencher.
 
OP
A

aardquark

Well-known member
Joined
Aug 27, 2011
Messages
72
Just to clarify, heat the back of the new point (where crimping is required) until dull red? I wondered about that possibility. I guess there are no issues with temper here.
 

crazylunker

Well-known member
Joined
Sep 2, 2014
Messages
198
Location
Connecticut, Trumbull
first issue I see is all the others are on upside down.
the tooth should be fitted to the shank so it doesn't wobble. you need to build up the shank with weld and grind it so the tooth is a perfect fit or else you will keep losing the teeth. then heat the sides to peen them in, I would the work on flipping all the other teeth and doing the same.
 

gmcgeo

Well-known member
Joined
Mar 11, 2019
Messages
3,701
first issue I see is all the others are on upside down.
the tooth should be fitted to the shank so it doesn't wobble. you need to build up the shank with weld and grind it so the tooth is a perfect fit or else you will keep losing the teeth. then heat the sides to peen them in, I would the work on flipping all the other teeth and doing the same.
What?? they do not look upside down. maybe i'm looking at it wrong
 
OP
A

aardquark

Well-known member
Joined
Aug 27, 2011
Messages
72
first issue I see is all the others are on upside down.
the tooth should be fitted to the shank so it doesn't wobble. you need to build up the shank with weld and grind it so the tooth is a perfect fit or else you will keep losing the teeth. then heat the sides to peen them in, I would the work on flipping all the other teeth and doing the same.
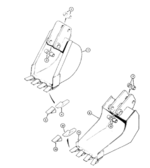
Yes, it seems the others are upside down, at least according to the parts diagram. Nice catch.
Screen Shot 2022-06-13 at 4.22.39 PM.png
 

crewchief888

Well-known member
Joined
Dec 3, 2009
Messages
13,751
Location
NW indiana
Just to clarify, heat the back of the new point (where crimping is required) until dull red? I wondered about that possibility. I guess there are no issues with temper here.
at least to dull red, if not hotter. the trick i found when doing them years ago was the more you beat on them, the more likely they are to start moving around.
 

gmcgeo

Well-known member
Joined
Mar 11, 2019
Messages
3,701
Interesting, I could see how it can be put on incorrectly easily. First glance i thought they are on correctly.

Great catch
 

Renegade1LI

Well-known member
Joined
Mar 11, 2018
Messages
5,023
Location
long island ny
That bucket looks a little rough, i would consider cutting off the old cutting edge and weld on a new one with new teeth. If that’s not an option i would just weld the tooth in and call it a day.
 
To avoid these ads, REGISTER NOW!
Top Bottom