Snoopy2x
Member
I recently purchased a Craftsman 5197 from a man who found it in a barn at a farm sale, mounted on a very old bench. When I acquired it, with the exception of the handle being bent, the vise was in remarkably good condition overall.

At the time I bought this vise, I'd just recently discovered this forum. I found the Vise Repair 101 thread ( https://www.garagejournal.com/forum...urces-for-parts-and-the-tricks-to-fix.252830/ ) extremely helpful in figuring out how best to approach this restoration.
I'd initially intended to start by disassembling the vise and then having the parts media blasted. However, as I learned from that thread, soaking things in concentrated Simple Green for a day or two, besides thoroughly degreasing them, will often actually remove most if not all of the old paint. I'm happy to say that this worked quite well in this case. After rinsing, all the parts were soaked in EvapoRust to completely de-rust them. What little paint and residue were left were easily removed with a wire wheel on an angle grinder, a small wire cup on a drill, and a very small one on a Dremel. This process prepared the body parts of the vise for the next step of restoration.
The bent handle was straightened by a friend that owns a local machine shop (who did a great job on it). To shine up the handle, hub, and the other originally polished steel parts, a wire wheel on a bench grinder was used for the first pass. Another very helpful tip I learned from the Vise Repair 101 thread was to get a deburring wheel, which I bought and installed on the other end of the same grinder. It worked incredibly well to polish these parts to a high sheen. Slightly uneven areas remaining after deburring were evened out using a "soft" drill-mounted 4" wire wheel. The slide (beam) was polished using a circular palm sander, starting with 120 grit discs, then progressively finer 240, 400, 600, and 800 grit discs.
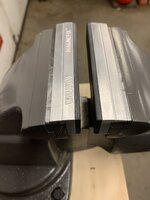
As can be seen in the photo above, some areas on the castings, particularly below and around the ends of the jaws, had suffered minor cosmetic damage over the years. To repair these, I'd initially planned to have them overfilled with welds that I could then grind and file down to match the original contours. Since I unfortunately don't have the skills and equipment to weld, I talked with several local welders about it, but they all quoted surprisingly high prices to do this work. The reason seemed to be that they were unsure of the composition of the "semi-steel" used to make these vises, and how much extra time might be required if the material turned out to be metallurgically closer to cast iron than to steel.
Given the unexpected expense of having the welding done - and the fact that I will not be subjecting the restored vise to any form of abuse by hammer, angle grinder, etc. - I decided to instead use JB Weld Steel-Reinforced Epoxy to repair these cosmetically damaged areas. I know this may raise criticism from some, but I've used this product a good deal in automotive restoration work, and have found it to be amazing stuff. For those who have never worked with it, the newer formula has over 5000 psi of tensile strength once cured, and can then be machined, filed, and sanded to blend with the contours of the surrounding metal (and can even be drilled and tapped for threads). I also used this to fill some of the small voids present in the original castings.
Here are a couple of shots showing the epoxy before curing, and after finish filing.


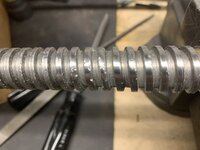
Some of the threads on the main screw had also sustained minor damage, probably caused by small pieces of debris getting stuck in the grease on the screw and being forced through the main nut. This was addressed by light filing with a round file to reduce the sharp edges where the threads were nicked, followed by polishing on the deburring wheel.
Two of the original jaw screws were in great shape, but the other two were not. I'm not sure how the latter two became damaged, as the faces of both original jaws are in excellent condition. I put an ad in the Classifieds forum hoping maybe someone had some original jaw screws they no longer needed, but didn't have any luck. Since I don't own a metal lathe, I had to figure out another way of making replacement jaw screws.
After a good bit of head scratching, I ended up buying some 3/4" long undercut flat head Phillips 5/16-18 stainless screws. With the threaded portion chucked into a drill, and the drill running, I ground the heads down using the side of the fine wheel on a bench grinder. I visually approximated the angle as closely as possible, adjusting as necessary until the result closely matched the original screw heads. This rather crude approach actually worked well, except for the fact that it was difficult to tighten the drill's chuck enough to hold the screws in place without damaging the threads. As a result, the screws tended to loosen in the chuck after about 10 seconds of grinding, so I had to stop frequently to retighten it.
Here are shots of the drill & grinder in action, and of a new screw (top) and original screw (bottom) placed head to head.

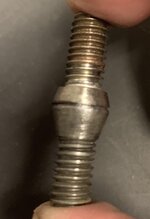
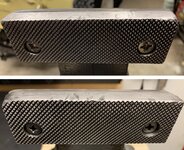
I installed the new stainless jaw screws with anti-seize (visible on the threads above) to prevent spalling. Once installed, the only noticeable difference between the original screws and the new ones is that the new screws (below, at top) have a #4 Phillips drive, while the originals (below at bottom) have a #3 Phillips drive.
I decided to paint the vise gray, but wanted a darker and less blue-ish color than the "industrial gray" it was originally painted. After experimenting on scrap metal with a number of different paint colors, the parts to be painted were thoroughly cleaned using rubbing alcohol (as it evaporates quickly). Starting with a coat of green etching primer, a coat of regular gray primer was added over that, and then finish coats of Ace Hardware brand (made by Valspar) matte Iron spray paint were applied. The matte enamel finish, which is somewhere between satin and flat, seemed to bring out the texture of the original casting nicely. The Craftsman lettering was then painted red using a Testors paint pen.
There was initially almost 1/8" of end play of the main screw lengthwise within the dynamic jaw, even with the threaded collar screwed in as far as it would go. The addition of two 7/8" i.d. x 1-3/8" o.d. x .062" arbor shims between the jaw and the collar reduced the end play to about 1/64".

Superlube PTFE grease was used on the main screw and nut, and heavy duty industrial Dupont PTFE grease was used between the slide and the body. I used Fluid Film on all other unpainted metal to protect it from oxidation.

Here's the assembled vise in its fully restored state.

At the time I bought this vise, I'd just recently discovered this forum. I found the Vise Repair 101 thread ( https://www.garagejournal.com/forum...urces-for-parts-and-the-tricks-to-fix.252830/ ) extremely helpful in figuring out how best to approach this restoration.
I'd initially intended to start by disassembling the vise and then having the parts media blasted. However, as I learned from that thread, soaking things in concentrated Simple Green for a day or two, besides thoroughly degreasing them, will often actually remove most if not all of the old paint. I'm happy to say that this worked quite well in this case. After rinsing, all the parts were soaked in EvapoRust to completely de-rust them. What little paint and residue were left were easily removed with a wire wheel on an angle grinder, a small wire cup on a drill, and a very small one on a Dremel. This process prepared the body parts of the vise for the next step of restoration.
The bent handle was straightened by a friend that owns a local machine shop (who did a great job on it). To shine up the handle, hub, and the other originally polished steel parts, a wire wheel on a bench grinder was used for the first pass. Another very helpful tip I learned from the Vise Repair 101 thread was to get a deburring wheel, which I bought and installed on the other end of the same grinder. It worked incredibly well to polish these parts to a high sheen. Slightly uneven areas remaining after deburring were evened out using a "soft" drill-mounted 4" wire wheel. The slide (beam) was polished using a circular palm sander, starting with 120 grit discs, then progressively finer 240, 400, 600, and 800 grit discs.
As can be seen in the photo above, some areas on the castings, particularly below and around the ends of the jaws, had suffered minor cosmetic damage over the years. To repair these, I'd initially planned to have them overfilled with welds that I could then grind and file down to match the original contours. Since I unfortunately don't have the skills and equipment to weld, I talked with several local welders about it, but they all quoted surprisingly high prices to do this work. The reason seemed to be that they were unsure of the composition of the "semi-steel" used to make these vises, and how much extra time might be required if the material turned out to be metallurgically closer to cast iron than to steel.
Given the unexpected expense of having the welding done - and the fact that I will not be subjecting the restored vise to any form of abuse by hammer, angle grinder, etc. - I decided to instead use JB Weld Steel-Reinforced Epoxy to repair these cosmetically damaged areas. I know this may raise criticism from some, but I've used this product a good deal in automotive restoration work, and have found it to be amazing stuff. For those who have never worked with it, the newer formula has over 5000 psi of tensile strength once cured, and can then be machined, filed, and sanded to blend with the contours of the surrounding metal (and can even be drilled and tapped for threads). I also used this to fill some of the small voids present in the original castings.
Here are a couple of shots showing the epoxy before curing, and after finish filing.
Some of the threads on the main screw had also sustained minor damage, probably caused by small pieces of debris getting stuck in the grease on the screw and being forced through the main nut. This was addressed by light filing with a round file to reduce the sharp edges where the threads were nicked, followed by polishing on the deburring wheel.
Two of the original jaw screws were in great shape, but the other two were not. I'm not sure how the latter two became damaged, as the faces of both original jaws are in excellent condition. I put an ad in the Classifieds forum hoping maybe someone had some original jaw screws they no longer needed, but didn't have any luck. Since I don't own a metal lathe, I had to figure out another way of making replacement jaw screws.
After a good bit of head scratching, I ended up buying some 3/4" long undercut flat head Phillips 5/16-18 stainless screws. With the threaded portion chucked into a drill, and the drill running, I ground the heads down using the side of the fine wheel on a bench grinder. I visually approximated the angle as closely as possible, adjusting as necessary until the result closely matched the original screw heads. This rather crude approach actually worked well, except for the fact that it was difficult to tighten the drill's chuck enough to hold the screws in place without damaging the threads. As a result, the screws tended to loosen in the chuck after about 10 seconds of grinding, so I had to stop frequently to retighten it.
Here are shots of the drill & grinder in action, and of a new screw (top) and original screw (bottom) placed head to head.
I installed the new stainless jaw screws with anti-seize (visible on the threads above) to prevent spalling. Once installed, the only noticeable difference between the original screws and the new ones is that the new screws (below, at top) have a #4 Phillips drive, while the originals (below at bottom) have a #3 Phillips drive.
I decided to paint the vise gray, but wanted a darker and less blue-ish color than the "industrial gray" it was originally painted. After experimenting on scrap metal with a number of different paint colors, the parts to be painted were thoroughly cleaned using rubbing alcohol (as it evaporates quickly). Starting with a coat of green etching primer, a coat of regular gray primer was added over that, and then finish coats of Ace Hardware brand (made by Valspar) matte Iron spray paint were applied. The matte enamel finish, which is somewhere between satin and flat, seemed to bring out the texture of the original casting nicely. The Craftsman lettering was then painted red using a Testors paint pen.
There was initially almost 1/8" of end play of the main screw lengthwise within the dynamic jaw, even with the threaded collar screwed in as far as it would go. The addition of two 7/8" i.d. x 1-3/8" o.d. x .062" arbor shims between the jaw and the collar reduced the end play to about 1/64".
Superlube PTFE grease was used on the main screw and nut, and heavy duty industrial Dupont PTFE grease was used between the slide and the body. I used Fluid Film on all other unpainted metal to protect it from oxidation.
Here's the assembled vise in its fully restored state.
Last edited: