

You are using an out of date browser. It may not display this or other websites correctly.
You should upgrade or use an alternative browser.
You should upgrade or use an alternative browser.
Pouring concrete lintel in place.
- Thread starter acer66
- Start date
rayra
Well-known member
Thanks for the compliments, I will.@rayra - please start a build thread on your outdoor kitchen/cooking space!
It’s clear you’ve got some serious skills and master plan cooking!
I've got some enforced idleness coming up soon after an outpatient surgical procedure. I can take the time to pull stuff together into some kind of cohesive topic. Give each mini project a post or three with properly embedded photos in the narrative.
And at the end get the grill counter presented and up to date.
rayra
Well-known member
Any progress on your pours?
I finally got the stuck beveled inserts out of my cast lintels. still need to get some paint off the concrete without marring the pieces.
The big 'concrete stuff' topic will be delayed, surgical schedule got re-arranged and I'm busy on other things.I have to get some image-hosting directories straightened up in my own domains, as well.
The other 2 pics are mockups of the grill island layout, the dog house standing in for a domed pizza oven I'll be building late in the year.
I finally got the stuck beveled inserts out of my cast lintels. still need to get some paint off the concrete without marring the pieces.
The big 'concrete stuff' topic will be delayed, surgical schedule got re-arranged and I'm busy on other things.I have to get some image-hosting directories straightened up in my own domains, as well.
The other 2 pics are mockups of the grill island layout, the dog house standing in for a domed pizza oven I'll be building late in the year.
Attachments


Nice work and thank you for sharing the process.Any progress on your pours?
I finally got the stuck beveled inserts out of my cast lintels. still need to get some paint off the concrete without marring the pieces.
The big 'concrete stuff' topic will be delayed, surgical schedule got re-arranged and I'm busy on other things.I have to get some image-hosting directories straightened up in my own domains, as well.
The other 2 pics are mockups of the grill island layout, the dog house standing in for a domed pizza oven I'll be building late in the year.
I was able to pour the lintel a few days ago.
I came up several ways to do it and in the end decided on just to walk on the casing.
Really paced myself in walking slow and filled the bucket not more than half way.
The support columns still kept their little play after the pour which surprised me a bit.

rayra
Well-known member
I hadn't quite realized that is a full-height room there. I'd thought it was a shorter space under a room addition. Looks good and nice setting of perimeter bolts in the lintel.
Does that space connect thru to the basement? Looks like you've made the opening large enough for double doors, so I presume so.
Correction, I see that it doesnt, in one of your earlier pics. Utility space? storeroom? generator vault?
Does that space connect thru to the basement? Looks like you've made the opening large enough for double doors, so I presume so.
Correction, I see that it doesnt, in one of your earlier pics. Utility space? storeroom? generator vault?
Last edited:
Thank you and yes it is partly full height and the opening is for 6’ wide french doors.I hadn't quite realized that is a full-height room there. I'd thought it was a shorter space under a room addition. Looks good and nice setting of perimeter bolts in the lintel.
Does that space connect thru to the basement? Looks like you've made the opening large enough for double doors, so I presume so.
There is no access to a basement mainly because there is just a crawlspace at the existing structure and I had to put in an interior retaining wall because I compromised the structural integrity of the existing footing.
Overall the addition is about 13’6” by 13’6”.

Standing on the lintel looking at the house.

Side view, its all a bit small due to the interior wall but I will build a platform for storage to the right of the base.
Originally it was supposed to be for potting and garden tools but now I might turn into a hangout space when it gets too hot because the room above will have a wrap around deck which is also covered with a roof in front of the doors.
But am not 100% sure what I will do with it right now.
mike93lx
ALLIANCE MEMBER
Looks great
Are you going to backfill behind that retaining wall with concrete?
Are you going to backfill behind that retaining wall with concrete?
rayra
Well-known member
Seems bigger and bigger every picture. That's a lot of volume. Could store a lot of supplies in there.
Are you in the hurricane part of NC or the ice-storm-snapping-trees-killing-power part?
I look at all that space and I'm thinking water tank, fuel storage, generator, piles of canned goods. I wish I had that kind of new volume.
Are you in the hurricane part of NC or the ice-storm-snapping-trees-killing-power part?
I look at all that space and I'm thinking water tank, fuel storage, generator, piles of canned goods. I wish I had that kind of new volume.
Thank you and the plans call for compacted #57 washed stone backfill there same around the outside walls.Looks great
Are you going to backfill behind that retaining wall with concrete?
The stones will be wrapped in mirifi 140n with a drain pipe at the bottom.
Walls will covered with gcp bituthene 3000 prior to backfill.
Plans do not call for it but I am also creating a slope with concrete on the outside of the walls where the backfilling happens on top of the footing and place the drain pipes at the low points away from the walls.
Just in case I am following through with a suggestion of a friend to dig out the dirt in the center of the room and fill it with concrete including a drain making it flush with the footings.
The water in the picture sits on top of the footings.
I hope this all makes sense.
I just saw that you escaped from Los Angeles, same here even I would not call it escaping on my end but I really like the four seasons, the green and the mountain ranges here WNC.Seems bigger and bigger every picture. That's a lot of volume. Could store a lot of supplies in there.
Are you in the hurricane part of NC or the ice-storm-snapping-trees-killing-power part?
I look at all that space and I'm thinking water tank, fuel storage, generator, piles of canned goods. I wish I had that kind of new volume.
I am pretty much as far it gets here in NC away from the hurricane part of NC.
The idea moving away from earthquakes, mudslides and wildfires into a hurricane area was not really appealing to me.

I have a shed with a generator etc. but since I moved here over 10 years ago I had only 1 major power outage lasting just for a few days.
Food storage is handled by the addition on the other side which is fortunately a bit simpler.
This will be a bump out for the kitchen containing a pantry and a mudroom.

Excuse the mess, I am basically going back and forth working on each addition when I have time.
larry4406
Well-known member
Make sure you water proof the uphill side of the interior retaining wall (circled in red) and provide appropriate drain tile and stone and connect the drain tile to the exterior. This will keep your storage shed portion dry. Many folks forget this!
Obviously the other exterior portions need to be treated the same.
Obviously the other exterior portions need to be treated the same.
Yes indeed, the walls in the circled area are treated like exterior walls on the inside so some walls will have water proofing, gravel, etc. on both sides and there is an 8” pipe at the bottom of the exterior wall to the right of the ladder for the drain pipe.Make sure you water proof the uphill side of the interior retaining wall (circled in red) and provide appropriate drain tile and stone and connect the drain tile to the exterior. This will keep your storage shed portion dry. Many folks forget this!
Obviously the other exterior portions need to be treated the same.
Thank you.
rayra
Well-known member
well we were talking about 'retiring' in a few years to E.TX somewhere around Tyler, 40" of rain. But covid came along and disrupted everything. So we cashed out of L.A. and moved out of CA but tried to stay close to my aged folks in Temecula, so we wound up in Vegas. And then they upped and moved too. So here we are in a terrible desert with an empty lake.
But we lived on all three coasts and multiple continents during my father's Naval career and a few places in my time in the Marines. But in SoCal most of my adult life. But I remembers Seasons in Great Lakes IL, Thurso Scotland, Tokyo, Rhode Island, Pascagoula, Honolulu.
Can't wait to finally get somewhere wet and green where I can grow things.
One improvement of Hurricanes vs the Three Seasons (fire mud and earthquake) you listed for SoCal - you get about a week of warning for a hurricane. I was on top of Northridge '94, lost my house. And almost burned out 3x in Santa Clarita and on the Kern river. Good Times.
Looks like you've got a full slate of projects. May it all go well and congrats on also getting out.
But we lived on all three coasts and multiple continents during my father's Naval career and a few places in my time in the Marines. But in SoCal most of my adult life. But I remembers Seasons in Great Lakes IL, Thurso Scotland, Tokyo, Rhode Island, Pascagoula, Honolulu.
Can't wait to finally get somewhere wet and green where I can grow things.
One improvement of Hurricanes vs the Three Seasons (fire mud and earthquake) you listed for SoCal - you get about a week of warning for a hurricane. I was on top of Northridge '94, lost my house. And almost burned out 3x in Santa Clarita and on the Kern river. Good Times.
Looks like you've got a full slate of projects. May it all go well and congrats on also getting out.
Thank you for sharing and please feel free to post the progress of your project here.well we were talking about 'retiring' in a few years to E.TX somewhere around Tyler, 40" of rain. But covid came along and disrupted everything. So we cashed out of L.A. and moved out of CA but tried to stay close to my aged folks in Temecula, so we wound up in Vegas. And then they upped and moved too. So here we are in a terrible desert with an empty lake.
But we lived on all three coasts and multiple continents during my father's Naval career and a few places in my time in the Marines. But in SoCal most of my adult life. But I remembers Seasons in Great Lakes IL, Thurso Scotland, Tokyo, Rhode Island, Pascagoula, Honolulu.
Can't wait to finally get somewhere wet and green where I can grow things.
One improvement of Hurricanes vs the Three Seasons (fire mud and earthquake) you listed for SoCal - you get about a week of warning for a hurricane. I was on top of Northridge '94, lost my house. And almost burned out 3x in Santa Clarita and on the Kern river. Good Times.
Looks like you've got a full slate of projects. May it all go well and congrats on also getting out.
Yes, these two additions plus deck are just the start to get the house to where I want it be before I get too old for this.

guess you made the stemming stones ... what is the red thing. also what do you use for color.ha, just shoehorning it in your topic
A little in the 'what did you do in your yard' and 'what did you do in your garage' topics.
I ought to have a project topic. But I will probably do a collective topic on several concrete-related projects very soon. I've been working on several interconnected things with various molds and forms that folks seem to find interesting. And I usually do 'how to' topics on lots of things.
I'll be casting a large concrete countertop and building a domed pizza oven later this year. I should have some dedicated topics by then. Right now I'm working on setting / adding the walls (with lintels) for the 8' x 6' cooking island. Propane grill docked on one side, charcoal weber inset on the offside and pizza oven / patio fireplace on the other. Lots of concrete, travertine and plaster work to come.

I have to make some items and I want to make them gray ..... it's been a long time since did any forms. the columns are interesting
rayra
Well-known member
The red mat is a tough silicone texture stamp, simulating a slate texture.guess you made the stemming stones ... what is the red thing. also what do you use for color.
I have to make some items and I want to make them gray ..... it's been a long time since did any forms. the columns are interesting
It was wider than my pavers by several inches in both dimensions, so I numbered the back #1-8 at the corners and midpoints and #9 in the center and each paver I lined up the mat on a different number so I would get some deliberate variation in the textures of the pieces.
There's two kinds of dye, 'integral' that you mix into the concrete - and comes in either powder or liquid - and a 'mold release' that is spread / cast upon the surface of the damp concrete as a dry powder, you put the texture piece over that and stamp it into the surface of the cast piece. When it cures your hose off the excess.
Integral has a wide variation in how much you need to overcome the natural gray of the concrete / mortar. I was using 3-4oz / 60# bag straight khaki for the pillars. later when I made the custom capstones for the wall I wanted things a little lighter so I did a mix of the khaki and titanium white. Running around 2 to 1, khaki to white. But you still have to go high on the khaki to get enough brown in it.
If you want gray, it ought to be real easy and likewise the darker colorations. You may have to do a couple test pieces to get close and keep in mind the color changes over a couple weeks as the concrete cures, getting generally a bit lighter.
I got both types of dye powders from WaltTools, via Amazon. Both are listed as 'khaki' or other versions of 'brown'. It looks the same to the eye, but the surface release powder is water-phobic, do NOT mix it into concrete it will wreck the integrity of the cast.
The stamp I also got off Amazon, as well as the plastic molds for the pillar pieces, differing vendors.

Stuff I used years ago was a powder that was mixed into the small batches (bags) that I made up and mixed in one of those barrel mixers. Took a lot of time .... but -- I was just playing around.The red mat is a tough silicone texture stamp, simulating a slate texture.
It was wider than my pavers by several inches in both dimensions, so I numbered the back #1-8 at the corners and midpoints and #9 in the center and each paver I lined up the mat on a different number so I would get some deliberate variation in the textures of the pieces.
There's two kinds of dye, 'integral' that you mix into the concrete - and comes in either powder or liquid - and a 'mold release' that is spread / cast upon the surface of the damp concrete as a dry powder, you put the texture piece over that and stamp it into the surface of the cast piece. When it cures your hose off the excess.
Integral has a wide variation in how much you need to overcome the natural gray of the concrete / mortar. I was using 3-4oz / 60# bag straight khaki for the pillars. later when I made the custom capstones for the wall I wanted things a little lighter so I did a mix of the khaki and titanium white. Running around 2 to 1, khaki to white. But you still have to go high on the khaki to get enough brown in it.
If you want gray, it ought to be real easy and likewise the darker colorations. You may have to do a couple test pieces to get close and keep in mind the color changes over a couple weeks as the concrete cures, getting generally a bit lighter.
I got both types of dye powders from WaltTools, via Amazon. Both are listed as 'khaki' or other versions of 'brown'. It looks the same to the eye, but the surface release powder is water-phobic, do NOT mix it into concrete it will wreck the integrity of the cast.
The stamp I also got off Amazon, as well as the plastic molds for the pillar pieces, differing vendors.
I have specified colored concrete on a couple of projects -- one was mixed at the plant and I had to pay to clean the truck (not cheap). I have also used the powder .... both times a product made by SIka. The last I did white and I'm still dealing with a less than perfect job
rayra
Well-known member
I takes a lot especially in the lighter colors and the stuff is not inexpensive, so some folks try to short it / stretch it. Doesn't work. But white is a tough thing. Would probably be better off whitewashing the concrete pieces at least a month after they've been cast, to get a good bond.Stuff I used years ago was a powder that was mixed into the small batches (bags) that I made up and mixed in one of those barrel mixers. Took a lot of time .... but -- I was just playing around.
I have specified colored concrete on a couple of projects -- one was mixed at the plant and I had to pay to clean the truck (not cheap). I have also used the powder .... both times a product made by SIka. The last I did white and I'm still dealing with a less than perfect job
There's lots of things you can add to concrete, they all drive the cost per volume up sharply. And that's even before supply disruptions and infaltionary pricing. Readimix has gone up 50% alone, here. Their liquid dyes are nearly 4x the price of the volume of concrete they are meant for. So any dyes rapidly inflate the cost of the concrete work. Consider concrete paint if possible. The concrete panels in my raised garden bed walls are painted, not dyed. Holding up real well, 15mos in.
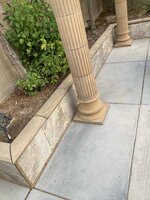
When I did the pillars I wanted to make them hollow, fitted them over 4x6 posts. There was a casting method for making them in vertical halves (the barrel segments) and I should have done that, assembly would have been a lot easier. I also added a bunch of vermiculite to the mix (10 cups per bag iirc), but it only lightened the pieces by 10-15%. Each of the column segments is over 100#. I cut the patio slab and dug out large footings for each column, specifically undergirding the slab ~4" wider than the cut hole, all around. And about 20"+ deep. Each footing was about 7 bags.
Not knowing the quality, thickness or steel content (if any) of the patio slab, I was concerned that stacking 600# in small footprints might result in cracking the patio slab. So I did the hard work of shoring it up with big footers. Seems to be working, especially at the back right corner where the pillar is very close to the edge of the slab. I even cut that slab hole offcenter away from the outer corner, trying to prevent it breaking off.
On adding the dye, I seem to get faster results if I put most the water in and the dye (and the vermiculite, in my case) and get those elements mixed before adding the concrete.
After mixing the garden bed panels by hand I opted to buy a cheap mixer from Harbor Freight and it is working pretty well. The motor housing however has zero ventilation and I basically keep its clamshell housing pried wide open. I cast all the pillar pieces - base and barrel - every other day throughout August in Vegas. Miserable job. This hot late Spring / early Summer I can smell the hot motor after just four 2x60# loads. I'm riding close to letting out the magic smoke. But by late morning it's over a 100F and I'm done in anyway.
But that's part of why I'm waiting for mid fall to complete the grill island.* The countertop cast in place, 8'4"x6'4"x3" thick is going to take 18 loads, continuous mixing. Neither I or the mixer can do that in Summer. Much less keep that casting from kicking in the 2hrs+ it will take to pour. And all that will be dyed to.
My dyes come in 10# buckets or 5# bags, I pre-measure it out and put the doses in sandwich baggies ahead of time. Using a small digital scale and solo cups for the measuring. So when I mix I'm setting out the 'set' of ingredients ahead of time and trying to do the steps the same order each time, to keep me from missing anything when I'm overheated and grinding it out.
* I'll be doing the two-layer plastering of the island walls and some of the decorative travertine tiling work on the walls over the next couple months. I still have the grout all the gaps on the tile and capstones of the patio walls to. All that work is going to be one batch early in the mornings, work until the grout / mortar is used up or I reach a good stopping point and then get back into the AC.
I use a lot of craft or contractor paper to mask things, not wanting to mar up the patio slab. Don't really want to have to do anything to it. And its drainage is terrible, so washing it off is troublesome. So the less dyed concrete and grout I spill, the less I have to clean up.
Attachments
-
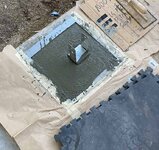 sparta pergola footings 24.jpg131.5 KB · Views: 20
 -
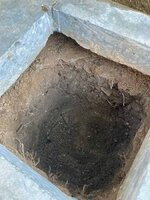 sparta pergola footings 22.jpg70 KB · Views: 17
 -
 sparta columns 89 slab cutting.jpg80.3 KB · Views: 16
 -
 sparta columns 28 color mix.jpg68.3 KB · Views: 16
 -
 sparta columns 05.jpg101.7 KB · Views: 16
 -
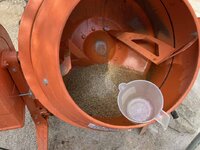 casting molds 09.jpg91.2 KB · Views: 17
 -
 goldfingah.jpg103.2 KB · Views: 18
 -
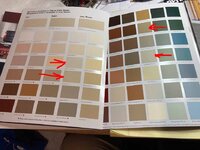 pillar colors possible.jpg74.3 KB · Views: 18
 -
 sparta patio capstones 122 installing.jpg65.8 KB · Views: 26
rayra
Well-known member
one other thing on DIY concrete work. We found a decent stone / landscaping yard here in Vegas, they wanted $600-1000 EACH for columns similar to these, delivered. Molds were ~$275, mixer was $225. Concrete was about 10 bags per column + 7 per footing, x4. Dye about $40 ($50 today), call it a little over $300 last year for the concrete mix. And a shitload of labor. But for the retail cost of 1 column I made 4. And I've still got the molds and mixer. Which I'll probably sell off after all my concrete work is done. The grill island, pizza oven. Some more footings for a 10x10 floating deck in the middle of the yard. And sometime this coming winter / spring about 75' of side property wall extensions. I'll hire out the footing and block laying work, but might run the mixer / concrete production to 'save' some $
eta at it's 0925 and I've screwed around and it is almost 100F out there already, heading for 111 today. Not getting much done out there THIS morning.
eta at it's 0925 and I've screwed around and it is almost 100F out there already, heading for 111 today. Not getting much done out there THIS morning.
Good thinking, I was lucky and able to borrow a mixer from a friend.one other thing on DIY concrete work. We found a decent stone / landscaping yard here in Vegas, they wanted $600-1000 EACH for columns similar to these, delivered. Molds were ~$275, mixer was $225. Concrete was about 10 bags per column + 7 per footing, x4. Dye about $40 ($50 today), call it a little over $300 last year for the concrete mix. And a shitload of labor. But for the retail cost of 1 column I made 4. And I've still got the molds and mixer. Which I'll probably sell off after all my concrete work is done. The grill island, pizza oven. Some more footings for a 10x10 floating deck in the middle of the yard. And sometime this coming winter / spring about 75' of side property wall extensions. I'll hire out the footing and block laying work, but might run the mixer / concrete production to 'save' some $
eta at it's 0925 and I've screwed around and it is almost 100F out there already, heading for 111 today. Not getting much done out there THIS morning.
One thing I learned for myself is to get the concrete for these size projects delivered.
For the foundations I p/u the pallets with a borrowed flat bed truck but the time that it takes to get them and unload it by hand made it not worth my time.
I then also had the cinderblocks delivered and same with the next concrete patch for the core filling and with their “off road” fork lifts they were able to put everything close to where it was needed and we/I could focus on mixing and pouring.
Getting a concrete truck were so expensive and were so far out that it made sense for me to do it this way.
rayra
Well-known member
I'm stuck schlepping it to the back yard. I'm in a suburban tract with minimum setbacks, no access to get a pallet delivered anywhere close. But I have an old pickup with an upgraded suspension, so I'm able to go get 20 bags at a time, usually placed in the truck with a forklift. But on my end I've got to haul them to the back yard 3 at a time in a wheelbarrow down a gravel side yard. It's making me strong and tired.
When it comes time to do the side walls work, I'll get the mortar / concrete / block pallets dropped at the top of the driveway. (sloped driveway too). And by then I can run the mixer on the side of the house close to the supplies.
back to work in my hot garage, I'm trying to frame up a secure storeroom, as 'light duty' work. 94 in there even with the door to the house open.
When it comes time to do the side walls work, I'll get the mortar / concrete / block pallets dropped at the top of the driveway. (sloped driveway too). And by then I can run the mixer on the side of the house close to the supplies.
back to work in my hot garage, I'm trying to frame up a secure storeroom, as 'light duty' work. 94 in there even with the door to the house open.
Have you even used colored glass -- the guy doing the exposed on my patios and steps used some in a sidewalk project I just took a look at .. sort of liked it. Have not had any opportunity to speak to him directly ....one other thing on DIY concrete work. We found a decent stone / landscaping yard here in Vegas, they wanted $600-1000 EACH for columns similar to these, delivered. Molds were ~$275, mixer was $225. Concrete was about 10 bags per column + 7 per footing, x4. Dye about $40 ($50 today), call it a little over $300 last year for the concrete mix. And a shitload of labor. But for the retail cost of 1 column I made 4. And I've still got the molds and mixer. Which I'll probably sell off after all my concrete work is done. The grill island, pizza oven. Some more footings for a 10x10 floating deck in the middle of the yard. And sometime this coming winter / spring about 75' of side property wall extensions. I'll hire out the footing and block laying work, but might run the mixer / concrete production to 'save' some $
eta at it's 0925 and I've screwed around and it is almost 100F out there already, heading for 111 today. Not getting much done out there THIS morning.

Forms came off rather easily due to the suggested anti stick applied and that it was more or less raining on a daily bases.
On the outside I used the sheeting I took off the house in the background so it has a somewhat matching design.
The two grey pvc pipes sticking out left and right of the lower corners will be used to powered exterior lights.
One thing I would do different is because plans changed and now there will be a concrete floor where the dirt/water is is to dig out the dirt and run a drain from there to daylight.
Which I should have done anyway I guess but I will do that later once everthing is dried in and inspected like so many other things.