To avoid these ads, REGISTER NOW!

Two Car Garage Build in Lancashire, England

OP
G

Gareth

Well-known member
Joined
May 23, 2007
Messages
151
Location
Lancashire, England, UK
That's coming along really well and I'm not in the slightest jealous. ;)

Thanks. I saw from another thread that you may be into VWs - I thought the username was familiar. If I'm thinking along the right lines then I believe congratulations are in order! :beer:

Coming along nicely! Good to see a UK presence on here - I'm on the North Staffs/South Cheshire border.

Dan

I don't think some of the Americans realise how tight land is over here, and that most people think it's good to have any kind of garage, let alone something of a half decent size!

:)
 
Last edited:
To avoid these ads, REGISTER NOW!
OP
G

Gareth

Well-known member
Joined
May 23, 2007
Messages
151
Location
Lancashire, England, UK
There are a few of us:thumbup:

Looking good. That's nice brick & block work too. I like the lintel solution. I 'm looking to use a glulam beam myself as in all probability, I'll be building a timber frame structure.

Are you able to post a better link to the plans, I can't see much from those on the post.
Where are you stairs going?

I think you said you were going to Epoxy the floor, if so, which product do you intend using? I've been doing some 'net searching on the subject in prep for my build.

Yeah, I'm really impressed with the blockwork. So much so the builders are staying on site to start the (major) work on the house.

If you message me your email address I'll send you a full size .pdf copy of the plans if you like.

I'm not sure about the floor yet. Most of the brands commonly discussed in the 'Flooring' forum seem to be US specific. I've been looking at Firwood paints, and Watco paints. It won't be for a while though as I want to get all the building works finished first, which will probably take at least 6 months (if everything goes to plan!)

:)
 

Buzz Lightyear

Well-known member
Joined
Jun 18, 2010
Messages
260
Location
Wiltshire, UK
Thanks. I saw from another thread that you may be into VWs - I thought the username was familiar. If I'm thinking along the right lines then I believe congratulations are in order! :beer:


I don't think some of the Americans realise how tight land is over here, and that most people think it's good to have any kind of garage, let alone something of a half decent size!

:)

I have a USA import '57 Oval which came from San Diego and a Mk2 Golf GTI that I am currently restoring.
Yes you are right my wife is pregnant with the first "Little Lightyear". We've had a VERY hard time getting this far so to say that we're pleased is a massive understatement. :beer:

I count myself lucky to have a single garage at home which is big enough to get a car in and open one door. I dream of having the space to build something on the scale of the beauties you see on here being built in the USA
 
Last edited:

993James993

Well-known member
Joined
Feb 24, 2008
Messages
524
Absolutely beautiful design and workmanship! Can't wait to see how this progresses.
 

51rider

Well-known member
Joined
Dec 21, 2009
Messages
502
Location
London, England.
Yeah, I'm really impressed with the blockwork. So much so the builders are staying on site to start the (major) work on the house.

If you message me your email address I'll send you a full size .pdf copy of the plans if you like.

I'm not sure about the floor yet. Most of the brands commonly discussed in the 'Flooring' forum seem to be US specific. I've been looking at Firwood paints, and Watco paints. It won't be for a while though as I want to get all the building works finished first, which will probably take at least 6 months (if everything goes to plan!)

:)
Thanks-will drop you a PM in the week.
Glad you could take on the builders for the next trenche of work. Should enable you to relax a little if you have experience of them & they have delivered the goods so to speak.

In reference to the flooring, I'm thinking of biting the bullet and ordering some Wolverine gear via Fred at Alpha garage. I've used Leyland workshop & garage paint both personally & professionally & it won't be in any garage I build ever again:mad: I'm hopefully looking at end of Sept to order but suspect in may be later.:(

Any updates on your build?
 

lupinsea

Well-known member
Joined
Mar 30, 2010
Messages
261
Looks great and I love seeing other construction methods and technology vs. the typical wood frame construction common to the U.S.

Keep up the photos.

Out of curiosity, the beam that you had welded up looks rather complicated with the different plates and all welded on too the I-beam. Any reason for that. Are those vertical plates / fins supposed to fit between the block joints?
 
OP
G

Gareth

Well-known member
Joined
May 23, 2007
Messages
151
Location
Lancashire, England, UK
Looking good fella :thumbup:

Thank you - I'm very pleased so far.

Absolutely beautiful design and workmanship! Can't wait to see how this progresses.

I know it's 'only' a relatively small garage, but I can't begin to explain how much thought I've put into every aspect of the garage. It's been driving my wife mad!

Thanks-will drop you a PM in the week.
Glad you could take on the builders for the next trenche of work. Should enable you to relax a little if you have experience of them & they have delivered the goods so to speak.

In reference to the flooring, I'm thinking of biting the bullet and ordering some Wolverine gear via Fred at Alpha garage. I've used Leyland workshop & garage paint both personally & professionally & it won't be in any garage I build ever again:mad: I'm hopefully looking at end of Sept to order but suspect in may be later.:(

Any updates on your build?

Updates when I manage to get the photos off my camera without the lead or a card reader! My wife is working away and has taken the camera lead with her as she has a same brand camera. :rolleyes:

Looks great and I love seeing other construction methods and technology vs. the typical wood frame construction common to the U.S.

Keep up the photos.

Out of curiosity, the beam that you had welded up looks rather complicated with the different plates and all welded on too the I-beam. Any reason for that. Are those vertical plates / fins supposed to fit between the block joints?

It's amazing the difference in construction methods. Over in England we have a reluctance to embrace timber buildings, although timber framed buildings are becoming more common. There are very few entirely timber residential buildings that I am aware of, other than holiday cabins.

The beam has been over engineered (as I can't help but do that) and would probably have been fine with just a plate welded to the underside. If this isn't clear, it's to support the outer course of block, so that the beam remains hidden within the structure (from the outside). The inner course rests on the top of the I-beam. The vertical plates sit just behind the outer course, and make the entire beam much more rigid. I have a 4 inch cavity, so there is no need for the vertical plates to go all the way across. Or so I think, time will tell!

Thank you for all the positive comments - it's very encouraging.

:)
 
OP
G

Gareth

Well-known member
Joined
May 23, 2007
Messages
151
Location
Lancashire, England, UK
Well, I managed to get the photos off my camera using the card slot on the printer, so I can do an update now. :thumbup:

Day 12 saw the inner course of blocks finished to fractionally under the wall plate. The trusses cannot rest on the inner course as it will alter the stresses they are under, but I did not want a gap around the top of the inside as it would look terrible. This was another reason for the fairly critical dimensions for the builders to work to, as by the time the ceiling is clad in plasterboard/sheetrock, the gap will be covered by the thickness of the boards. Or so it is on my plans anyway! Not much to show, so just a poor picture showing the builders excellent blockwork. The lintels will need a single course of small common brick to finish it off neatly:

Innercoursetofullheight.jpg


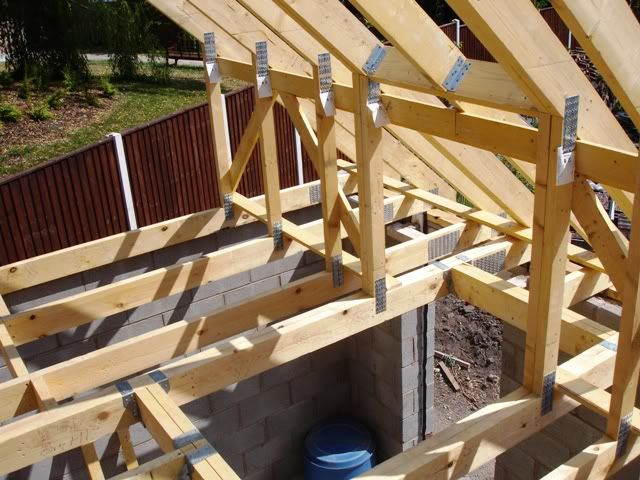
After getting the date for delivery of the roof trusses, I took a day off work to get them up. I decided to save the money (and gain a lot of satisfaction) by fitting the trusses myself. The quote came in at £320 plus VAT (tax) - around $550 inclusive - but I could see no reason why I couldn't do it myself. The builders kindly agreed to help me unload them and get them up onto the roof. They worked the day free of charge which was very good of them and quite unexpected.

I was a little apprehensive when they arrived on Day 13 of the build, as I had paid for a structural engineer to design them, but I wasn't pleased with their plans, so I redid them myself! I was a little worried that my arrogance would come and bite me on the ****...

The delivery driver was a great guy, and he reversed the wagon right into the garden, where as other drivers have refused to do anything other than dump the load into the road.

Trussesarrive.jpg


TrussesUnloaded.jpg


The three of us then lifted them up onto the roof by hand, with no ropes/pulleys, etc. One of the builders we had a quote from said that he would have to hire a crane, and that point was non-negotiable! Not that bad a job either, and certainly not worth the expense of a crane. We got them anchored in the right place on the wall place, and temporarily braced together by late afternoon.

The good news was that they fit perfectly, and the room(s) above will be a very good size, especially considering it would otherwise be dead space.

Trussesup1.jpg


Trussesup3.jpg


Trussesup2.jpg


And that was how it was at the end of the day (Thursday), shortly before I left to do the 100 mile drive back to where we are living at the moment, only to return again the following evening. Not to mention my 50 mile daily commute to work! :shocking: I feel very sorry for my car which is getting some abuse at the moment.

:)
 

993James993

Well-known member
Joined
Feb 24, 2008
Messages
524
I am in awe, sir!!!! What a beautiful building. The block work is wonderful.

I know it's 'only' a relatively small garage, but I can't begin to explain how much thought I've put into every aspect of the garage. It's been driving my wife mad! :)

I understand completely. Keep up the good work and please continue to post updates with photos.
 
OP
G

Gareth

Well-known member
Joined
May 23, 2007
Messages
151
Location
Lancashire, England, UK
This is coming along really nicely, I'll definately be keeping an eye on this thread.

That's going to such a fine looking garage, so different in construction than how things are done over here.:thumbup:

I am in awe, sir!!!! What a beautiful building. The block work is wonderful.

I understand completely. Keep up the good work and please continue to post updates with photos.

Thanks - will post another update shortly. :)
 
OP
G

Gareth

Well-known member
Joined
May 23, 2007
Messages
151
Location
Lancashire, England, UK
What did you do to alter the trusses?
Here in NZ all trusses have to have a registration
& design sticker on them and altering is not allowed.

I didn't alter the trusses themselves, I just altered the design I received from the structural engineer who I asked to design the roof structure and spec the I-beam for over the door. I am not able to even drill a hole in a truss to pass a wire through!

The design that they supplied had the roof at a 45 degree angle and the trusses resting on the inner course of blockwork. The main problem with this design was that the overhang came down over the top of the side door and windows, and the width of the space over the top was narrower than I expected.

I altered the angle to 42 degrees and put the trusses on the outer course. This gave me exactly the space I need for the power door, while giving me maximum headroom for the room above. I also gained a foot of width in the space above. It doesn't sound much but with a relatively small build I want to maximise every possible space. Apparently it 'goes against convention' to sit the trusses on the outer course, but I have not found a reasonable explanation for why it should not be done. It is perfectly acceptable to build a single skin building and still use trusses, so I can't see the difference.

After that it was just a case of putting all the dimensions into a computer program to check that the trusses are structurally sound. Each truss comes with a tag on them, and I have the certification from the manufacturer that they will be strong enough, even when considering the extra loads from time to time, e.g. snow/wind.

The roof windows I am using are designed to fit between the standard spacing, and for the opening for the steps I used a double truss each side, and built up the infill to make up the strength. It has to be checked by the Building Inspector before I can cover anything up so fingers crossed!

:)
 
OP
G

Gareth

Well-known member
Joined
May 23, 2007
Messages
151
Location
Lancashire, England, UK
Over last weekend I got stuck into the bracing of the trusses. Most of the time was taken up by climbing and having to keep going down for more wood / different tools. I should have done the floor area first and then set up the mitre saw in the roof space I guess.

This gives an idea of the actual size:

TrussBracing1.jpg


TrussBracing2.jpg


And I don't look as scared as I actually was up there - I don't like heights! Note the lack of any form of safety gear, and the inappropriate footwear. You'd think I'd have learned after two trips to hospital for DIY related injuries in the past (metal in my eye from grinding and tip cut off my thumb after trapping it in a shower base!) :lol:

The only thing I haven't done is put triangular bracing over the inside of the roof space, which I am hoping to avoid. It seems very strong, especially as the gables are not built. The roof structure is tied onto the gable walls with six 1/8" x 5' straps on each end.

TrussBracing4.jpg


TrussBracing3.jpg


TrussBracing5.jpg


And finally, two of my favourite photos so far. I'm going to knock down the old garage this weekend coming, which will give a much better idea of the driveway space and overall proportions.

Perspective.jpg


And the first proper photo of the inside space. Floor slab looks pretty good. It looks smaller than it actually is on the photo - the time it took me to sweep it out proves how big it actually is compared to my current garage!

Inside.jpg


:)
 
OP
G

Gareth

Well-known member
Joined
May 23, 2007
Messages
151
Location
Lancashire, England, UK
The space looks huge now the roof is taking shape.

I don't think it looks as big in photos as it seems 'in flesh' so to speak. I will probably only ever keep one car in it, with lots of work space. It would be nice to know I can easily fit two cars in if I see anything I just 'have' to buy!

Quite nice! I'm sure you are going to enjoy your new garage immensely.

I've hardly had time to think about enjoying it! I've barely started planning the inside details yet either.

It will be equipped with plumbed in compressor, welder, parts washer, drill press, bench grinder, and my big collection of hand tools. I'm looking forward to moving my tool chest over, and I have already bought 3 large tambour cabinets for tools, parts and all the other stuff that ends up being stored in the garage. They are exceptionally good quality and they look like the mid sized one here:

Cabinets.jpg


The cabinets were a bargain, and incidentally were sourced from the same family friend that manufactured the beam. His firm also specialise in demolition, and they were contracted to strip and demolish a Government agency building, and the cabinets, which were nearly new, came out of there!

The recommended retail price for them new is around £300 ($450) each, and I paid £100 ($150) for three of them(!!!), and I may get a fourth depending on space. The best thing about them is that you don't need any clearance to fully open the doors, which I have often found a problem in the past.

I haven't decided on power points or lighting yet and I am still looking for inspiration, so if anyone can help please do!

There will be a sink and a short run of industrial looking kitchen units across the back wall by the side door. The stainless steel sink was a £5 clearance bargain from B&Q which is our equivalent of Home Depot (I think!)

The builders were rained off today, but the gable of the back wall was almost finished yesterday. Only another 2 days of building and then the roof can be finished.

:)
 

51rider

Well-known member
Joined
Dec 21, 2009
Messages
502
Location
London, England.
Given you have extra length in the garage the best option is for you to run the benching along the back wall and put the tambour units between the window openings. As they are for storage and have the sliding openings you do not need to allow extra space for door clearance.
Initially I would have said to run it along the wall with the windows in. However, I think this reduces your width too much for parking vehicles and working. It is better to use the extra depth you have designed in.

Use some graph paper to work out a layout that fits everything in. This will then tell you where the sockets need to go. Sockets near to the door opening are a good idea & also make some provision for weather proof external sockets with integrated rcd's for use of tools etc outside.

I presume the garage will have it's own DB? I would imagine the load from the welder is reasonably heavy. I would put in a dedicated circuit just for that & use cooker cable to the dedicated socket. Use of the cooker cable may be helpful in future if you decide to turn the garage into a granny flat/dwelling house as you will not have to retro fit it or the separate breaker. You will just have to terminate into the appropriate local isolator & cooker connector.

I don't know how you plan to finish the interior but in my last garage, all sockets were surface mounted & I had white pvc round conduit running between them. I also used singles (individual cable as opposed to twin & earth) to wire it all up. It was a shed load easier to pull the singles through the conduit than 2.5mm twin & earth cable! I used the MK metalclad range of sockets and light switches.
If the conduit doesn't appeal visually then you could use 2.5mm twin & earth FP200 fire cable. You would need to buy the glands for the socket back boxes and the 'P' clips to secure the cable to the wall but IMHO it does give a very neat & professional looking install especially when compared to the square/rectangular snap lid trunking.
Of course if you really wanted to achieve an industrial look you could opt for proper galvanised conduit but that would be a load of work & heavy on the wallet.:shocking:
In terms of lighting, the general consensus is the more the better:) Plenty over the workbench & machinery. If you end up using flourescents please ensure you put a twin fitting above any fixed rotating machinery. This will cancel out the strobe effect that is possible when using a single fitting. It is also a good idea to make the rows of lighting individually switchable, that way you can only have on what you need.
I can't suggest any make or model of fitting as the style & size is up to you & is again determined by how you intend to finish the garage ceiling. Pop down to your local electrical wholesaler & see what he has to offer. Most will carry a number of brands and will have catalogues for you to take home & peruse. Some of the GU10 (mains rated) LED spotlights now provide decent lighting and are a fraction of the cost to run compared to the standard 35/50W lamps. Personally I would stay away from the MR10 (12V) spots as the transformers always end up giving grief. :(
If you intend installing wall cabinets above the bench and they are repurposed kitchen ones, you can always install the under pelmet lighting for really good illumination of your work surface.
 
To avoid these ads, REGISTER NOW!

MG David

Well-known member
Joined
Apr 14, 2009
Messages
192
Location
Warwick UK
Some good points there.

I am changing my current socket over the bench to a metal one and fitting some extras at the same time.

Gareth, putting your plumbed in compressor in a small wooden leanto in that gap behind the garage would work well.
 

Flange

Well-known member
Joined
Jun 9, 2010
Messages
424
Location
Northern England
Ditto 51rider on using surface mounted conduit (PVC or metal) with metal clad sockets and switches.

When I rewire mine after the refurb I will be running 50 x 50 trunking around the perimeter of the garage wall at ceiling height and just use 25mm conduit for the drops. That way if you ever need to change or add to your wiring it is very easy and quick with no mess. Just an option to consider.

I have always found TLC Direct very good as a starting point for browsing what is available in terms of light fittings etc.
 

993James993

Well-known member
Joined
Feb 24, 2008
Messages
524
Nice documentation of the build so far!

Not sure if I missed it but any expected cost on the entire job? Looks great.:thumbup:

I can only imagine your budget for this project. Masonry work here is quite expensive. Whatever your total estimate, by sure to increase it by 20%. As T Vette says, Looks great!
 
OP
G

Gareth

Well-known member
Joined
May 23, 2007
Messages
151
Location
Lancashire, England, UK
Given you have extra length in the garage the best option is for you to run the benching along the back wall and put the tambour units between the window openings. As they are for storage and have the sliding openings you do not need to allow extra space for door clearance.
Initially I would have said to run it along the wall with the windows in. However, I think this reduces your width too much for parking vehicles and working. It is better to use the extra depth you have designed in.

Use some graph paper to work out a layout that fits everything in. This will then tell you where the sockets need to go. Sockets near to the door opening are a good idea & also make some provision for weather proof external sockets with integrated rcd's for use of tools etc outside.

I presume the garage will have it's own DB? I would imagine the load from the welder is reasonably heavy. I would put in a dedicated circuit just for that & use cooker cable to the dedicated socket. Use of the cooker cable may be helpful in future if you decide to turn the garage into a granny flat/dwelling house as you will not have to retro fit it or the separate breaker. You will just have to terminate into the appropriate local isolator & cooker connector.

I don't know how you plan to finish the interior but in my last garage, all sockets were surface mounted & I had white pvc round conduit running between them. I also used singles (individual cable as opposed to twin & earth) to wire it all up. It was a shed load easier to pull the singles through the conduit than 2.5mm twin & earth cable! I used the MK metalclad range of sockets and light switches.
If the conduit doesn't appeal visually then you could use 2.5mm twin & earth FP200 fire cable. You would need to buy the glands for the socket back boxes and the 'P' clips to secure the cable to the wall but IMHO it does give a very neat & professional looking install especially when compared to the square/rectangular snap lid trunking.
Of course if you really wanted to achieve an industrial look you could opt for proper galvanised conduit but that would be a load of work & heavy on the wallet.:shocking:
In terms of lighting, the general consensus is the more the better:) Plenty over the workbench & machinery. If you end up using flourescents please ensure you put a twin fitting above any fixed rotating machinery. This will cancel out the strobe effect that is possible when using a single fitting. It is also a good idea to make the rows of lighting individually switchable, that way you can only have on what you need.
I can't suggest any make or model of fitting as the style & size is up to you & is again determined by how you intend to finish the garage ceiling. Pop down to your local electrical wholesaler & see what he has to offer. Most will carry a number of brands and will have catalogues for you to take home & peruse. Some of the GU10 (mains rated) LED spotlights now provide decent lighting and are a fraction of the cost to run compared to the standard 35/50W lamps. Personally I would stay away from the MR10 (12V) spots as the transformers always end up giving grief. :(
If you intend installing wall cabinets above the bench and they are repurposed kitchen ones, you can always install the under pelmet lighting for really good illumination of your work surface.

Thanks for all the useful information, appreciated.

Despite it being so much larger than my current garage, it seems much more difficult to decide where to put everything! I can't put anything substantial on the window side as the gap between the windows is only around 2 1/2 feet, so unfortunately that suggestion won't work. I'm thinking of some form of U-shaped work area coming out of the back wall to make the most of the space, but I'm sure it will become more obvious once I've got the sink unit fitted and had the units delivered.

I've already bought the 20mm conduit for the wiring as I'm going to leave the walls in painted block finish in the garage, and I'll be getting the metal clad sockets/switches but I haven't decided which brand yet. I'm going to wire it as though it was a small house rather than a garage, so I'll use a regular consumer unit rather than one of the 'garage' types. I want to put power and lights in the garden shed, the greehouse and in the garden on the deck so it makes sense to have the additional circuits.

I think I will go for twin flourescents, but I'm undecided as to the locations and positions, with a few spots. I hadn't thought of having wall units over the bench area, but it's not a bad idea as it would be so much tidier and cleaner than open shelving.

Thanks again. :)
 

Grizz1963

Well-known member
Joined
Jan 7, 2010
Messages
12,033
Location
Rochester, KENT. UK
Continues to look good mate.

Like the idea of maximised use of space.

I built my first home in Cape Town up on a hilside, and helped the builder with the top lfloor trusses and timbers, which had to be carried up the hill and then drawn up by rope and fixed one at a time.

Massive brownie points to this guy too.

Trussesarrive.jpg


Looks easy now, but trust me, when this house was a skelleton, we were sweating.
I moved in the moment the drywalls and ceilings were plastered, sanding the floors, painting, tiles, inner stairs etc were all done by me, along with my regular job.

You will reap the reward of this job for a long time.

Above the house was a nature reserve.

IMG_0660.jpg
 
Last edited:
OP
G

Gareth

Well-known member
Joined
May 23, 2007
Messages
151
Location
Lancashire, England, UK
Some good points there.

I am changing my current socket over the bench to a metal one and fitting some extras at the same time.

Gareth, putting your plumbed in compressor in a small wooden leanto in that gap behind the garage would work well.

I definitely want to put it in a sound deadened enclosure but I'm not sure where. Are there any issues with cooling / air supply to worry about? It's not a huge one and is just about portable, but the noise is very distracting and it bothers me using it later at night so anything that would cut this down is worth considering.

Nice documentation of the build so far!

Not sure if I missed it but any expected cost on the entire job? Looks great.:thumbup:

I can only imagine your budget for this project. Masonry work here is quite expensive. Whatever your total estimate, by sure to increase it by 20%. As T Vette says, Looks great!

I'm not sure whether the budget is big or not, as I'm not sure how much other people spend and what is considered 'usual'.

I was originally planning on around £8,000 ($12,000) but that was for a single car garage plus work area, and was before we had completed the purchase of the house. I hadn't quite realised how much space there was until I started clearing the garden, and the plans (and budget) quickly got bigger!

I am hoping that with the doors, windows, electrics, kitchen area, upstairs rooms finished, etc it will come in at just under £15,000 ($22,750).

I have done quite a lot of the work myself, and my Dad (who is semi retired) shopped around for the best deals and saved me a small fortune. I have trade accounts at the various builders merchants I use which helps as there is a lot of discount on some things.

The builder does not charge a mark up on anything he arranges to supply, and he is definitely doing it cheap. One quote I had came to over £20,000 ($30,250) and that didn't include the windows, doors, wiring and general fitting out, so I could easily have spent upwards of £25,000 ($38,000)! :shocking:

Despite what I think is a low budget, I have not compromised on anything I wanted, and it's just been a case of being patient until I find what I want at a price I am prepared to pay.

An example of this approach was with the side door, as this will be on full view from the garden, the kitchen, the dining area, and the 1st floor balcony, so I was keen to ensure that it was attractive, whilst being secure and useful in terms of size. I ended up finding a solid Oak stable door, with a triple glazed window in the upper part. I want to be able to have the door open, yet prevent the dog (or kids eventually) from coming in so it seemed the perfect solution. The list price is £900 ($1350), and the trade price is £360 ($550). I got it for £235 inc tax ($350). It's 2'8'' x 6'8'' x 1 3/4'', and weighs 45kg / 100 pounds bare, so it should be pretty secure and sound proof as possible. This is it anyway:

SideDoor.jpg


A lot of hassle over something as minor as the side door, but it demonstrates my obsessive (and excessive) attention to detail! :lol_hitti
 
Last edited:
OP
G

Gareth

Well-known member
Joined
May 23, 2007
Messages
151
Location
Lancashire, England, UK
Continues to look good mate.

Like the idea of maximised use of space.

I built my first home in Cape Town up on a hilside, and helped the builder with the top lfloor trusses and timbers, which had to be carried up the hill and then drawn up by rope and fixed one at a time.

Looks easy now, but trust me, when this house was a skelleton, we were sweating.
I moved in the moment the drywalls and ceilings were plastered, sanding the floors, painting, tiles, inner stairs etc were all done by me, along with my regular job.

You will reap the reward of this job for a long time.

Above the house was a nature reserve.

IMG_0660.jpg

That's fantastic! Why did you move? I don't think I could have left somewhere as beautiful as that.

There should be literally no wasted space at all, and I've used the same approach to the design of the house which I'm desperately trying to finalise as the work is starting later this week!
 
OP
G

Gareth

Well-known member
Joined
May 23, 2007
Messages
151
Location
Lancashire, England, UK
Anyway, now it's time for a small update.

Days 14 and 15 saw the gables being constructed and the blockwork completely finished. The builders asked me nicely to get some proper scaffolding in as they weren't convinced that my scaffold tower was strong/secure enough (and they were almost certainly right!)

Over last weekend I fitted the fascias and barge boards, together with the necessary supporting woodwork. The hardest part was trimming the ends of the trusses to form the support for the soffits. I hadn't done it before, and only had 'common sense' as my guide to how to do it, so it was quite a stressful day! The wood was all treated with 3 coats of wood preservative and two coats of acrylic primer before fitting it.

I used stainless steel screws which are very clever, in that they drill their owe hole, countersink their own head and never rust! Worth the extra cost. Just need to spend some time carefully filling and sanding to remove any trace of them before a further coat of primer and top coats.

FrontGable1.jpg


It was good to do some work in the garage for the first time, and as usual, my Dad was there to help me out as it would have been a difficult job to do single handedly!

FrontGable0.jpg


FrontGable2.jpg


FrontGable3.jpg


Fascias1.jpg


It was a big tight down there, but all part of maximising space!

Fascias2.jpg


Fascias3.jpg


RearGable.jpg


:)
 
OP
G

Gareth

Well-known member
Joined
May 23, 2007
Messages
151
Location
Lancashire, England, UK
And a final update:

I decided that thanks to all the money I've saved doing the roof structure and fascias, etc myself, I can afford to get a roofer in to finish the roof and do the tiling. The main reason is time, because I think it would take me a minimum 4 days work (two weekends), assuming I could convince my Dad or one of my mates to come and help with it, and even then it would probably take me much longer as I've never done it before. Which is the second reason. Although I'm confident that I could do it, I'm concerned that I may not be able to do it well enough as I'm sure a lot of the skill in tiling a roof comes from experience, and I'd just be making it up as I went along! :D

My Mum just sent me this phone picture, which is what the team of 4 roofers accomplished today. Fortunately they put the windows in the right place, as it was difficult to explain over the phone where I wanted them. That will teach me not to leave a plan. I'm looking forward to seeing it on Friday, when the roof may well be finished!

Roof1.jpg


The bottom windows look a little tall as I have got some stone sills to be fitted, once they have been (carefully) cut to size. Another bargain, as I got them for 20% of the price they should have been. Someone ordered them to be made specially but failed to collect them - the builders merchant just wanted them out of the way. They are pretty much exactly what I would have had made so an excellent find.

:)
 
OP
G

Gareth

Well-known member
Joined
May 23, 2007
Messages
151
Location
Lancashire, England, UK
Ditto 51rider on using surface mounted conduit (PVC or metal) with metal clad sockets and switches.

When I rewire mine after the refurb I will be running 50 x 50 trunking around the perimeter of the garage wall at ceiling height and just use 25mm conduit for the drops. That way if you ever need to change or add to your wiring it is very easy and quick with no mess. Just an option to consider.

I have always found TLC Direct very good as a starting point for browsing what is available in terms of light fittings etc.

Cheers for that - I'll take a look at the link now. :)

Rather than use 50x50 trunking I'm going to run the circuits in the eaves area, with the drops coming down through the ceiling. I figure it will be the easiest way to add things in the future.

I've got an electricial friend coming round to have a further chat and he said he will prepare the plans for me, and then sign it off when I'm done (assuming it's right!) He usually does top end jobs so he is a little expensive to do the work! He has convinced me to include wiring for a security system, Cat5, TV, etc in addition to the usual stuff.

Now it's dry I should be able to start on the wiring relatively soon, although I won't be able to permanently connect it to the mains until the house extension is finished, as the consumer unit / meter is going in a room of the house that isn't built yet!
 

Flange

Well-known member
Joined
Jun 9, 2010
Messages
424
Location
Northern England
I've already bought the 20mm conduit for the wiring

Just a point to note. 20mm conduit is OK for a single 2.5mm2 T&E but not two. If you are going for a ring for the sockets then you will need 25mm conduit, trust me.

20mm is fine for the lights (1mm2 or 1.5mm2 T&E)
 
OP
G

Gareth

Well-known member
Joined
May 23, 2007
Messages
151
Location
Lancashire, England, UK
Just a point to note. 20mm conduit is OK for a single 2.5mm2 T&E but not two. If you are going for a ring for the sockets then you will need 25mm conduit, trust me.

20mm is fine for the lights (1mm2 or 1.5mm2 T&E)

I had actually started to think that while looking at that link. I had thought that using single core conduit cable would fit though.

I think I will run the ring circuit round the room at ceiling height, with the sockets on spurs from junction boxes at the top. I think that should be fine, but I guess the electrician will tell me more.

I can always buy more conduit - it was only cheap and I'm sure it will come in useful for something.
 

51rider

Well-known member
Joined
Dec 21, 2009
Messages
502
Location
London, England.
That's looking great!

Glad you've got a sparks to design it for you. Since the feed is coming from the house, you will have to run it as a sub-board and use RCBO's.

That is a great price for the build! I had quotes of £34K+ for my single story plan.

Did you say what you were planning on doing for heating? I'm currently researching this & will probably end up with radiant in-floor heat.

Lovely door, I have a non-stable version to go in mine when it gets done.......

Rian, that 's a lovely looking place you had back in SA-must have been a terrible wrench to leave it. What s the news on the new place/sale?
 
Last edited:
OP
G

Gareth

Well-known member
Joined
May 23, 2007
Messages
151
Location
Lancashire, England, UK
That's looking great!

Glad you've got a sparks to design it for you. Since the feed is coming from the house, you will have to run it as a sub-board and use RCBO's.

That is a great price for the build! I had quotes of £34K+ for my single story plan.

Did you say what you were planning on doing for heating? I'm currently researching this & will probably end up with radiant in-floor heat.

Lovely door, I have a non-stable version to go in mine when it gets done.......

I thought about fitting underfloor heating, and then I thought about fitting an oil fired boiler and radiators (as I have removed such a system from the house) but then I decided that I would just fit an electric storage heater at the back end of the garage, just to take the edge off in the winter! I grew up working in my Dad's garage (both at home and his business) and there was no heating and they are ancient buildings, so it wouldn't be the same if it was warm. Plus, I tend to get hot enough once I start working in the garage anyway! :D

Overall I'm pleased with what it's cost, and think I've got good value for money. It should have put a lot more value than that on the house, and I'm looking forward to the valuer coming. We've funded the garage from savings, but we are having to extend our borrowing to do the major works to the house, so the extra equity will be a big help. Fingers crossed anyway!
 

993James993

Well-known member
Joined
Feb 24, 2008
Messages
524
Looking great! I did a double take when I read your budget. I would have thought that your building would have cost 3 times as much to build anywhere in England. I promise you have tons of sweat equity!
 

Stuart in MN

Well-known member
Joined
Sep 8, 2005
Messages
23,139
Location
Minneapolis
Very nice garage! It's interesting to see building techniques in other countries - I don't think I've ever see the gable end of a garage built out of concrete block like that in the US. Here, the walls may be concrete block but once the building gets to the rim joint level, everything from there on up is wood construction.
 

ddawg16

Well-known member
Joined
Jul 11, 2008
Messages
21,005
Location
S. California
Looking great.....I can't believe you have gotten that much good weather to work on it.....having lived there, I know how the weather can be.....it's not a mater of "Will it rain", but rather "When will it rain".

Preston? My wife was born there....and I spent quite a bit of time in Hurst Green and Salmsbury....

You are going to be very glad for the skylights....are they they type you can open?
 
To avoid these ads, REGISTER NOW!
Top Bottom