

You are using an out of date browser. It may not display this or other websites correctly.
You should upgrade or use an alternative browser.
You should upgrade or use an alternative browser.
What did you do "IN" your garage today?
- Thread starter mayhemman
- Start date


555
Well-known member
I discovered the 2 1/2" stainless bolts I bought for a project are 1/2" too long. I guesstimated the length so the blame is on me. I'll get more tomorrow.
niget2002
Well-known member
I mounted a wyze camera in the chicken brooder.
Then I set up my work laptop to cast the rtsp stream as a fake Webcam. This allows me to stream the wyze camera instead of my Webcam during work zoom calls.
Created an immediate 10 minute derailment of the first meeting of the day.
The baby chicks look better than I do anyways.
Told the boss that if it's too distracting to let me know and I'll turn it off.
PhantomEB
Well-known member
Well got an impromptu 3 days off so I got the garage cleaned up some so I could calm down and work on the quad which got more of the plastics off the floor. Buddy was hoping the quad would be in the position to be moved out so we could get pics of a loaner cj2a that h has for two weeks and my bronco together in the garage.

rayra
Well-known member
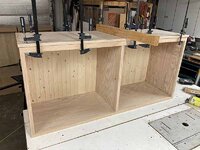
ok, sideboard cabinet puttied, sanded up and tape mess cleaned up. Ready to permanently attach the top.
Working on fitting the shelves now and I have some 1"x3/4" oak fascia to attach to those shelves. BUT those shelves have to be 'handed'. The vertical center is not centered, it's off by 3/32" to the left. And the vertical fascia in the center protrude 1/8" while the fascias at the end protrude 1/4" inboard. So the shelf facias have to clear that. So I wind up with two adjustable shelves that are each custom fit to their Left and Right sides.
Still to come today -
Finish fitting the shelves and their fascias, glue and clamp them up and set them aside.
some biscuit joiner practice and attachment of the counter deck to the cabinet.
sand up the shelves.
Full cleanup and dust blowout and prep for applying the stinky conditioner tomorrow morning.
The sander pic - 9yrs of abuse and the hooks on the sander pad don't hook very well. I'd thought the problem was the well worn rough grit discs I was trying to use. So I finally bought some new sanding disks yesterday and whaddya now, they don't stick. Oh, the hooks are about gone. So ordered a replacement pad for $10 should come tomorrow. But in the meantime I'm using some contact adhesive on the old pad, it's working well enough. I'm trying to srpay at a sharp angle to the pad and not spraying glue INTO the channels in the sander. Got to sand TODAY, not tomorrow. Production Uber Alles.
Attachments


rayra
Well-known member
well I got the top deck secured to the cabinet body with glued biscuits and it was a sketchy process.
I first did a few practice cuts with the tool and joined a couple pieces of plywood scrap in a perpendicular config and learned the cutting bit was a bit offcenter in the edge of my veneer thickness. And learned I needed to keep track of that orientation as I cut in the biscuits in the top edges of the cabinet and then transferred those locations to the deck. And had to compensate for the amount of overhang at the ends and front edge of the deck to the body.
I was smart enough to do a dry fit and with a little rubber mallet encouragement it all went together snug.
So I got things positioned on the table and squeezed some glue in all the top edge slots and set the biscuits. Then I got the orientation on the deck set, upside down, so I could likewise squeeze some glue in the center dip of each of those slots. Gave things a slow count to let it all settle in deep and then dithered about trying to tape along the top edges of the cabinet body in case of glue runs. Then just went ahead and turned the deck right side up and got it up roughly in place before the glue started to run out. Then set about driving it down onto the protruding biscuits. And suddenly it was much more difficult and not going well.
I didn't have enough 36" clamps to force it down, not could I get to the off corner in the middle of the table with a clamp. Then had some trouble getting the biscuits along the back aligned and fully seated. So I had to shuffle clamps around on the fly and rigged shorter clamps along the front edge, which was more than enough there and got longer clamps moved to the back. And then the middle was still not seated. So I dug around from some 2x4 offcut with a useful bow to it and arranged some clamps on the end so it pressed down the middle of the deck to a snug fit.
So it's all sitting there drying and after some mallet blows and more torquing on clamp handles, things look ok.
Still need to do the shelf sanding and get those fascia mounted. Soon as I dry out a bit. 95 and muggy in that garage and I am sweat-soaked again. Sitting under a ceiling fan with some sugar-free gatorade.
With some luck and perseverance I'll get everything ready in the next hour or two and first thing in the morning I can apply the staining stinky toxic pre-conditioner to everything
eta
shelves trimmed, fitted, sanded, fascias glued and clamped. Early tomorrow I'll run the sander over them and over the cabinet one last time and on goes the 'petroleum distillates' / benzene conditioner. Try and get that done early so I can open the garage and vent that **** outside asap.
The conditioner is to provide a better more stainable surface on **** pinewood, which has very uneven pores. The conditioner basically provides a better surface for the stain to distribute itself on. And it also reduces the penetration on hardwoods, which gives you a little better color control. Especially useful on darker shades as you don't get too saturated / dark, too fast.
It's easy blending colors, but you need to start with the lighter one first, because you'll never stain something lighter if it starts too dark.
Similarly, the conditioner lets you creep up on your final preferred tone / saturation, gives you a little better color control.
Then I can go buy the stain. Verithane 'Carrington', which is just a touch redder than regular 'walnut'. It should be a good compromise between all the pieces I'm trying to match in the room. Whichever old piece you saturate your rods with first should carry over to the new color.
Attachments


Last edited:
kaymccampbell
Well-known member
Fought with the laser. Did laundry. Made a few earrings. Filled a bottle. Fought with the laser.
Wiz02
Well-known member
I hope that you are winning the war against that laserFought with the laser. Did laundry. Made a few earrings. Filled a bottle. Fought with the laser.

kaymccampbell
Well-known member
Oh yeah. It's just learning the correct steps, or developing my own, after lots of reading. It's pumping out product. The only real gotcha is when I try something new, and there's a couple more chapters to read. And everything's new to me in this world.I hope that you are winning the war against that laser
Magnum440d100
Well-known member
Not garage, but garage adjacent. And by adjacent, I mean the house attached to it lmao.
Now that I have my table saw here from California, the renovations can begin!
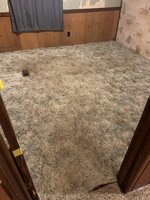
The dogs have pissed and pooped in the house enough to leave an odor. So the carpet is coming up.
Started in the front bedroom. They’ve never been in there, but a guy up the street wants old carpet for his dog kennel. Figured this carpet is trash as well, and the subfloor needs replaced as well. So, into the pile it goes! This works out because the wall that’s inset I believe used to be where the closets were (back to back) for the master bedroom and this bedroom. So I’m going to redo it to that, and remove the crudely built closet in this bedroom.
And I sure hope to HECK, that that water damage was from the flood a few years back, and not from a leaky window. I have no problem removing and resealing the window, but if it’s from a poorly installed window, the framing may be damaged.
Can. Of. Worms.
Fun fun.
Now that I have my table saw here from California, the renovations can begin!
The dogs have pissed and pooped in the house enough to leave an odor. So the carpet is coming up.
Started in the front bedroom. They’ve never been in there, but a guy up the street wants old carpet for his dog kennel. Figured this carpet is trash as well, and the subfloor needs replaced as well. So, into the pile it goes! This works out because the wall that’s inset I believe used to be where the closets were (back to back) for the master bedroom and this bedroom. So I’m going to redo it to that, and remove the crudely built closet in this bedroom.
And I sure hope to HECK, that that water damage was from the flood a few years back, and not from a leaky window. I have no problem removing and resealing the window, but if it’s from a poorly installed window, the framing may be damaged.
Can. Of. Worms.
Fun fun.
Attachments


I see 3 pedals,
I added a phone holder to the Chevelle. Im still working on the interior. Tomorrow I’m going to get the new AC system I installed charged up so I can get cold air blowing inside!!!!
")
kaymccampbell
Well-known member
Double wide/modular?Not garage, but garage adjacent. And by adjacent, I mean the house attached to it lmao.
Now that I have my table saw here from California, the renovations can begin!
The dogs have pissed and pooped in the house enough to leave an odor. So the carpet is coming up.
Started in the front bedroom. They’ve never been in there, but a guy up the street wants old carpet for his dog kennel. Figured this carpet is trash as well, and the subfloor needs replaced as well. So, into the pile it goes! This works out because the wall that’s inset I believe used to be where the closets were (back to back) for the master bedroom and this bedroom. So I’m going to redo it to that, and remove the crudely built closet in this bedroom.
And I sure hope to HECK, that that water damage was from the flood a few years back, and not from a leaky window. I have no problem removing and resealing the window, but if it’s from a poorly installed window, the framing may be damaged.
Can. Of. Worms.
Fun fun.
555
Well-known member
Drag some steel out of the corner, cut the steel, cleaned the steel and painted the steel.
Magnum440d100
Well-known member
YesDouble wide/modular?
kaymccampbell
Well-known member
That flooring looks familiar. After cutting out 1400 sqft of it, the bad dreams never fully go away.

Magnum440d100
Well-known member
That’s roughly what I have to cut outThat flooring looks familiar. After cutting out 1400 sqft of it, the bad dreams never fully go away.

Every room has a soft spot. Plus it flooded a few years back. So even if I just patch it, the softness will continue to spread.
So, it’s all coming out and being replaced with actual plywood. Then I’m thinking hardwood above that. Should stiffen it up quite a bit lol.
kaymccampbell
Well-known member
I feel for ya. Wear a good paint n organics respirator. Or you'll be smelling the lovely piss n mold smell that comes out of that shitboard.That’s roughly what I have to cut out
Every room has a soft spot. Plus it flooded a few years back. So even if I just patch it, the softness will continue to spread.
So, it’s all coming out and being replaced with actual plywood. Then I’m thinking hardwood above that. Should stiffen it up quite a bit lol.
While you're at it, set a floor joist between each of the 2 foot centered factory floor joists. It makes a world of difference. And it's only 2x6's, so it's cheap enough.
rayra
Well-known member
Going as planned. Got a last sanding on everything, a big brush and blowout of all the dust. And then a thorough application of the stanky petroleum distillate pre-staining 'conditioner'. This time I was smart enough to don the VOC mask before I cracked open the containers. Got to protect those remaining brain cells and nerve function.
Heading out for the stain and a few other supplies, staining tomorrow morning. Will be too danged hot to do it late today. Especially after having the garage doors propped open to vent the fumes. Supposed to top 100 this afternoon and strong likelihood of thunderstorm showers.
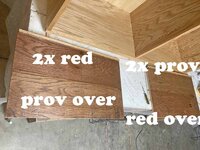
Stain was supposed to be 'Carrington', can't find it locally. Looks like Minwax Oil Provincial. Or Varithane Classic Oil Red Mahogany. Will probably do the bottom of the adjustable shelves in each color tonight to make a final call in the room in the morning.
The room has a few color tones in it, and two bookcases done years ago in some form of medium brown walnut. And this sideboard is built to vaguely match and continue a small laterally file that has a sort of mahogany hue. Was was trying to split the difference with the 'Carrington'. Which in the store it seems they've rebranded as 'Honey', but I didn't get that.
These pieces might wind up with a base coat of the Provincial with a second coat of the red mahogany. If that doesn't make things too dark. The conditioner should help greatly with that. We shall see.
Heading out for the stain and a few other supplies, staining tomorrow morning. Will be too danged hot to do it late today. Especially after having the garage doors propped open to vent the fumes. Supposed to top 100 this afternoon and strong likelihood of thunderstorm showers.
Stain was supposed to be 'Carrington', can't find it locally. Looks like Minwax Oil Provincial. Or Varithane Classic Oil Red Mahogany. Will probably do the bottom of the adjustable shelves in each color tonight to make a final call in the room in the morning.
The room has a few color tones in it, and two bookcases done years ago in some form of medium brown walnut. And this sideboard is built to vaguely match and continue a small laterally file that has a sort of mahogany hue. Was was trying to split the difference with the 'Carrington'. Which in the store it seems they've rebranded as 'Honey', but I didn't get that.
These pieces might wind up with a base coat of the Provincial with a second coat of the red mahogany. If that doesn't make things too dark. The conditioner should help greatly with that. We shall see.
Attachments


Last edited:
Magnum440d100
Well-known member
Thank you for the advice!I feel for ya. Wear a good paint n organics respirator. Or you'll be smelling the lovely piss n mold smell that comes out of that shitboard.
While you're at it, set a floor joist between each of the 2 foot centered factory floor joists. It makes a world of difference. And it's only 2x6's, so it's cheap enough.
Magnum440d100
Well-known member
Can of worms officially open.
Pulled the carpet from the hallways.
Looks like moisture is coming from the furnace closet. Made the floor wet, then people walking on it made it soft/made holes.
There is a bathroom on the other side of the furnace, but if it were leaking, I would suspect water farther up the hallway, closer to the door, as that’s where the sink and piping is.
Coupled with the fact I saw condensation on the AC lines a few months back. I wish I had taken pictures, but I thought nothing of it.
Looks like I’ll be calling the installer tomorrow to see if someone can come out and check the function of the drain. It’s supposed to have a 10 year warranty, so I don’t want to mess with it. I don’t want them to have an “out” to not cover it. Oof.
Attachments


Fixed the hammer loop on my tool belt. Tough Built sent me a replacement under warranty but it is different and I don't care for it.

Swanny1953
ALLIANCE MEMBER
Finished up power steering box replacement on ‘65 GTO. Just need to get A/C serviced and it’ll be all ready to go!!
rayra
Well-known member
Seems the closest stain color I can find is 'Red Mahogany', but it is going to take a couple coats and possibly a third with another color. TBD.
Just finished the first application and a little out of it. Forgot the mask again.
Late afternoon / early evening I'm putting a second heavier application on.
colors were Red mahogany and Provincial. The 3rd pic with the shelves up against the lateral file, the far right is 2 coats Red Mahogany.
eta
5pm, still a bit gooey in places. Second coat is not happening this evening. Will check again in 3-4hrs, but probably not getting a 2nd stain application until tomorrow morning, which starts to screw up my intended timing. If the first coat isn't dry, a second wet coat will dissolve and remove some of the prior coat and I'll wind up with a blotchy finish that I can't correct.
I can still get another coating on Friday morning and a first poly on the top late Friday night and a full poly on Saturday morning and maybe get the piece into the house midafternoon Saturday. Really want to get it off the work table and out of the garage before Sunday morning. I need the worktable clear for other things on Sunday.
Attachments


Last edited:
niget2002
Well-known member
Pulled the kayak out of the shop so the daughter could paddle it around the pool.
Then took the seat off of the Sportster and applied clear vinyl so my saddle bags won't scratch the paint.
Then took the seat off of the Sportster and applied clear vinyl so my saddle bags won't scratch the paint.


Magnum440d100
Well-known member
Still ripping out carpet. This is the trailers original kitchen area. 

Found the leak in the HVAC. Contacted the company that now owns the company that I purchased the system from. They’re sending someone out Saturday to look at it.
Removed the window AC from the wall. It was in a weird spot anyway. The outside was in the garage. When it ran, it made the garage hot and humid. Plus the “shelf” the PO made, was a pain to twist around when getting in and out of a car. This will be where I’ll put a man door from the house to the garage. Never mind the mess everywhere. 12 hour days, get home, do work, then it’s late and bedtime lmao.
You going to tape and mud the ceiling first?planed down and routed the last 25 pickets for the back wall of the cabin. Now just have to rip down a few for the final row

jbfsr
Well-known member
Started the power steering pressure line replacement on my 2007 F150. What a PITA!!!!!!!!
At a later date.. no hurry. The top rows are just tacked into place on the front and back wall.You going to tape and mud the ceiling first?
Flat Thunder Channel
Well-known member
Dug into multiple hydraulic cylinders. Made a hug mess, but now I can inspect the seals closer to attempt to get some replacements on order. That circle clip almost tricked me for a good minute. Messy messy
.jpg")


rayra
Well-known member
oil-based red mahogany stain is giving me fits. VERY hard to get good even coverage, so much tint in it. Apparently I'm putting it on too thick whatever means I'm using.
Worse yet, a second coat. 26hrs and the first coat wasn't thoroughly dry so if I let any thick application sit before I wipe it down, it lifts some of the prior color. VERY difficult to get an even finish.
So I've done all I'm going to do, color wise. Will have fans going on this the next day+ so I can get a poly coat on late Saturday. May not even be dry enough for that until late Sunday.
I think the next suite of furniture - dining hutches, next month - I'm going to try applying the stain with a sprayer and just let it sit and lay down, don't touch it at all.
That furniture will be predominantly black and it is a coin toss whether it will be stained black, or ebony or even painted semi-gloss black.
I have the paint equipment and rusty skills and plenty of foot-square offcuts of the oak veneer to experiment on.
Our kitchen cabinets are semi-gloss paint. If I go straight paint I can go cheaper on the wood. Still make the drawers and doors from good oak, have the router tooling and experience making 5-piece doors.
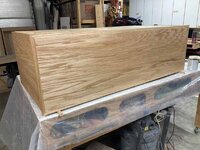
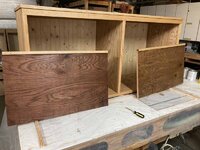
Pics are the sideboard cabinet as it sits right now. The mid-shelves are out of frame, drying separately.
The cabinet doors are our kitchen remodel back in L.A., 10yrs ago. Built that hanging cabinet structure from scratch.
Worse yet, a second coat. 26hrs and the first coat wasn't thoroughly dry so if I let any thick application sit before I wipe it down, it lifts some of the prior color. VERY difficult to get an even finish.
So I've done all I'm going to do, color wise. Will have fans going on this the next day+ so I can get a poly coat on late Saturday. May not even be dry enough for that until late Sunday.
I think the next suite of furniture - dining hutches, next month - I'm going to try applying the stain with a sprayer and just let it sit and lay down, don't touch it at all.
That furniture will be predominantly black and it is a coin toss whether it will be stained black, or ebony or even painted semi-gloss black.
I have the paint equipment and rusty skills and plenty of foot-square offcuts of the oak veneer to experiment on.
Our kitchen cabinets are semi-gloss paint. If I go straight paint I can go cheaper on the wood. Still make the drawers and doors from good oak, have the router tooling and experience making 5-piece doors.
Pics are the sideboard cabinet as it sits right now. The mid-shelves are out of frame, drying separately.
The cabinet doors are our kitchen remodel back in L.A., 10yrs ago. Built that hanging cabinet structure from scratch.
Attachments


Wiz02
Well-known member
Pulled Corvette out of garage at 0 dark thirty (at least it early was for me). Made the pilgrimage to Carlisle for Corvettes at Carlisle, traipsed around the fair grounds in the hot sun, spent money, drove home, quickly cleaned off the vette and put it back in the garage. Repeat tomorrow!
Crowbarman55
Well-known member
- Joined
- May 22, 2021
- Messages
- 1,083
Installed a new hood ornament, new hood hinge springs and right side crest emblem on my 55 Chevy Bel Air.
Todd
Todd
kaymccampbell
Well-known member
Gathered tools n parts for tomorrow's battle with a mini split.
Distracted from garage fun today.
Located the clean out for the washer drain, root bound upstream from there.
Got holes through kitchen wall plate to run dedicated branch to the microwave. Plan on a split GFCI as I wont have to pop new box into slate backsplash.
Located the clean out for the washer drain, root bound upstream from there.
Got holes through kitchen wall plate to run dedicated branch to the microwave. Plan on a split GFCI as I wont have to pop new box into slate backsplash.
rayra
Well-known member
New install or repairs?Gathered tools n parts for tomorrow's battle with a mini split.
I'd like to learn about minis, considering one for my sweltering garage. About 70sq', drywalled in. Any place you can suggest?
kaymccampbell
Well-known member
New install. A ton n a half unit to replace an undersized window unit. I like Pioneer units, even if the line install is a little fiddly. This one will be a Senville. I'm already not overly fond of the outdoor unit's wall brackets, but they might be just fine once we get going. We'll see how it goes.New install or repairs?
I'd like to learn about minis, considering one for my sweltering garage. About 70sq', drywalled in. Any place you can suggest?
70 sqft? I'd say **** on an ice cube and you'll be fine. For 700 sqft in southern Californica, I'd guess about 18-20K BTU. You should probably consult your local HVAC supply house to be on the safe side. They should know the requirements for your area.