To avoid these ads, REGISTER NOW!

ZMotorsports Shop Projects 2.0

To avoid these ads, REGISTER NOW!
OP
Z

zmotorsports

ALLIANCE MEMBER
Joined
Oct 20, 2009
Messages
21,468
Location
Northern Utah
Well, with my son's WJ running well after a week long test of wheeling in the San Juan's a couple of weeks ago it was time to turn to some cosmetic work.

Now keep in mind this won't be as precise as what Robert (MP&C) would do but I think it is turning out about as close to OEM as I can get it.

When my son purchased the Jeep three years ago it was stock and relatively clean but we did notice a small amount of rust starting on the left rear wheel arch/door jamb area. My son removed the body trim and found a buildup of dirt and debris causing the area to hold moisture so he cleaned it as well as checked the other areas around the Jeep with the same removable body panels.

We knew we would have to address this once we got the mechanical aspects of the Jeep ironed out so we pulled it into the shop Friday night and started cutting. I was fortunate that we were able to find a rust panel for the outer skin of the dog leg which we originally thought would be all it needed.

However, once I started tapping with the body hammer we quickly discovered it was more than just the outer panel.
rust1.jpg

The new rust repair dog leg replacement panel.
rust2.jpg

Area marked for cutting and spot welds drilled to separate the inner and outer panels.
rust3.jpg

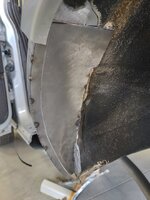
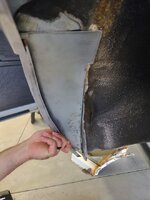
Pulling the outer panel away from the inner panels and foam.
rust4.jpg

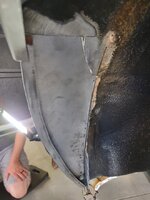
Outer panel removed and the inner panel's damage revealed.
rust5.jpg

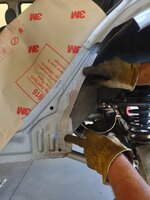
Not much remaining of the inner panel so a new plan was devised.
rust6.jpg

Continue drilling spot welds and remove the inner wheel well panel.
rust7.jpg

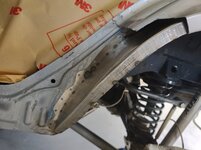
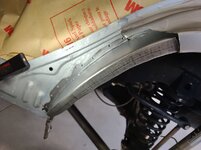
Once that panel was removed we found good solid metal once again.
rust8.jpg

Other than a very small piece at the lower edge which was an easy fix. Small rust area was cut out, POR 15 Metal Prep was sprayed all around the area to treat the last remaining surface rust and the piece cut out according to the template.
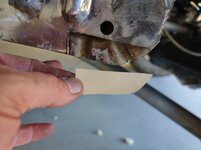
rust9.jpg

Some UPOL #2 weld through coating applied after washing the Metal Prep off and drying.
rust10.jpg


More to follow.....
 
OP
Z

zmotorsports

ALLIANCE MEMBER
Joined
Oct 20, 2009
Messages
21,468
Location
Northern Utah
Continuing on with the rust repair.

Work area started getting a bit cluttered.
rust11.jpg

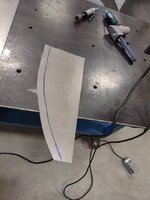
I started by making a cardboard template for the inner flange then transferring it to some 18-gauge P&O and punching the spot weld holes into it.
rust12.jpg

Test fitting the outer panel in place for measurements.
rust13.jpg

Transferred the measurements to another piece of 18-gauge P&O plus a little bit for the outer flange to be bent and shrunk.
rust14.jpg

Tipping dies installed on the bead roller.
rust15.jpg

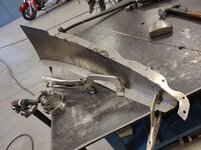
Outer flange tipped over, hammered to 90-degrees and started the shrinking process to get the curvature of the wheel arch.
rust16.jpg

Sneaking up on the profile.
rust17.jpg

Panel held in place for test fitting outer panel.
rust18.jpg

Tacking the inner flange to the inner panel.
rust19.jpg

Another test fit along with the outer flange added and tacked in place for the outer panel to spot weld to.
rust20.jpg


More to follow.....
 
OP
Z

zmotorsports

ALLIANCE MEMBER
Joined
Oct 20, 2009
Messages
21,468
Location
Northern Utah
Continuing on with the inner panel fabrication.

Again, please be kind, I'm not as fluent in this as Robert (MP&C) is. He would make this look easy.

Inner panel now clamped in place and ready to mark the top area to be cut for fitment.
rust21.jpg

Inner panel's inner and outer flanges fully TIG welded and edges blended before sanding the panel.
rust22.jpg

rust23.jpg

One last test fit.
rust24.jpg

Sneaking up on the upper cut line.
rust25.jpg

More to follow....
 
OP
Z

zmotorsports

ALLIANCE MEMBER
Joined
Oct 20, 2009
Messages
21,468
Location
Northern Utah
Last part of the inner panel fabrication.

Now to close up the lower corner of the inner panel. The original was a stamped piece which was a bit more rounded but we just closed the end in with a small filler piece after making a cardboard template and transferring it to sheet metal.
rust30.jpg

Filler piece being fine tuned to fit.
rust31.jpg

A little grinding and a little bending and it fits pretty good.
rust32.jpg

TIG welded and metal finished to blend in.
rust33.jpg

Newly fabricated panel alongside what is left of the original panel.
rust34.jpg

Last test fit before coating in preparation for final welding.
rust35.jpg

Upper edge trimmed to size and ready for welding.
rust36.jpg


That is as far as we got on Saturday afternoon.

Thanks for looking.
 
OP
Z

zmotorsports

ALLIANCE MEMBER
Joined
Oct 20, 2009
Messages
21,468
Location
Northern Utah
Looks like great work from here Mike!

Thanks Marc. I had to blow the dust off of some of my sheet metal tools as they haven't been used much in the past decade or so.

My son was funny though, as I was pulling tools out of the toolbox he would say "oh I remember that one."

I had a small air blow gun that I made about 30 years ago with a curved piece of tubing at the end. I used it for cooling spot welds on sheet metal. I could hold it in my right hand, welding gun in the left and after each spot weld, I'd give it a shot of cool air to keep the panel warm to the touch and to prevent warping. When I pulled it out and connected it to one of the air hoses he grabbed it and said "wow, I bet this thing has cooled thousands of spot welds over the years." I was surprised at some of the tools he remembered from his younger years.
 

MadeByMiller

Well-known member
Joined
Dec 29, 2018
Messages
1,230
Location
Rapid City, SD
Excellent work on the rust repair so far Mike! I've got a rusted wheel arch on our family hauler that needs this treatment, but the Ford tri-coat white paint is quite intimidating to blend, especially for me with zero auto paint experience. I've called about every shop in town, no one will touch it unless they replace the entire quarter panel, which would probably be a $5,000 repair. Hard to justify on a 14 year old vehicle.
 
OP
Z

zmotorsports

ALLIANCE MEMBER
Joined
Oct 20, 2009
Messages
21,468
Location
Northern Utah
Excellent work on the rust repair so far Mike! I've got a rusted wheel arch on our family hauler that needs this treatment, but the Ford tri-coat white paint is quite intimidating to blend, especially for me with zero auto paint experience. I've called about every shop in town, no one will touch it unless they replace the entire quarter panel, which would probably be a $5,000 repair. Hard to justify on a 14 year old vehicle.

Thank you.

Those tri-coat colors are a ***** to repair. I did one years ago and ended up spraying some drop down panels to determine the closest match with the pearl coat and then just barely blew a little onto the edge of the adjoining panel before clearing. It turned out ok but I would avoid having to do another. When the wife and I were looking to replace her car a few years ago she saw a beautiful pearl white tri-coat car but I talked her out of it for repairability reasons. Just too much trouble to repair in the event of an accident, scratch or ding.


Nice job Mike!.

Thanks Cam.


Thanks for the comments and for following along guys. Greatly appreciated.
 

MadeByMiller

Well-known member
Joined
Dec 29, 2018
Messages
1,230
Location
Rapid City, SD
Thank you.

Those tri-coat colors are a ***** to repair. I did one years ago and ended up spraying some drop down panels to determine the closest match with the pearl coat and then just barely blew a little onto the edge of the adjoining panel before clearing. It turned out ok but I would avoid having to do another. When the wife and I were looking to replace her car a few years ago she saw a beautiful pearl white tri-coat car but I talked her out of it for repairability reasons. Just too much trouble to repair in the event of an accident, scratch or ding.

You're absolutely right, and I've learned that lesson and will apply it when the time comes to move on to the next vehicle. I'm curious to see how you will seal the inside of the patch when you're finished. Another thing the shops in town told is they wouldn't do patch panels because the back side of the weld seam will immediately begin rusting again. I think I get the theory, but it sure seems excessive to replace the entire quarter panel to repair a rusted pinch seam on the wheel arch..
 
OP
Z

zmotorsports

ALLIANCE MEMBER
Joined
Oct 20, 2009
Messages
21,468
Location
Northern Utah
You're absolutely right, and I've learned that lesson and will apply it when the time comes to move on to the next vehicle. I'm curious to see how you will seal the inside of the patch when you're finished. Another thing the shops in town told is they wouldn't do patch panels because the back side of the weld seam will immediately begin rusting again. I think I get the theory, but it sure seems excessive to replace the entire quarter panel to repair a rusted pinch seam on the wheel arch..

I've used some UPOL #2 weld through coating on the backside with really good results in the past but I have NOT had good results with 3M's weld through coating. However, the way I most prefer to do a repair such as this is to weld in the inner panel in place then mix up some SPI Epoxy Primer (used 3M epoxy primer in the past) and brush it all over the inner panel that I can access as well as the backside of the outer panel being welded into place. I will let it dry then apply some 3M seam sealer to the inside of the inner panel along the inner panel weld seam that cannot be accessed after the outer panel is welded in place. When installing the outer replacement panel I will weld the seam in very small sections to keep the heat down and avoid not only warping (using blasts of air to keep cool), but also to avoid burning off the coating on the backside of the panel. For the spot welds, after punching the holes in the outer panel where I want them I will clamp the panel in place and I have a 1/4" drill bit that I have knocked the end down flat and I will use that to lightly remove the coatings that I previously applied in the area that will receive the spot weld. This gets the bare clean metal to accept the spot weld much easier than trying to go through coatings and just popping and sputtering all over the place.

I hope the manner in which I explained that makes sense. It's kind of hard to type out.

Once the overall welding is completed and the metalwork is complete I will apply some additional 3M seam sealer to the remaining areas such as where the inner panel that I fabricated will meet up with the inner wheel well. At that point I will move on to the paint repair/blending part of the repair.

I would love to hear Robert (MP&C) chime in on the way he would recommend this as well as it has been quite a while since I have done a repair such as this.
 

Mr.zippy

Well-known member
Joined
Apr 27, 2020
Messages
2,221
Location
Wyoming
Doggone it Mike, you have got to stop taking photos with that Harley in the background..........it's making me light headed.
Once again, I am amazed at the vast talents you have! Thanks for sharing!
 

MadeByMiller

Well-known member
Joined
Dec 29, 2018
Messages
1,230
Location
Rapid City, SD
I've used some UPOL #2 weld through coating on the backside with really good results in the past but I have NOT had good results with 3M's weld through coating. However, the way I most prefer to do a repair such as this is to weld in the inner panel in place then mix up some SPI Epoxy Primer (used 3M epoxy primer in the past) and brush it all over the inner panel that I can access as well as the backside of the outer panel being welded into place. I will let it dry then apply some 3M seam sealer to the inside of the inner panel along the inner panel weld seam that cannot be accessed after the outer panel is welded in place. When installing the outer replacement panel I will weld the seam in very small sections to keep the heat down and avoid not only warping (using blasts of air to keep cool), but also to avoid burning off the coating on the backside of the panel. For the spot welds, after punching the holes in the outer panel where I want them I will clamp the panel in place and I have a 1/4" drill bit that I have knocked the end down flat and I will use that to lightly remove the coatings that I previously applied in the area that will receive the spot weld. This gets the bare clean metal to accept the spot weld much easier than trying to go through coatings and just popping and sputtering all over the place.

I hope the manner in which I explained that makes sense. It's kind of hard to type out.

Once the overall welding is completed and the metalwork is complete I will apply some additional 3M seam sealer to the remaining areas such as where the inner panel that I fabricated will meet up with the inner wheel well. At that point I will move on to the paint repair/blending part of the repair.

I would love to hear Robert (MP&C) chime in on the way he would recommend this as well as it has been quite a while since I have done a repair such as this.

Thank you for the detailed walk through Mike, it makes perfect sense. As has been mentioned several times including recently on this thread, your technical writing is quite excellent. I could build a picture in my mind as you detailed the process. Now I await the resulting recap post here to see it all in practice!
 
OP
Z

zmotorsports

ALLIANCE MEMBER
Joined
Oct 20, 2009
Messages
21,468
Location
Northern Utah
Thank you for the detailed walk through Mike, it makes perfect sense. As has been mentioned several times including recently on this thread, your technical writing is quite excellent. I could build a picture in my mind as you detailed the process. Now I await the resulting recap post here to see it all in practice!

Thank you. I'm glad it came through in good enough explanation. It sounded good in my head but wasn't sure how it was coming across when typing it. :unsure: Then again, a lot of things sound good in my head until they are actually out in the open. Which tells me maybe they should just stay in my head... :ROFLMAO:
 
OP
Z

zmotorsports

ALLIANCE MEMBER
Joined
Oct 20, 2009
Messages
21,468
Location
Northern Utah
To further help with the explanation above, here are a few pictures of the process.

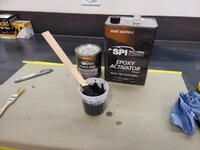
Mixing up a small amount of SPI Epoxy Primer and let it sit for its 30-minute induction period while I walked around the lawn with the walk-behind mower last night.
spi1.jpg

The inner edges of the panels prepped to receive the epoxy primer. I used a clean & strip wheel to remove the e-coat on the new part and just rough up the new panel enough to create a good bite for the epoxy primer.
spi2.jpg

Edges of the outer panel brushed with epoxy primer and as much of the inner panel as I could.
spi3.jpg

The edges of the body panel which will receive the panels prepped by hitting with an 80-grit Roloc disc and then brushed with epoxy primer. I also reached up inside of the rocker panel as far as I could and applied some epoxy primer with a brush taped to a piece of tubing.
spi4.jpg

In hindsight, I should have used some gray epoxy primer but I forgot I had some left over until after I had already mixed up some black primer. Oh well, I doubt anyone will see the color mix-match.:lol:
 
OP
Z

zmotorsports

ALLIANCE MEMBER
Joined
Oct 20, 2009
Messages
21,468
Location
Northern Utah
Last night I was able to get the fabricated inner panel welded in and recoated with SPI Epoxy Primer.

Panel clamped into position and the flattened drill bit used to clean the epoxy primer off the inner panel so it can receive a spot weld.
rust40.jpg

Flattened off drill bit.
rust41.jpg

Plug welds ready for welding by knocking the epoxy primer off the back panel.
rust42.jpg

I made this curved air nozzle about 30 years ago to cool the spot welds. It works pretty slick and it quick. Welder in one hand and hit it with cool air with the other then move on. Really helps to control warpage and keep the panel relatively cool.
rust43.jpg

The underside of the wheel well where the original panel and the fabricated panel meet. I snuck up on the **** seam then started tacking. After welding was completed I used a 3" diameter by 1/8" wheel on an die grinder to start knocking down the welds.
rust44.jpg

Using the 3" x 1/8" grinding disc I knock the high spots down so the weld barely stands proud of the parent material. Then go over the last little bit with a 2" and/or 3" Roloc disc to metal finish the weld. The trick it to not remove any more parent material than absolutely necessary keeping the panel as thick as possible.
rust45.jpg

After a little grinding to the underside as well as knocking down the high spots on the spot welds I hit it with another coat of SPI Epoxy Primer so it can dry/cure overnight.
rust46.jpg

With a little seam sealer to replicate the OEM seam as well as some undercoating this should be completely undetectable.
rust47.jpg


Thanks for looking.
 
To avoid these ads, REGISTER NOW!
OP
Z

zmotorsports

ALLIANCE MEMBER
Joined
Oct 20, 2009
Messages
21,468
Location
Northern Utah
More progress on the rust repair on my son's WJ.

Before test fitting the outer panel I applied some urethane seam sealer to the joint both inside and in the wheelwell.
rust50.jpg

After test fitting the outer panel I punched the holes for the spot welds along the flanges.
rust51.jpg

The panel required a bit of "finessing" to get all flanges to properly align. I started by aligning the top flange in the door jamb where the gasket goes and then the bottom rocker panel was hanging just a little too low. For this I used a bottle jack and block of wood to push upward just enough to get the lower panel in alignment. At that point everything aligned and I clamped it in place for final welding.
rust52.jpg

Spot welds along the flanges first then worked my way outward on the two **** joints.
rust53.jpg

Double checking the door gaps to ensure everything is properly placed and aligned.
rust54.jpg

Final welding completed and then I ran over the seams with 80-grit on a DA. All that is remaining is the small area where there was still rust but the panel was not big enough to cover. I started by making a cardboard template which will get transferred to 18-gauge steel.
rust55.jpg

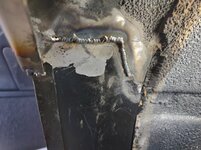
Lower rail joint completed and metal finished.
rust56.jpg

rust57.jpg

Overview of the panel replacement.
rust59.jpg

All that is left is to fabricate a small patch panel for the wheel arch, then apply another coat of SPI Epoxy Primer to bare steel and then I can proceed with a little glazing putty, primer and prep for paint.

Thanks for looking.
 

XJSuperman

Well-known member
Joined
Jan 26, 2018
Messages
3,088
Location
Central Iowa
Ok, insert the ole "Come do mine next" joke. XJ instead of WJ though. Job well done as usual Mike. I'm taking notes for when I get back to mine. I assume you're going to whip up a batch of silver and blend it like you did on the truck?
 
OP
Z

zmotorsports

ALLIANCE MEMBER
Joined
Oct 20, 2009
Messages
21,468
Location
Northern Utah
Ok, insert the ole "Come do mine next" joke. XJ instead of WJ though. Job well done as usual Mike. I'm taking notes for when I get back to mine. I assume you're going to whip up a batch of silver and blend it like you did on the truck?

Thank you. I don't know about "whip up" but I will have to purchase either a pint or quart of base color. I think we'll go with PPG again as I have a vast knowledge and experience with them as well as excellent results. This small job could easily be done with a pint but I think we're planning on doing the rocker panel on the passenger's side at the same time so I may get a quart just to be sure to have enough. We got the paint code last night so when I get the primer applied I'll call in the paint for mixing. I have plenty of SPI epoxy primer as well as SPI Universal Clear so those two bases are covered.
 
OP
Z

zmotorsports

ALLIANCE MEMBER
Joined
Oct 20, 2009
Messages
21,468
Location
Northern Utah
We had an unexpected detour from the WJ rust repair job last night. Wednesday night as my son was leaving and backing out of the driveway I noticed hydraulic fluid pissin' out from under his truck. I had him immediately pull it back into the shop to investigate. Looks like the sector shaft seal had let go, but at nearly 300k I guess it has had a good run. He said it wasn't leaking the day before because his garage floor was clean as he was mowing his lawn.

My son looked pretty bummed as he looked around the shop with the Jeep all torn apart and now unexpectedly, his truck went down for at least one night. I told him not to worry that we'd get it sorted out and he could take my truck home and to work the next day. I feel bad for him because I think he has the weight of the world on him right now and although I can't take all of those stresses away I want to help as much as I can as no parent wants to see their child struggle. On the other hand I don't want to take all of his stresses away because I feel the good Lord places those struggles in front of us to not only test us but to make us stronger. Still, I would like him to catch a break and feel his efforts are being rewarded. I am already so proud of the man my son has become but I don't want to deprive him of even more blessings. It breaks my heart to see him struggle right now but I know he'll come through these struggles an even better man.

I on the other hand, have not dealt with this situation the best. It seems like when I have something planned going on in my shop I seem to do ok, however, if something else goes down such as one of my vehicles or my son's while I am working on something in the shop, I haven't been dealing with the disruption to the schedule very well lately. Maybe having to deal with all of those "unknowns" or "unexpected" things at my job for the past 34+ years is taking its toll on me. My shop is supposed to be my reprieve or my sanctuary and when those variables change or my scheduled plans change at home, I just haven't been handling it real well. It seems to be getting worse as I get older, I'm not rolling with the punches as well as I should. Something as stupid as having my tool cart loaded with tools for the WJ project and not having it available for the gearbox swap just drove me freakin' nuts last night. My son could see my frustration and said he would hurry and put the tools away from the cart but that made no sense to just get them back out again once the gearbox was replaced and we resumed the work on the WJ. It still drove me bonkers not having that stupid tool cart at my side while working on his truck and having the workbench cluttered with tools. For some reason I feel my OCD is getting the better of me lately and I don't like feeling like this. I felt completely out of control last night and it even affected my thought process as I progressed through the job.

I know it's not my son's fault that the gearbox failed and started leaking adding one more job to my list and although I am trying to be supportive and help as much as I can, my stress level shot up and I know my demeanor changes when these interruptions occur. Looks like I'm being tested as well and being given struggles so that I too can grow as a person, although I don't think I'm doing real great lately as I can feel my boiling point nearing.

Anyways, back to last night's work.

Truck racked and steering gearbox being removed.
steer1.jpg

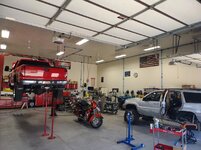
Full shop at the moment and what a mess. I don't function real well in chaos and having multiple vehicles torn apart with tools strewn all about the shop doesn't help matters.
steer2.jpg

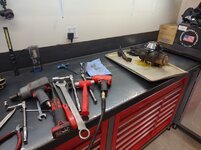
A cluttered workbench with the leaking gearbox removed and pitman arm ready to move over to the remanned gearbox.
steer3.jpg

Old gearbox wrapped and boxed up so I can return the core.
steer4.jpg


Thanks for looking and letting me vent.
 

OutlawDrifter

Well-known member
Joined
Jan 20, 2015
Messages
3,898
Location
KS
Keep your head up Mike! I'm not sure why we get tested, but we do. I'm the same way when it comes to plans changing with a wrench thrown in the gears(seems to happen more often the higher the kid to parent ratio).

Focus on the end game and take some solace in the fact you have the know-how and tools to complete the tasks at hand. Be a good example, they're always watching and learning. It's something I lose sight of often, my wife has a good way of recentering me when she sees my mood changing. My dad was a very straightforward no-nonsense guy, and I watched him actually mellow out the older he got...I seem to be going the other way, haha. I'm guessing there is a point when the good Lord shows you some light and gives you a break!
 

Bob Heine

ALLIANCE MEMBER
Joined
Oct 24, 2009
Messages
10,708
Location
Boca Raton, Florida
Mike, take this crisis as a reward rather than a punishment. Imagine not being able to help your son because you have neither space nor skills to do the repairs. Recognize how blessed you are to be able to transfer some stress from your son to yourself. The best some of us can do is give our children a little financial help so they can have their vehicle "repaired" at some ripoff joint that covers rust with bondo or forgets to tighten fasteners. Having a truck to loan him instead of putting a car rental on your son's shoulders is another big blessing.

You might want to let your wife know what's going on -- she might have some advice that helps because she knows you better than we do. If she tells you to quit your bitchin', you might discover your stress is contagious.
 
OP
Z

zmotorsports

ALLIANCE MEMBER
Joined
Oct 20, 2009
Messages
21,468
Location
Northern Utah
Thanks for the comments guys. I realize I am NOT the easiest person to live with and that sometimes my passion spills out in ugly form but I feel like I am getting worse rather than better lately. Like you Marc, I watched my father mellow as he aged but I am becoming less tolerant of deviations from the plan, whatever that plan for the day is.

My wife is always having to "recenter" me but I hate putting that burden on her as I'm sure after 33+ years of marriage she is tiring of it.
 

MadeByMiller

Well-known member
Joined
Dec 29, 2018
Messages
1,230
Location
Rapid City, SD
Mike, your parenting strategy and recognition of your son's situation and your subsequent reaction is nothing short of rock solid and admirable. You are also not out of bounds for your emotional response surrounding the events of the unexpected, and we are very similar in that regard. If I may offer a basic piece of advice, purchase yourself a second tool cart! It's a small investment that will go a long ways for your overall happiness and easing the discomfort of future reproductions of last night's unease. I'm sure it won't sit idle in between those episodes as well. That's my two cents anyways!
 
OP
Z

zmotorsports

ALLIANCE MEMBER
Joined
Oct 20, 2009
Messages
21,468
Location
Northern Utah
Mike, your parenting strategy and recognition of your son's situation and your subsequent reaction is nothing short of rock solid and admirable. You are also not out of bounds for your emotional response surrounding the events of the unexpected, and we are very similar in that regard. If I may offer a basic piece of advice, purchase yourself a second tool cart! It's a small investment that will go a long ways for your overall happiness and easing the discomfort of future reproductions of last night's unease. I'm sure it won't sit idle in between those episodes as well. That's my two cents anyways!

Thanks for the comments. While a second tool cart would be a quick and easy remedy, I'm afraid it will merely mask whatever is really going on. Plus, I don't think I have the room for another cart and that would trigger another frustration. :unsure:
 

Mr.zippy

Well-known member
Joined
Apr 27, 2020
Messages
2,221
Location
Wyoming
Mike, if it makes you feel any better, the posts you have made with personal trials and tribulations, and how you have overcome them have been extremely beneficial to me in my daily life. You have been an inspiration to many of us I suspect! Keep plugging along Sir!
 
OP
Z

zmotorsports

ALLIANCE MEMBER
Joined
Oct 20, 2009
Messages
21,468
Location
Northern Utah
Mike, if it makes you feel any better, the posts you have made with personal trials and tribulations, and how you have overcome them have been extremely beneficial to me in my daily life. You have been an inspiration to many of us I suspect! Keep plugging along Sir!

Thank you. I think there are a lot of like minded people on this forum and it helps to lean on one another for things other than shop questions or automotive help.

I am trying to be a better person and I see the way some on here so easily deal with what life throws at them and I need all the help I can get. Polishing my skillset and becoming a better mechanic is secondary to just wanting to be a better husband, father, father-in-law and overall better person.
 

Monza Harry

Well-known member
Joined
Dec 29, 2018
Messages
1,433
Location
Windsor ON
Mike remember that our problem solving process changes as we age. We look for work arounds (new ideas) when younger and we rely more on experience as we age. It can manifest differently for each of us as well. A fellow at work was looking for something right in front of him but couldn't see the forest for the trees, so to speak. Our experience has us looking for what we remember from our experience not from our short term memory, [I do this a lot lately as well]. I'm willing to bet that, coupled with the loss of our superpowers [youth] things have you little frazzled. You will go through a few iterations of this yet as we lose our youth. We can't fix everything for our children and as you already mentioned we shouldn't, but "Daddy" always wants to! When you feel that you are getting less like "Mike" just grab that young man or your wife and give them a hug until the unwanted feelings go away and then thank them for the "Love". I am feeling the differences between my coworkers and myself [there way of dealing with their own insecurities and lashing out at someone (me) they know/see as better at something and rather than learn they lash out like a child and it's taking its toll on me. I hope this gives you some strength and insight. If not we are listening. And not to armchair parent too much more here, you've done plenty to help and I'm sure he knows that! Harry
Sorry all I's got! ;)
 

SilverJimmy

Well-known member
Joined
Apr 14, 2012
Messages
1,682
Location
Prescott/Flagstaff, AZ
Mike, I have no good advice about dealing with children as I have none. When I was younger I thought I was the smart one of all my friends that were raising “rug rats” but now that I’m in my golden years I’m seeing how very wrong that was. My friends that have kids and now grandkids are rich beyond any amount of gold or cash could bring. On your automotive shop concerns, I too would recommend a second cart. One of the things that I’ve seen that you truly enjoy is a very robust PM program for all your equipment. A cart dedicated to LOF only would free your other cart for your project use. It could live out in your RV bay out of sight till needed. And then when a situation like the current one occurs it could be pressed into service. I’ve said it before, but I’m saying it again. I really wish you had been one of my customers when I sold tools. The amount of Automotive Malpractice that I observed in my years was staggering, I actually watched a car rip in half on a collision frame machine! It was brought to a good body shop to try to fix extreme tire wear while being dolly towed behind a guys RV. I was talking to the tech while he was trying to pull the subframe back into spec when the whole car split right behind the pillar between the four doors! It turned out to be a backhalved total from a shady used car dealer, only held together with a couple spotwelds, bondo, and seam sealer! The level of craftsmanship that you apply to everything you do is amazing. I try very hard to come to 50% of your work and my friends think I’m a star! Your uncompromising work ethic is commendable. I don’t believe you’re OCD, you just have a very strong conviction about what is right.
P.S. When can I bring my 06 Duramax by for it‘s ZMotorSports Spa treatment?!
 
OP
Z

zmotorsports

ALLIANCE MEMBER
Joined
Oct 20, 2009
Messages
21,468
Location
Northern Utah
Thanks for the comments guys. It is much appreciated. I took yesterday (Labor Day) off to enjoy a 3-day weekend and to enjoy our home, yard, shop and time with my wife and son. It was nice to sit on the deck in the mornings and enjoy overlooking the yard while drinking coffee. Friday night I edged, trimmed and mowed the lawns so they looked nice all weekend. Actually, even though we are in drought water usage conditions other than one spot I would actually be very pleased with my yard this year. I am using less than my allotted water amount and it is nice and green other than the one spot in the back yard where I had those nasty grubs.

Saturday morning after coffee, my son came over and I was able to spend all day Saturday working with my son on his WJ which was quite nice, although I didn't get quite as much done as I had hoped. Sunday the wife and I went to breakfast and then a nice drive. We have sure enjoyed our Sunday drives this past year or so. I'm not sure if it is the scenery we seem to find or just that one on one time that we spend together talking and relaxing but we have sure come to enjoy taking long Sunday drives.

Yesterday we enjoyed the deck in the morning until it became too warm as we are still in the triple digits here in Northern Utah. I think yesterday we broke another record of 28 days this year in triple digits and it is supposed to be in the triple digits again today as well as tomorrow. Usually by the end of August and into the Labor Day weekend we are in the mid to upper 80's here so this is definitely unseasonably warm for us. I went out into the shop yesterday and worked on my son's WJ for a few hours and then ran around the lawns again as I am back to twice a week mowings and although it was hotter than hell it was an enjoyable day. My wife was able to get some things done in the house that she wanted to such as some deep cleaning and putting up some fall decorations and I was able to spend some quality time in the shop with the radio on. She said she loves looking out the kitchen window and seeing me in the shop working with the doors open and that she is looking forward to retirement when that will be a more routine occurance. I concur... ;)
 
To avoid these ads, REGISTER NOW!
Top Bottom